


无意中发现了一个巨牛的人工智能教程,忍不住分享一下给大家。教程不仅是零基础,通俗易懂,而且非常风趣幽默,像看小说一样!觉得太牛了,所以分享给大家。点这里可以跳转到教程。
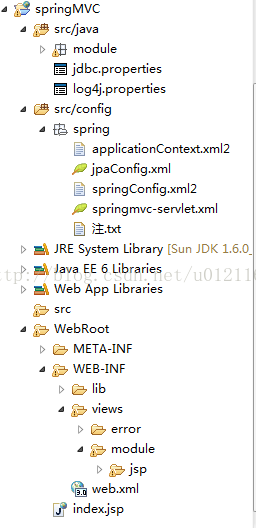
这篇文章总结一下spring mvc的基本配置,首先贴一张我的项目的目录截图,有一些多余的文件,大家不必在意:
用到的一些jar包在这:<a>http://download.csdn.net/detail/u012116457/8426199</a>
接下来是web.xml的配置:
<?xml version="1.0" encoding="UTF-8"?>
<web-app version="3.0"
	xmlns="http://java.sun.com/xml/ns/javaee"
	xmlns:xsi="http://www.w3.org/2001/XMLSchema-instance"
	xsi:schemaLocation="http://java.sun.com/xml/ns/javaee
	http://java.sun.com/xml/ns/javaee/web-app_3_0.xsd">
  <welcome-file-list>
    <welcome-file>index.jsp</welcome-file>
  </welcome-file-list>

    <!--1.配置spring分发器(是总的控制中心  被拦截的url会汇聚到该servlet) -->
	<servlet>
	    <servlet-name>springmvc</servlet-name>
	    <servlet-class>org.springframework.web.servlet.DispatcherServlet</servlet-class>
	    <!--配置spring上下文  (从该目录下加载spring mvc的配置文件) -->
	    <init-param>
	       <param-name>contextConfigLocation</param-name>
	       <param-value>/WEB-INF/classes/spring/spring*.xml</param-value>
	    </init-param>
	    <load-on-startup>1</load-on-startup>  <!-- tomcat启动后立即加载 -->
	</servlet>

	<!--2. 配置spring拦截的url模板  以.do结尾的url-->
	<servlet-mapping>
		<servlet-name>springmvc</servlet-name>
		<url-pattern>*.do</url-pattern>
	</servlet-mapping>

	<!--3. 注册配置文件读取器,监听spring配置文件的变化 详见 注3-->
	<listener>
        <listener-class>org.springframework.web.context.ContextLoaderListener</listener-class>
    </listener>

    <!--4.  设定配置文件列表 设置全局参数 为3的参数配置信息-->
	<context-param>
		<param-name>contextConfigLocation</param-name>
	    <param-value>/WEB-INF/classes/spring/*Config.xml</param-value>
	</context-param>

	<!--5. 编码字符集统一为UTF-8(过滤器) -->
	<filter>
		<display-name>encodingFilter</display-name>
		<filter-name>encodingFilter</filter-name>
		<filter-class>org.springframework.web.filter.CharacterEncodingFilter</filter-class>
		<init-param>
			<param-name>encoding</param-name>
			<param-value>UTF-8</param-value>
		</init-param>
	</filter>


</web-app>
接下来是springMVC-servlet.xml:
<?xml version="1.0" encoding="UTF-8"?>
<beans xmlns="http://www.springframework.org/schema/beans"
	xmlns:xsi="http://www.w3.org/2001/XMLSchema-instance" xmlns:p="http://www.springframework.org/schema/p"
	xmlns:mvc="http://www.springframework.org/schema/mvc" xmlns:context="http://www.springframework.org/schema/context"
	xmlns:util="http://www.springframework.org/schema/util"
	xsi:schemaLocation="http://www.springframework.org/schema/beans http://www.springframework.org/schema/beans/spring-beans-3.0.xsd
    http://www.springframework.org/schema/context  http://www.springframework.org/schema/context/spring-context-3.0.xsd                 http://www.springframework.org/schema/mvc  http://www.springframework.org/schema/mvc/spring-mvc-3.0.xsd
    http://www.springframework.org/schema/util  http://www.springframework.org/schema/util/spring-util-3.0.xsd">

   <!-- @Controller注解的使用前提配置  详细解释见(注.txt 1. )-->
   <mvc:annotation-driven />
  <!--  <context:annotation-config/> -->
   <!-- 对module包中的所有类进行扫描,以完成Bean创建和自动依赖注入的功能-->
   <context:component-scan base-package="module">
   </context:component-scan>

   <!-- 启动Spring MVC的注解功能,完成请求和注解POJO的映射 -->
	<bean
		class="org.springframework.web.servlet.mvc.annotation.AnnotationMethodHandlerAdapter" />

    <!-- 定义视图解析器,在视图模型前后添加前缀后缀 暂时只支持jsp后缀-->
   <bean class="org.springframework.web.servlet.view.InternalResourceViewResolver">
		<property name="prefix" value="/WEB-INF/views/" /><!-- 路径前缀 -->
		<property name="suffix" value=".jsp" /><!-- 后缀 -->
	</bean>

</beans>
这些就是spring mvc最基础的配置,下面是一个控制类的实例:
package module.controller;

import javax.servlet.http.HttpServletRequest;

import org.springframework.stereotype.Controller;
import org.springframework.web.bind.annotation.RequestMapping;

@Controller
@RequestMapping("/start")
public class StartController {

	private static String START="module/jsp/start";

	@RequestMapping("/index.do")
	public String start(HttpServletRequest request){
		return START;
	}
}
这样在浏览器中输入:http://localhost:8080/springMVC/start/index.do即可访问到start.jsp页面


 3565
3565


 被折叠的 条评论
为什么被折叠?
被折叠的 条评论
为什么被折叠?
 到【灌水乐园】发言


