


在前一篇博客滴滴插件化框架VirtualAPK原理解析(一)之插件Activity管理
中VirtualAPK是如何对Activity进行管理的,本篇博客,我们继续来学习这个框架,这次我们学习的是如何去管理Service。
Freedom框架,我个人手写的0反射插件化框架
Service工作原理分析
说道如何对Service进行插件化,肯定得先了解Service的工作过程,不然何谈插件化?所以我们先一起学习Service的工作原理。
Service分为两种形式:以startService启动的服务和用bindService绑定的服务;其实这两种方法的启动都是大同小异,所以这里,我们以bindService为例分析进行分析即可。
bindService的启动是通过Context类的bindService方法完成的,这个方法需要三个参数:第一个参数代表想要绑定的Service的Intent,第二个参数是一个ServiceConnetion,我们可以通过这个对象接收到Service绑定成功或者失败的回调;第三个参数则是绑定时候的一些FLAG,当然如果你对Service还不是很了解的话,可以看官方的training文档http://developer.android.com/intl/zh-cn/guide/components/services.html
Context的具体实现在ContextImpl类,ContextImpl中的bindService方法直接调用了bindServiceCommon方法
 private boolean bindServiceCommon(Intent service, ServiceConnection conn, int flags,
            UserHandle user) {
        IServiceConnection sd;
        if (conn == null) {
            throw new IllegalArgumentException("connection is null");
        }
        if (mPackageInfo != null) {
            sd = mPackageInfo.getServiceDispatcher(conn, getOuterContext(),
                    mMainThread.getHandler(), flags);
        } else {
            throw new RuntimeException("Not supported in system context");
        }
        validateServiceIntent(service);
        try {
            IBinder token = getActivityToken();
            if (token == null && (flags&BIND_AUTO_CREATE) == 0 && mPackageInfo != null
                    && mPackageInfo.getApplicationInfo().targetSdkVersion
                    < android.os.Build.VERSION_CODES.ICE_CREAM_SANDWICH) {
                flags |= BIND_WAIVE_PRIORITY;
            }
            service.prepareToLeaveProcess();
            int res = ActivityManagerNative.getDefault().bindService(
                mMainThread.getApplicationThread(), getActivityToken(),
                service, service.resolveTypeIfNeeded(getContentResolver()),
                sd, flags, user.getIdentifier());
            if (res < 0) {
                throw new SecurityException(
                        "Not allowed to bind to service " + service);
            }
            return res != 0;
        } catch (RemoteException e) {
            return false;
        }
    }
通过代码,其实你会发现最后是通过ActivityManagerNative借助AMS进而完成Service的绑定过程,这里需要提及一下sd变量,这个变量的类型是IServiceConnection,这个IServiceConnection与IApplicationThread是相同的,都是ActivityThread给AMS提供的用来与之进行通信的Binder对象;这个接口的实现类为LoadedApk.ServiceDispatcher
接下来我们看ActivityManagerNative的bindService方法
  public int bindService(IApplicationThread caller, IBinder token,
            Intent service, String resolvedType,
            IServiceConnection connection, int flags, int userId) {
        enforceNotIsolatedCaller("bindService");

        // Refuse possible leaked file descriptors
        if (service != null && service.hasFileDescriptors() == true) {
            throw new IllegalArgumentException("File descriptors passed in Intent");
        }

        synchronized(this) {
            return mServices.bindServiceLocked(caller, token, service, resolvedType,
                    connection, flags, userId);
        }
    }
bindService中调用了ActivityServices类的bindServiceLocked方法:
int bindServiceLocked(IApplicationThread caller, IBinder token, Intent service,
        String resolvedType, IServiceConnection connection, int flags,
        String callingPackage, int userId) throws TransactionTooLargeException {
    final ProcessRecord callerApp = mAm.getRecordForAppLocked(caller);
    // 省略部分代码

    ServiceLookupResult res =
        retrieveServiceLocked(service, resolvedType, callingPackage,
                Binder.getCallingPid(), Binder.getCallingUid(), userId, true, callerFg);
    //  省略部分代码
    ServiceRecord s = res.record;

    final long origId = Binder.clearCallingIdentity();

    try {
        // ...  省略部分代码

        mAm.startAssociationLocked(callerApp.uid, callerApp.processName,
                s.appInfo.uid, s.name, s.processName);

        AppBindRecord b = s.retrieveAppBindingLocked(service, callerApp);
        ConnectionRecord c = new ConnectionRecord(b, activity,
                connection, flags, clientLabel, clientIntent);
        IBinder binder = connection.asBinder();
        ArrayList<ConnectionRecord> clist = s.connections.get(binder);

        // 对connection进行处理, 方便存取,略
        clist.add(c);

        if ((flags&Context.BIND_AUTO_CREATE) != 0) {
            s.lastActivity = SystemClock.uptimeMillis();
            if (bringUpServiceLocked(s, service.getFlags(), callerFg, false) != null) {
                return 0;
            }
        }

        // 与BIND_AUTO_CREATE不同的启动FLAG,原理与后续相同,略

    } finally {
        Binder.restoreCallingIdentity(origId);
    }

    return 1;
}
首先通过retrieveServiceLocked方法获取到了intent匹配到的需要bind到的Service组件res;然后把ActivityThread传递过来的IServiceConnection使用ConnectionRecord进行了包装,方便接下来使用;最后如果启动的FLAG为BIND_AUTO_CREATE,那么调用bringUpServiceLocked开始创建Service
private final String bringUpServiceLocked(ServiceRecord r, int intentFlags, boolean execInFg,
        boolean whileRestarting) throws TransactionTooLargeException {

    // 省略代码

    final boolean isolated = (r.serviceInfo.flags&ServiceInfo.FLAG_ISOLATED_PROCESS) != 0;
    final String procName = r.processName;
    ProcessRecord app;

    if (!isolated) {
        app = mAm.getProcessRecordLocked(procName, r.appInfo.uid, false);
        if (app != null && app.thread != null) {
            try {
                app.addPackage(r.appInfo.packageName, r.appInfo.versionCode, mAm.mProcessStats);
                // 1. important !!!
                realStartServiceLocked(r, app, execInFg);
                return null;
            } catch (TransactionTooLargeException e) {
                throw e;
            } catch (RemoteException e) {
                Slog.w(TAG, "Exception when starting service " + r.shortName, e);
            }

        }
    } else {
        app = r.isolatedProc;
    }

    // Not running -- get it started, and enqueue this service record
    // to be executed when the app comes up.
    if (app == null) {
        // 2. important !!!
        if ((app=mAm.startProcessLocked(procName, r.appInfo, true, intentFlags,
                "service", r.name, false, isolated, false)) == null) {
            bringDownServiceLocked(r);
            return msg;
        }
        if (isolated) {
            r.isolatedProc = app;
        }
    }
    // 省略代码
    return null;
}
如果Service所在的进程已经启动,那么直接调用realStartServiceLocked方法来真正启动Service组件;如果Service所在的进程还没有启动,那么先在AMS中记下这个要启动的Service组件,然后通过startProcessLocked启动新的进程。
先看Service进程已经启动的情况,realStartServiceLocked方法:
private final void realStartServiceLocked(ServiceRecord r,
        ProcessRecord app, boolean execInFg) throws RemoteException {

    // 省略代码

    boolean created = false;
    try {
        synchronized (r.stats.getBatteryStats()) {
            r.stats.startLaunchedLocked();
        }
        mAm.ensurePackageDexOpt(r.serviceInfo.packageName);
        app.forceProcessStateUpTo(ActivityManager.PROCESS_STATE_SERVICE);
        app.thread.scheduleCreateService(r, r.serviceInfo,
                mAm.compatibilityInfoForPackageLocked(r.serviceInfo.applicationInfo),
                app.repProcState);
        r.postNotification();
        created = true;
    } catch (DeadObjectException e) {
        mAm.appDiedLocked(app);
        throw e;
    } finally {
        // 省略代码
    }

    requestServiceBindingsLocked(r, execInFg);

    //省略代码
}
调用了app.thread的scheduleCreateService方法,这是一个IApplicationThread对象,它是App所在进程提供给AMS的用来与App进程进行通信的Binder对象,这个Binder的Server端在ActivityThread的ApplicationThread类
public final void scheduleCreateService(IBinder token,
                ServiceInfo info, CompatibilityInfo compatInfo, int processState) {
            updateProcessState(processState, false);
            CreateServiceData s = new CreateServiceData();
            s.token = token;
            s.info = info;
            s.compatInfo = compatInfo;

            sendMessage(H.CREATE_SERVICE, s);
        }
这里发送一个消息给ActivityThread的H这个Handler,H类收到这个消息之后,直接调用了ActivityThread类的handleCreateService方法
 private void handleCreateService(CreateServiceData data) {
        // If we are getting ready to gc after going to the background, well
        // we are back active so skip it.
        unscheduleGcIdler();

        LoadedApk packageInfo = getPackageInfoNoCheck(
                data.info.applicationInfo, data.compatInfo);
        Service service = null;
        try {
            java.lang.ClassLoader cl = packageInfo.getClassLoader();
            service = (Service) cl.loadClass(data.info.name).newInstance();
        } catch (Exception e) {
            if (!mInstrumentation.onException(service, e)) {
                throw new RuntimeException(
                    "Unable to instantiate service " + data.info.name
                    + ": " + e.toString(), e);
            }
        }

        try {
            if (localLOGV) Slog.v(TAG, "Creating service " + data.info.name);

            ContextImpl context = ContextImpl.createAppContext(this, packageInfo);
            context.setOuterContext(service);

            Application app = packageInfo.makeApplication(false, mInstrumentation);
            service.attach(context, this, data.info.name, data.token, app,
                    ActivityManagerNative.getDefault());
            service.onCreate();
            mServices.put(data.token, service);
            try {
                ActivityManagerNative.getDefault().serviceDoneExecuting(
                        data.token, SERVICE_DONE_EXECUTING_ANON, 0, 0);
            } catch (RemoteException e) {
                // nothing to do.
            }
        } catch (Exception e) {
            if (!mInstrumentation.onException(service, e)) {
                throw new RuntimeException(
                    "Unable to create service " + data.info.name
                    + ": " + e.toString(), e);
            }
        }
    }
1.使用ClassLoader加载并通过反射创建Service 对象
2.创建ContextImpl ,并绑定Service
3.makeApplication创建Application
4.service.attach方法将创建的Application和ContextImpl 和service进行绑定
5.service.onCreate()方法进行service的创建
虽然都是通过ClassLoader通过反射创建,但是Activity却把创建过程委托给了Instrumentation类,而Service则是直接进行。
ActivityThread里面的handleCreateService方法成功创建出了Service对象,并且调用了它的onCreate方法;到这里我们的Service已经启动成功。scheduleCreateService这个Binder调用过程结束,代码又回到了AMS进程的realStartServiceLocked方法。
private final void realStartServiceLocked(ServiceRecord r,
        ProcessRecord app, boolean execInFg) throws RemoteException {

    // 省略代码

    boolean created = false;
    try {
        synchronized (r.stats.getBatteryStats()) {
            r.stats.startLaunchedLocked();
        }
        mAm.ensurePackageDexOpt(r.serviceInfo.packageName);
        app.forceProcessStateUpTo(ActivityManager.PROCESS_STATE_SERVICE);
        app.thread.scheduleCreateService(r, r.serviceInfo,
                mAm.compatibilityInfoForPackageLocked(r.serviceInfo.applicationInfo),
                app.repProcState);
        r.postNotification();
        created = true;
    } catch (DeadObjectException e) {
        mAm.appDiedLocked(app);
        throw e;
    } finally {
        // 省略代码
    }

    requestServiceBindingsLocked(r, execInFg);

    // 省略代码
}
scheduleCreateService这个binder调用之后,执行了一个requestServiceBindingsLocked方法
private final boolean requestServiceBindingLocked(ServiceRecord r,
            IntentBindRecord i, boolean execInFg, boolean rebind) {
        if (r.app == null || r.app.thread == null) {
            // If service is not currently running, can't yet bind.
            return false;
        }
        if ((!i.requested || rebind) && i.apps.size() > 0) {
            try {
                bumpServiceExecutingLocked(r, execInFg, "bind");
                r.app.forceProcessStateUpTo(ActivityManager.PROCESS_STATE_SERVICE);
                r.app.thread.scheduleBindService(r, i.intent.getIntent(), rebind,
                        r.app.repProcState);
                if (!rebind) {
                    i.requested = true;
                }
                i.hasBound = true;
                i.doRebind = false;
            } catch (RemoteException e) {
                if (DEBUG_SERVICE) Slog.v(TAG, "Crashed while binding " + r);
                return false;
            }
        }
        return true;
    }
又通过IApplicationThread这个Binder进行了一次IPC调用,我们跟踪ActivityThread类里面的ApplicationThread的scheduleBindService方法,发现这个方法不过通过Handler转发了一次消息,真正的处理代码在handleBindService里面:
  private void handleBindService(BindServiceData data) {
        Service s = mServices.get(data.token);
        if (DEBUG_SERVICE)
            Slog.v(TAG, "handleBindService s=" + s + " rebind=" + data.rebind);
        if (s != null) {
            try {
                data.intent.setExtrasClassLoader(s.getClassLoader());
                data.intent.prepareToEnterProcess();
                try {
                    if (!data.rebind) {
                        IBinder binder = s.onBind(data.intent);
                        ActivityManagerNative.getDefault().publishService(
                                data.token, data.intent, binder);
                    } else {
                        s.onRebind(data.intent);
                        ActivityManagerNative.getDefault().serviceDoneExecuting(
                                data.token, SERVICE_DONE_EXECUTING_ANON, 0, 0);
                    }
                    ensureJitEnabled();
                } catch (RemoteException ex) {
                }
            } catch (Exception e) {
                if (!mInstrumentation.onException(s, e)) {
                    throw new RuntimeException(
                            "Unable to bind to service " + s
                            + " with " + data.intent + ": " + e.toString(), e);
                }
            }
        }
    }
要Bind的Service在这里完成了绑定,绑定之后又通过ActivityManagerNative这个Binder进行一次IPC调用,我们查看AMS的publishService方法,这个方法又调用了publishServiceLocked方法
void publishServiceLocked(ServiceRecord r, Intent intent, IBinder service) {
        final long origId = Binder.clearCallingIdentity();
        try {
            if (DEBUG_SERVICE) Slog.v(TAG, "PUBLISHING " + r
                    + " " + intent + ": " + service);
            if (r != null) {
                Intent.FilterComparison filter
                        = new Intent.FilterComparison(intent);
                IntentBindRecord b = r.bindings.get(filter);
                if (b != null && !b.received) {
                    b.binder = service;
                    b.requested = true;
                    b.received = true;
                    for (int conni=r.connections.size()-1; conni>=0; conni--) {
                        ArrayList<ConnectionRecord> clist = r.connections.valueAt(conni);
                        for (int i=0; i<clist.size(); i++) {
                            ConnectionRecord c = clist.get(i);
                            if (!filter.equals(c.binding.intent.intent)) {
                                if (DEBUG_SERVICE) Slog.v(
                                        TAG, "Not publishing to: " + c);
                                if (DEBUG_SERVICE) Slog.v(
                                        TAG, "Bound intent: " + c.binding.intent.intent);
                                if (DEBUG_SERVICE) Slog.v(
                                        TAG, "Published intent: " + intent);
                                continue;
                            }
                            if (DEBUG_SERVICE) Slog.v(TAG, "Publishing to: " + c);
                            try {
                                c.conn.connected(r.name, service);
                            } catch (Exception e) {
                                Slog.w(TAG, "Failure sending service " + r.name +
                                      " to connection " + c.conn.asBinder() +
                                      " (in " + c.binding.client.processName + ")", e);
                            }
                        }
                    }
                }

                serviceDoneExecutingLocked(r, mDestroyingServices.contains(r), false);
            }
        } finally {
            Binder.restoreCallingIdentity(origId);
        }
    }
这里终于到IServiceConnection的用处了,在bindServiceLocked方法里面,这个IServiceConnection放到了一个ConnectionRecord的List中存放在ServiceRecord里面,这里所做的就是取出已经被Bind的这个Service对应的IServiceConnection对象,然后调用它的connected方法;我们说过,这个IServiceConnection也是一个Binder对象,它的Server端在LoadedApk.ServiceDispatcher里面。接下来是LoadedApk.ServiceDispatcher的connected方法
 public void connected(ComponentName name, IBinder service) {
            if (mActivityThread != null) {
                mActivityThread.post(new RunConnection(name, service, 0));
            } else {
                doConnected(name, service);
            }
        }
无论哪种判断,都会走到doConnected方法中
 public void doConnected(ComponentName name, IBinder service) {
            ServiceDispatcher.ConnectionInfo old;
            ServiceDispatcher.ConnectionInfo info;

            synchronized (this) {
                if (mForgotten) {
                    // We unbound before receiving the connection; ignore
                    // any connection received.
                    return;
                }
                old = mActiveConnections.get(name);
                if (old != null && old.binder == service) {
                    // Huh, already have this one.  Oh well!
                    return;
                }

                if (service != null) {
                    // A new service is being connected... set it all up.
                    mDied = false;
                    info = new ConnectionInfo();
                    info.binder = service;
                    info.deathMonitor = new DeathMonitor(name, service);
                    try {
                        service.linkToDeath(info.deathMonitor, 0);
                        mActiveConnections.put(name, info);
                    } catch (RemoteException e) {
                        // This service was dead before we got it...  just
                        // don't do anything with it.
                        mActiveConnections.remove(name);
                        return;
                    }

                } else {
                    // The named service is being disconnected... clean up.
                    mActiveConnections.remove(name);
                }

                if (old != null) {
                    old.binder.unlinkToDeath(old.deathMonitor, 0);
                }
            }

            // If there was an old service, it is not disconnected.
            if (old != null) {
                mConnection.onServiceDisconnected(name);
            }
            // If there is a new service, it is now connected.
            if (service != null) {
                mConnection.onServiceConnected(name, service);
            }
        }
这里我们知道了onServiceConnected方法是在哪里进行的回调。
到这里,Service所在进程已经存在的情况已经分析完毕,如果Service所在进程不存在,那么会调用startProcessLocked方法创建一个新的进程,并把需要启动的Service放在一个队列里面;创建进程的过程通过Zygote fork出来,进程创建成功之后会调用ActivityThread的main方法,在这个main方法里面间接调用到了AMS的attachApplication方法,在AMS的attachApplication里面会检查刚刚那个待启动Service队列里面的内容,并执行Service的启动操作;之后的启动过程与进程已经存在的情况下相同
如何对Service进行插件化?
通过对Service的工作原理的分析,我们知道Service通过Context类完成启动,接着通过ActivityMnagaerNative进入AMS,最后又通过IApplicationThread这个Binder IPC到App进程的Binder线程池,然后通过H转发消息到App进程的主线程,最终完成组件生命周期的回调
Activity与Service组件最大的不同点在于,Activity组件可以与用户进行交互;这一点意味着用户的行为会对Activity组件产生影响,对我们来说最重要的影响就是Activity组件的生命周期;用户点击按钮从界面A跳转到界面B,会引起A和B这两个Activity一系列生命周期的变化。而Service组件则代表后台任务,除了内存不足系统回收之外,它的生命周期完全由我们的代码控制,与用户的交互无关。
Activity组件的生命周期受用户交互影响,而这种变化只有Android系统才能感知,因此我们必须把插件的Activity交给系统管理,才能拥有完整的生命周期;但Service组件的生命周期不受外界因素影响,那么自然而然,我们可以手动控制它的生命周期,既然Service的生命周期可以由我们自己控制,那么我们可以有更简单的方案实现它的插件化。
可以通过手动控制Service组件的生命周期实现Service的插件化
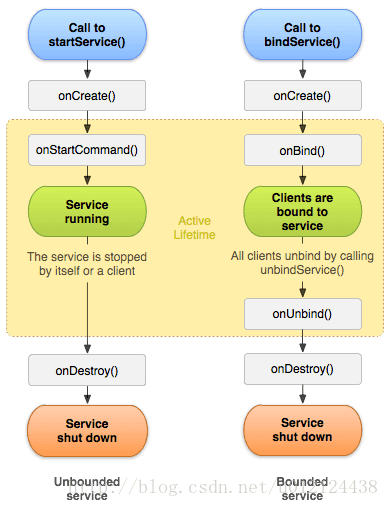
Service的生命周期相当简单:整个生命周期从调用 onCreate() 开始起,到 onDestroy() 返回时结束。对于非绑定服务,就是从startService调用到stopService或者stopSelf调用。对于绑定服务,就是bindService调用到unbindService调用;
1.如果以startService方式启动插件Service,直接回调要启动的Service对象的onStartCommand方法即可;如果用stopService或者stopSelf的方式停止Service,只需要回调对应的Service组件的onDestroy方法。
2.如果用bindService方式绑定插件Service,可以调用对应Service对应的onBind方法,获取onBind方法返回的Binder对象,然后通过ServiceConnection对象进行回调统计;unBindService的实现同理。
VirtualAPK是如何实现Service插件化的
VirtualAPK中使用了一种代理分发的方法,注册一个真正的Service组件ProxyService,让这个Service承载一个真正的Service组件所具备的能力(进程优先级等);当启动插件的服务比如PluginService的时候,我们统一启动这个ProxyService,当这个ProxyService运行起来之后,再在它的onStartCommand等方法里面进行分发,执行PluginService的onStartCommond等对应的方法
1.注册代理Service
上面说道,我们需要一个货真价实的Service组件来承载进程优先级等功能,因此需要在AndroidManifest.xml中声明一个或多个这样的Sevice,打开VirtualAPK的代码,我们发现也确实这样的:
 <!-- Local Service running in main process -->
        <service android:name="com.didi.virtualapk.delegate.LocalService" />

        <!-- Daemon Service running in child process -->
        <service android:name="com.didi.virtualapk.delegate.RemoteService" android:process=":daemon">
            <intent-filter>
                <action android:name="${applicationId}.intent.ACTION_DAEMON_SERVICE" />
            </intent-filter>
        </service>
可以发现,VirtualAPK注册了两个Service ,一个本进程的Service,一个是跨进程的Service
2.Hook IActivityManager,拦截startService等调用过程
要手动控制Service组件的生命周期,需要拦截startService,stopService等调用,并且把启动插件Service全部重定向为启动ProxyService(保留原始插件Service信息);这个拦截过程需要Hook ActvityManagerNative,还记得我们前面说VirtualAPK通过动态代理的方式Hook ActvityManagerNative方法吗?
hookSystemServices是在PluginManager中实现的
 private void prepare() {
        Systems.sHostContext = getHostContext();
        this.hookInstrumentationAndHandler();
        this.hookSystemServices();
    }
 private void hookSystemServices() {
        try {
            Singleton<IActivityManager> defaultSingleton = (Singleton<IActivityManager>) ReflectUtil.getField(ActivityManagerNative.class, null, "gDefault");
            IActivityManager activityManagerProxy = ActivityManagerProxy.newInstance(this, defaultSingleton.get());

            // Hook IActivityManager from ActivityManagerNative
            ReflectUtil.setField(defaultSingleton.getClass().getSuperclass(), defaultSingleton, "mInstance", activityManagerProxy);

            if (defaultSingleton.get() == activityManagerProxy) {
                this.mActivityManager = activityManagerProxy;
            }
        } catch (Exception e) {
            e.printStackTrace();
        }
    }
首先拿到ActivityManagerNative中的gDefault对象,该对象返回的是一个Singleton,然后拿到其mInstance对象,即IActivityManager对象(可以理解为和AMS交互的binder的client对象)对象。
然后通过动态代理的方式,替换为了一个代理对象。
ActivityManagerProxy.java
@Override
    public Object invoke(Object proxy, Method method, Object[] args) throws Throwable {
        if ("startService".equals(method.getName())) {
            try {
                return startService(proxy, method, args);
            } catch (Throwable e) {
                Log.e(TAG, "Start service error", e);
            }
        } else if ("stopService".equals(method.getName())) {
            try {
                return stopService(proxy, method, args);
            } catch (Throwable e) {
                Log.e(TAG, "Stop Service error", e);
            }
        } else if ("stopServiceToken".equals(method.getName())) {
            try {
                return stopServiceToken(proxy, method, args);
            } catch (Throwable e) {
                Log.e(TAG, "Stop service token error", e);
            }
        } else if ("bindService".equals(method.getName())) {
            try {
                return bindService(proxy, method, args);
            } catch (Throwable e) {
                e.printStackTrace();
            }
        } else if ("unbindService".equals(method.getName())) {
            try {
                return unbindService(proxy, method, args);
            } catch (Throwable e) {
                e.printStackTrace();
            }
        } else if ("getIntentSender".equals(method.getName())) {
            try {
                getIntentSender(method, args);
            } catch (Exception e) {
                e.printStackTrace();
            }
        } else if ("overridePendingTransition".equals(method.getName())){
            try {
                overridePendingTransition(method, args);
            } catch (Exception e){
                e.printStackTrace();
            }
        }

        try {
            // sometimes system binder has problems.
            return method.invoke(this.mActivityManager, args);
        } catch (Throwable th) {
            Throwable c = th.getCause();
            if (c != null && c instanceof DeadObjectException) {
                // retry connect to system binder
                IBinder ams = ServiceManager.getService(Context.ACTIVITY_SERVICE);
                if (ams != null) {
                    IActivityManager am = ActivityManagerNative.asInterface(ams);
                    mActivityManager = am;
                }
            }

            Throwable cause = th;
            do {
                if (cause instanceof RemoteException) {
                    throw cause;
                }
            } while ((cause = cause.getCause()) != null);

            throw c != null ? c : th;
        }

    }
可以看到在ActivityManagerProxy中,对startService等将所有的Service操作进行拦截,然后调用了自己内部的相应方法,我们先看startService方法
3.拦截startService方法
 private Object startService(Object proxy, Method method, Object[] args) throws Throwable {
        IApplicationThread appThread = (IApplicationThread) args[0];
        Intent target = (Intent) args[1];
        ResolveInfo resolveInfo = this.mPluginManager.resolveService(target, 0);
        if (null == resolveInfo || null == resolveInfo.serviceInfo) {
            // is host service
            return method.invoke(this.mActivityManager, args);
        }

        return startDelegateServiceForTarget(target, resolveInfo.serviceInfo, null, RemoteService.EXTRA_COMMAND_START_SERVICE);
    }
1.mPluginManager.resolveService方法通过Intent 过滤出要启动的插件Service的ResolveInfo
 public ResolveInfo resolveService(Intent intent, int flags) {
        for (LoadedPlugin plugin : this.mPlugins.values()) {
            ResolveInfo resolveInfo = plugin.resolveService(intent, flags);
            if (null != resolveInfo) {
                return resolveInfo;
            }
        }

        return null;
    }
这个方法最终会到LoadedPlugin的resolveService方法中
 public ResolveInfo resolveService(Intent intent, int flags) {
        List<ResolveInfo> query = this.queryIntentServices(intent, flags);
        if (null == query || query.isEmpty()) {
            return null;
        }

        ContentResolver resolver = this.mPluginContext.getContentResolver();
        return chooseBestActivity(intent, intent.resolveTypeIfNeeded(resolver), flags, query);
    }
然后会调用queryIntentServices
  public List<ResolveInfo> queryIntentServices(Intent intent, int flags) {
        ComponentName component = intent.getComponent();
        List<ResolveInfo> resolveInfos = new ArrayList<ResolveInfo>();
        ContentResolver resolver = this.mPluginContext.getContentResolver();

        for (PackageParser.Service service : this.mPackage.services) {
            if (service.getComponentName().equals(component)) {
                ResolveInfo resolveInfo = new ResolveInfo();
                resolveInfo.serviceInfo = service.info;
                resolveInfos.add(resolveInfo);
            } else if (component == null) {
                // only match implicit intent
                for (PackageParser.ServiceIntentInfo intentInfo : service.intents) {
                    if (intentInfo.match(resolver, intent, true, TAG) >= 0) {
                        ResolveInfo resolveInfo = new ResolveInfo();
                        resolveInfo.serviceInfo = service.info;
                        resolveInfos.add(resolveInfo);
                        break;
                    }
                }
            }
        }

        return resolveInfos;
    }
如果要启动的Intent中含有component信息,则根据component来匹配,否则component为null的话,则根据intentInfo进行匹配
回到ActivityManagerProxy的startService方法中,如果null == resolveInfo,则表明不是插件里的Service,否则调用startDelegateServiceForTarget
 private ComponentName startDelegateServiceForTarget(Intent target, ServiceInfo serviceInfo, Bundle extras, int command) {
        Intent wrapperIntent = wrapperTargetIntent(target, serviceInfo, extras, command);
        return mPluginManager.getHostContext().startService(wrapperIntent);
    }
还记得我们说要将启动的PluginService先替换成ProxyService么,这个动作就是在wrapperTargetIntent方法中完成的
private Intent wrapperTargetIntent(Intent target, ServiceInfo serviceInfo, Bundle extras, int command) {
        // fill in service with ComponentName
        target.setComponent(new ComponentName(serviceInfo.packageName, serviceInfo.name));
        String pluginLocation = mPluginManager.getLoadedPlugin(target.getComponent()).getLocation();

        // start delegate service to run plugin service inside
        boolean local = PluginUtil.isLocalService(serviceInfo);
        Class<? extends Service> delegate = local ? LocalService.class : RemoteService.class;
        Intent intent = new Intent();
        intent.setClass(mPluginManager.getHostContext(), delegate);
        intent.putExtra(RemoteService.EXTRA_TARGET, target);
        intent.putExtra(RemoteService.EXTRA_COMMAND, command);
        intent.putExtra(RemoteService.EXTRA_PLUGIN_LOCATION, pluginLocation);
        if (extras != null) {
            intent.putExtras(extras);
        }

        return intent;
    }
这个方法主要做了以下步骤:
1.给target的Intent设置Component
target.setComponent(new ComponentName(serviceInfo.packageName, serviceInfo.name));
2.获取要启动的插件service的插件路径
String pluginLocation = mPluginManager.getLoadedPlugin(target.getComponent()).getLocation();
3.判断目标service是本地的还是跨进程的
boolean local = PluginUtil.isLocalService(serviceInfo);
        Class<? extends Service> delegate = local ? LocalService.class : RemoteService.class;
4.替换intent为启动代理的Service的intent,并将启动真正插件的Service的intent保存到RemoteService.EXTRA_TARGET参数中,携将command保存到EXTRA_COMMAND_START_SERVICE,以及插件apk路径保存到EXTRA_PLUGIN_LOCATION中。
Intent intent = new Intent();
        intent.setClass(mPluginManager.getHostContext(), delegate);
        intent.putExtra(RemoteService.EXTRA_TARGET, target);
        intent.putExtra(RemoteService.EXTRA_COMMAND, command);
        intent.putExtra(RemoteService.EXTRA_PLUGIN_LOCATION, pluginLocation);
        if (extras != null) {
            intent.putExtras(extras);
        }
接下来就是启动代理service啦
private ComponentName startDelegateServiceForTarget(Intent target, ServiceInfo serviceInfo, Bundle extras, int command) {
        Intent wrapperIntent = wrapperTargetIntent(target, serviceInfo, extras, command);
        return mPluginManager.getHostContext().startService(wrapperIntent);
    }
接下来就会到LocalService中了,直接来到onStartCommand方法
 if (null == intent || !intent.hasExtra(EXTRA_TARGET) || !intent.hasExtra(EXTRA_COMMAND)) {
            return START_STICKY;
        }

        Intent target = intent.getParcelableExtra(EXTRA_TARGET);
        int command = intent.getIntExtra(EXTRA_COMMAND, 0);
        if (null == target || command <= 0) {
            return START_STICKY;
        }
如果启动不是插件的service,那就原来咋样就咋样,否则就根据传入的command来走相应的步骤,首先是EXTRA_COMMAND_START_SERVICE
case EXTRA_COMMAND_START_SERVICE: {
                ActivityThread mainThread = (ActivityThread)ReflectUtil.getActivityThread(getBaseContext());
                IApplicationThread appThread = mainThread.getApplicationThread();
                Service service;

                if (this.mPluginManager.getComponentsHandler().isServiceAvailable(component)) {
                    service = this.mPluginManager.getComponentsHandler().getService(component);
                } else {
                    try {
                        service = (Service) plugin.getClassLoader().loadClass(component.getClassName()).newInstance();

                        Application app = plugin.getApplication();
                        IBinder token = appThread.asBinder();
                        Method attach = service.getClass().getMethod("attach", Context.class, ActivityThread.class, String.class, IBinder.class, Application.class, Object.class);
                        IActivityManager am = mPluginManager.getActivityManager();

                        attach.invoke(service, plugin.getPluginContext(), mainThread, component.getClassName(), token, app, am);
                        service.onCreate();
                        this.mPluginManager.getComponentsHandler().rememberService(component, service);
                    } catch (Throwable t) {
                        return START_STICKY;
                    }
                }

                service.onStartCommand(target, 0, this.mPluginManager.getComponentsHandler().getServiceCounter(service).getAndIncrement());
                break;
            }
如果这个插件service之前已经创建过了,已经缓存在ComponentsHandler中的mServices中,则不再重复创建
if (this.mPluginManager.getComponentsHandler().isServiceAvailable(component)) {
                    service = this.mPluginManager.getComponentsHandler().getService(component);
                }
如果之前没有进行创建过,则通过ClassLoader加载这个service,反射调用service的attach方法,传入相应的参数,然后手动调用service的onCreate方法,并将这个service添加到缓存中,这样service的创建就完成了。
else {
                    try {
                        service = (Service) plugin.getClassLoader().loadClass(component.getClassName()).newInstance();

                        Application app = plugin.getApplication();
                        IBinder token = appThread.asBinder();
                        Method attach = service.getClass().getMethod("attach", Context.class, ActivityThread.class, String.class, IBinder.class, Application.class, Object.class);
                        IActivityManager am = mPluginManager.getActivityManager();

                        attach.invoke(service, plugin.getPluginContext(), mainThread, component.getClassName(), token, app, am);
                        service.onCreate();
                        this.mPluginManager.getComponentsHandler().rememberService(component, service);
                    } catch (Throwable t) {
                        return START_STICKY;
                    }
                }
当然上面的这段代码,其实思路就是来源于系统源码,他参照了系统是如何创建Service对象的,这个代码就是在ActivityThread类的handleCreateService完成,代码如下
try {
            java.lang.ClassLoader cl = packageInfo.getClassLoader();
            service = (Service) cl.loadClass(data.info.name).newInstance();
        } catch (Exception e) {
            if (!mInstrumentation.onException(service, e)) {
                throw new RuntimeException(
                    "Unable to instantiate service " + data.info.name
                    + ": " + e.toString(), e);
            }
        }

        try {
            if (localLOGV) Slog.v(TAG, "Creating service " + data.info.name);

            ContextImpl context = ContextImpl.createAppContext(this, packageInfo);
            context.setOuterContext(service);

            Application app = packageInfo.makeApplication(false, mInstrumentation);
            service.attach(context, this, data.info.name, data.token, app,
                    ActivityManagerNative.getDefault());
            service.onCreate();
            mServices.put(data.token, service);
            try {
                ActivityManagerNative.getDefault().serviceDoneExecuting(
                        data.token, SERVICE_DONE_EXECUTING_ANON, 0, 0);
            } catch (RemoteException e) {
                // nothing to do.
            }
        }
4.拦截stopService方法
stopService方法与startService大同小异,最终都会到LocalService的onStartCommand方法中
 case EXTRA_COMMAND_STOP_SERVICE: {
                Service service = this.mPluginManager.getComponentsHandler().forgetService(component);
                if (null != service) {
                    try {
                        service.onDestroy();
                    } catch (Exception e) {
                        Log.e(TAG, "Unable to stop service " + service + ": " + e.toString());
                    }
                } else {
                    Log.i(TAG, component + " not found");
                }
                break;
            }
其实stopService方法十分简单,就是从ComponentsHandler中将对应的Service 从集合中移除,然后调用其service.onDestroy()方法
5.bindService方法
private Object bindService(Object proxy, Method method, Object[] args) throws Throwable {
        Intent target = (Intent) args[2];
        ResolveInfo resolveInfo = this.mPluginManager.resolveService(target, 0);
        if (null == resolveInfo || null == resolveInfo.serviceInfo) {
            // is host service
            return method.invoke(this.mActivityManager, args);
        }

        Bundle bundle = new Bundle();
        PluginUtil.putBinder(bundle, "sc", (IBinder) args[4]);
        startDelegateServiceForTarget(target, resolveInfo.serviceInfo, bundle, RemoteService.EXTRA_COMMAND_BIND_SERVICE);
        mPluginManager.getComponentsHandler().remberIServiceConnection((IBinder) args[4], target);
        return 1;
    }
这里将IBinder存入了一个Bundle中,这个IBinder就是我们前面分析源码时候提及的IServiceConnection类,然后同样是通过startDelegateServiceForTarget,然后又是来到LocalService的onStartCommand方法中
case EXTRA_COMMAND_BIND_SERVICE: {
                           ActivityThread mainThread = (ActivityThread)ReflectUtil.getActivityThread(getBaseContext());
                IApplicationThread appThread = mainThread.getApplicationThread();
                Service service = null;

                if (this.mPluginManager.getComponentsHandler().isServiceAvailable(component)) {
                    service = this.mPluginManager.getComponentsHandler().getService(component);
                } else {
                    try {
                        service = (Service) plugin.getClassLoader().loadClass(component.getClassName()).newInstance();

                        Application app = plugin.getApplication();
                        IBinder token = appThread.asBinder();
                        Method attach = service.getClass().getMethod("attach", Context.class, ActivityThread.class, String.class, IBinder.class, Application.class, Object.class);
                        IActivityManager am = mPluginManager.getActivityManager();

                        attach.invoke(service, plugin.getPluginContext(), mainThread, component.getClassName(), token, app, am);
                        service.onCreate();
                        this.mPluginManager.getComponentsHandler().rememberService(component, service);
                    } catch (Throwable t) {
                        t.printStackTrace();
                    }
                }
                try {
                    IBinder binder = service.onBind(target);
                    IBinder serviceConnection = PluginUtil.getBinder(intent.getExtras(), "sc");
                    IServiceConnection iServiceConnection = IServiceConnection.Stub.asInterface(serviceConnection);
                    iServiceConnection.connected(component, binder);
                } catch (Exception e) {
                    e.printStackTrace();
                }
                break;
            }
来到这里,前半部分还是和startService一样,去创建Service并调用其onCreate方法,不同的是下面这部分
 try {
                    IBinder binder = service.onBind(target);
                    IBinder serviceConnection = PluginUtil.getBinder(intent.getExtras(), "sc");
                    IServiceConnection iServiceConnection = IServiceConnection.Stub.asInterface(serviceConnection);
                    iServiceConnection.connected(component, binder);
                } catch (Exception e) {
                    e.printStackTrace();
                }
我们知道通过bindService的方式,还有一个ServiceConnection回调的问题,这里就是将之前保存的IServiceConnection取出来,然后手动调用其connected方法,完成这个回调的过程,具体可以参考AMS的如下源码部分:
void publishServiceLocked(ServiceRecord r, Intent intent, IBinder service) {
    final long origId = Binder.clearCallingIdentity();
    try {
        if (r != null) {
            Intent.FilterComparison filter
                    = new Intent.FilterComparison(intent);
            IntentBindRecord b = r.bindings.get(filter);
            if (b != null && !b.received) {
                b.binder = service;
                b.requested = true;
                b.received = true;
                for (int conni=r.connections.size()-1; conni>=0; conni--) {
                    ArrayList<ConnectionRecord> clist = r.connections.valueAt(conni);
                    for (int i=0; i<clist.size(); i++) {
                        ConnectionRecord c = clist.get(i);
                        if (!filter.equals(c.binding.intent.intent)) {
                            continue;
                        }
                        try {
                            c.conn.connected(r.name, service);
                        } catch (Exception e) {
                        }
                    }
                }
            }

            serviceDoneExecutingLocked(r, mDestroyingServices.contains(r), false);
        }
    } finally {
        Binder.restoreCallingIdentity(origId);
    }
}
7.unbindService
unbindService的套路也是基本一致,我们只看LocalService就可以了
 case EXTRA_COMMAND_UNBIND_SERVICE: {
                Service service = this.mPluginManager.getComponentsHandler().forgetService(component);
                if (null != service) {
                    try {
                        service.onUnbind(target);
                        service.onDestroy();
                    } catch (Exception e) {
                        Log.e(TAG, "Unable to unbind service " + service + ": " + e.toString());
                    }
                } else {
                    Log.i(TAG, component + " not found");
                }
                break;
            }
也是非常简单,取出service,手动调用 service.onUnbind()和service.onDestroy()方法即可
到此,整个VirtualAPK框架的Service就基本分析完毕了,细心的你或许会发现在ActivityManagerProxy中还hook了一个stopServiceToken方法,这个方法主要用于一些特殊的Service,比如IntentService,其stopSelf是由自身调用的,最终会调用mActivityManager.stopServiceToken方法,这个方法最后还是走代理stopService的逻辑。


 1056
1056


 被折叠的 条评论
为什么被折叠?
被折叠的 条评论
为什么被折叠?
 到【灌水乐园】发言


