


spring mvc 框架本质上是一个servlet,在深究springmvc 底层实现之前我们先进行一个简单的springmvc入门例子,来带领大家进行一个spring mvc 的初体验。
1.环境搭建
spring mvc 的环境搭建非常简单,首先创建一个web 项目,如果是maven项目,只需要简单地加入spring mvc 和servlet的依赖就可以了(Tomcat8 默认使用的是servlet3.1,Tomcat使用的是servlet3.0)
<dependency>
<groupId>javax.servlet</groupId>
<artifactId>javax.servlet-api</artifactId>
<version>3.1.0</version>
<scope>provided</scope>
</dependency>

<dependency>
<groupId>org.springframework</groupId>
<artifactId>spring-webmvc</artifactId>
<version>4.1.5</version>
</dependency>
如果没有使用maven,如果是myeclipse ,那么直接引入spring 框架就可以了。
2.web.xml配置spring mvc
1.在web.xml 中配置spring mvc
<!--  spring mvc配置 开始 -->
<servlet>
    <servlet-name>springmvc</servlet-name>
    <servlet-class>org.springframework.web.servlet.DispatcherServlet</servlet-class>
    <load-on-startup>1</load-on-startup>
</servlet>
    <servlet-mapping>
        <servlet-name>springmvc</servlet-name>
        <url-pattern>/</url-pattern>
  </servlet-mapping>
<!--  spring mvc配置 结束 -->
在配置DispatcherServlet 的时候可以设置contextConfigLocation参数来设置spring mvc 的配置文件的位置,默认是使用web-inf下的[servlet-name]-servlet.xml
3.创建springmvc-servlet.xml
<?xml version="1.0" encoding="UTF-8"?>
<beans xmlns="http://www.springframework.org/schema/beans"
    xmlns:xsi="http://www.w3.org/2001/XMLSchema-instance" xmlns:context="http://www.springframework.org/schema/context"
    xmlns:mvc="http://www.springframework.org/schema/mvc"
    xmlns:aop="http://www.springframework.org/schema/aop"
    xmlns:tx="http://www.springframework.org/schema/tx"
    xsi:schemaLocation="http://www.springframework.org/schema/beans
    http://www.springframework.org/schema/beans/spring-beans.xsd
    http://www.springframework.org/schema/context
    http://www.springframework.org/schema/context/spring-context.xsd
    http://www.springframework.org/schema/mvc
    http://www.springframework.org/schema/mvc/spring-mvc.xsd
    http://www.springframework.org/schema/aop
    http://www.springframework.org/schema/aop/spring-aop.xsd
    http://www.springframework.org/schema/tx
    http://www.springframework.org/schema/tx/spring-tx.xsd">
    <mvc:annotation-driven/>
    <context:component-scan base-package="com.home.sd" />
</beans>
如果只想扫描 @controller 的配置如下
<context:component-scan base-package="com.home.sd" use-default-filters="false">
    <context:include-filter type="annotation" expression ="org.springframework.stereotype.Controller" />
</context:component-scan>
4.创建 Controller 和view
1.创建 Controller 类
首先在 com.home.sd包下创建一个类 StartController.java
package com.home.sd.controller;

import org.apache.commons.logging.Log;
import org.apache.commons.logging.LogFactory;
import org.springframework.stereotype.Controller;
import org.springframework.ui.Model;
import org.springframework.web.bind.annotation.RequestMapping;
import org.springframework.web.bind.annotation.RequestMethod;


@Controller
public class StartController {
    private final Log logger = LogFactory.getLog(StartController.class);

    @RequestMapping(value={"/"},method={RequestMethod.POST})
    public String head(){
        return "index.jsp";
    }

    @RequestMapping(value={"/index","/"},method ={RequestMethod.GET})
    public String index(Model model) throws Exception{
        logger.info("proccessed by index ======");
        model.addAttribute("msg", "hello Spring mvc");
        return "index.jsp";
    }
}
2.创建view index.jsp
<%@ page language="java" import="java.util.*" pageEncoding="UTF-8"%>
<%
String path = request.getContextPath();
String basePath = request.getScheme()+"://"+request.getServerName()+":"+request.getServerPort()+path+"/";
%>
<!DOCTYPE HTML PUBLIC "-//W3C//DTD HTML 4.01 Transitional//EN">
<html>
<head>
<base href="<%=basePath%>">
<title>首页</title>
<meta http-equiv="pragma" content="no-cache">
<meta http-equiv="cache-control" content="no-cache">
<meta http-equiv="expires" content="0">
<meta http-equiv="keywords" content="keyword1,keyword2,keyword3">
<meta http-equiv="description" content="This is my page">
<!--
<link rel="stylesheet" type="text/css" href="styles.css">
-->
</head>
<body>
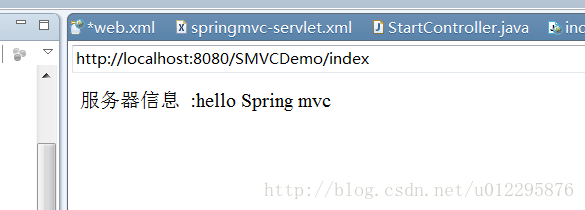
服务器信息 :${msg}
</body>
</html>
好了,接下来将项目部署到Tomcat上,运行,就会出现以下效果:


 903
903


 被折叠的 条评论
为什么被折叠?
被折叠的 条评论
为什么被折叠?
 到【灌水乐园】发言


