


1.详情底部界面

1.布局
<RelativeLayout xmlns:android="http://schemas.android.com/apk/res/android"
    android:id="@+id/bottom_layout"
    android:layout_width="match_parent"
    android:layout_height="match_parent" >

    <Button
        android:id="@+id/bottom_favorites"
        android:layout_width="68dp"
        android:layout_height="38dp"
        android:layout_alignParentLeft="true"
        android:layout_margin="6dp"
        android:background="@drawable/detail_btn"
        android:gravity="center"
        android:textColor="#ffffff"
        android:textSize="16dp"
        android:text="收藏"
        />

    <Button
        android:id="@+id/bottom_share"
        android:layout_width="68dp"
        android:layout_height="38dp"
        android:layout_alignParentRight="true"
        android:layout_margin="6dp"
        android:background="@drawable/detail_btn"
        android:gravity="center"
        android:textColor="#ffffff"
        android:textSize="16dp"
         android:text="分享"/>

<!--     <FrameLayout
        android:visibility="gone"
        android:id="@+id/progress_layout"
        android:layout_width="match_parent"
        android:layout_height="38dp"
        android:layout_centerVertical="true"
        android:layout_toLeftOf="@id/bottom_share"
        android:layout_toRightOf="@id/bottom_favorites" >

        <ProgressBar
            android:id="@+id/pb_load_process"
            style="?android:attr/progressBarStyleHorizontal"
            android:layout_width="match_parent"
            android:layout_height="match_parent"
            android:background="@drawable/progress_bg"
            android:progressDrawable="@drawable/progress_drawable"
            android:visibility="invisible" />

        <TextView
            android:id="@+id/tv_load_process"
            android:layout_width="match_parent"
            android:layout_height="match_parent"
            android:gravity="center"
            android:text="暂停"
            android:textColor="#ffffff"
            android:textSize="18sp" />
    </FrameLayout> -->

    <Button
        android:id="@+id/progress_btn"
        android:layout_width="match_parent"
        android:layout_height="38dp"
        android:layout_centerVertical="true"
        android:layout_toLeftOf="@id/bottom_share"
        android:layout_toRightOf="@id/bottom_favorites"
        android:background="@drawable/progress_btn"
        android:gravity="center"
        android:textColor="#ffffff"
        android:textSize="18dp"
        android:text="下载">
    </Button>

</RelativeLayout>
2.DetailBottomHolder
public class DetailBottomHolder extends BaseHolder<AppInfo> implements OnClickListener {
	@ViewInject(R.id.bottom_favorites)
	Button bottom_favorites;
	@ViewInject(R.id.bottom_share)
	Button bottom_share;
	@ViewInject(R.id.progress_btn)
	Button progress_btn;
	@Override
	public View initView() {
		View view=Uiutils.inflate(R.layout.detail_bottom);
		ViewUtils.inject(this, view);
		return view;
	}

	@Override
	public void refreshView(AppInfo data) {
		bottom_favorites.setOnClickListener(this);
		bottom_share.setOnClickListener(this);
		progress_btn.setOnClickListener(this);
	}

	@Override
	public void onClick(View v) {
		switch (v.getId()) {
		case R.id.bottom_favorites:
			Toast.makeText(Uiutils.getContext(), "收藏", 0).show();
			break;
		case R.id.bottom_share:
			Toast.makeText(Uiutils.getContext(), "分享", 0).show();
			break;
		case R.id.progress_btn:
			Toast.makeText(Uiutils.getContext(), "下载", 0).show();
			break;
		}
	}

}
3.添加
// 添加信息区域
		bottom_layout = (FrameLayout) view.findViewById(R.id.bottom_layout);
		bottomHolder = new DetailBottomHolder();
		bottomHolder.setData(data);
		bottom_layout.addView(bottomHolder.getContentView());
2.界面细节的处理
1.把点击查看详情页面应用到其他页面---抽取到公共类
public abstract class ListBaseAdapter extends DefaultAdapter<AppInfo>{

	public ListBaseAdapter(List<AppInfo> datas,ListView listView) {
		super(datas,listView);
		// TODO Auto-generated constructor stub
	}

	@Override
	public BaseHolder<AppInfo> getHolder() {
		return new ListBaseHolder();
	}

	@Override
	protected abstract List<AppInfo> onload();
	@Override
	public void onInnerItemClick(int position) {
		super.onInnerItemClick(position);
		Toast.makeText(Uiutils.getContext(), "position:"+position, 0).show();
		AppInfo appInfo = datas.get(position);
		Intent intent=new Intent(Uiutils.getContext(), DetailActivity.class);
		intent.putExtra("packageName", appInfo.getPackageName());
		Uiutils.startActivity(intent);
	}
}
2.不在Activity中跳转到Activity
(1)Uiutils
/**
	 * 可以打开activity
	 * @param intent
	 */
	public static void startActivity(Intent intent) {
		// 如果不在activity里去打开activity  需要指定任务栈  需要设置标签
		if(BaseActivity.activity==null){
			intent.setFlags(Intent.FLAG_ACTIVITY_NEW_TASK);
			getContext().startActivity(intent);
		}else{
			BaseActivity.activity.startActivity(intent);
		}
	}
(2)BaseActivity
public static BaseActivity activity;
	@Override
	protected void onResume() {
		super.onResume();
		activity=this;
	}
	@Override
	protected void onPause() {
		super.onPause();
		activity=null;
	}
3.按照宽高比例显示
1.宽度精确值, 高度=宽度/比例
测量当前布局
// 测量当前布局
		@Override
		protected void onMeasure(int widthMeasureSpec, int heightMeasureSpec) {
			//widthMeasureSpec  宽度的规则    包含了两部分 模式 + 值
			int widthMode = MeasureSpec.getMode(widthMeasureSpec);  // 模式       包括三种模式
			int widthSize = MeasureSpec.getSize(widthMeasureSpec);// 宽度大小
			int width=widthSize-getPaddingLeft()-getPaddingRight();// 去掉左右两边的padding

			int heightMode = MeasureSpec.getMode(heightMeasureSpec);  // 模式
			int heightSize = MeasureSpec.getSize(heightMeasureSpec);// 高度大小
			int height=heightSize-getPaddingTop()-getPaddingBottom();// 去掉上下两边的padding

			//如果宽度是一个精确值(类似match parent),高度不是一个精确值
			if(widthMode==MeasureSpec.EXACTLY&&heightMode!=MeasureSpec.EXACTLY){
				// 修正一下 高度的值   让高度=宽度/比例
				height=(int) (width/ratio+0.5f);   // 保证4舍五入
			}else if(widthMode!=MeasureSpec.EXACTLY&&heightMode==MeasureSpec.EXACTLY){
				//由于高度是精确的值 ,宽度随着高度的变化而变化
				width=(int) ( (height*ratio)+0.5f);
			}
			//  重新制作了新的规则
			widthMeasureSpec=MeasureSpec.makeMeasureSpec(MeasureSpec.EXACTLY, width+getPaddingLeft()+getPaddingRight());
			heightMeasureSpec=MeasureSpec.makeMeasureSpec(MeasureSpec.EXACTLY, height+getPaddingTop()+getPaddingBottom());

			super.onMeasure(widthMeasureSpec, heightMeasureSpec);
		}
模式:
2.自定义一个布局,让里面的图片按照一定比例显示
public class RatioLayout extends FrameLayout {
	// 按照宽高比例去显示
	private float ratio = 2.43f; // 比例值

	public void setRatio(float ratio) {
		this.ratio = ratio;
	}

	public RatioLayout(Context context) {
		super(context);
	}

	public RatioLayout(Context context, AttributeSet attrs, int defStyle) {
		super(context, attrs, defStyle);
		// 参数1 命名控件 参数2 属性的名字 参数3 默认的值
		float ratio = attrs.getAttributeFloatValue(
				"http://schemas.android.com/apk/res/com.itheima.googleplay",
				"ratio", 2.43f);
		setRatio(ratio);
	}

	public RatioLayout(Context context, AttributeSet attrs) {
		this(context, attrs, 0);
	}

	// 测量当前布局
	@Override
	protected void onMeasure(int widthMeasureSpec, int heightMeasureSpec) {
		// widthMeasureSpec 宽度的规则 包含了两部分 模式 值
		int widthMode = MeasureSpec.getMode(widthMeasureSpec); // 模式
		int widthSize = MeasureSpec.getSize(widthMeasureSpec);// 宽度大小
		int width = widthSize - getPaddingLeft() - getPaddingRight();// 去掉左右两边的padding

		int heightMode = MeasureSpec.getMode(heightMeasureSpec); // 模式
		int heightSize = MeasureSpec.getSize(heightMeasureSpec);// 高度大小
		int height = heightSize - getPaddingTop() - getPaddingBottom();// 去掉上下两边的padding

		if (widthMode == MeasureSpec.EXACTLY
				&& heightMode != MeasureSpec.EXACTLY) {
			// 修正一下 高度的值 让高度=宽度/比例
			height = (int) (width / ratio + 0.5f); // 保证4舍五入
		} else if (widthMode != MeasureSpec.EXACTLY
				&& heightMode == MeasureSpec.EXACTLY) {
			// 由于高度是精确的值 ,宽度随着高度的变化而变化
			width = (int) ((height * ratio) + 0.5f);
		}
		// 重新制作了新的规则
		widthMeasureSpec = MeasureSpec.makeMeasureSpec(MeasureSpec.EXACTLY,
				width + getPaddingLeft() + getPaddingRight());
		heightMeasureSpec = MeasureSpec.makeMeasureSpec(MeasureSpec.EXACTLY,
				height + getPaddingTop() + getPaddingBottom());

		super.onMeasure(widthMeasureSpec, heightMeasureSpec);
	}

}
3.使用
      <com.example.googleplay.View.RatioLayout
            android:id="@+id/rl_layout"
            android:layout_width="match_parent"
            android:layout_height="wrap_content"
            android:padding="5dp"
            >

            <ImageView
                android:id="@+id/item_icon"
                android:layout_width="match_parent"
                android:layout_height="wrap_content"
                android:scaleType="fitCenter"
                android:src="@drawable/ic_default" />
        </com.itheima.googleplay.view.RatioLayout>
4.自定义属性
1.为自定义布局定义属性
(1)系统的属性放在 attrs.xml文件中
(2)在Values文件下创建attrs.xml------------文件名必须和系统的一致
<?xml version="1.0" encoding="utf-8"?>
<resources>
    <declare-styleable name="com.itheima.googleplay.view.RatioLayout">
        <attr  name="ratio"  format="float"></attr>
    </declare-styleable>
</resources>
(3)引入命名空间
xmlns:itheima=<a target=_blank href="http://schemas.android.com/apk/res/com.itheima.googleplay">http://schemas.android.com/apk/res/com.itheima.googleplay</a>使用:itheima:ratio="2.43"
(4)解析attrs中的属性
public class RatioLayout extends FrameLayout {
	// 按照宽高比例去显示
	private float ratio = 2.43f; // 比例值

	public void setRatio(float ratio) {
		this.ratio = ratio;
	}

	public RatioLayout(Context context) {
		super(context);
	}

	public RatioLayout(Context context, AttributeSet attrs, int defStyle) {
		super(context, attrs, defStyle);
		// 参数1 命名控件 参数2 属性的名字 参数3 默认的值
		float ratio = attrs.getAttributeFloatValue(
				"http://schemas.android.com/apk/res/com.itheima.googleplay",
				"ratio", 2.43f);
		setRatio(ratio);
	}

	public RatioLayout(Context context, AttributeSet attrs) {
		this(context, attrs, 0);
	}}
5.分类界面解析数据
1.信息对象CategoryInfo
public class CategoryInfo {
	private String title;
	private String url1;
	private String url2;
	private String url3;
	private String name1;
	private String name2;
	private String name3;

	private  boolean  isTitle;// 是否是标题


	public boolean isTitle() {
		return isTitle;
	}
	public void setIsTitle(boolean isTitle) {
		this.isTitle = isTitle;
	}
	public String getTitle() {
		return title;
	}
	public void setTitle(String title) {
		this.title = title;
	}
	public String getUrl1() {
		return url1;
	}
	public void setUrl1(String url1) {
		this.url1 = url1;
	}
	public String getUrl2() {
		return url2;
	}
	public void setUrl2(String url2) {
		this.url2 = url2;
	}
	public String getUrl3() {
		return url3;
	}
	public void setUrl3(String url3) {
		this.url3 = url3;
	}
	public String getName1() {
		return name1;
	}
	public void setName1(String name1) {
		this.name1 = name1;
	}
	public String getName2() {
		return name2;
	}
	public void setName2(String name2) {
		this.name2 = name2;
	}
	public String getName3() {
		return name3;
	}
	public void setName3(String name3) {
		this.name3 = name3;
	}
	public CategoryInfo() {
		super();
	}
	public CategoryInfo(String title, String url1, String url2, String url3,
			String name1, String name2, String name3,boolean isTitle) {
		super();
		this.title = title;
		this.url1 = url1;
		this.url2 = url2;
		this.url3 = url3;
		this.name1 = name1;
		this.name2 = name2;
		this.name3 = name3;
		this.isTitle=isTitle;
	}


}
2.联网协议 CategoryProtocol
public class CategoryProtocol extends BaseProtocol<List<CategoryInfo>> {

	@Override
	public List<CategoryInfo> paserJson(String json) {
		List<CategoryInfo> categoryInfos=new ArrayList<CategoryInfo>();
		try {
			JSONArray array=new JSONArray(json);
			for(int i=0;i<array.length();i++){
				JSONObject jsonObject = array.getJSONObject(i);
				String title=jsonObject.getString("title");
				CategoryInfo categoryInfo=new CategoryInfo();
				categoryInfo.setTitle(title);
				categoryInfo.setIsTitle(true);
				categoryInfos.add(categoryInfo);

				JSONArray jsonArray = jsonObject.getJSONArray("infos");
				for(int j=0;j<jsonArray.length();j++){
					JSONObject jsonObject2 = jsonArray.getJSONObject(j);
					String url1=jsonObject2.getString("url1");
					String url2=jsonObject2.getString("url2");
					String url3=jsonObject2.getString("url3");
					String name1=jsonObject2.getString("name1");
					String name2=jsonObject2.getString("name2");
					String name3=jsonObject2.getString("name3");
					CategoryInfo categoryInfo2=new CategoryInfo(title, url1, url2, url3, name1, name2, name3,false);
					categoryInfos.add(categoryInfo2);
				}

			}
			return categoryInfos;

		} catch (JSONException e) {
			e.printStackTrace();
			return null;
		}

	}

	@Override
	public String getKey() {
		return "category";
	}

}
6.分类界面
1.因为服务器三个条目为一行,所以使用ListView
(1)CategoryFragment
public class CategoryFragment extends BaseFragment {
	private List<CategoryInfo> datas;
	// 创建成功的界面
	@Override
	public View createSuccessView() {
		BaseListView listView = new BaseListView(UiUtils.getContext());
		listView.setAdapter(new CategoryAdapter(datas, listView));

		return listView;
	}

	private class CategoryAdapter extends DefaultAdapter<CategoryInfo> {
		private int position;// 当前条目位置记录

		public CategoryAdapter(List<CategoryInfo> datas, ListView lv) {
			super(datas, lv);
		}
		// 实现每个条目的界面
		@Override
		protected BaseHolder<CategoryInfo> getHolder() {
				return new CategoryContentHolder();
		}
		@Override
		protected boolean hasMore() { // 当前方法 如果为false onload就不会被调用了
			return false;
		}
		@Override
		protected List<CategoryInfo> onload() {
			return null;
		}
	}

	// 请求服务器
	@Override
	protected LoadResult load() {
		CategoryProtocol protocol = new CategoryProtocol();
		datas = protocol.load(0);
		return checkData(datas);
	}
}
2.每个条目用一个Holder表示
(1)CategoryContentHolder---布局
<LinearLayout xmlns:android="http://schemas.android.com/apk/res/android"
    android:layout_width="match_parent"
    android:layout_height="match_parent"
    android:clickable="false"
    android:orientation="horizontal"
    android:paddingLeft="5dp"
    android:paddingRight="5dp" >

    <RelativeLayout
        android:id="@+id/rl_1"
        android:layout_width="0dip"
        android:layout_height="wrap_content"
        android:layout_weight="1"
        android:background="@drawable/grid_item_bg"
        android:clickable="true"
        android:paddingBottom="10dp"
        android:paddingTop="10dp" >

        <ImageView
            android:id="@+id/iv_1"
            android:layout_width="55dp"
            android:layout_height="55dp"
            android:layout_centerHorizontal="true"
            android:scaleType="fitXY"
            android:src="@drawable/ic_default" />

        <TextView
            android:id="@+id/tv_1"
            android:layout_width="wrap_content"
            android:layout_height="wrap_content"
            android:layout_below="@id/iv_1"
            android:layout_centerHorizontal="true"
            android:textColor="#ff7a7a7a" />
    </RelativeLayout>

    <RelativeLayout
        android:id="@+id/rl_2"
        android:layout_width="0dip"
        android:layout_height="wrap_content"
        android:layout_weight="1"
        android:background="@drawable/grid_item_bg"
        android:clickable="true"
        android:paddingBottom="10dp"
        android:paddingTop="10dp" >

        <ImageView
            android:id="@+id/iv_2"
            android:layout_width="55dp"
            android:layout_height="55dp"
            android:layout_centerHorizontal="true"
            android:scaleType="fitXY"
            android:src="@drawable/ic_default" />

        <TextView
            android:id="@+id/tv_2"
            android:layout_width="wrap_content"
            android:layout_height="wrap_content"
            android:layout_below="@id/iv_2"
            android:layout_centerHorizontal="true"
            android:textColor="#ff7a7a7a" />
    </RelativeLayout>

    <RelativeLayout
        android:id="@+id/rl_3"
        android:layout_width="0dip"
        android:layout_height="wrap_content"
        android:layout_weight="1"
        android:background="@drawable/grid_item_bg"
        android:clickable="true"
        android:paddingBottom="10dp"
        android:paddingTop="10dp" >

        <ImageView
            android:id="@+id/iv_3"
            android:layout_width="55dp"
            android:layout_height="55dp"
            android:layout_centerHorizontal="true"
            android:scaleType="fitXY"
            android:src="@drawable/ic_default" />

        <TextView
            android:id="@+id/tv_3"
            android:layout_width="wrap_content"
            android:layout_height="wrap_content"
            android:layout_below="@id/iv_3"
            android:layout_centerHorizontal="true"
            android:textColor="#ff7a7a7a" />
    </RelativeLayout>

</LinearLayout>
(2)CategoryContentHolder,不包括标题
public class CategoryContentHolder extends BaseHolder<CategoryInfo> {
	ImageView [] ivs;
	TextView [] tvs;
	@Override
	public View initView() {
		View view=UiUtils.inflate(R.layout.item_category_content);
		ivs=new ImageView[3];
		ivs[0]=(ImageView) view.findViewById(R.id.iv_1);
		ivs[1]=(ImageView) view.findViewById(R.id.iv_2);
		ivs[2]=(ImageView) view.findViewById(R.id.iv_3);

		tvs=new TextView[3];
		tvs[0]=(TextView) view.findViewById(R.id.tv_1);
		tvs[1]=(TextView) view.findViewById(R.id.tv_2);
		tvs[2]=(TextView) view.findViewById(R.id.tv_3);


		return view;
	}

	@Override
	public void refreshView(CategoryInfo data) {
		// 第一块
		if(!TextUtils.isEmpty(data.getName1())&&!TextUtils.isEmpty(data.getUrl1())){
			tvs[0].setText(data.getName1());
			bitmapUtils.display(ivs[0], HttpHelper.URL+"image?name="+data.getUrl1());
			tvs[0].setVisibility(View.VISIBLE);
			ivs[0].setVisibility(View.VISIBLE);
		}else{
			tvs[0].setVisibility(View.INVISIBLE);
			ivs[0].setVisibility(View.INVISIBLE);
		}
		// 第二块
		if(!TextUtils.isEmpty(data.getName2())&&!TextUtils.isEmpty(data.getUrl2())){
			tvs[1].setText(data.getName2());
			bitmapUtils.display(ivs[1], HttpHelper.URL+"image?name="+data.getUrl2());
			tvs[1].setVisibility(View.VISIBLE);
			ivs[1].setVisibility(View.VISIBLE);
		}else{
			tvs[1].setVisibility(View.INVISIBLE);
			ivs[1].setVisibility(View.INVISIBLE);
		}
		//第三块
		if(!TextUtils.isEmpty(data.getName3())&&!TextUtils.isEmpty(data.getUrl3())){
			tvs[2].setText(data.getName3());
			bitmapUtils.display(ivs[2], HttpHelper.URL+"image?name="+data.getUrl3());
			tvs[2].setVisibility(View.VISIBLE);
			ivs[2].setVisibility(View.VISIBLE);
		}else{
			tvs[2].setVisibility(View.INVISIBLE);
			ivs[2].setVisibility(View.INVISIBLE);
		}
	}

}
7.复杂的listView
1.给ListView添加标题
2.复写父类的方法(DefaultAdapter)
(1)DefaultAdapter
	/** 根据位置 判断当前条目是什么类型 */
	@Override
	public int getItemViewType(int position) {  //20
		if (position == datas.size()) { // 当前是最后一个条目
			return MORE_ITEM;
		}
		return getInnerItemViewType(position); // 如果不是最后一个条目 返回默认类型
	}

	protected int getInnerItemViewType(int position) {
		return DEFAULT_ITEM;
	}

	/** 当前ListView 有几种不同的条目类型 */
	@Override
	public int getViewTypeCount() {
		return super.getViewTypeCount() + 1; // 2 有两种不同的类型
	}

	@Override
	public long getItemId(int position) {
		return position;
	}

	public View getView(int position, View convertView, ViewGroup parent) {
		BaseHolder holder = null;

		switch (getItemViewType(position)) {  // 判断当前条目时什么类型
		case MORE_ITEM:
			if(convertView==null){
				holder=getMoreHolder();
			}else{
				holder=(BaseHolder) convertView.getTag();
			}
			break;
		default:
			if (convertView == null) {
				holder = getHolder();
			} else {
				//System.out.println("aaa");
				holder = (BaseHolder) convertView.getTag();
			}
			if (position < datas.size()) {
				holder.setData(datas.get(position));
			}
			break;
		}
		return holder.getContentView();  //  如果当前Holder 恰好是MoreHolder  证明MoreHOlder已经显示
	}
3.CategoryTitleHolder(标题Holder)
public class CategoryTitleHolder extends BaseHolder<CategoryInfo> {

	private TextView tv;

	@Override
	public View initView() {
		tv = new TextView(UiUtils.getContext());
		tv.setTextColor(Color.BLACK);
		tv.setBackgroundDrawable(UiUtils.getDrawalbe(R.drawable.grid_item_bg));
		return tv;
	}

	@Override
	public void refreshView(CategoryInfo data) {
		tv.setText(data.getTitle());
	}

}
4.CategoryFragment
public class CategoryFragment extends BaseFragment {
	private List<CategoryInfo> datas;
	public static int ITEM_TITLE =2;

	// 创建成功的界面
	@Override
	public View createSuccessView() {
		BaseListView listView = new BaseListView(UiUtils.getContext());
		listView.setAdapter(new CategoryAdapter(datas, listView));

		return listView;
	}

	private class CategoryAdapter extends DefaultAdapter<CategoryInfo> {
		private int position;// 当前条目位置记录

		public CategoryAdapter(List<CategoryInfo> datas, ListView lv) {
			super(datas, lv);
		}

		// 实现每个条目的界面
		@Override
		protected BaseHolder<CategoryInfo> getHolder() {
			if (!datas.get(position).isTitle()) {
				return new CategoryContentHolder();
			}else{
				return new CategoryTitleHolder();
			}
		}

		@Override
		public View getView(int position, View convertView, ViewGroup parent) {
			this.position = position;
			return super.getView(position, convertView, parent);
		}

		@Override
		protected boolean hasMore() { // 当前方法 如果为false onload就不会被调用了
			return false;
		}

		@Override
		protected int getInnerItemViewType(int position) {
			if (datas.get(position).isTitle()) {
				return ITEM_TITLE;
			} else {
				return super.getInnerItemViewType(position);
			}
		}

		@Override
		protected List<CategoryInfo> onload() {
			return null;
		}
		//  集合 管理三个convertView
		@Override
		public int getViewTypeCount() {
			return super.getViewTypeCount() + 1; // 在父类的基础上又额外多了一种条目类型  现在又三种  1 标题 2 内容 3 加载更多(没有显示)
		}

	}

	// 请求服务器
	@Override
	protected LoadResult load() {
		CategoryProtocol protocol = new CategoryProtocol();
		datas = protocol.load(0);
		return checkData(datas);
	}
}
8.分类界面
1.CategoryAdapter
(1)增加一种类型
		@Override
		public int getViewTypeCount() {
			return super.getViewTypeCount() + 1; // 又额外多了一种条目类型  现在又三种  1 标题 2 内容 3 加载更多(没有显示)
		}
(2)返回类型
		@Override
		protected int getInnerItemViewType(int position) {
			if (datas.get(position).isTitle()) {
				return ITEM_TITLE;
			} else {
				return super.getInnerItemViewType(position);  //调用父类的
			}
		}
(3)根据不同类型返回不同Holder
		// 实现每个条目的界面
		@Override
		protected BaseHolder<CategoryInfo> getHolder() {
			if (!datas.get(position).isTitle()) {
				return new CategoryContentHolder();
			}else{
				return new CategoryTitleHolder();
			}
		}
2.CategoryFragment完整
public class CategoryFragment extends BaseFragment {
	private List<CategoryInfo> datas;
	public static int ITEM_TITLE =2;

	// 创建成功的界面
	@Override
	public View createSuccessView() {
		BaseListView listView = new BaseListView(UiUtils.getContext());
		listView.setAdapter(new CategoryAdapter(datas, listView));

		return listView;
	}

	private class CategoryAdapter extends DefaultAdapter<CategoryInfo> {
		private int position;// 当前条目位置记录

		public CategoryAdapter(List<CategoryInfo> datas, ListView lv) {
			super(datas, lv);
		}

		// 实现每个条目的界面
		@Override
		protected BaseHolder<CategoryInfo> getHolder() {
			if (!datas.get(position).isTitle()) {
				return new CategoryContentHolder();
			}else{
				return new CategoryTitleHolder();
			}
		}

		@Override
		public View getView(int position, View convertView, ViewGroup parent) {
			this.position = position;
			return super.getView(position, convertView, parent);
		}

		@Override
		protected boolean hasMore() { // 当前方法 如果为false onload就不会被调用了
			return false;
		}

		@Override
		protected int getInnerItemViewType(int position) {
			if (datas.get(position).isTitle()) {
				return ITEM_TITLE;
			} else {
				return super.getInnerItemViewType(position);
			}
		}

		@Override
		protected List<CategoryInfo> onload() {
			return null;
		}
		//  集合 管理三个convertView
		@Override
		public int getViewTypeCount() {
			return super.getViewTypeCount() + 1; // 在父类的基础上又额外多了一种条目类型  现在又三种  1 标题 2 内容 3 加载更多(没有显示)
		}

	}

	// 请求服务器
	@Override
	protected LoadResult load() {
		CategoryProtocol protocol = new CategoryProtocol();
		datas = protocol.load(0);
		return checkData(datas);
	}
}
9.排行界面
1.联网协议Ptotocal
public class TopProtocol extends BaseProtocol<List<String>> {

	@Override
	public List<String> paserJson(String json) {
		List<String> datas=new ArrayList<String>();
		try {
			JSONArray array=new JSONArray(json);
			for(int i=0;i<array.length();i++){
				String str=array.getString(i);
				datas.add(str);
			}
			return datas;
		} catch (JSONException e) {
			e.printStackTrace();
			return null;
		}

	}

	@Override
	public String getKey() {
		return "hot";
	}

}
2.xml文件都可以用代码实现
代码实现shape.xml
public class DrawableUtils {
	public static GradientDrawable createShape(int color){
		GradientDrawable drawable=new GradientDrawable();
		drawable.setCornerRadius(UiUtils.dip2px(5));//设置4个角的弧度
		drawable.setColor(color);// 设置颜色
		return drawable;


	}
}
3.TopFragment
public class TopFragment extends BaseFragment {

	private List<String> datas;

	@Override
	public View createSuccessView() {
		ScrollView scrollView=new ScrollView(Uiutils.getContext());
		scrollView.setBackgroundResource(R.drawable.grid_item_bg_normal);
		LinearLayout layout=new LinearLayout(Uiutils.getContext());
		layout.setOrientation(LinearLayout.VERTICAL);// 设置线性布局的方向


		for(int i=0;i<datas.size();i++){
			TextView textView=new TextView(Uiutils.getContext());
			final String str=datas.get(i);
			textView.setText(str);

			Random random=new Random();   //创建随机
			int red = random.nextInt(200)+22;       //随机颜色,去掉白色和黑色
			int green = random.nextInt(200)+22;
			int blue = random.nextInt(200)+22;
			int color=Color.rgb(red, green, blue);//范围 0-255

			GradientDrawable createShape = DrawableUtils.createShape(color); // 默认显示的图片

			textView.setBackgroundDrawable(createShape);
			textView.setTextColor(Color.WHITE);
			textView.setTextSize(Uiutils.dip2px(10));
			int textPaddingV = Uiutils.dip2px(4);
			int textPaddingH = Uiutils.dip2px(7);
			textView.setPadding(textPaddingH, textPaddingV, textPaddingH, textPaddingV); //设置padding 边距
			layout.addView(textView,new LinearLayout.LayoutParams(LayoutParams.WRAP_CONTENT, -2));// -2 包裹内容
		}

		scrollView.addView(layout);
		return scrollView;
	}

	@Override
	protected LoadResult load() {
		TopProtocol protocol=new TopProtocol();
		datas = protocol.load(0);
		return checkData(datas);
	}
}
10.状态选择器
1.在代码中创建状态选择器
public class DrawableUtils {
	public static GradientDrawable createShape(int color){
		GradientDrawable drawable=new GradientDrawable();
		drawable.setCornerRadius(UiUtils.dip2px(5));//设置4个角的弧度
		drawable.setColor(color);// 设置颜色
		return drawable;


	}
	//状态选择器
	public static StateListDrawable createSelectorDrawable(Drawable pressedDrawable,Drawable normalDrawable){
//		<selector xmlns:android="http://schemas.android.com/apk/res/android"  android:enterFadeDuration="200">
//	    <item  android:state_pressed="true" android:drawable="@drawable/detail_btn_pressed"></item>
//	    <item  android:drawable="@drawable/detail_btn_normal"></item>
//	</selector>
		StateListDrawable stateListDrawable=new StateListDrawable();
		stateListDrawable.addState(new int[]{android.R.attr.state_pressed}, pressedDrawable);// 按下显示的图片
		stateListDrawable.addState(new int[]{}, normalDrawable);// 抬起显示的图片
		return stateListDrawable;

	}
}
2.创建状态选择器
                int backColor = 0xffcecece;  //灰色
		Drawable pressedDrawable=DrawableUtils.createShape(backColor);// 按下显示的图片
		GradientDrawable createShape = DrawableUtils.createShape(color); // 默认显示的图片
		 StateListDrawable createSelectorDrawable = DrawableUtils.createSelectorDrawable(pressedDrawable, createShape);// 创建状态选择器
3.TextView默认不可点击,为TextView设置点击事件
textView.setOnClickListener(new OnClickListener() {  // 设置点击事件

				@Override
				public void onClick(View v) {
					Toast.makeText(UiUtils.getContext(), str, 0).show();
				}
			});
12.测量每个孩子
1.自定义一个布局,让控件按照一定规则排列
2.测量的流程
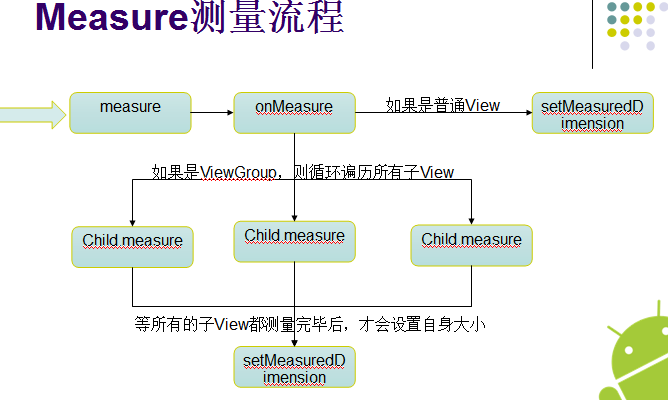
(1)setMeasuredDimension() :设置控件或布局本身的大小
(2)如果当前为ViewGroup,则先测量所有子View
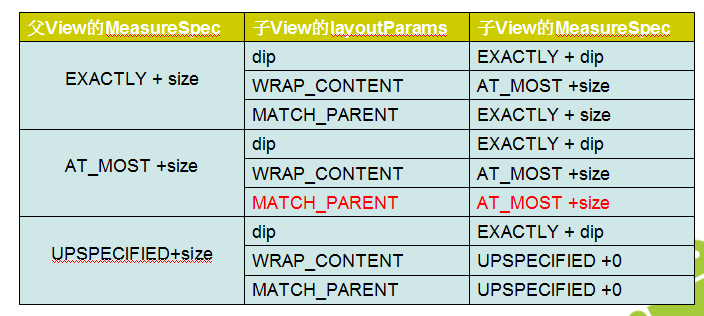
3.MeasureSpec判定规则
4.测量onMeasure --------------------------------------------------------模板写法
  // 测量 当前控件Flowlayout
	// 父类是有义务测量每个孩子的
	@Override
	protected void onMeasure(int widthMeasureSpec, int heightMeasureSpec) {
		// TODO Auto-generated method stub
//		MeasureSpec.EXACTLY;
//		MeasureSpec.AT_MOST;
//		MeasureSpec.UNSPECIFIED;
		mLines.clear();
		currentline=null;
		useWidth=0;
		//先把父容器的模式和尺寸拿出
		int widthMode = MeasureSpec.getMode(widthMeasureSpec);
		int heightMode = MeasureSpec.getMode(heightMeasureSpec);  //  获取当前父容器(Flowlayout)的模式
		width = MeasureSpec.getSize(widthMeasureSpec)-getPaddingLeft()-getPaddingRight();
		int height = MeasureSpec.getSize(heightMeasureSpec)-getPaddingBottom()-getPaddingTop(); // 获取到宽和高
		int childeWidthMode;//子View的模式
		int childeHeightMode;
		//根据表
	    //  为了测量每个孩子 需要指定每个孩子测量规则
	    //如果父容器的模式为精确值,则子view为MeasureSpec.AT_MOST,否则为MeasureSpec.EXACTLY
		childeWidthMode=widthMode==MeasureSpec.EXACTLY?MeasureSpec.AT_MOST:widthMode;
		childeHeightMode=heightMode==MeasureSpec.EXACTLY?MeasureSpec.AT_MOST:heightMode;

		//得到子View的测量规则 模式+尺寸
		int childWidthMeasureSpec=MeasureSpec.makeMeasureSpec(childeWidthMode,  width);
		int childHeightMeasureSpec=MeasureSpec.makeMeasureSpec(childeHeightMode,  height);


		//遍历每个孩子
		for(int i=0;i<getChildCount();i++)	{
			View child=getChildAt(i);
			System.out.println("孩子的数量:"+getChildCount());
			// 测量每个孩子
			child.measure(childWidthMeasureSpec, childHeightMeasureSpec);
			}
			}
5.测量步骤
(1).先把父容器的模式和宽高度拿出
(2) 测量孩子-模式和宽高:根据父容器模式得出(看表)
//根据表
// 为了测量每个孩子 需要指定每个孩子测量规则
//如果父容器的模式为精确值,则子view为MeasureSpec.AT_MOST,否则为MeasureSpec.EXACTLY
childeWidthMode=widthMode==MeasureSpec.EXACTLY?MeasureSpec.AT_MOST:widthMode;
childeHeightMode=heightMode==MeasureSpec.EXACTLY?MeasureSpec.AT_MOST:heightMode;
//得到子View的测量规则 模式+尺寸----------------以上几步就为了得出子View的模式和尺寸
int childWidthMeasureSpec=MeasureSpec.makeMeasureSpec(childeWidthMode, width);
int childHeightMeasureSpec=MeasureSpec.makeMeasureSpec(childeHeightMode, height);
(3)遍历测量每个孩子
for(int i=0;i<getChildCount();i++) {
View child=getChildAt(i);
System.out.println("孩子的数量:"+getChildCount());
// 测量每个孩子
child.measure(childWidthMeasureSpec, childHeightMeasureSpec);
}
//得到每个孩子的宽高
13.自定义控件的原理
14.分配每个孩子的位置
1.先分行
2.再分位置
15.加上padding后处理
1.把每一行多余的间距控件分给每一个TextView
2. 加Padding
3.总步骤:先测量,再分配
//继承ViewGroup
public class Flowlayout extends ViewGroup {
	private int horizontolSpacing=UiUtils.dip2px(13);//水平间隔
	private int verticalSpacing=UiUtils.dip2px(13);//垂直间隔
	public Flowlayout(Context context) {
		super(context);
	}
	public Flowlayout(Context context, AttributeSet attrs, int defStyle) {
		super(context, attrs, defStyle);
	}
	private Line currentline;// 当前的行
	private int useWidth=0;// 当前行使用的宽度
	private List<Line> mLines=new ArrayList<Flowlayout.Line>();  //当前行集合
	private int width;
	public Flowlayout(Context context, AttributeSet attrs) {
		super(context, attrs);
	}
	// 测量 当前控件Flowlayout
	// 父类是有义务测量每个孩子的
	@Override
	protected void onMeasure(int widthMeasureSpec, int heightMeasureSpec) {
		// TODO Auto-generated method stub
//		MeasureSpec.EXACTLY;
//		MeasureSpec.AT_MOST;
//		MeasureSpec.UNSPECIFIED;
		mLines.clear();
		currentline=null;
		useWidth=0;
		//先把父容器的模式和尺寸拿出
		int widthMode = MeasureSpec.getMode(widthMeasureSpec);
		int heightMode = MeasureSpec.getMode(heightMeasureSpec);  //  获取当前父容器(Flowlayout)的模式
		width = MeasureSpec.getSize(widthMeasureSpec)-getPaddingLeft()-getPaddingRight();
		int height = MeasureSpec.getSize(heightMeasureSpec)-getPaddingBottom()-getPaddingTop(); // 获取到宽和高
		int childeWidthMode;//子View的模式
		int childeHeightMode;
		//根据表
	//  为了测量每个孩子 需要指定每个孩子测量规则
	//如果父容器的模式为精确值,则子view为MeasureSpec.AT_MOST,否则为MeasureSpec.EXACTLY
		childeWidthMode=widthMode==MeasureSpec.EXACTLY?MeasureSpec.AT_MOST:widthMode;
		childeHeightMode=heightMode==MeasureSpec.EXACTLY?MeasureSpec.AT_MOST:heightMode;

		//得到子View的测量规则 模式+尺寸
		int childWidthMeasureSpec=MeasureSpec.makeMeasureSpec(childeWidthMode,  width);
		int childHeightMeasureSpec=MeasureSpec.makeMeasureSpec(childeHeightMode,  height);

		currentline=new Line();// 创建了第一行
		//遍历每个孩子
		for(int i=0;i<getChildCount();i++)	{
			View child=getChildAt(i);
			System.out.println("孩子的数量:"+getChildCount());
			// 测量每个孩子
			child.measure(childWidthMeasureSpec, childHeightMeasureSpec);

			int measuredWidth = child.getMeasuredWidth();
			useWidth+=measuredWidth;// 让当前行加上使用的长度
			if(useWidth<=width){
				currentline.addChild(child);//这时候证明当前的孩子是可以放进当前的行里,放进去
				useWidth+=horizontolSpacing;
				if(useWidth>width){
					//换行
					newLine();
				}
			}else{
				//换行
				if(currentline.getChildCount()<1){
					currentline.addChild(child);  // 保证当前行里面最少有一个孩子
				}
				newLine();
			}

		}
		if(!mLines.contains(currentline)){
			mLines.add(currentline);// 添加最后一行
		}
		int  totalheight=0;
		for(Line line:mLines){
			totalheight+=line.getHeight();
		}
		totalheight+=verticalSpacing*(mLines.size()-1)+getPaddingTop()+getPaddingBottom();

		System.out.println(totalheight);
		//测量完子View后调用
		//父容器宽高
		 setMeasuredDimension(width+getPaddingLeft()+getPaddingRight(),resolveSize(totalheight, heightMeasureSpec));
	}

	private void newLine() {    //创建新的一行
		mLines.add(currentline);// 记录之前的行
		currentline=new Line(); // 创建新的一行
		useWidth=0;
	}

	private class Line{
		int height=0; //当前行的高度
		int lineWidth=0;
		private List<View> children=new ArrayList<View>();
		/**
		 * 添加一个孩子
		 * @param child
		 */
		public void addChild(View child) {
			children.add(child);
			if(child.getMeasuredHeight()>height){ //选择最高的高度
				height=child.getMeasuredHeight();
			}
			lineWidth+=child.getMeasuredWidth();
		}
		public int getHeight() {
			return height;
		}
		/**
		 * 返回孩子的数量
		 * @return
		 */
		public int getChildCount() {
			return children.size();
		}
		public void layout(int l, int t) {
			//把剩余的空间平均分给每一个View对象
			lineWidth+=horizontolSpacing*(children.size()-1); //每一行实际占用的空间
			int surplusChild=0;
			int surplus=width-lineWidth; //每一行剩余的空间
			if(surplus>0){
				surplusChild=surplus/children.size(); //每个View对象分到的大小
			}
			for(int i=0;i<children.size();i++){
				View child=children.get(i);
				//  getMeasuredWidth()   控件实际的大小
				// getWidth()  控件显示的大小
				child.layout(l, t, l+child.getMeasuredWidth()+surplusChild, t+child.getMeasuredHeight());
				l+=child.getMeasuredWidth()+surplusChild;
				l+=horizontolSpacing;
			}
		}

	}


	//重点
	// 分配每个孩子的位置
	@Override
	protected void onLayout(boolean changed, int l, int t, int r, int b) {
		l+=getPaddingLeft();
		t+=getPaddingTop();
		for(int i=0;i<mLines.size();i++){
			Line line=mLines.get(i);
			line.layout(l,t);  //交给每一行去分配
			t+=line.getHeight()+verticalSpacing;
		}
	}

}
TopFragment
public class TopFragment extends BaseFragment {

	private List<String> datas;

	@Override
	public View createSuccessView() {
		ScrollView scrollView=new ScrollView(Uiutils.getContext());
		scrollView.setBackgroundResource(R.drawable.grid_item_bg_normal);
		Flowlayout layout=new Flowlayout(Uiutils.getContext());
		int padding=Uiutils.dip2px(13);
		layout.setPadding(padding, padding, padding, padding);
		//layout.setOrientation(LinearLayout.VERTICAL);// 设置线性布局的方向
		int backColor = 0xffcecece;
		Drawable pressedDrawable=DrawableUtils.createShape(backColor);// 按下显示的图片
		for(int i=0;i<datas.size();i++){
			TextView textView=new TextView(Uiutils.getContext());
			final String str=datas.get(i);
			textView.setText(str);

			Random random=new Random();   //创建随机
			int red = random.nextInt(200)+22;       //随机颜色,去掉白色和黑色
			int green = random.nextInt(200)+22;
			int blue = random.nextInt(200)+22;
			int color=Color.rgb(red, green, blue);//范围 0-255

			GradientDrawable createShape = DrawableUtils.createShape(color); // 默认显示的图片
			StateListDrawable createSelectorDrawable = DrawableUtils.createSelectorDrawable(pressedDrawable, createShape);// 创建状态选择器
			textView.setBackgroundDrawable(createSelectorDrawable);
			textView.setTextColor(Color.WHITE);
			textView.setTextSize(Uiutils.dip2px(9));
			int textPaddingV = Uiutils.dip2px(4);
			int textPaddingH = Uiutils.dip2px(7);
			textView.setPadding(textPaddingH, textPaddingV, textPaddingH, textPaddingV); //设置padding 边距
			textView.setClickable(true);//设置textView可以被点击
			textView.setOnClickListener(new OnClickListener() {  // 设置点击事件

				@Override
				public void onClick(View v) {
					Toast.makeText(Uiutils.getContext(), str, 0).show();
				}
			});
			layout.addView(textView,new LinearLayout.LayoutParams(LayoutParams.WRAP_CONTENT, -2));// -2 包裹内容
		}

		scrollView.addView(layout);
		return scrollView;
	}

	@Override
	protected LoadResult load() {
		TopProtocol protocol=new TopProtocol();
		datas = protocol.load(0);
		return checkData(datas);
	}
}


 2113
2113


 被折叠的 条评论
为什么被折叠?
被折叠的 条评论
为什么被折叠?
 到【灌水乐园】发言


