


之前看了两位android大神关于LayoutInflate.inflate详解,我综合一下两篇文章做了自己的总结。如果觉得我总结的不好或者想看原例请看下面:
郭霖:http://blog.csdn.net/guolin_blog/article/details/12921889
鸿洋_:http://blog.csdn.net/lmj623565791/article/details/38171465
LayoutInflate的inflate方法用于加载R.layout.xxx的布局文件,根据这个布局文件创建一个View实例。有以下几种重载的方式:
| inflate(int resource, ViewGroup root) | |
| inflate(int resource, ViewGroup root, boolean attachToRoot) | |
| inflate(XmlPullParser parser, ViewGroup root) | |
| inflate(XmlPullParser parser, ViewGroup root, boolean attachToRoot) |
几种方法都是调用inflate(XmlPullParser parser, ViewGroup root, boolean attachToRoot)方法。
public View inflate(XmlPullParser parser, ViewGroup root,boolean attachToRoot) {
synchronized(mConstructorArgs) {
finalAttributeSet attrs = Xml.asAttributeSet(parser);
mConstructorArgs[0] = mContext;
View result =root;
try {
inttype;
while((type = parser.next()) != XmlPullParser.START_TAG &&
type != XmlPullParser.END_DOCUMENT) {
}
if (type!= XmlPullParser.START_TAG) {
throw new InflateException(parser.getPositionDescription()
+ ": No start tag found!");
}
finalString name = parser.getName();
if(TAG_MERGE.equals(name)) {
if (root == null || !attachToRoot){
throw new InflateException("merge can be used only with a validViewGroup root and attachToRoot=true");
}
rInflate(parser, root, attrs);
} else {
Viewtemp = createViewFromTag(name, attrs);
ViewGroup.LayoutParams params = null;
if (root != null) {
params = root.generateLayoutParams(attrs);
if (!attachToRoot) {
temp.setLayoutParams(params);
}
}
rInflate(parser, temp, attrs);
if (root != null &&attachToRoot) {
root.addView(temp, params);
}
if (root == null || !attachToRoot) {
result = temp;
}
}
} catch(XmlPullParserException e) {
InflateException ex = new InflateException(e.getMessage());
ex.initCause(e);
throwex;
} catch(IOException e) {
InflateException ex = new InflateException(
parser.getPositionDescription()
+ ": " + e.getMessage());
ex.initCause(e);
throw ex;
}
returnresult;
}
}
对于inflate的实现过程和几个重载方法的区别主要在红色代码和蓝色代码部分。
◎实现过程:首先通过while循环用pull解析器parser.next()获得xml文件的标签类型(或称节点,如Button、TextView等)判断xml文件是否合法。
再name=parser.getName();获得标签名。不同标签代表了不同的组件类。使用temp=createViewFromTag(name, attrs) 根据标签名和参数创建View对象,在createViewFromTag()方法的内部又会去调用createView()方法,然后使用反射的方式创建出View的实例并返回。
这样createViewFromTag等到的时一个根布局,还需要创建这个根标签下子标签的组件。此时调用rInflate(parser, temp, attrs)将布局文件、根布局、布局参数都传入。这是一个递归调用自身的方法。目的是递归的将根View(temp)下的子View实例化并addView到其父View中。
这样,把整个布局文件都解析完成后就形成了一个完整的DOM结构,最终会把最顶层的根布局返回,至此inflate()过程全部结束。
◎几个重载方法的区别:主要是区别ViewGrouproot和boolean attachToRoot的null/非null和true/false不同组合时的返回结果。
首先inflate方法返回的是View result,并且初始化引用了root。接下来会创建一个布局参数ViewGroup.LayoutParamsparams=null。
当root不为null,会用root.generateLayoutParams(attrs)实例化params。若root=null,inflate返回的result指向temp,所以此时返回的View的布局参数(getLayoutParams())为null,attachToRoot也没有意义。
接下来,当root!=null,若attachToRoot=false,就将temp的布局参数设为params(temp.setLayoutParams(params))。而若attachToRoot=true,就把temp添加到root组件中,作为嵌套在temp外面的一层布局。
总结一下几种inflate方法的区别:
Øinflate(resId , null ) 只创建temp ,返回temp。
Øinflate(resId , parent, false )创建temp,然后执行temp. setLayoutParams(params);返回temp。
Øinflate(resId , parent, true ) 创建temp,然后执行root.addView(temp,params);最后返回root。
假设resId布局文件只有一个Button组件(button_layout.xml):
<Button xmlns:android="http://schemas.android.com/apk/res/android"
   xmlns:tools="http://schemas.android.com/tools"
   android:id="@+id/id_btn"
   android:layout_width="120dp"
   android:layout_height="120dp"
   android:text="Button" >
</Button>
使用以下方式在Activity中显示:
(1)
protected void onCreate(Bundle savedInstanceState) {
        super.onCreate(savedInstanceState);
        setContentView(R.layout.activity_main);
        mainLayout = (LinearLayout) findViewById(R.id.main_layout);
        LayoutInflater layoutInflater = LayoutInflater.from(this);
        View buttonLayout = layoutInflater.inflate(R.layout.button_layout, null);  //①
        mainLayout.addView(buttonLayout);
    }
其中main_layout是一个只有一个LinearLayout的布局文件。上面是将把Button动态添加到mainLayout中,其中使用的是inflate(resId , null )方法。此时显示的效果是
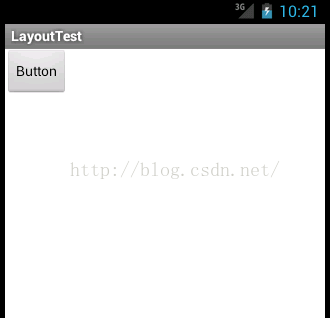
图1
而若将①改为layoutInflater.inflate(R.layout.button_layout, mainLayout,false);显示如下
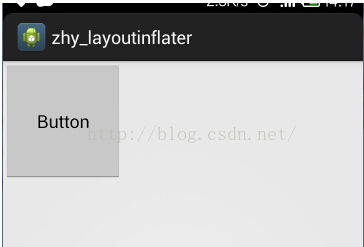
图2
这是因为root的存在,调用setLayoutParams(params)使得resId的layout_height和layout_width有效。
(2)接下来换一种显示方式
protected void onCreate(Bundle savedInstanceState)
    {
       super.onCreate(savedInstanceState);
        mInflater =LayoutInflater.from(this);
         Viewview1 = mInflater.inflate(R.layout.button_layout, null);
        View view2 =mInflater.inflate(R.layout.button_layout,
               (ViewGroup)findViewById(android.R.id.content), false);
        View view3 =mInflater.inflate(R.layout.button_layout,
               (ViewGroup)findViewById(android.R.id.content), true);
} 运行结果view1、view2的并不能显示,而view3可以显示。这是因为view3的root是Activity的内容区域:即android.R.id.content,是一个FrameLayout,我们在setContentView(resId)时,其实系统会自动为了包上一层FrameLayout(id=content)!并且view3的attachToRoot=true,所以虽然没有调用setContentView,还是能将view3 addView到android.R.id.content的FrameLayout根View上!
所以如果在Activity中使用setContentView(R.layout.button_layout)同样会显示图2的效果。


 1117
1117


 被折叠的 条评论
为什么被折叠?
被折叠的 条评论
为什么被折叠?
 到【灌水乐园】发言


