


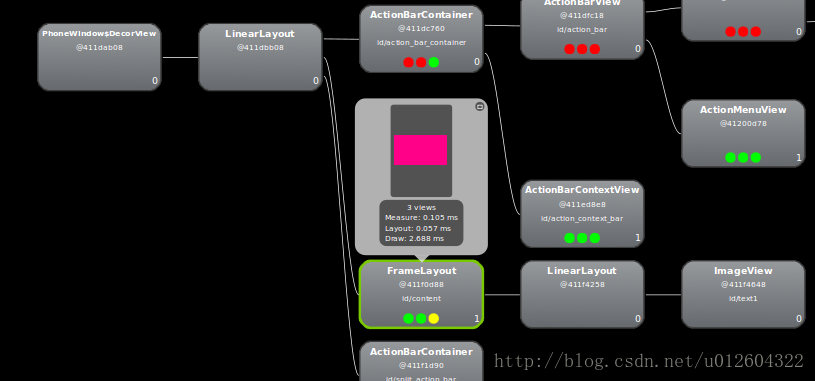
如上图所示,几乎所有的Activity的视图树都是从PhoneWindow$DecorView——>LinearLayout——>FrameLayout(id/content)开始的,接下来的内容才是我们在layout中定义的视图的开始,现在从源码中看看这样的结构是怎么形成的。
Activity视图加载总是从setContentView()开始的:
    public void setContentView(int layoutResID) {
        getWindow().setContentView(layoutResID);
        initActionBar();
    }


    public Window getWindow() {
        return mWindow;
    }
    public void setContentView(View view, ViewGroup.LayoutParams params) {
        if (mContentParent == null) {
            installDecor();
        } else {
            mContentParent.removeAllViews();
        }
        mContentParent.addView(view, params);
        final Callback cb = getCallback();
        if (cb != null && !isDestroyed()) {
            cb.onContentChanged();
        }
    }

...

    private void installDecor() {
        if (mDecor == null) {
            mDecor = generateDecor();
            mDecor.setDescendantFocusability(ViewGroup.FOCUS_AFTER_DESCENDANTS);
            mDecor.setIsRootNamespace(true);
            if (!mInvalidatePanelMenuPosted && mInvalidatePanelMenuFeatures != 0) {
                mDecor.postOnAnimation(mInvalidatePanelMenuRunnable);
            }
        }
        if (mContentParent == null) {
            mContentParent = generateLayout(mDecor);

...

    protected DecorView generateDecor() {
        return new DecorView(getContext(), -1);
    }
generateLayout(mDecor)函数则揭示了文章开始提到的问题
    protected ViewGroup generateLayout(DecorView decor) {

...

 } else if ((features & (1 << FEATURE_ACTION_MODE_OVERLAY)) != 0) {
            layoutResource = com.android.internal.R.layout.screen_simple_overlay_action_mode;
        } else {
            // Embedded, so no decoration is needed.
            layoutResource = com.android.internal.R.layout.screen_simple;
            // System.out.println("Simple!");
        }

        mDecor.startChanging();

        Trace.traceBegin(Trace.TRACE_TAG_VIEW, "DecorView-inflate");
        View in = mLayoutInflater.inflate(layoutResource, null);
        Trace.traceEnd(Trace.TRACE_TAG_VIEW);
        decor.addView(in, new ViewGroup.LayoutParams(MATCH_PARENT, MATCH_PARENT));

        ViewGroup contentParent = (ViewGroup)findViewById(ID_ANDROID_CONTENT);

...

        return contentParent;
<LinearLayout xmlns:android="http://schemas.android.com/apk/res/android"
    android:layout_width="match_parent"
    android:layout_height="match_parent"
    android:fitsSystemWindows="true"
    android:orientation="vertical">
    <ViewStub android:id="@+id/action_mode_bar_stub"
              android:inflatedId="@+id/action_mode_bar"
              android:layout="@layout/action_mode_bar"
              android:layout_width="match_parent"
              android:layout_height="wrap_content" />
    <FrameLayout
         android:id="@android:id/content"
         android:layout_width="match_parent"
         android:layout_height="match_parent"
         android:foregroundInsidePadding="false"
         android:foregroundGravity="fill_horizontal|top"
         android:foreground="?android:attr/windowContentOverlay" />
</LinearLayout>
        View in = mLayoutInflater.inflate(layoutResource, null);
        Trace.traceEnd(Trace.TRACE_TAG_VIEW);
        decor.addView(in, new ViewGroup.LayoutParams(MATCH_PARENT, MATCH_PARENT));
这段内容表明了decor是视图树的根视图,然后是根据不同特征加载的不同的layout,然后才是我们自己的layout。
总结上述内容,我们要关注的是DecorView对象是如何成为视图树的根(唯一)的,以及接下来的视图是如何展开的,并且还要主义id/content是什么。


 16
16


 被折叠的 条评论
为什么被折叠?
被折叠的 条评论
为什么被折叠?
 到【灌水乐园】发言


