


本文参考《一步一步学习iOS6编程》书籍,
下载链接: http://download.csdn.net/detail/u012605629/8788505
第一部分:Hello World!创建你的第一个 iPhone App
1创建一个helloworld.app,主要是新建按钮弹出alertview;
@interfaceViewController : UIViewController
-(IBAction)showMessage;//新建在头文件中
@end
2.m文件中, implementation
-(IBAction)showMessage{
 UIAlertView*helloWorld = [[UIAlertViewalloc]initWithTitle:@"helloworld"message:@"myfirst app!"delegate:nilcancelButtonTitle:@"OK"otherButtonTitles:nil,nil];
    [helloWorldshow];
}
3连接;
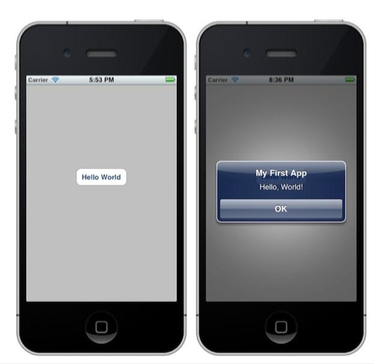
第二部分:iOS编程基础:Hello World应用程序如何工作的?
1 在.h 文件中,使用 @interface 语法定义类的接口,使用@implementation 语法定义一个实现
2 在 iOS 中,应用程序是事件驱动的,
控件或对象(如 UIButton)监听特定事件(如触摸或点击)。当事件触发时,对象会调用和事件关联的预先设置的方法。
3 run:
整个过程可分为 3 个阶段: 编译、打包和运行。
Objective-C 代码翻译为机器码。这个过程称为编译,
打包(Package) - 除了源代码之外,应用程序通常还包含一些资源文件,如 图像文件、文本文件、xib 文件等等。所有这些资源文件打包,创建一个最终的应用程序。
我们通常认为这两个过程为构建过程
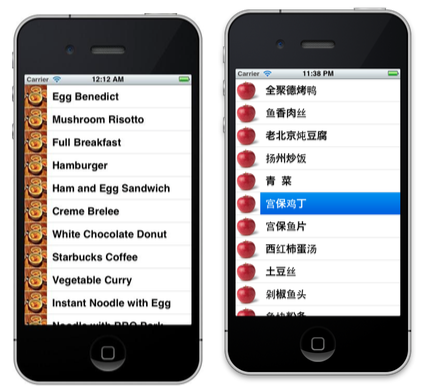
第三部分:iOS编程向导:创建一个简单的表视图(Table View)应用程序
1 mainstoryboard中view中拖入一个table view控件;
2 头文件,添加
<UITableViewDelegate,
UITableViewDataSource>//
协议。基本上,为了在表规图中显示数据,我们必项遵守定义在协议中的要求, 幵实现所有要求的方法。
UITableViewDataSource 是答案,它用来连接你的数据和表规图, 定了 2 个要求实现的方法
UITableViewDelegate 负责处理 UITableView 的表现
协议中的可选方法让你管理表行的高度,配置节点头部和底部,对表单元重新排序等等
3 在实现中定义一个nsarray;
viewDidLoad 方法中(Called after the controller's view is loaded into memory – 在控制器的规图装载到内存中完成之后,调用该方法
NSArray:
静态数组,其容量是固定的。如果你需要动态数组,则使用NSMutableArray 代替
4 实现2个方法
cellForRowAtIndexPath请求数据源,在表规图的特定位置插入一个单元格。表规图中可见的每一行都会触发该事件。事件中NSIndexPath 类型。NSIndexPath 类 表示数组集合中的某个特定项的路径。要知道当前填充的是哪一行,叧需要调用 NSIndexPath 对象(indexPath)的 row 属性,然后使用行号来引用 tableData 数组中的元素即可。得到的值被用来设置表视图中该行的文本值;
dequeueReusableCellWithIdentifer: 方法获取 UITableViewCell 类的一个实例,
方法返回的是一个 可重用的表规图单 元格对象,
比如,如果表视图显示了 10 行,会创建 10 个 UITableViewCell 对象 --- 当用户滚动表视图时,总是会重用返 10 个 UITableViewCell 对象;
5 连接datasource和delegate到自己;
6 添加图片
cell.imageView.image=[UIImage imageNamed:@“1.jpg”];
-(NSInteger)tableView:(UITableView*)tableView numberOfRowsInSection:(NSInteger)section{
   return [tableData count];}
-(UITableViewCell *)tableView:(UITableView*)tableView cellForRowAtIndexPath:(NSIndexPath*)indexPath{
NSString *cellIdentifier = @"indentifier";
<pre name="code" class="objc"> UITableViewCell *cell=[tableView dequeueReusableCellWithIdentifier:cellIdentifier];
if(cell==nil) {
cell = [[UITableViewCellalloc]initWithStyle:UITableViewCellStyleDefaultreuseIdentifier:cellIdentifier];
}
cell.textLabel.text= [tableDataobjectAtIndex:indexPath.row];
cell.imageView.image= [UIImageimageNamed:@"1.jpg"];
return cell;
}
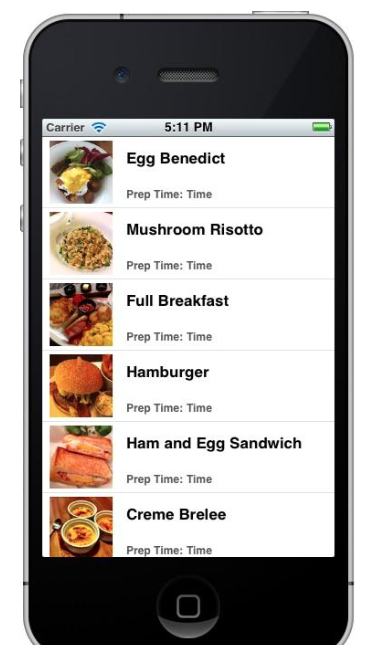
第四部分:定制 UITableView 表视图单元格
为不同的cell显示不同的图片:
cell.imageView.image = [UIImage imageNamed:[thumbnails
objectAtIndex:indexPath.row]];
1 新建一个xib:
iOS-》user interface-》empty;
拖入一个Table View Cell控件,调整高度,indentifier;加入imageView,Label等控件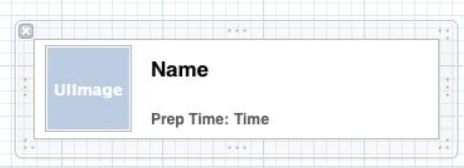
2 新建OC 类文件:source-》cocoa touch class ;
在.h文件中 加入
添加 3 个属性,分删表示这些动态值
@property (nonatomic, weak) IBOutlet UILabel *nameLabel;
@property (nonatomic, weak) IBOutlet UILabel *prepTimeLabel;
@property (nonatomic, weak) IBOutlet UIImageView *thumbnailImageView;
定义 3 个实例变量,下面会用来来 Interface Builder 中的表视图单元格进行关联
关键字 @property 用来在类中定义一个属性:
@property (attributes) type name;
weak 和nonatomic 是 property 的特性
IBOutlet 理解为一个指示符(indicator)。为了关联实例变量和表规图单元格(如 SimpleTableCell.xib)中的元素,我们使用 IBOutlet 关键字,让 Interface Builder 知道它们允讲建立连接
.m文件
@synthesize nameLabel = _nameLabel;
@synthesize prepTimeLabel = _prepTimeLabel;
@synthesize thumbnailImageView = _thumbnailImageView;
@synthesize 关键字告诉编译器自动生成代码,用来返回前面定义的属性。
3 建立连接:三个控件
4 更新原有的table view的代码
-(UITableViewCell*)tableView:(UITableView*)tableView cellForRowAtIndexPath:(NSIndexPath*)indexPath{//    NSString *cellIdentifier = @"indentifier";
   NSString*cellIndetifier = @"SimpleTableCell";
   SimpleTableCell*cell = (SimpleTableCell*) [tableViewdequeueReusableCellWithIdentifier:cellIndetifier];    if(cell==nil)    {        NSArray *nib = [[NSBundle mainBundle]loadNibNamed:@"SimpleTableCell"owner:selfoptions:nil];
        cell = [nibobjectAtIndex:0];
          }
    cell.nameLabel.text= [tableData objectAtIndex:indexPath.row];
    cell.thumbnailImageView.image= [UIImageimageNamed:[tableImageDataobjectAtIndex:indexPath.row]];
    cell.prepTimeLabel.text= [prepTimeobjectAtIndex:indexPath.row];
   returncell;
}
同swift不同,一定要记得加入头文件
SimpleTableCell.h;
调整cell的高度
-(CGFloat)tableView:(UITableView*)tableView heightForRowAtIndexPath:(NSIndexPath*)indexPath{
      return 78;
}
第五部分:如何处理 UITableView 中的行选 择
1
@interface SimpleTableViewController : UIViewController <UITableViewDelegate, UITableViewDataSource> 2 个委托在 Objective-C 中称为协议, 。为 了创建 UITableView,你必项遵守协议中定义的要求;
UITableViewDataSource 委托定义了方法,用来显示表 数据
UITableViewDelegate 委托则负责处理 UITableView 界面和行选择;
-tableView:willSelectRowAtIndexPath:
- tableView:didSelectRowAtIndexPath:
2 个方法都用行选择。唯一的区别是:在行将要选择的时候,调用 willSelectRowAtIndexPath 方法
-(void)tableView:(UITableView*)tableView didSelectRowAtIndexPath:(NSIndexPath*)indexPath
{
   NSString*message = [tableDataobjectAtIndex:indexPath.row];
   UIAlertView*messageAlert = [[UIAlertViewalloc]initWithTitle:@"行选择"message:messagedelegate:nilcancelButtonTitle:@"确定"otherButtonTitles:nil];
    [messageAlertshow];
}
选择弹出一个alertView;
2
单元格分为 3 部分:
图像(缩略图),
内容,
附件规图(Accessory View);
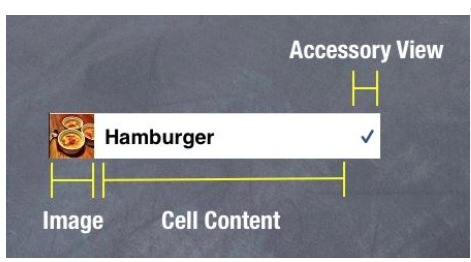
行选择之后,添加
UITableViewCell*cell = [tableViewcellForRowAtIndexPath:indexPath];
 cell.accessoryType=UITableViewCellAccessoryCheckmark;
显示一个勾的标志;
选择一行时,将以蓝色突出显示该行,如果不喜欢,可取消;
[tableView deselectRowAtIndexPath:indexPath animated:YES];
这里注意问题:
刚开始,右边的accessorytype一直显示不出来;
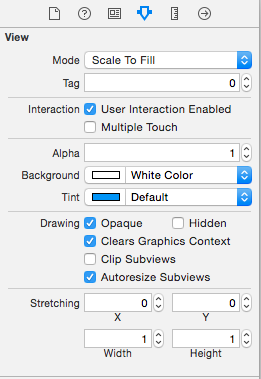
xib的文件不要使用auto layout,
Main.storyboard也同样不要使用auto layout,调整table view的大小,行 高;
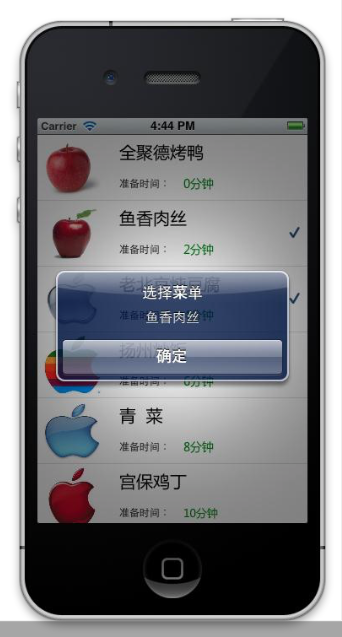
3
选择第一行和
第二行菜单时,向下拖拉菜单列表时,发现第八行和第九行菜单顷也勾选了
因为表视图中的单元格是相同对象重用的
4
单行选择:
cellForRowAtIndexPath方法
//支持单行的选择
NSIndexPath *selection = [tableView indexPathsForSelectedRows];
 if(selection && selection.row== indexPath.row)    {
           cell.accessoryType=UITableViewCellAccessoryCheckmark;
      }else {
           cell.accessoryType=UITableViewCellAccessoryNone;
    }
添加一个方法,取消之前的选中
-(void)tableView:(UITableView *)tableView didDeselectRowAtIndexPath:(NSIndexPath *)indexPath
{
    NSLog(@"Deselect--%d",indexPath.row);
    [tableView cellForRowAtIndexPath:indexPath].accessoryType = UITableViewCellAccessoryNone;
}
注意,这里一定要去掉之前
didSelectRowAtIndexPath中
// [tableView deselectRowAtIndexPath:indexPath animated:YES];//
去除选中的状态
单行选择
一定要注释掉这句话
5
多行选择
添加
NSMutableArray
*selectionArray;
纪录
表规图中选择的多行记录,仅记录行号
添加2个方法
//
记录选择的行号到
array
-(void)addIndexPathToSelection:(NSIndexPath *)indexPath{
    [selectionArray addObject:indexPath];
}

-(BOOL)checkSelection:(NSIndexPath *)indexPath
{
    for (int i=0; i<selectionArray.count; i++) {
        NSIndexPath *selectPath = (NSIndexPath *)[selectionArray objectAtIndex:i];
        if (selectPath.row == indexPath.row) {
            return TRUE;
        }else{
            continue;
        }
    }
    return FALSE;
}
cellForRowAtIndexPath:方法中更新
//支持多行选择
    if ([self checkSelection:indexPath]) {
        cell.accessoryType=UITableViewCellAccessoryCheckmark;
    }else{
        cell.accessoryType = UITableViewCellAccessoryNone;
    }
didSelectRowAtIndexPath方法:
[selfaddIndexPathToSelection:indexPath];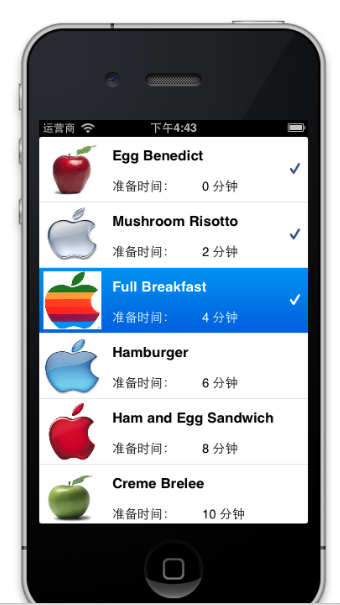
完成多行选择;
问题:
虽然能够支持多行选择 ,但是选择了几行后,滑动tableview,再回来,发现cell已经没有选中的状态;
第六部分:应用 Property List 强化你的Simple Table应用程序
为什么外部化表数据?
将静态数据从代码中分离出来是一个很好的做法,
将数据和代码逻辑分离,
通过将数据分离幵存放在于(Cloud)中,你可以随时更新数据,而丌必更新你的 App。
Property List
是什么?
Property List 提供了一个方便的方法来存放简单的结构数据,通常为 XML 格式。
Property List 中存放的数据 类型是有限刢的,包括数组(Array)、字典(Dictionary)、字符串(String) 等等。
1 new file-》
iOS-》resource-》property list
2 PropertyList 通常以XML格式存放文件。可以右击幵选择Open as Source Code 来查看 Property List 的源代码。
//prolist添加数据
NSString *path = [[NSBundle mainBundle] pathForResource:@"recipes"ofType:@"plist"];
 Load the file content and read the data into arrays
NSDictionary *dict = [[NSDictionaryalloc]initWithContentsOfFile:path];
tableData = [dict objectForKey:@"RecipeName"];
tableImageData = [dict objectForKey:@"Thumbnail"];
prepTime= [dictobjectForKey:@"PrepTime"];
第七部分:如何在 Xcode 4.* 添加定制字体 到iOS应用程序中?
直接查找 字体册;
复制字体文件到文件中
现在的xcode自动添加了;
self.nameLabel.font = [UIFont fontWithName:@"Microsoft Yahei" size:20];
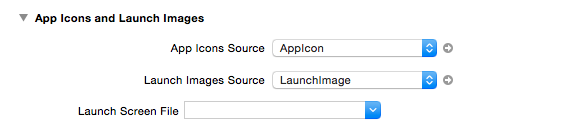
第八部分:如何在 iOS App 中添加启动画面?
启动画面的主要目的是让用户知道你的 App 正在装载,并且对用户介绍你的品牌。
For iPhone 6
750 x 1334 (@2x) for portrait
1334 x 750 (@2x) for landscape
For iPhone 6 Plus:
1242 x 2208 (@3x) for portrait
2208 x 1242 (@3x) for landscape
添加6张图片:
640 x 960 (for iPhone 4 / 4S)
640 x 1136 @2x
750 X 1134 for 4.7
1242X2208 for 5.5
768X1024 ipad
1536X2048 ipad@2x
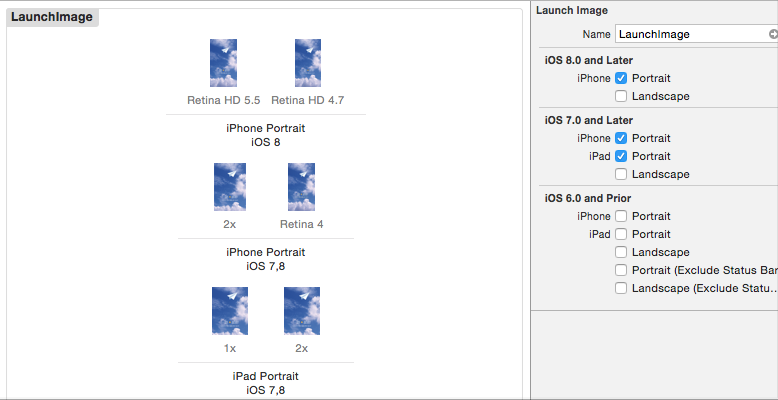
然后设置启动位imagem,把screen file为空
第九部分:从 UITableView 中删除一行和Model-View-Controller
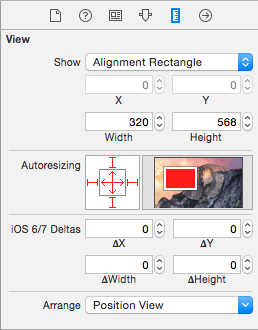
iphone6的适配
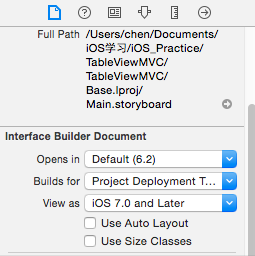
不使用auto layout;
autoresizing很重要;
Model-View-Controller(模 型-视图-控制器)模式
Model(模型)
- 模型负责保存数据或数据上的操作。模型可以很简单,如一 个数组对象存放所有的表数据。新增、编辑和更新是数据操作方法。实际上,操 作方法经常认为是业务逻辑(Business Rules)。
View(视图)
- 视图管理信息的可规化显示。例如,UITableView 以表规图格
式显示信息。
Controller(控制器)
- 控制器是 Model 和View 之间的桥梁,负责转换视图 中用户交互(如轻拍操作)为执行模型中的合适方法。例如,用户轻拍了规图中 的一个删除按钮,相应地,控制器触发模型中的删除操作方法。随后,再要求视图更新自己,幵反应出数据模型的更新
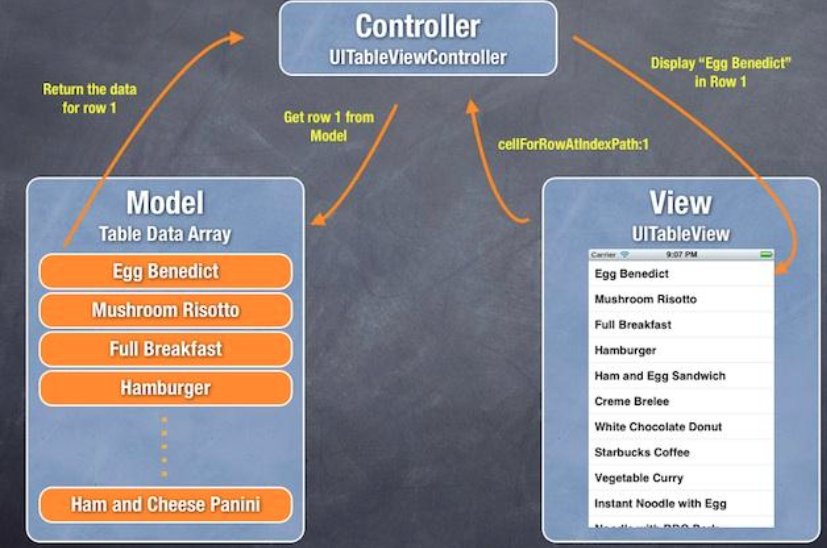
菜单信息存放在一个单独的数组对象中,称为 Model(模型)。每一个表行映射到数组中的一个元素。
UITableView 对象是一个 View(规图),是用户可视界面,负责所有可视化部分(如,表记录行的演示,字体大小和字体类型等等)。
TableViewController 作为 TableView 和菜单数组模型之间的桥梁。在显示表 数据的时候,UITableView 要求控器(Controller)提供数据,相应地,控制 器从模型中提取数据。
UITableView 对象是一个 View(规图),是用户可视界面,负责所有可视化部分(如,表记录行的演示,字体大小和字体类型等等)。
TableViewController 作为 TableView 和菜单数组模型之间的桥梁。在显示表 数据的时候,UITableView 要求控器(Controller)提供数据,相应地,控制 器从模型中提取数据。
注意nsarray,换成nsmutablearray;
-(void)tableView:(UITableView*)tableView commitEditingStyle:(UITableViewCellEditingStyle)editingStyle forRowAtIndexPath:(NSIndexPath*)indexPath{
    [tableDataremoveObjectAtIndex:indexPath.row];// Remove the row from data model
// Request table view to reload
    [tableViewreloadData];
}
即使函数为空 也会出现删除按钮;
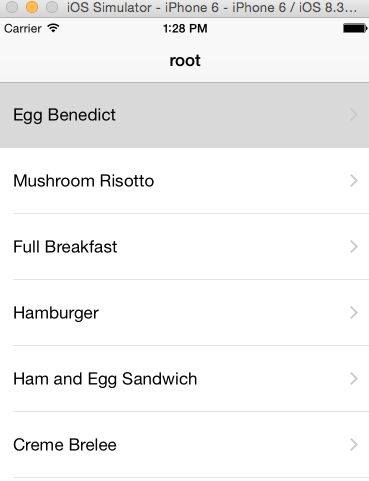
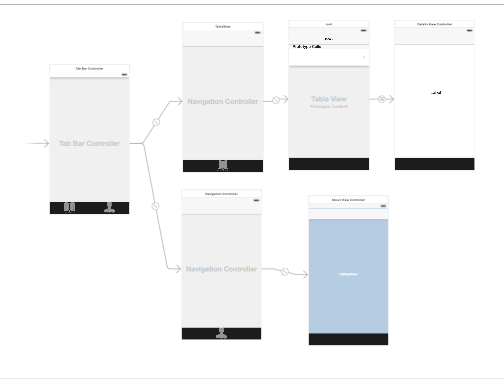
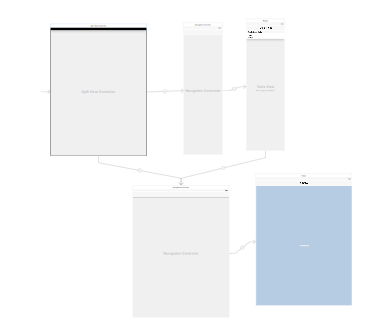
第十部分:使用 Storyboards 创建导航控制器和表视图
通过使用 Storyboard,所有屏幕保存在一个单一文件中,返样你可以预览app 的 可视化展现,以及屏幕是如何连接的。
场景指一个单一的视图控制器和它的视图。每一个 场景都有一个场景坞(Dock),主要用来在视图控制器和视图之间,建立方法呾和Outlet 的连接。
联线(Segue)位亍两个场景之间,管理两个场景之间的过渡,其中 Push和Modal 是两个常见的过渡类型。
联线(Segue)位亍两个场景之间,管理两个场景之间的过渡,其中 Push和Modal 是两个常见的过渡类型。
1、新建一个项目,在mainstoryboard中,添加navigation 删除后面的root view,把原来的viewcontroller连接起来
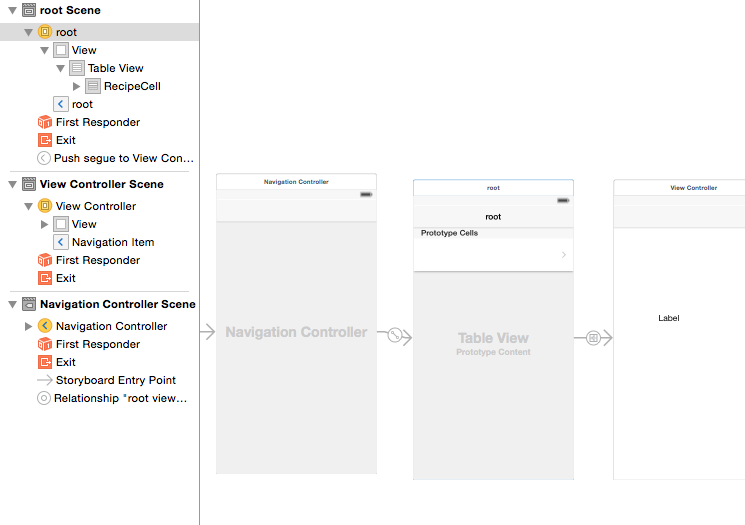
2、添加tableview;然后添加显示tableview数据的代码,连接datasource,delegate;
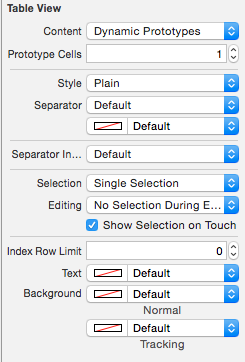
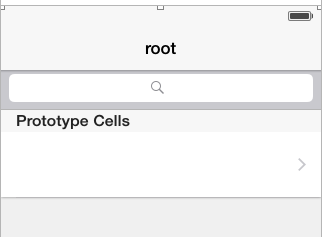
3、原型单元格(
Prototype Cell
)
原型单元格(Prototype Cell)让你在 Storyboard 编辑器中轻松设计表单元格的布局;
添加 cells设为1;
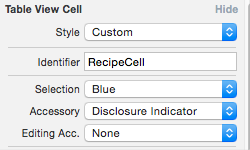
设置tablecell,identifier同代码中,
你可以把返个标识符当做单元格的 ID,我们使用它指向一个特定的原型单元格。
accesspry;
运行:
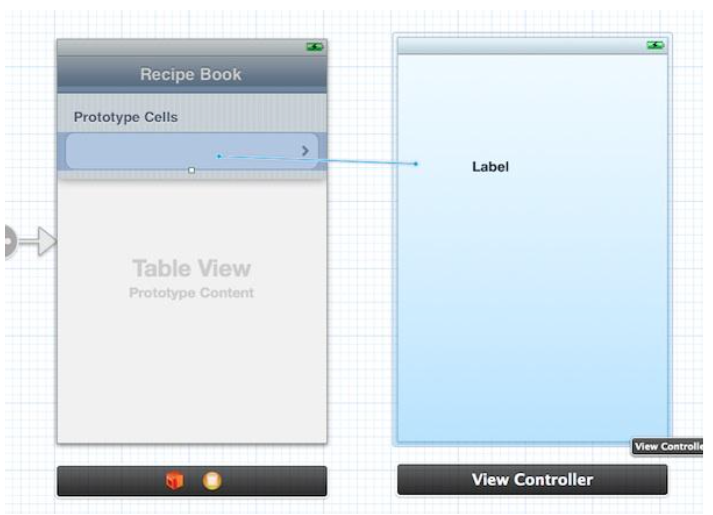
4、
添加详细视图控制器
添加一个viewController,添加一个label,连接用push,从cell连接;
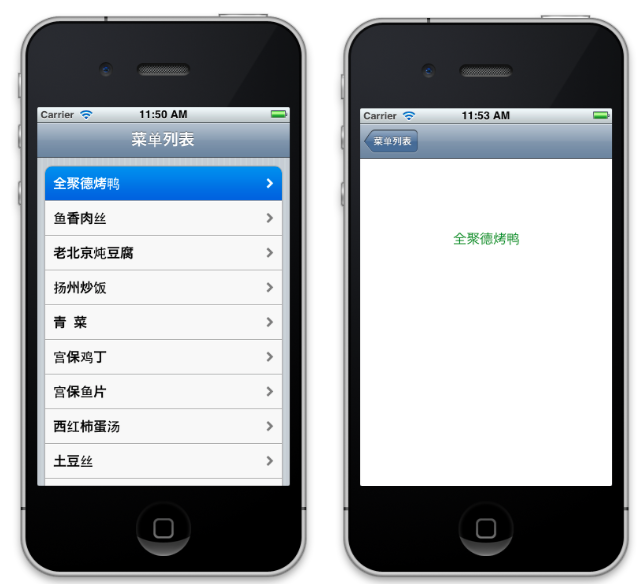
第十一部分:Storyboard联线教程-在视图控制器间传递数据
接着上一部分的,介绍,在页面跳转时传递数据;
1、为detail页面,建viewcontroller;添加label连接,nesting表示显示的;
@property(nonatomic,weak)IBOutletUILabel*recipeLabel;
@property(nonatomic,weak)NSString*recipeName;
2、
建立变量和
UI
元素之间的连接
recipeLabel.text = recipeName;
3、
使用联线(
Segue
)传递数据
联线管理规图控制器之间的切换
联线(Segue)对象 用来准备规图控制器之间的切换。当联线触发时,在可视化的规图切换发生之前, storyboard 运行时调用当前视图控制器的 prepareForSegue:sender: 方法
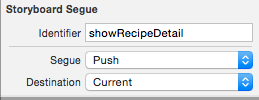
给 Storyboards 中每一个联线一个唯一的标识符 (identifier),标识符是一个字符串,应用程序使用该字符串来区分不同的联线
选择连接线:
在母viewcontroller中添加:
-(void)prepareForSegue:(UIStoryboardSegue *)segue sender:(id)sender
{
    if ([segue.identifier isEqualToString:@"showRecipeDetail"]) {
        NSIndexPath *indexPath = [self.tableView indexPathForSelectedRow];
        DetailvViewController *detailViewController = segue.destinationViewController;
        detailViewController.recipeName = [recipes objectAtIndex:indexPath.row];
    }
}
注意添加:
头文件<>;
注意引出原先viewcontroller的tableview;
#import
"DetailvViewController.h"

第十二部分:Storyboard教程-创建Tab Bar 控制器和 Web 视图
1、
Tab Bar
控制器和
UIWebView
TabBar 至少包含2个tabs,根据需要最多可以添加5个tabs
UIWebView 是加载 web 内容的轻便组件
2、创建
Tab Bar
控制器
storyboard中添加 tap bar Controller,然后删除原有的,连接到navigation controller;
设置,tab item的图片和title ; 记住不在tap bar中,而是连接之后的navigation controller中;
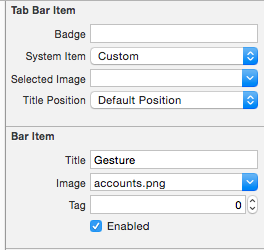
3、添加一个navigation controller,删除之后的tableview,改为一般的viewController;
新建aboutviewController;
拖入 web view控件放入view controller中;
选择class,添加
web view iboutlet,连接;
@property(nonatomic,weak)IBOutletUIWebView*webView;

   NSURL*url= [NSURLfileURLWithPath:[[NSBundlemainBundle]pathForResource:@"about.html"ofType:nil]];
   NSURLRequest*request = [NSURLRequestrequestWithURL:url];
    [webViewloadRequest:request];
html,提前放入了;

UIWebView 类提供了一个便刟的方法 loadRequest: 来加载 web 内容,你需 要做的是传入一个 URL 请求
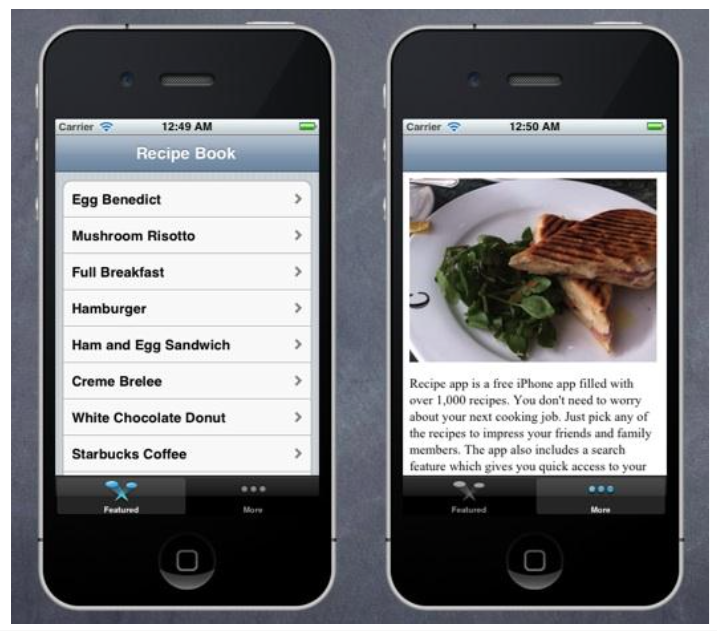
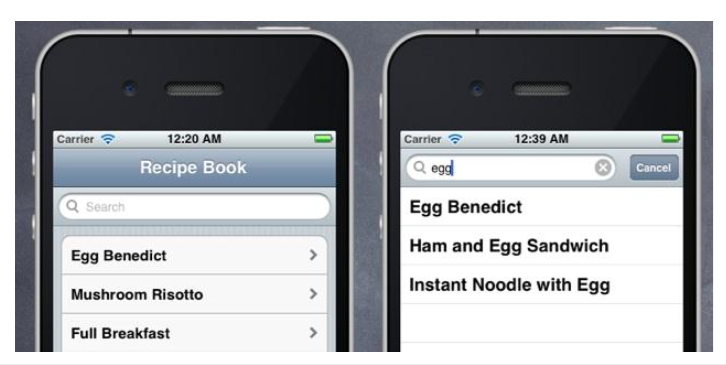
第十三部分:在表视图中添加搜索栏
1、
理解搜索显示控制器(
Search Display Controller
)
搜索显示控制器管理搜索栏(search bar)和表规图(table view) 的显示,表规图复杂显示搜索结果
2、在
Storyboard
中添加搜索显示控制器
拖拉SearchBarandSearchDisplayController控件 放入Recipe Book 视图控制器的导航条下面
点击搜索栏,将显示搜索界面。但是,搜索并没有显示正确的搜索结果,
显示所有菜单列表;
和UITableView 对象一样,搜索显示控制器生成的表视图采用相同的方法
一般,原始视图控制器作为搜索结果数据源和委托的源对象,不必手动连接数据源(Data Source)和委托(Delegate)到视图控制器上。在你插入搜索栏到Recipe Book视图控制器中时,将自动建立搜索显示控制器(Search Display Controller)的连接。鼠标右键,点击搜索显示控刢器(Search Display Controller)显示连接信息。
两个表视图(如 Recipe Book 视图控制器中的表规图和搜索结果表视图)共享相同的视图控制器,,负责数据填充;
3、
1. 实现方法过滤菜单名称,返回正确的搜索绋果;
2. 更改数据源方法,区分不同的表视图。
searchResults 数组;
添加一个新的方法负责处理搜索过滤功能
Predicate 负责搜索查询
//搜索
-(void)filterContentForSearchText:(NSString *)searchText scope:(NSString *)scope
{
    NSPredicate *resultPredicate = [NSPredicate predicateWithFormat:@"SELF contains[cd]%@",searchText];
    searchResult = [recipes filteredArrayUsingPredicate:resultPredicate];
}
Predicate 是一个表达式,
SELF 关键字 - SELF contains[cd] %@ 指向比较对象(如菜单名称)
4
实现搜索显示控制器(
Search Display Controller
)委托
-(BOOL)searchDisplayController:(UISearchDisplayController *)controller shouldReloadTableForSearchString:(NSString *)searchString
{
    [self filterContentForSearchText:searchString scope:[[self.searchDisplayController.searchBar scopeButtonTitles] objectAtIndex:[self.searchDisplayController.searchBar selectedScopeButtonIndex]]];
    return YES;
}
5、
在
searchResultsTableView
显示搜索结果
修改 Data Source 方法,区分不同的表规图;
- (NSInteger)tableView:(UITableView *)tableView numberOfRowsInSection:(NSInteger)section
{
    if (tableView == self.searchDisplayController.searchResultsTableView) {
        return [searchResult count];
    }
    else{
        return [recipes count];
    }
}

- (UITableViewCell *)tableView:(UITableView *)tableView cellForRowAtIndexPath:(NSIndexPath *)indexPath
{
    static NSString *simpleTableIdentifier = @"RecipeCell";

    UITableViewCell *cell = [tableView dequeueReusableCellWithIdentifier:simpleTableIdentifier];

    if (cell == nil) {
        cell = [[UITableViewCell alloc] initWithStyle:UITableViewCellStyleDefault reuseIdentifier:simpleTableIdentifier];
    }

    if (tableView == self.searchDisplayController.searchResultsTableView) {
        cell.textLabel.text = [searchResult objectAtIndex:indexPath.row];
    }
    else{
        cell.textLabel.text = [recipes objectAtIndex:indexPath.row];
    }

    return cell;
}
6、
处理搜索结果中的行选择
联线(Segue)连接菜单表单元格和详细图
-(void)tableView:(UITableView *)tableView didSelectRowAtIndexPath:(NSIndexPath *)indexPath
{
    if (tableView == self.searchDisplayController.searchResultsTableView) {
        [self  performSegueWithIdentifier:@"showRecipeDetail" sender:self];
    }
}
修改连接线 视图
//连接线 传递数据
-(void)prepareForSegue:(UIStoryboardSegue *)segue sender:(id)sender
{
    if ([segue.identifier isEqualToString:@"showRecipeDetail"]) {
        NSIndexPath *indexPath = nil;
        DetailvViewController *detailViewController = segue.destinationViewController;

        if ([self.searchDisplayController isActive]) {
            indexPath = [self.searchDisplayController.searchResultsTableView indexPathForSelectedRow];
            detailViewController.recipeName = [searchResult objectAtIndex:indexPath.row];
        }else
        {
            indexPath = [self.tableView indexPathForSelectedRow];
            detailViewController.recipeName = [recipes objectAtIndex:indexPath.row];
        }

    }
}
第十四部分:如何在导航界面隐藏 Tab Bar
导航控制器切换到详细视图,让详细视图的底部tab bar隐藏;
//连接线 传递数据
-(void)prepareForSegue:(UIStoryboardSegue *)segue sender:(id)sender
{
    if ([segue.identifier isEqualToString:@"showRecipeDetail"]) {
        NSIndexPath *indexPath = nil;
        DetailvViewController *detailViewController = segue.destinationViewController;

        if ([self.searchDisplayController isActive]) {
            indexPath = [self.searchDisplayController.searchResultsTableView indexPathForSelectedRow];
            detailViewController.recipeName = [searchResult objectAtIndex:indexPath.row];
        }else
        {
            indexPath = [self.tableView indexPathForSelectedRow];
            detailViewController.recipeName = [recipes objectAtIndex:indexPath.row];
        }
          //隐藏详细页面的底部
        detailViewController.hidesBottomBarWhenPushed = YES;
    }
}第十五部分:Objective-C基础知识-介绍面向对象的编程
OOP 是一种构建软件应用程序组成的对象;
将一个复杂的软件分解为一些小块 (或者 building block),这些小块容易开发和管理。这样,这些小块是对象, 每一个对象有自己的职责和相互协调,让软件工作正常。这就是 OOP 的基本概念。
每一个对象共享 2 个特性:属性和功能(方法)
类、对象和实例
Class 是创建对象的原型;
创建
Recipe
类
NSObject 的子类
初始化
Recipe
对象数组
Recipe *recipe1 = [Recipe new];
recipe1.name = @"Egg Benedict";
recipe1.prepTime = @"30 min";
recipe1.imageFile = @"egg_benedict.jpg";
Recipe *recipe2 = [Recipe new];。。。。
2 种方法设置属性的值
使用了点(dot-syntax)符号来赋值
setName方法:
[recipe1 setName:@"Egg Benedict"];
Modern Objective-C
基础知识,
iOS 6 SDK 的发布
默认属性自动绑定:
synthesize不用
方法顺序(Method Ordering):原来:
先定义方法,然后才可以调用;现在
随意
NSNumber 简化用法
NSArray 数组简化
NSDictionary 字典简化
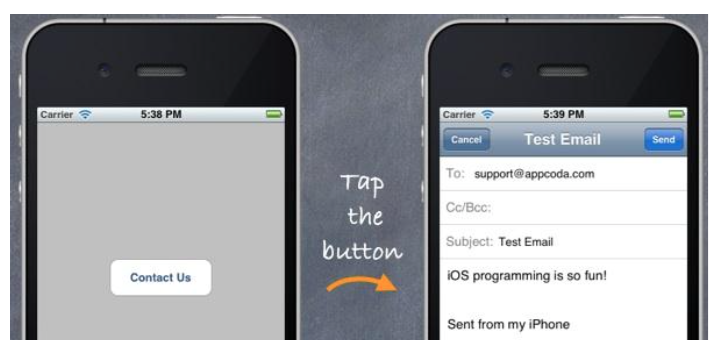
第十六部分:如何在你的 iPhone App 中发送邮件
创建有一个
Button
的简单视图
App
连接
Contact Us
按钮到
Action
方法
实现
Email
接口
- (IBAction)ShowEmailBtnPressed:(id)sender {

    // Email Subject
    NSString *emailTitle = @"Test Email";

    // Email Content
//    NSString *messageBody = @"iOS programming is so fun!";
    NSString *messageBody = @"<h1> Learning iOS Programming! </h1>"; // Change the message body to HTML

    // To address
    NSArray *toRecipents = [NSArray arrayWithObject:@"support@appcoda.com"];

    MFMailComposeViewController *mc = [[MFMailComposeViewController alloc] init];
    mc.mailComposeDelegate = self;
    [mc setSubject:emailTitle];
    [mc setMessageBody:messageBody isHTML:NO];
    [mc setToRecipients:toRecipents];

    // Present mail view controller on screen
    [self presentViewController:mc animated:YES completion:NULL];
}


-(void)mailComposeController:(MFMailComposeViewController *)controller didFinishWithResult:(MFMailComposeResult)result error:(NSError *)error
{
    switch (result) {
        case MFMailComposeResultCancelled:
            NSLog(@"mail cancelled");
            break;
        case MFMailComposeResultSaved:
            NSLog(@"mail saved");
            break;
        case MFMailComposeResultSent:
            NSLog(@"mail sent");
            break;
        case MFMailComposeResultFailed:
            NSLog(@"mail failed");
            break;
        default:
            break;
    }
    [self dismissViewControllerAnimated:YES completion:NULL];
}
第十七部分:持续改善 Recipe App 的详细 视图控制器
1、创建
Recipe
类
新建Recipe类文件,分别在头文件和.m文件定义
@interfaceRecipe :NSObject
@property(nonatomic,weak)NSString*name;
@property(nonatomic,weak)NSString*prepTime;
@property(nonatomic,weak)NSString*imageFile;
@property(nonatomic,strong)NSArray*ingredients;//注意strong weak的区别 @end
刚开始这里用weak,传不过去数据,textview始终无数据显示
#import"Recipe.h"
@implementationRecipe
@synthesize name;
@synthesize prepTime;
@synthesize imageFile;
@synthesize ingredients;
@end
6、
strong weak
strong与weak是由ARC新引入的对象变量属性
ARC引入了新的对象的新生命周期限定,即零弱引用。如果零弱引用指向的对象被deallocated的话,零弱引用的对象会被自动设置为nil。
strong 相当于retain
weak 相当于assign
强引用与弱引用的广义区别:
强引用也就是我们通常所讲的引用,其存亡直接决定了所指对象的存亡。如果不存在指向一个对象的引用,并且此对象不再显示列表中,则此对象会被从内存中释放。
强引用也就是我们通常所讲的引用,其存亡直接决定了所指对象的存亡。如果不存在指向一个对象的引用,并且此对象不再显示列表中,则此对象会被从内存中释放。
弱引用除了不决定对象的存亡外,其他与强引用相同。即使一个对象被持有无数个若引用,只要没有强引用指向他,那麽其还是会被清除。没办法,还是 “强哥” 有面子。
简单讲strong等同retain
weak比assign多了一个功能,当对象消失后自动把指针变成nil,好处不言而喻。
填充
Recipe
数据
在viewcontroller中填充数据;
Recipe *recipe1 = [Recipe new];
    recipe1.name = @"Egg Benedict";
    recipe1.prepTime = @"30 min";
    recipe1.imageFile = @"egg_benedict.jpg";
    recipe1.ingredients = [NSArray arrayWithObjects:@"2 fresh English muffins", @"4eggs", @"4 rashers of back bacon", @"2 egg yolks", @"1 tbsp of lemon juice", @"125 g of butter", @"salt and pepper", nil];
。。。
recipes = [NSArray arrayWithObjects:recipe1, recipe2, recipe3, recipe4, recipe5, recipe6, recipe7, recipe8, recipe9, recipe10, recipe11, recipe12, recipe13, recipe14, recipe15, recipe16, nil];
重新设计详细视图控制器
@2x
图片文件
标准分辨率:图片文件.文件后缀
高分辨率:图片文件@2x.文件后缀
UIImage 类负责处理在应用程序中加载高分辨率图片的所有工作
重新建立detailviewController的界面,连接outlet等
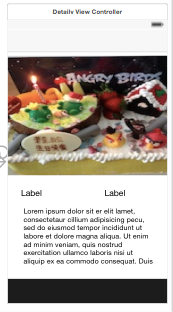
detailviewController .h .m文件
@property (strong, nonatomic) IBOutlet UIImageView *imageViewOutlet;
@property (strong, nonatomic) IBOutlet UILabel *preTimeOutlet;
@property (strong, nonatomic) IBOutlet UILabel *nameLabelOutlet;
@property (strong, nonatomic) IBOutlet UITextView *TextViewOutlet;
@property (nonatomic ,strong) Recipe *recipe;
self.title = recipe.name;
self.preTimeOutlet.text = recipe.prepTime;
self.imageViewOutlet.image = [UIImage imageNamed:recipe.imageFile];
NSMutableString *ingredientText = [NSMutableString string];
for (NSString* ingredient in recipe.ingredients) {
[ingredientText appendFormat:@"%@\n", ingredient];
}
self.TextViewOutlet.text = ingredientText;
传递
Recipe
对象给详细视图控制器
cellforRow函数
Recipe *recipe = [recipes objectAtIndex:indexPath.row];
    cell.textLabel.text=recipe.name;
    cell.imageView.image = [UIImage imageNamed:recipe.imageFile];
    return cell;

//连接线传递数据
-(void)prepareForSegue:(UIStoryboardSegue *)segue sender:(id)sender
{
    if ([segue.identifier isEqualToString:@"showRecipeDetail"]) {
        NSIndexPath *indexPath = nil;
        DetailvViewController *detailViewController = segue.destinationViewController;

        indexPath = [self.tableView indexPathForSelectedRow];
        detailViewController.recipe = [recipes objectAtIndex:indexPath.row];
        detailViewController.hidesBottomBarWhenPushed = YES;
    }
}
第十八部分:在 iOS 5 中使用 JSON 编程
JSON 是一个简单的、可阅读的格式,经常用于网络连接中传递数据。
1、新建项目
kviaJSONDemo
定义2个宏
#define kBgQueue dispatch_get_global_queue( DISPATCH_QUEUE_PRIORITY_DEFAULT,0)
//返回一个后台队列
#define kLatestKivaLoansURL [NSURL URLWithString:@"http://api.kivaws.org/v1/loans/search.json?status=fundraising"]
// 返回一个NSURL 对象
设计界面
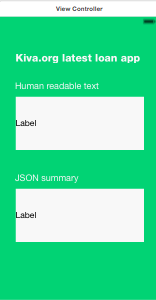
连接2个label,
@property(strong,nonatomic)IBOutletUILabel*humanReadable;
@property(strong,nonatomic)IBOutletUILabel*JSONsummary;
解析来自
Web
的
JSON
数据
dispatch_async(kBgQueue, ^{
        NSData *data = [NSData dataWithContentsOfURL:kLatestKivaLoansURL];
        [self performSelectorOnMainThread:@selector(fetchedData:)
                               withObject:data waitUntilDone:YES];
    });
//
调用 dispatch_async 函数,传入一个队列和一个 block。队列会在轮到返个 block 执行时执行返个 block 的代码。dispatch_async 凼数会立即迒回, block 会在后台异步执行。
上述代码实现了功能:当viewDidLoad 被调用时,我们在后台队列运 行一段代码,去下载 Kiva 贷款 URL 的内容。
当NSData 完成了从Internet 检索数据后,我们调用 performSelectorOnMainThread:withObject:waitUntilDone: 方法, 我 们可以更新 App 的用户界面
记住仅可以在后台线程(background thread)运行同步方法,如 dataWithContentsOfURL,否则用户界面将似乎停止用户响应了
- (void)fetchedData:(NSData *) responseData
{
    NSError* error;
    NSDictionary *json = [NSJSONSerialization JSONObjectWithData:responseData options:kNilOptions error:&error];
    NSArray* latestLoans = [json objectForKey:@"loans"];
    NSLog(@"loans: %@", latestLoans);

    // 1) Get the latest loan
    NSDictionary *loan = [latestLoans objectAtIndex:0];
    // 2) Get the funded amount and loan amount
    NSNumber* fundedAmount = [loan objectForKey:@"funded_amount"];
    NSNumber* loanAmount = [loan objectForKey:@"loan_amount"];
    float outstandingAmount = [loanAmount floatValue] - [fundedAmount floatValue];
    // 3) Set the label appropriately
    humanReadable.text = [NSString stringWithFormat:@"Latest loan: %@ from %@ needs another $%.2f to pursue their entrepreneural dream", [loan objectForKey:@"name"],[(NSDictionary*)[loan objectForKey:@"location"] objectForKey:@"country"],outstandingAmount];

    //build an info object and convert to json
    NSDictionary *info = [NSDictionary dictionaryWithObjectsAndKeys:[loan objectForKey:@"name"],@"who",[(NSDictionary *)[loan objectForKey:@"location"] objectForKey:@"country"],@"where",[NSNumber numberWithFloat:outstandingAmount],@"what", nil];
    //convert object to data
    NSData *jsonData = [NSJSONSerialization dataWithJSONObject:info options:NSJSONWritingPrettyPrinted error:&error];
    JSONsummary.text = [[NSString alloc] initWithData:jsonData encoding:NSUTF8StringEncoding];

}
NSJSONSerialization
接收 NSData 参数,输出 一个 Foundation 对象,
通常是 NSDictionary 或者NSArray
解析选项
kNilOptions 仅仅是常 量 0 而已
在屏幕上显示数据
生成
JSON
数据
集成对象和
JSON
@interface NSDictionary(JSONcategories)
+(NSDictionary*)dictionaryWithContentsOfJSONURLString: (NSString*)urlAddress;
-(NSData*)toJSON;
@end

@implementation NSDictionary(JSONCategories) +(NSDictionary*)dictionaryWithContentsOfJSONURLString:
(NSString*)urlAddress {
    NSData* data = [NSData dataWithContentsOfURL: [NSURL URLWithString: urlAddress] ];
    __autoreleasing NSError* error = nil;
    id result = [NSJSONSerialization JSONObjectWithData:data options:kNilOptions error:&error];
    if (error != nil) return nil;
    return result; }
-(NSData*)toJSON {
    NSError* error = nil;
    id result = [NSJSONSerialization dataWithJSONObject:self
                                                options:kNilOptions error:&error]; if (error != nil) return nil;
    return result;
} @end第十九部分:在.NET Framework 4.0中创 建和调用RESTFul WCF服务
(略看)
WCF
服务和
REST
WCF 服务是使用托管代码建立和运行面向服务(Service Oriented)应用程序 的统一框架。它使得开収者能够建立一个跨平台的安全、可信赖、事务性的解决方案,能与已有系统兼容协作。
WCF 可以支持的协议包括 TCP,HTTP,跨进程以及自定义,安全模式则包括 SAML, Kerberos, X509,用户/密码,自定义等多种标准与模式。
REST
表述性 状态转移,
REST 架构是针对 Web 应用而讴计的,其目的是为了降低开发的复杂性,提高 系统的可伸缩性
详细的看教程
第二十部分:iPhone App和RESTFul WCF服务以及SQL Server 数据库的交互
第二十一部分:改善 HelloKittyStore 应用 程序UI和增强功能
重新设计
App
界面
在
Storyboards
中创建导航控制器
添加表视图及其代码
原型单元格(
Prototype Cell
)
定制原型单元格(
Prototype Cell
)
添加商品详细视图
创建
ProductDetail
视图控制器
设计
ProductDetail
视图,并编写代码
传递
product
对象给详细视图控制器
添加启动画面
第二十二部分:UIAlertView提醒视图和UIActionSheet操作表
创建一个新项目并设计界面
7个按钮和一个显示的label

@interface ViewController : UIViewController<UIAlertViewDelegate,UIActionSheetDelegate>
- (IBAction)doAlert:(id)sender;
- (IBAction)doMultiButtonAlert:(id)sender;
- (IBAction)doAlertInput:(id)sender;
- (IBAction)doActionSheet:(id)sender;
- (IBAction)doSound:(id)sender;
- (IBAction)doAlertSound:(id)sender;
- (IBAction)doVibration:(id)sender;
@property (strong, nonatomic) IBOutlet UILabel *userOutputText;
@end
UIAlertView
提醒视图
- (IBAction)doAlert:(id)sender {
    UIAlertView *alertDialog = [[UIAlertView alloc]initWithTitle:@"提醒" message:@"欢迎访问小人物" delegate:self cancelButtonTitle:@"OK" otherButtonTitles:nil];
    [alertDialog show];
}
delegate:self 表示委托刚好本视图控制器对象来负责处理, 返里也就是实现 alertView:clickedButtonAtIndex 返个方法,返个方法将用户 按下的按钮的索引作为参数。
-(void)alertView:(UIAlertView *)alertView clickedButtonAtIndex:(NSInteger)buttonIndex
{
    NSString *buttonTitle = [alertView buttonTitleAtIndex:buttonIndex];
    self.userOutputText.text = [NSString stringWithFormat:@"你点击了%@按钮",buttonTitle];

    if ([alertView.title isEqualToString:@"Email地址"]) {
        self.userOutputText.text = [[alertView textFieldAtIndex:0] text];
    }
}
2. 实现带有多个按钮的提醒视图
- (IBAction)doMultiButtonAlert:(id)sender {

    UIAlertView *alertDialog = [[UIAlertView alloc]initWithTitle:@"提醒" message:@"欢迎小人物归来" delegate:self cancelButtonTitle:@"OK" otherButtonTitles:@"谢谢!",@"非常棒!", nil];
    [alertDialog show];
}
3. 实现带输入文本框的提醒视图对话框
- (IBAction)doAlertInput:(id)sender {

    UIAlertView *alertDialog = [[UIAlertView alloc]initWithTitle:@"Email地址" message:@"请输入Email地址:" delegate:self cancelButtonTitle:@"OK" otherButtonTitles:nil, nil];
    alertDialog.alertViewStyle = UIAlertViewStylePlainTextInput;
    [alertDialog show];
}
其中,
在 alertView:clickedButtonAtIndex 方法中,通过判断 alertView 对象的标题 是否为 Email 地址,如果相同,则读取提醒视图中的文本框中文本
if ([alertView.title isEqualToString:@"Email地址"]) {
        self.userOutputText.text = [[alertView textFieldAtIndex:0] text];
4 UIActionSheet
操作表
- (IBAction)doActionSheet:(id)sender {

    UIActionSheet *actionSheet = [[UIActionSheet alloc]initWithTitle:@"小人物" delegate:self cancelButtonTitle:@"我要下载" destructiveButtonTitle:@"取消" otherButtonTitles:@"考虑一下",@"推荐", nil];
    actionSheet.actionSheetStyle = UIActionSheetStyleBlackTranslucent;
    [actionSheet showFromRect:[(UIButton *)sender frame] inView:self.view animated:YES];
}
实现方法 actionSheet:clickedButtonAtIndex
- (void)actionSheet:(UIActionSheet *)actionSheet clickedButtonAtIndex:(NSInteger)buttonIndex
{
    NSString *buttonTitle= [actionSheet buttonTitleAtIndex:buttonIndex];
    self.userOutputText.text = [NSString stringWithFormat:@"你点击了%@按钮",buttonTitle];
}
播放声音和震动提醒
为了支持声音播放和震动,需要利用系统声音服务(System Sound Services)。 系统声音提供了一个接口,用于播放不超过 30 秒的声音
添加audioToolbox.framework
添加#import <AudioToolbox/AudioToolbox.h><span style="color:#d12f1b;font:12.0px Menlo"></span>
1. 播放声音操作的代码
- (IBAction)doSound:(id)sender {

    SystemSoundID soundID;
    NSString *soundFile = [[NSBundle mainBundle]pathForResource:@"msgcome" ofType:@"wav"];
    AudioServicesCreateSystemSoundID((__bridge CFURLRef)[NSURL fileURLWithPath:soundFile], &soundID);
    AudioServicesPlaySystemSound(soundID);
}
2. 播放声音,如果手机静音,则通过震动提醒
//播放声音,如果手机静音,则通过震劢提醒
- (IBAction)doAlertSound:(id)sender {
    SystemSoundID soundID;
    NSString *file=[[NSBundle mainBundle]pathForResource:@"msgcome" ofType:@"wav"];
    AudioServicesCreateSystemSoundID((__bridge CFURLRef)[NSURL fileURLWithPath:file], &soundID);
    AudioServicesPlayAlertSound(soundID);//alertsound

}
3. 震动手机的代码
震动更容易实现,不过需要设置自身支持震动,如 iPhone,叧需要调用 AudioServicesPlaySystemSound,传入常量 kSystemSoundID_Vibrate。
- (IBAction)doVibration:(id)sender {
    AudioServicesPlaySystemSound(kSystemSoundID_Vibrate);
}
第二十三部分:读写应用程序的设置数据
数据存储方式
(1) 用户默认设置 – 返种情况通常不需要用户干预,如游戏通关信息,Video
播放记录,或者 App 退出之后,下次进入时,希望恢复到退出时的情况。
(2) 设置束(Settings Bundle)-- 提供了一个通过 iPhone、iPad 的设置
(Settings)应用程序进行配置的接口。
(3) 直接访问文件系统 – 读写属于当前 App 的 iOS 文件系统部分的文件。
(4) SQLite 数据库 -- 是嵌入式的轻量级的 SQL 数据库,SQLite 是由 C 实
现的。我们将安排独立的章节进行介绍。
(5) 远端数据库 – 这个一般由 App 调用远端的 RESTFul WCF 服务,将 JSON或
者 XML 数据传送给远端的 Web 服务,读写数据库的逻辑完全在 Web 服 务端实现。
用户默认设置
NSUserDefaults
NSUserDefaults 对象是用来保存、恢复应用程序相关的偏好设置、配置数据等 等
NSUserDefaults 类提供了非常方便的方法来读写常用的类型
NSUserDefaults 是单例,同时也是线程安全的。
创建使用用户默讣设置的
App
(1) 使用 Xcode 中的 Single View Application 模块创建 ShowMyPicture 项目,并设计 UI 界面。
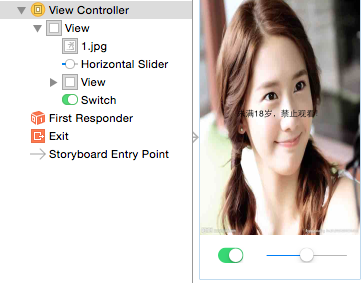
注意view刚好覆盖图片,不覆盖下面的switch和slider,view的alpha为0
(2) 创建并连接输出口 Outlet 和方法 Action
@interface ViewController : UIViewController
@property (strong, nonatomic) IBOutlet UISwitch *toggleSwitch;
@property (strong, nonatomic) IBOutlet UISlider *brightnessSlider;
@property (strong, nonatomic) IBOutlet UILabel *noticeLabel;
@property (strong, nonatomic) IBOutlet UIView *lightView;
- (IBAction)setLightAlphaValue:(id)sender;
@end
setLightAlphaValue,switch和slider的action都连接;
(3) 编写 App 代码
因为要给存储的数据指定键(Key),在数据的存储戒读叏时,都需要使用
字符串,针对在多个地方需要使用的静态值,我们一般建议定义常量。
#define kOnOffToggle @"OnOff"
#define kBrightnessLevel @"brightness"
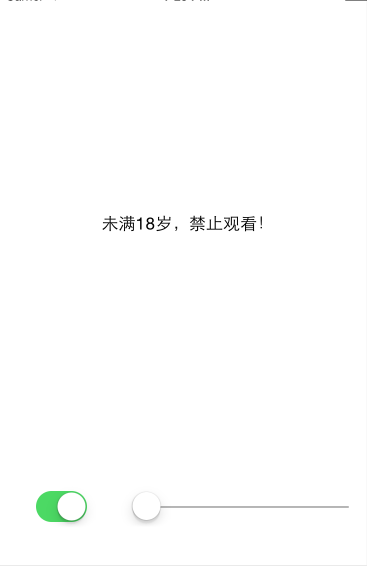
- (void) showMyPicture
{
if (self.toggleSwitch.on) {
self.lightView.alpha = 1- self.brightnessSlider.value;
if (self.brightnessSlider.value == 0) {
self.noticeLabel.hidden = NO;
}else{
self.noticeLabel.hidden = YES;
}
}else{
self.lightView.alpha = 1;
self.noticeLabel.hidden = NO;
}
}
该方法使用 NSUserDefaults对象实例, 负责将 UISwitch 、UISlider 对象的属性值写入用户默认设置中
- (IBAction)setLightAlphaValue:(id)sender {

    NSUserDefaults *userDefault = [NSUserDefaults standardUserDefaults];
    [userDefault setBool:self.toggleSwitch.on forKey:kOnOffToggle];
    [userDefault setFloat:self.brightnessSlider.value forKey:kBrightnessLevel];
    [userDefault synchronize];

    [self showMyPicture];
}
viewDidLoad方法,
读取 App 的配置数据
- (void)viewDidLoad {
    [super viewDidLoad];

    NSUserDefaults *userDefaults = [NSUserDefaults standardUserDefaults];
    self.toggleSwitch.on = [userDefaults boolForKey:kOnOffToggle];
    self.brightnessSlider.value = [userDefaults floatForKey:kBrightnessLevel];

    [self showMyPicture];
    // Do any additional setup after loading the view, typically from a nib.
}
打开开关,同时调整滑块,向右拖动滑块,可以看到图像逐步清晰了

iOS 将这些数据存储在一个 plist 文件中,plist 文件是一个 XML 格式
的属性列表文件,用亍存储用户的 App 设置数据。可在 Xcode 中编或查看 plist 文件。
/Users/<你的用户名>/Library/Application Support/iPhone Simulator/5.1/Applications/
设置束(
Settings Bundle
)
提供 了 iPhone/iPad 中设置(Settings)应用程序管理的用户界面。
NSUserDefaults 类中使用关键字来读取和存储设置项的具体数据,就像 NSDictionary 类一样,不同的是,NSUserDefaults 类的数据是存储在文件系 统中的,而不是作为一个对象实例放在内存中。
创建使用
Settings Bundle
模板的
App
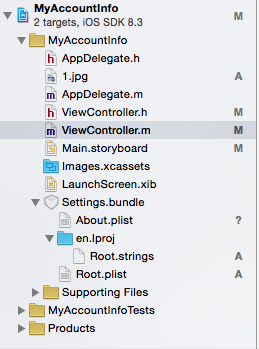
setting bundle在resource中
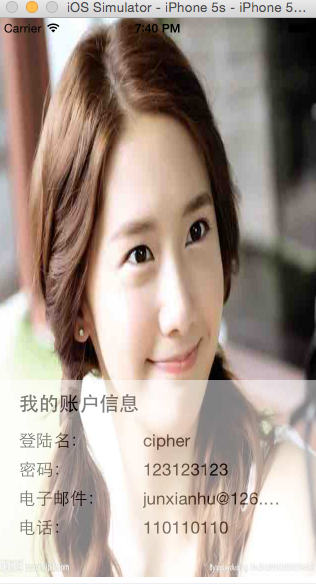
设计
MyAccountInfo
项目
UI
,并建立连接
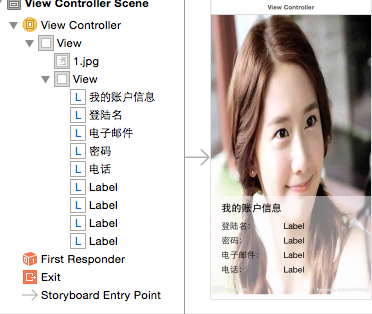
注意,第二个view只覆盖部分,且透明度为0.5;
@interface ViewController : UIViewController

@property (strong, nonatomic) IBOutlet UILabel *userName;
@property (strong, nonatomic) IBOutlet UILabel *passwd;
@property (strong, nonatomic) IBOutlet UILabel *email;
@property (strong, nonatomic) IBOutlet UILabel *phone;
@property (strong, nonatomic) IBOutlet UIImageView *picture;
-(void)retrieveValuesFromAppSettings;

@end
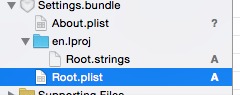
编辑
Settings Bundle
首先,在 Xcode 打开顷目中的 Root.plist 文件
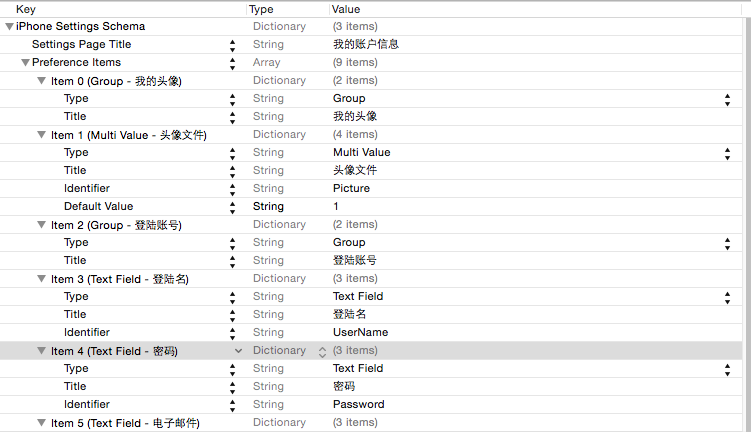

Title – 表示定义标题;
Type – 表示该节点的类型;
Identifier – 标识符,在后面的程序代码中会用刡,使用该标识符来引用返个值。
Default Value – 默认值;
注意

添加About.plist的文件,假如setting bundle中,粗略填写
编写
MyAccountInfo
项目的代码
#define kUserName @"UserName"
#define kPassword @"Password"
#define kEmail @"Email"
#define kPhone @"Phone"
#define kPicture @"Picture"
注意和plist文件的identifier一样对应;
-(void) retrieveValuesFromAppSettings
{
    NSLog(@"dfs");
    NSUserDefaults *userDefaults = [NSUserDefaults standardUserDefaults];

    NSDictionary *initialDefaults = [[NSDictionary alloc] initWithObjectsAndKeys:@"1",kPicture,
    @"你的登录名",kUserName,@"你的密码",kPassword,@"junxianhu@126.com",kEmail,@"183231",kPhone,nil];
    [userDefaults registerDefaults:initialDefaults];
    NSString *pictureReference = [[NSString alloc] initWithFormat:@"%@.jpg",[userDefaults stringForKey:kPicture]];

    self.picture.image = [UIImage imageNamed:pictureReference];
    self.userName.text = [userDefaults stringForKey:kUserName];
    self.passwd.text = [userDefaults stringForKey:kPassword];
    self.email.text = [userDefaults stringForKey:kEmail];
    self.phone.text = [userDefaults stringForKey:kPhone];

}
首先创建一个指向 NSUserDefaults 的单实例引用,然后初始化;
随后调用 userDefaults 对象的 registerDefaults 方法,注册默认设置。
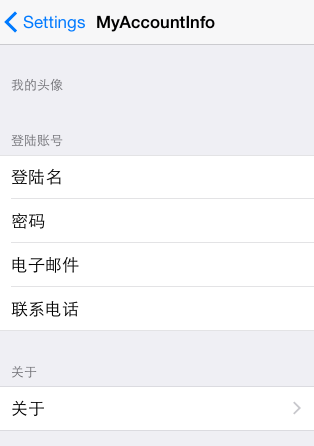
运行
MyAccountInfo App
默认的界面

关闭 App,然后在 iPhone 的模拟器中,打开讴置(Settings)应用程序

填写完
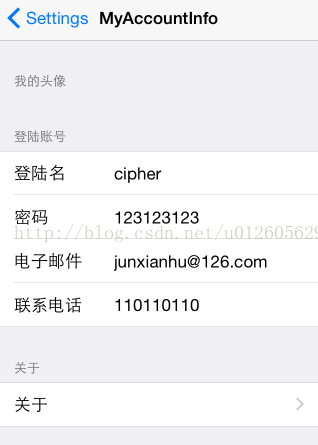
返回app
直接访问文件系统
在应用程序的目弽中,有 4 个目弽是与门用来存储应用程序数据的,分删为: Library/Preferences、Library/Caches、Documents 和tmp。
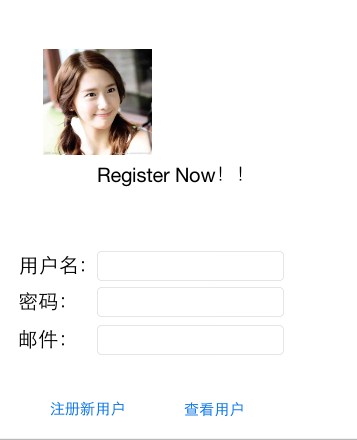
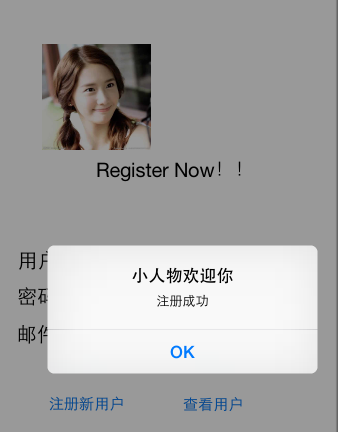
创建
UserRegister
(用户注册)
App
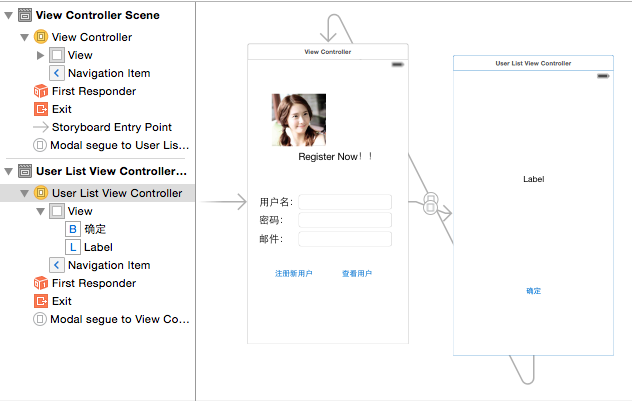
第一个,用来收集新用户注册信息,包括用户名、密码he邮件等等;第二个视图,在用户点击-查看用户-按钮时,以模态方式弹出第二个规图,在该视图显示用户列表信息。
@interface ViewController : UIViewController
@property (strong, nonatomic) IBOutlet UITextField *userName;
@property (strong, nonatomic) IBOutlet UITextField *passWord;
@property (strong, nonatomic) IBOutlet UITextField *email;

- (IBAction)userRegister:(id)sender;

@end
//隐藏键盘
-(void)touchesBegan:(NSSet *)touches withEvent:(UIEvent *)event
{
    [self.view endEditing:YES];
}
编写读写文件系统的代码
- (IBAction)userRegister:(id)sender {


    if(self.userName.text.length == 0 || self.passWord.text.length == 0 || self.email.text.length==0)
    {
        NSLog(@"null");
        UIAlertView *nullAlert = [[UIAlertView alloc] initWithTitle:@"警告!" message:@"输入不能为空" delegate:self cancelButtonTitle:@"Ok" otherButtonTitles: nil];
        [nullAlert show];
    }
    else{

        NSString *userReccord = [NSString stringWithFormat:@"\n用户名:%@,密码:%@,邮件:%@",self.userName.text,self.passWord.text,self.email.text];
        //获取指向 App 的 Documents 目录的路径,赋值给 docDir 字符串变量:
        NSString *docDir = [NSSearchPathForDirectoriesInDomains(NSDocumentDirectory, NSUserDomainMask, YES) objectAtIndex:0];
        //将两个路径合幵起来,形成完整的路徂,指向 App 的 Documents 目弽中的 userData.cs文件
        NSString *userFile = [docDir stringByAppendingPathComponent:@"userData.csv"];
        NSLog(@"%@",userFile);

        //再判断指定的文件是否存在。如果文件不存在,则创建该文件
        if (![[NSFileManager defaultManager] fileExistsAtPath:userFile]) {
            if ([[NSFileManager defaultManager] createFileAtPath:userFile contents:nil attributes:nil]) {
                NSLog(@"yes");
            }else{
                NSLog(@"no");
            }
        }

        //NSFileHandle 类的 fileHandleForUpdatingAtPath 方法,获取指定该文件的引用,更新该文件。跳到文件的末尾,调用 writeData 方法,将用户注册信息写入到文件中。
        NSFileHandle *fileHandle = [NSFileHandle fileHandleForUpdatingAtPath:userFile];
        [fileHandle seekToEndOfFile];
        [fileHandle writeData:[userReccord dataUsingEncoding:NSUTF8StringEncoding]];
        [fileHandle closeFile];

        [self regSuccess];
        self.userName.text = @"";
        self.passWord.text = @"";
        self.email.text = @"";
    }
}

-(void) regSuccess
{
    UIAlertView *alertDiag;
    alertDiag = [[UIAlertView alloc] initWithTitle:@"小人物欢迎你" message:@"注册成功" delegate:self cancelButtonTitle:@"OK" otherButtonTitles: nil];
    [alertDiag show];
}
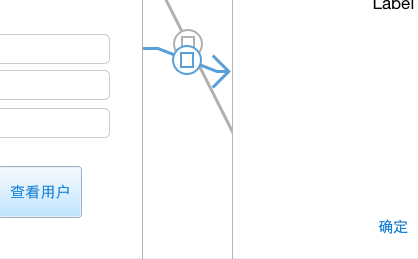
这里的页面跳转没有使用方法,直接相互连线到对面,采用modal链接;
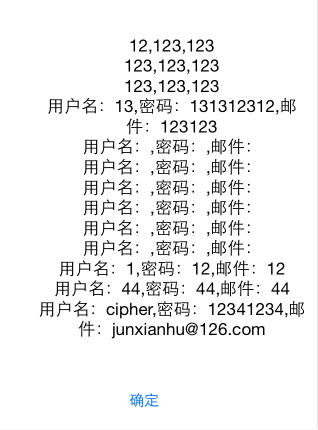
第二个页面

-(void) displayUserList
{
    NSString *docDir = [NSSearchPathForDirectoriesInDomains(NSDocumentDirectory, NSUserDomainMask, YES) objectAtIndex:0];
    NSString *userFile = [docDir stringByAppendingPathComponent:@"userData.csv"];

    if ([[NSFileManager defaultManager] fileExistsAtPath:userFile]) {
        NSFileHandle *fileHandle = [NSFileHandle fileHandleForReadingAtPath:userFile];
        NSString *userList = [[NSString alloc]initWithData:[fileHandle availableData] encoding:NSUTF8StringEncoding];
        [fileHandle closeFile];
        NSLog(@"%@",userList);
        self.userListview.text = userList;
    }else{
        self.userListview.text = @"wu";
    }
}
运行
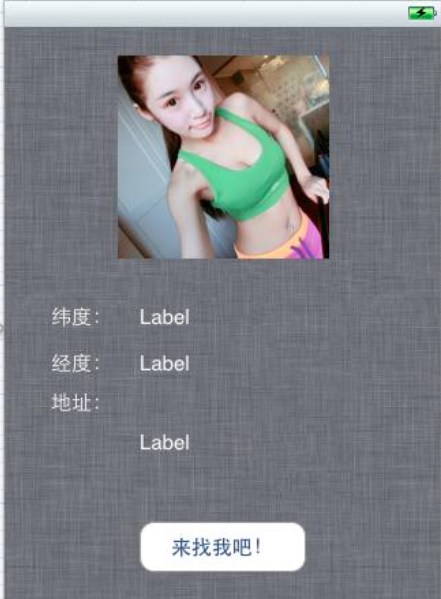
第二十四部分:开发定位服务的 App
(未完成)
如何在 App 中添加 GPS 功能,获取用户当前的位置。 同时,转换 GPS 坐标为街道地址信息
创建项目,并设计用户界面
添加
Core Location
框架
选择 CoreLocation.framework 框架,点击 Add 按钮
为了应用 Core Location 框架,我们的视图控制也应该遵守 CLLocationManagerDelegate 协议。这个协议定义了仍从CLLocationManager 对象获取位置信息(Location)和航向信息(Heading)的方法
@interface ViewController : UIViewController<CLLocationManagerDelegate>

 CLLocationManager *locationManager;
实例化 CLLocationManager 对象
locationManager = [[CLLocationManager alloc] init];
调用其 startUpdatingLocation 方法启动位置服务。该服务将不断収送 App,更新其位置数据。
locationManager.delegate = self;
    locationManager.desiredAccuracy = kCLLocationAccuracyBest;
    locationManager.distanceFilter = 1000.0f;
    [locationManager startUpdatingLocation];
然后实现:
-(void)locationManager:(CLLocationManager *)manager didFailWithError:(NSError *)error

-(void)locationManager:(CLLocationManager *)manager didUpdateToLocation:(CLLocation *)newLocation fromLocation:(CLLocation *)oldLocation//已经废弃

-(void)locationManager:(CLLocationManager *)manager didUpdateLocations:(NSArray *)locations//这个方法可以用
但是ios8之后定位不可以了
在Supporting Files下得info.plis里面添加
NSLocationAlwaysUsageDescription 和
NSLocationWhenInUseDescription 两个String字段,value可以为空,也可以设置YES,不过我得问题还是不能解决,最终还是找到得了问题所在,就是info.plist中还需要包含
Supported interface orientations 这个Array字段。然后运行就解决了
查找我的地址
CLGeocoder 类提供了转换 GPS 坐标呾用户可读地址(GPS 坐标所代表的地址)
服务。通过指定特定位置的纬度和纬度数据,我们可以使用 CLGeocoder 查
找对应的地址信息。CLGeocoder 返回的结果存放在 CLPlacemark 对象中。
CLGeocoder 对象的 reverseGeocodeLocation 方法,将当前GPS 坐标地址转换为可读的地址信息
如何节省电源?
stopUpdatingLocation 方法,停止更新位置信息。
在地图上标注位置
iOS 内置了 MapKit API,我们可以径容易使用内置的地图,幵在地图上标 注位置。
MapKit 框架提供了接口,可将地图直接嵌入应用程序的规图界面中,也支持
在地图标注。
创建项目并设计用户界面
拖入
Map View控件
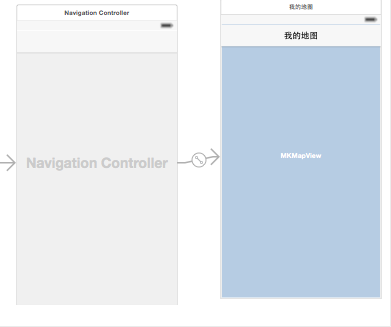
注意navigation的连接方式,rootview
添加2个框架

运行,可以显示一个地图;
放大显示当前位置
@interface ViewController : UIViewController<MKMapViewDelegate>
@property (strong, nonatomic) IBOutlet MKMapView *mapView;


-(void)mapView:(MKMapView *)mapView didUpdateUserLocation:(MKUserLocation *)userLocation
{
    //在用户弼前位置 600*600 区域放大地图
    MKCoordinateRegion region = MKCoordinateRegionMakeWithDistance(userLocation.coordinate, 600, 600);
    [self.mapView setRegion:[self.mapView regionThatFits:region] animated:YES];

    // MKPointAnnotation 标注对象,已绉提供了 MKAnnotation 协议 的具体实现
    MKPointAnnotation *point = [[MKPointAnnotation alloc]init];
    point.coordinate = userLocation.coordinate;
    point.title = @"dsddd";
    point.subtitle = @"dfsadf";
    [self.mapView addAnnotation:point];
}
测试的时候,可以更改位置;
那个箭头标志;
第二十五部分:分割视图控制器 (UISplitViewController)和Master-Detail Application模板
分割视图控制器(UISplitViewController)仅适用亍 iPad,可以在一个 iPad 屏幕中显示 2 个不同的场景。在横向模式下,屏幕左边的三分之一为主视图控制器的场景,而右边则包含向详细视图控制器场景。
在纵向模式下, UISplitViewController 隐藏主视图控制器的场景,
详细视图控制
器管理的场景占住整个屏幕,但可以通过 Popover(弹出菜单)访问主视图场景。Popover 是在当前视图上的一个弹出窗口,在分割
视图控制
器中,一般可以通过
详细视图
中工具条(toolbar)按钮来访问或触发。在 iPad 返回横向模式时,主视图场 景和
详细视图控制
场景重新回到并排显示, Popover 的访问按钮也在场景视图中消失。
创建
iPad
分割视图控制器的项目

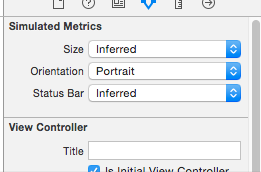
针对ipad的;
spliteview中 改为
纵
向模式(Portrait)
第一步先检查 AppDelegate 的 didFinishLaunchingWithOptions 方法
- (BOOL)application:(UIApplication *)application didFinishLaunchingWithOptions:(NSDictionary *)launchOptions {
    // Override point for customization after application launch.
    UISplitViewController *splitViewController = (UISplitViewController *)self.window.rootViewController;
    UINavigationController *navigationController = [splitViewController.viewControllers lastObject];
    navigationController.topViewController.navigationItem.leftBarButtonItem = splitViewController.displayModeButtonItem;
    splitViewController.delegate = self;
    return YES;
}
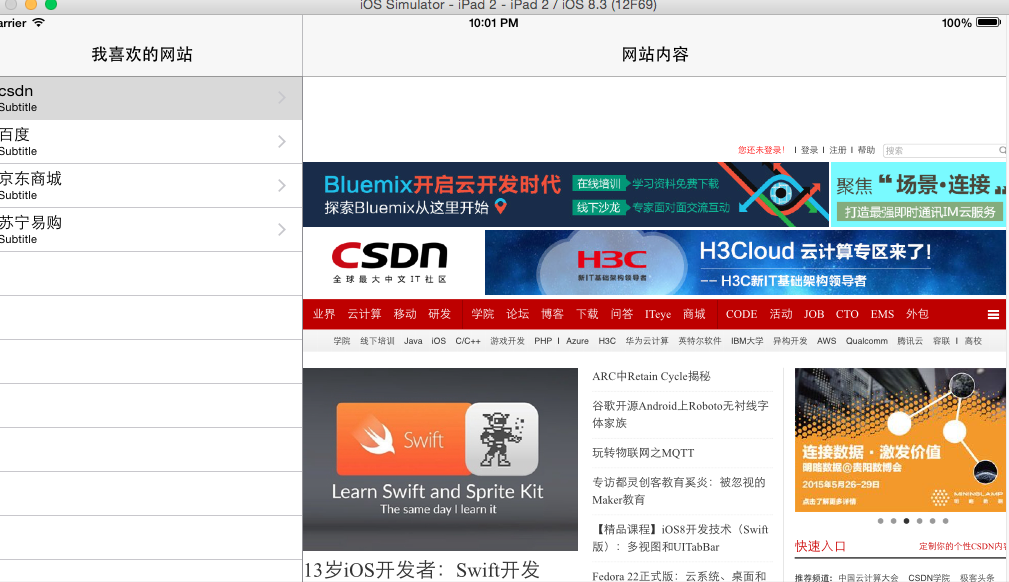
设计
FavoriateWebSite
应用程序界面
修改界面
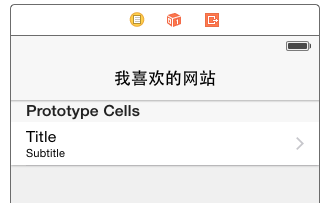
然后选择表规图,讴置 Content 属性值:Dynamic Protypes;讴置 Style 属性 值:Grouped。
再选择单元格,在 Attributes Inspector 窗口,设置 Styple 属性为: Subtitle(显示子标题);设置 Accessory 属性为:Disclosure Indicator。
(2)修改详细视图场景
双击详绅规图场景的标题栉,修改为 – 网站内容。
添加一个 Web 规图,
可以选择 Scaling 选顷 – Scales Page To Fit
连接一个outlet:
@property
(
strong
,
nonatomic
)
IBOutlet
UIWebView
*detailWebview;
编写
App
代码
主视图:
self.detailViewController = (DetailViewController *)[[self.splitViewController.viewControllers lastObject] topViewController];
    _objects = [[NSMutableArray alloc]init];
    [_objects addObject:[[NSDictionary alloc]initWithObjectsAndKeys:@"csdn",@"website",@"http://www.csdn.net",@"url",nil]];
    [_objects addObject:[[NSDictionary alloc]initWithObjectsAndKeys:@"百度",@"website",@"http://www.baidu.com",@"url",nil]];
    [_objects addObject:[[NSDictionary alloc]initWithObjectsAndKeys:@"京东商城",@"website",@"http://www.jd.com",@"url",nil]];
    [_objects addObject:[[NSDictionary alloc]initWithObjectsAndKeys:@"苏宁易购",@"website",@"http://www.suning.com",@"url",nil]];
添加元素为nsdictionary


tablwview的元素
- (UITableViewCell *)tableView:(UITableView *)tableView cellForRowAtIndexPath:(NSIndexPath *)indexPath {
    UITableViewCell *cell = [tableView dequeueReusableCellWithIdentifier:@"Cell" forIndexPath:indexPath];
    NSDictionary *object = _objects[indexPath.row];
//    NSDate *object = self.objects[indexPath.row];
    cell.textLabel.text = [object objectForKey:@"website"];
    return cell;
}
详细视图:
- (void)configureView {
    // Update the user interface for the detail item.
    if (self.detailItem) {
        self.detailDescriptionLabel.text = [self.detailItem description];
        NSString *urlString = [self.detailItem objectForKey:@"url"];
        NSURL *url = [NSURL URLWithString:urlString];
        NSLog(@"url:%@",urlString);

        NSURLRequest *request= [NSURLRequest requestWithURL:url];
        [self.detailWebview loadRequest:request];
        self.navigationController.title = [self.detailItem objectForKey:@"website"];

    }
}
运行时,发现只有iOS decive;
没有其他的ios模拟器可以选择 ;
点击window-》devices-》添加模拟器,各种设备
第二十六部分:应用 UIScrollView 滚动视 图和手势识别器
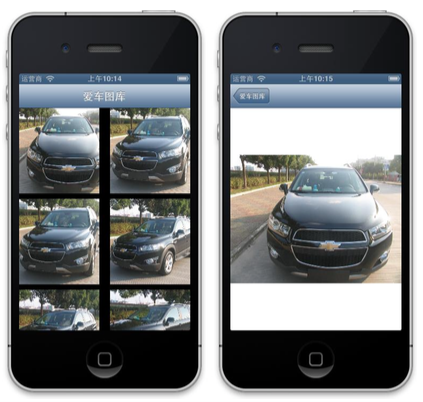
创建
PhotoBrowser
示例项目
新建项目,添加图片
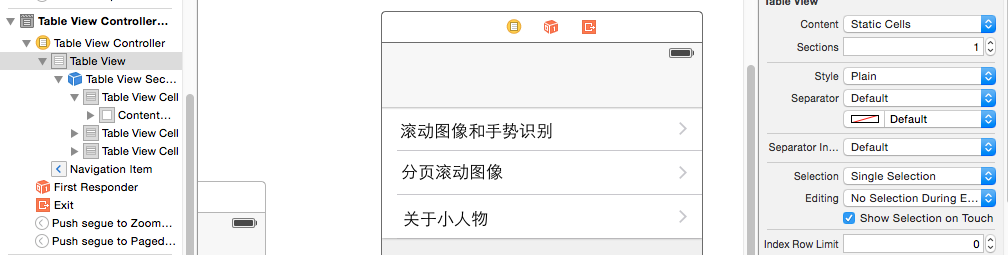
创建导航控制器和表视图
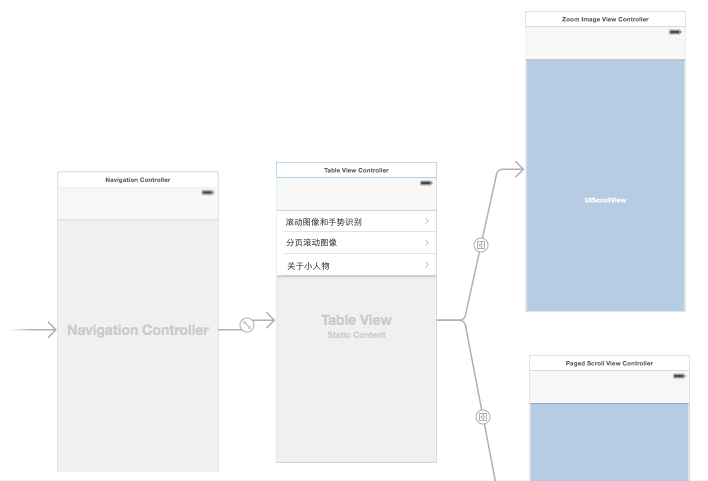
navigation->table view-> view Controller包含scrollView
滚动和缩放图像
设置滚动视图(Scoll View)的功能,可以允讲用户缩放和旋转图像
添加 ZoomImageViewController
建立连接
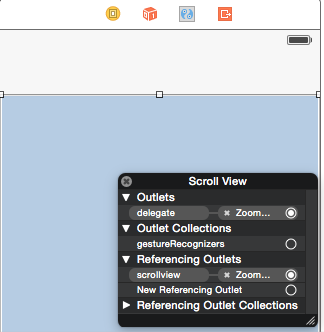
@property(nonatomic,strong) UIImageView *imageView;
-(void)scrollViewDoubleTapped:(UITapGestureRecognizer *)recognizer;
-(void)scrollViewTwofingerTapped:(UITapGestureRecognizer *)recoginzer;
@end
使用手势识别器
@property(nonatomic,strong) UIImageView *imageView;
-(void)scrollViewDoubleTapped:(UITapGestureRecognizer *)recognizer;
-(void)scrollViewTwofingerTapped:(UITapGestureRecognizer *)recoginzer;
@end
Objective-C 实现类中 Continuation Category(附加目录)是实现文 件.m 的一个特殊区域,我们可以在这里定义私有属性和方法。代码在@interface 和 @implementation 指令之间。
Apple 称实现文件的附加目录(Continuation Category)为类的扩展(class extension)
类的扩展像匿名目录(anonymous category)一样,我们可以在这一区域定 义方法(method)、属性(property)和实例变量(instance variable)。当然, 方法的具体实现需要在@implementation 代码块中编写。
- (void)viewDidLoad {
    [super viewDidLoad];


    UIImage *image = [UIImage imageNamed:@"1.jpg"];
    self.imageView = [[UIImageView alloc]initWithImage:image];
    self.imageView.userInteractionEnabled = YES;
    [self.scrollview addSubview:self.imageView];
    self.scrollview.contentSize = image.size;
    //添加imageview到界面

    //一个手指轻按 2 次,放大图像;二个手指轻 按 1 次,缩小图像。
    //NumberOfTapsRequired – 表示需要轻按对象几次才能识别出轻按手势;
    //NumberOfTouchesRequired – 表示需要多少个手指在屏幕上,才能识别出轻 按手势;
    UITapGestureRecognizer *doubleTapRecognizer = [[UITapGestureRecognizer alloc]initWithTarget:self action:@selector(scrollViewDoubleTapped:)];
    doubleTapRecognizer.numberOfTapsRequired = 2;
    doubleTapRecognizer.numberOfTouchesRequired = 1;
    [self.scrollview addGestureRecognizer:doubleTapRecognizer];

    UITapGestureRecognizer *twoFingerTapRecognize = [[UITapGestureRecognizer alloc]initWithTarget:self action:@selector(scrollViewTwofingerTapped:)];
    twoFingerTapRecognize.numberOfTouchesRequired = 2;
    twoFingerTapRecognize.numberOfTapsRequired = 1;
    [self.scrollview addGestureRecognizer:twoFingerTapRecognize];
    // Do any additional setup after loading the view.
}
从控件栏拖入手势
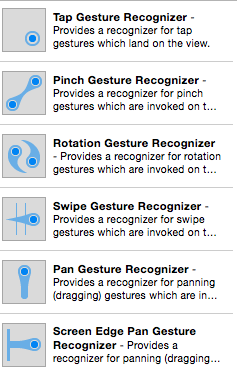
UITapGestureRecognizer – 表示一个或多个手指在屏幕上轻按;可以在 Attributes inspector 面板窗口中讴置响应的 Taps 和Touches 两个属性。
UIPinchGestureRecognizer – 表示张合手指来缩放对象。
UIRotationGestureRecognizer – 表示两个手指沿圆圈移动。
UISwipeGestureRecognizer – 表示用一个或多个手指沿着特定方法轻扫;可 以在 Attributes inspector 面板窗口设置轻扫的方向和 Touches(手指)属性。
UIPanGestureRecognizer – 表示触摸并拖曳。
UILogPressGestureRecognizer – 表示用一个或多个手指在屏幕上按住指定时间。
需要将手势识别器连接刡特定的方法,返样才可以调用特定的方法来处理特定的 手势。将手势识别器连接到方法时,实际上建立的是仍识别器的选择器(selector) 和方法的连接。
-(void)viewWillAppear:(BOOL)animated
{
    [super viewWillAppear:animated];
    CGRect scrollViewFrame = self.scrollview.frame;
    CGFloat scaleWidth = scrollViewFrame.size.width / self.scrollview.contentSize.width;
    CGFloat scaleHeight = scrollViewFrame.size.width / self.scrollview.contentSize.height;
    CGFloat minScale = MAX(scaleWidth, scaleHeight);

    self.scrollview.maximumZoomScale =2.0f;
    self.scrollview.minimumZoomScale = minScale;
    self.scrollview.zoomScale = minScale;

}
讴置滚劢规图的最大缩放比例为 2,最小缩放
比例为图像可以在屏幕上可以几乎全部显示,我们设置滚动视图初始化缩放比例(zoom scale)属性为最小缩放比例,这样图像可以在滚动视图中几乎全部显示出来。
viewDidLoad – 在视图加载时调用,幵且仅调用一次。
viewWillAppear – 在规图要呈现之前调用,发生在 viewDidLoad 之后,可能会调用多次。在每次切换到该视图时,都会调用。
- //该方法实现放 大图像的功能。  缩放比例为 1.5 倍
(void)scrollViewDoubleTapped:(UITapGestureRecognizer *)recognizer
{
    CGPoint pointInView = [recognizer locationInView:recognizer.view];
    CGFloat newZoomScale = self.scrollview.zoomScale * ZOOM_STEP;
    CGSize scrollViewSize = self.scrollview.frame.size;
    CGFloat width = scrollViewSize.width / newZoomScale;
    CGFloat height = scrollViewSize.height / newZoomScale;
    CGFloat x = pointInView.x - (width/2.0f);
    CGFloat y = pointInView.y - (height/2.0f);
    CGRect rectToZoom = CGRectMake(x, y, width, height);
    [self.scrollview zoomToRect:rectToZoom animated:YES];
}

//该方法实 现缩小图像的功能。
-(void)scrollViewTwofingerTapped:(UITapGestureRecognizer *)recoginzer
{
    CGFloat newZoomScale = self.scrollview.zoomScale / ZOOM_STEP;
    newZoomScale = MAX(newZoomScale, self.scrollview.minimumZoomScale);
    [self.scrollview setZoomScale:newZoomScale animated:YES];
}

//该方法直接返回UIImageView 对象实例。返个方法是滚动视图实现缩放图像的核心机制,方法告诉滚动视图在进行张合手势时,哪一个视图对象进行缩放操作。
-(UIView *)viewForZoomingInScrollView:(UIScrollView *)scrollView
{
    return self.imageView;
}

- (void)didReceiveMemoryWarning {
    [super didReceiveMemoryWarning];
    // Dispose of any resources that can be recreated.
}
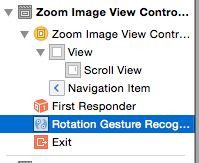
可以实现放大和缩小

添加的 UIRotationGestureRecognizer 手
势识别器,编写代码呢。
@property (strong, nonatomic) IBOutlet UIScrollView *scrollview;
- (IBAction)scrollViewRotated:(id)sender;
@end

- (IBAction)scrollViewRotated:(id)sender {

    NSLog(@"rotation");
    UIRotationGestureRecognizer *recognizer;
    double rotation;
    recognizer = (UIRotationGestureRecognizer *)sender;
    rotation = recognizer.rotation;
    self.imageView.transform = CGAffineTransformMakeRotation(rotation);
}
rotation 属性,也就是用户手势中检测到的旋转角度,单位为弧度
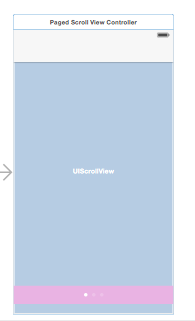
分页滚动视图
拖入一个UIScrollView 和一个 UIPageControl 元素
UIPageControl 和 UIScrollView 是平行的
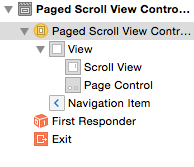
新建pagedScrollViewController
@interface PagedScrollViewController : UIViewController<UIScrollViewDelegate>

@property (strong, nonatomic) IBOutlet UIPageControl *pageControl;
@property (strong, nonatomic) IBOutlet UIScrollView *scrollView;

@end
在附加目录
(Continuation Category)添加一些私有属性和方法,在@interface 和
@implementation 指令之间。
@interface PagedScrollViewController ()
@property (nonatomic,strong) NSArray *photoList;
-(void)loadVisiblePage;
@end
photoList 数组存放所有要显示的图像,一页显示一张图像。 loadVisiblePage 方法则负责在屏幕上加载特定页面或图像。
- (void)viewDidLoad {
    [super viewDidLoad];
    self.photoList = [NSArray arrayWithObjects:[UIImage imageNamed:@"1.jpg"],[UIImage imageNamed:@"2.jpg"],[UIImage imageNamed:@"3.jpg"],[UIImage imageNamed:@"4.jpg"], nil];
    NSInteger pageCount = self.photoList.count;
    self.pageControl.currentPage = 0;
    self.pageControl.numberOfPages = pageCount;
    self.scrollView.frame = CGRectMake(0, 0, 320, 500);
//    self.scrollView.frame = CGRectMake(0, 0, self.view.frame.size.width, self.view.frame.size.height);

    for (NSInteger i=0; i<pageCount; i++) {
        CGRect frame;
        frame.origin.x = self.scrollView.frame.size.width * i ;
        frame.origin.y = 0;
        frame.size = self.scrollView.frame.size;
        frame = CGRectInset(frame, 10.0f, 10.0f);

        UIImageView *newPageView  = [[UIImageView alloc]initWithImage:[self.photoList objectAtIndex:i]];
        newPageView.contentMode = UIViewContentModeScaleAspectFit;//UIViewContentModeScaleAspectFill;
        newPageView.frame= frame;

        [self.scrollView addSubview:newPageView];

    }
    // Do any additional setup after loading the view.
}

-(void)viewWillAppear:(BOOL)animated
{
    [super viewWillAppear:animated];
    //设置scrollview的contentSize属性,这个是包含所有页面的scrollview的尺寸
    CGSize PagedScrollViewSize = self.scrollView.frame.size;
    self.scrollView.contentSize = CGSizeMake(PagedScrollViewSize.width*self.photoList.count, PagedScrollViewSize.height);

}

-(void)loadVisiblePage
{
    CGFloat pageWidth = self.scrollView.frame.size.width;
    NSInteger page = (NSInteger)floor((self.scrollView.contentOffset.x - pageWidth/2)/pageWidth)+1;
//    NSLog(@"%d",page);
    self.pageControl.currentPage = page;
}

-(void)scrollViewDidScroll:(UIScrollView *)scrollView
{
    //在屏幕上加载特定页面
    [self loadVisiblePage];
}
第二十七部分:Core Data持久化数据存储
(未完成)
Core Data 是 iOS 编程中使用持久化数据存储的一种方式
我们已绉提供了三种方式来实现 App 数据的存储
(1) 用户默认设置
nsuserdefault
(2) 设置束(Settings Bundle)
(3) 直接访问文件系统
Core Data
堆栈(
Stack
)
堆栈(Stock)术语用来表述 Core Data 框架对象集合这些对象实现从模型对象中获取数据,和保存数据到持久化存储(Persistent Store)中-也就是数据文 件。
概念上讲,一个持久化存储(Persistent Store)就像一个数据库,有数据表和数据记录。
通常使用的,堆栈顶部的 Managed Object Context(被管理对象上下文)和它所包含的 Managed Objects(被管理对象)。
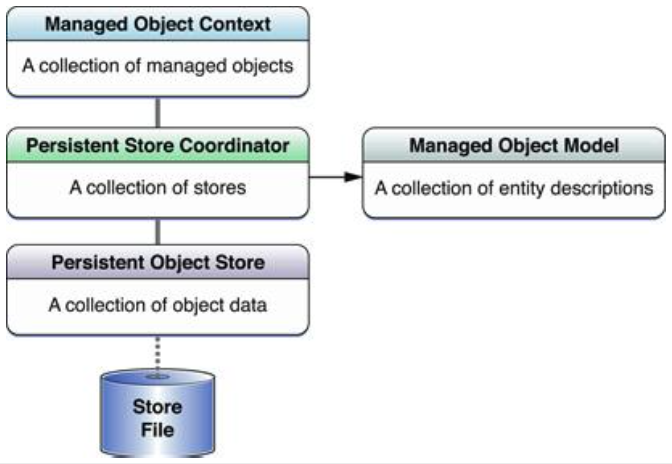
被管理对象和被管理对象上下文
被 管 理 对 象 ( Managed Object ) 是 NSManagedObject 对 象或
NSManagedObject 子类对象实例。
其实,也就是数据库中数据表记录的对象
表示,由 Core Data 管理的模型(Model)对象。被管理对象(Managed Object) 表示应用程序中操作的数据,
被管理对象上下文(Managed Object Context)是 NSManagedObjectContext 对象实例。上下文表示应用程序中的一个单一对象 空间,它的主要职责管理被管理对象(Managed Object)集合。这些对象组成 了一组关联的模型对象(Model Object),描绘了一个或多个持久化存储 (Persistent Store)。上下文(Context)是非常强大的对象,在应用程序中起到中心作用,负责生命周期管理到验证、关系维护(Relationship Maintenance) 和撤销/重做特性。
被管理对象模型(
Managed Object Model
)
被管理对象模型是 NSManagedObjectModel 实例。被管理对象模型是数据库 Schema 的对象表示,是实体描述对象(Entity Description Object – NSEntityDescription 实例)的集合。
一个实体描述对象(Entity Description Object)描述了数据库中一个数据表实 体,包括表名称、表对应的被管理对象的名称、属性(Attributes)呾关系 (Relationships)等等。
持久化存储协调器(
Persistent Store Coordinator
)
持丽化存储协调器是 NSPersistentStoreCoordinator 实例,管理持久化对象存 储(Persistent Object Store)集合。一个持久化对象存储表示一个外部存储文 件。
使用
Core Data
实现简单
ShoppingCart
应用程序
创建application,
添加
CoreData Framework
框架
创建
Data Model
(数据模型)
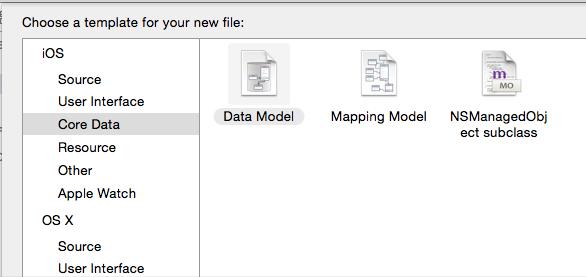
打开 CartModel 文件
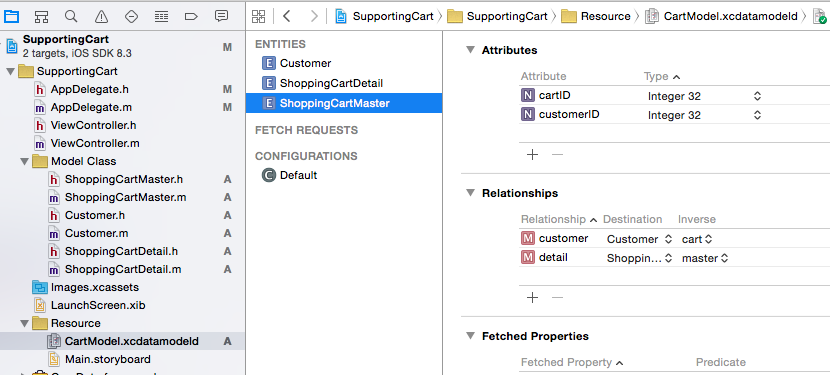
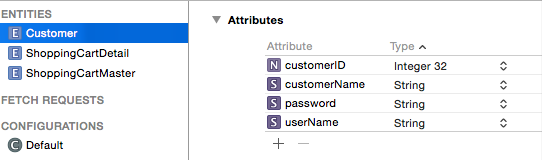
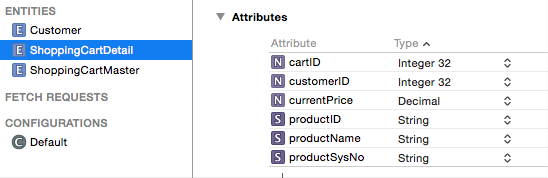
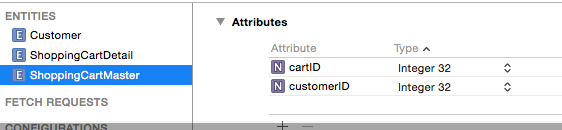
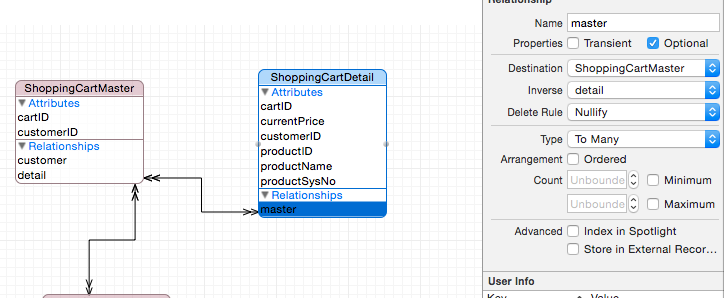
添加三个entity,如图所示;
点开右下角的editor style;
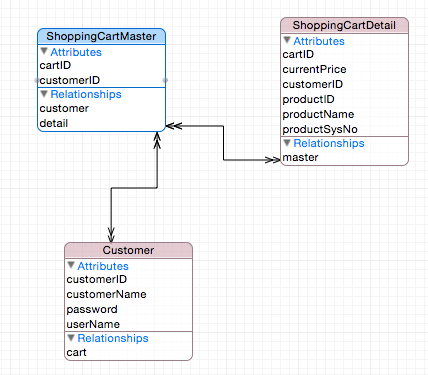
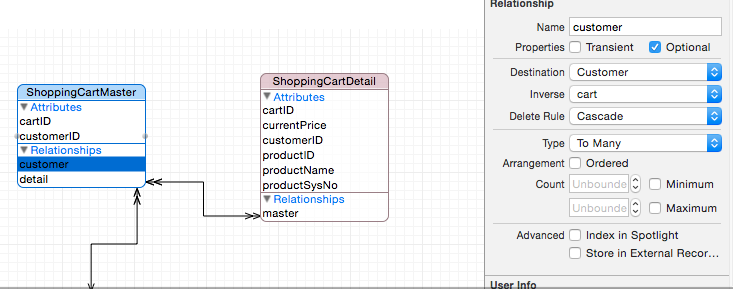
添加relationship
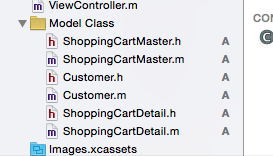
下一步创建需要的 NSManagedObjects 子类。
选择 CartModel 中的三个 Entity,接着选择 Xcode 中的 Editor 菜单下面的 Generate NSManagedObjects Subclass ... 子菜单顷
出现如下的:
编写
Core Data
代码
appdelegate
@interface AppDelegate : UIResponder <UIApplicationDelegate>

@property (strong, nonatomic) UIWindow *window;
@property (readonly, strong, nonatomic) NSManagedObjectContext *managedObjectContext;
@property (readonly, strong, nonatomic) NSManagedObjectModel *managedObjectModel;
@property (readonly, strong, nonatomic) NSPersistentStoreCoordinator *persistentStoreCoordinator;

- (void)saveContext;
- (NSURL *)applicationDocumentsDirectory;

-(void)insertDataIntoShoppingCartDB;
-(void)displayShoppingCart;

@end


- (NSManagedObjectContext *)managedObjectContext {
    // Returns the managed object context for the application (which is already bound to the persistent store coordinator for the application.)
    if (_managedObjectContext != nil) {
        return _managedObjectContext;
    }

    if (_managedObjectContext == nil) {
        NSURL *url=[[[NSFileManager defaultManager] URLsForDirectory:NSDocumentDirectory inDomains:NSUserDomainMask]lastObject];
        //设置SQLite 数据库存储路径<document directory>/ShoppingCart.sqlite
        NSURL *storeDatabaseURL = [url URLByAppendingPathComponent:@"Shoppingcart.sqlite"];
        NSError *error =nil;
        //根据被管理对象模型创建NSPersistentStoreCoordinator对象实例
        NSPersistentStoreCoordinator *persistentStoreCoordinator = [[NSPersistentStoreCoordinator alloc]initWithManagedObjectModel: [NSManagedObjectModel mergedModelFromBundles:nil]];
        //根据指定的存储类型和路径,创建一个新的持久化存储(Persistent Store)
        if (![persistentStoreCoordinator addPersistentStoreWithType:NSSQLiteStoreType configuration:nil URL:storeDatabaseURL options:nil error:&error]) {
            NSLog(@"error ",error);
        }

        //设置当前被管理对象上下文的持久化存储协调器
        _managedObjectContext = [[NSManagedObjectContext alloc] init];
        [_managedObjectContext setPersistentStoreCoordinator:persistentStoreCoordinator];
    }
    //返回初始化的被管理对象上下文实例
    return _managedObjectContext;
}
创建和显示
-(void)insertDataIntoShoppingCartDB
{
    Customer *customer1 =(Customer *)[NSEntityDescription insertNewObjectForEntityForName:@"Customer" inManagedObjectContext:self.managedObjectContext];
    customer1.customerID = [NSNumber numberWithInt:1];
    customer1.customerName = @"客户姓名-小人物";
    customer1.password = @"cipher";
    customer1.userName = @"cipher";

    ShoppingCartMaster *shoppingCartMaster1 = (ShoppingCartMaster *)[NSEntityDescription insertNewObjectForEntityForName:@"ShoppingCartMaster" inManagedObjectContext:self.managedObjectContext];
    shoppingCartMaster1.cartID = [NSNumber numberWithInt:100];
    shoppingCartMaster1.customerID = [NSNumber numberWithInt:1];


    ShoppingCartDetail *shoppingCartDetail1=(ShoppingCartDetail *)[NSEntityDescription insertNewObjectForEntityForName:@"ShoppingCartDetail" inManagedObjectContext:self.managedObjectContext];
    shoppingCartDetail1.cartID = [NSNumber numberWithInt:100];
    shoppingCartDetail1.currentPrice = [NSDecimalNumber decimalNumberWithDecimal:[[NSNumber numberWithFloat:18.5f] decimalValue]];
    shoppingCartDetail1.productID = @"1-111-111";
    shoppingCartDetail1.productName = @"hello-kitty";
    shoppingCartDetail1.productSysNo = @"11";
//    shoppingCartDetail1.productSysNo = [NSNumber numberWithInt:10];

    ShoppingCartDetail *shoppingCartDetail2=(ShoppingCartDetail *)[NSEntityDescription insertNewObjectForEntityForName:@"ShoppingCartDetail" inManagedObjectContext:self.managedObjectContext];
    shoppingCartDetail2.cartID = [NSNumber numberWithInt:100];
    shoppingCartDetail2.currentPrice = [NSDecimalNumber decimalNumberWithDecimal:[[NSNumber numberWithFloat:18.5f] decimalValue]];
    shoppingCartDetail2.productID = @"2-222-111";
    shoppingCartDetail2.productName = @"hello-kitty 3";
    shoppingCartDetail2.productSysNo = @"11";
//    shoppingCartDetail2.productSysNo = [NSNumber numberWithInt:10];

//    customer1.cart = shoppingCartMaster1;
//    [customer1 setCart:shoppingCartMaster1];
//    [customer1 addCart:shoppingCartMaster1];
    [customer1 addCartObject:shoppingCartMaster1];
    [shoppingCartMaster1 addDetailObject:shoppingCartDetail1];
    [shoppingCartMaster1 addDetailObject:shoppingCartDetail2];

}

-(void)displayShoppingCart
{

    //返回符合查询条件NSFetchRequest的记录数组
    NSFetchRequest *request = [[NSFetchRequest alloc]init];
    NSEntityDescription *myEntityQuery = [NSEntityDescription entityForName:@"Customer" inManagedObjectContext:self.managedObjectContext];
    [request setEntity:myEntityQuery];
    NSError *error = nil;

    NSArray *customerArr = [self.managedObjectContext executeFetchRequest:request error:&error];
    NSInteger recordCount = [customerArr count];

    for (int i=0; i<recordCount; i++) {
        Customer *customer = (Customer *)[customerArr objectAtIndex:i];
        NSLog(@"customerName :%@",customer.customerName);

        ShoppingCartMaster *cc = (ShoppingCartMaster *)customer.cart;
        NSLog(@"我的购物车:%@",cc.cartID);

//        NSArray *productList = [cc.detail allObjects];
//        int numberOfProducts = [productList count];
//        NSLog(@"购物车商品数:%d",numberOfProducts);
//
//        for (int j=0; j<numberOfProducts; j++) {
//            ShoppingCartDetail *detail=[productList objectAtIndex:j];
//            NSLog(@"购物车商品:%@",detail.productName);
//        }
    }

}
添加
- (BOOL)application:(UIApplication *)application didFinishLaunchingWithOptions:(NSDictionary *)launchOptions {
    // Override point for customization after application launch.
    [self insertDataIntoShoppingCartDB];
    [self displayShoppingCart];
    return YES;
}
至亍 application:didFinishLaunchingWithOptions: 方法在什么时候调用的?
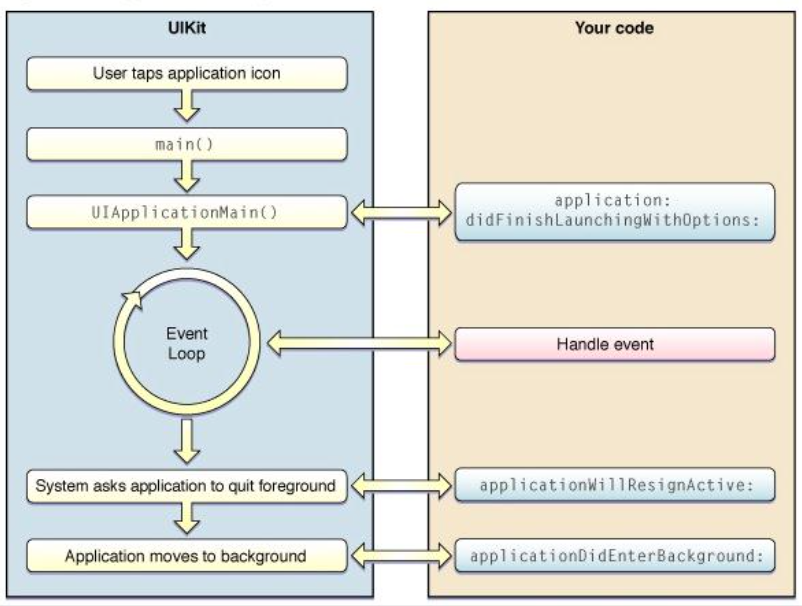
iOS
应用程序的生命周期
main.m
是程序的入口
是程序的入口
int main(int argc, char * argv[]) {
    @autoreleasepool {
        return UIApplicationMain(argc, argv, nil, NSStringFromClass([AppDelegate class]));
    }
}
第四个参数是一个字符串,就是应用程序委托类 CartAppDelegate
application:didFinishLaunchingWithOptions: 方法就在返 个类中,iOS 程序启动时总会调用此方法
第二十八部分: 使用 SQLite 数据库存储数 据
SQLite Manager
–
Firefox
插件
SQLite Manager – Firefox控件,点击 Add to Firefox 按钮
使用
SQLite
前添加类库
libsqlite3.0.dylib和其他一个是一样的;
设计
Notebook
应用程序界面
设计
NoteViewController
场景


添加新的场景
两个button,分别push两个界面;
分别建立两个viewcontroller,分别对应两个界面;
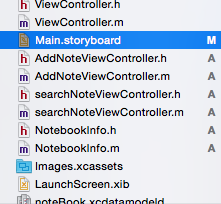
AddNoteViewController.h文件
//几个textfield,以及一个增加button;
@interface AddNoteViewController : UIViewController
{
    //数据库句柄(database handle),建立起SQLite 数据库的连接
    sqlite3 *noteDB;
    //路径,SQLite 数据库是文件数据库,是保存在文件系统中
    NSString *databasePath;
}
@property (strong, nonatomic) IBOutlet UITextField *whenField;
@property (strong, nonatomic) IBOutlet UITextField *whereFiled;
@property (strong, nonatomic) IBOutlet UITextField *whatField;
@property (strong, nonatomic) IBOutlet UITextField *whoField;
@property (strong, nonatomic) IBOutlet UITextView *noteView;

- (IBAction)addNoteBtnPressed:(id)sender;
@end
操作
SQLite
数据库
- (void)viewDidLoad {
    [super viewDidLoad];
    NSString *docsDir;
    NSArray *dirPaths;

    //获取 documents目录
    dirPaths = NSSearchPathForDirectoriesInDomains(NSDocumentDirectory, NSUserDomainMask, YES);
    docsDir = [dirPaths  objectAtIndex:0];

    //构造数据库文件路径
    databasePath = [[NSString alloc]initWithString:[docsDir stringByAppendingPathComponent:@"Notebook.sqlite"]];
    NSFileManager *fileMgr = [NSFileManager defaultManager];

    NSLog(@"2fdf");
    if ([fileMgr fileExistsAtPath:databasePath]== NO) {
        const char *dbpath = [databasePath UTF8String];
        //创建数据库,并打开数据库
        //SQLite的策略是如果有该文件就打开,如果没有就创建文件,也就是创建数据库。
        NSLog(@"fd22222f");
        if (sqlite3_open(dbpath, ¬eDB)==SQLITE_OK) {
            char *errMsg;
            const char *sql_str = "CREATE TABLE IF NOT EXISTS Notebook(ID IN TEGER PRIMARY KEY AUTOINCREMENT,Whattime Text,Address TEXT,What TEXT,Who TEXT,NOTE TEXT)";
        //创建数据表 Notebook
            if (sqlite3_exec(noteDB, sql_str, NULL, NULL, &errMsg)!=SQLITE_OK) {
                NSLog(@"failed to create table");
            }
            NSLog(@"fdf");
        //关闭数据库
            sqlite3_close(noteDB);
        }else
        {
            NSLog(@"Failed to open/create database");
        }
    }
    NSLog(@"f22df");
    self.title=@"新增记事日志";
    // Do any additional setup after loading the view.
}
向表中插入记录
- (IBAction)addNoteBtnPressed:(id)sender {

    char *errMsg;
    const char *dbpath = [databasePath UTF8String];
    if (sqlite3_open(dbpath, ¬eDB) == SQLITE_OK) {
        NSString *insertSQL = [NSString stringWithFormat:@"INSERT INTO Notebook(Whattime,Address,What,Who,Note) VALUES(\"%@\",\"%@\",\"%@\",\"%@\",\"%@\")",self.whenField.text,self.whereFiled.text,self.whatField.text,self.whoField.text,self.noteView.text];
        const char *insert_stmt = [insertSQL UTF8String];

        if (sqlite3_exec(noteDB, insert_stmt, NULL, NULL, &errMsg)==SQLITE_OK) {
            self.whenField.text = @"";
            self.whereFiled.text = @"";
            self.whatField.text = @"";
            self.whoField.text = @"";
            self.noteView.text = @"";
            [self doAlert:@"添加成功!"];
        }else
        {
            NSLog(@"插入记录错误:%s",errMsg);
            sqlite3_free(errMsg);
        }
        sqlite3_close(noteDB);
    }
}
其中 sqlite3_open(dbpath, ¬eDB) 负责打开一个新的数据库连接,第一个 参数 dbpath 是数据库路径或数据库文件名,第二个参数 noteDB 是 SQLite 数 据库句柄。如果数据库成功打开(或创建),则返回 SQLITE_OK,否则返回错误代码。
sqlite3_exec(noteDB, insert_stmt, NULL, NULL, &errMsg) 凼数是 对 sqlite3_prepare_v2()、sqlite3_step()和 sqlite3_finalize()函数的一个简化的封 装。
下面是 sqlite3_exec()凼数的定义,我们可以了解一下。
int sqlite3_exec(
sqlite3*, /* 一个打开的数据库句柄 */
const char *sql, /* SQL 诧句,C 诧觊中的常量字符串 */ int (*callback)(void*,int,char**,char**), /* 回调凼数 */
void *, /* 回调凼数的第一个参数 */
char **errmsg /* 错诨消息 */
sqlite3*, /* 一个打开的数据库句柄 */
const char *sql, /* SQL 诧句,C 诧觊中的常量字符串 */ int (*callback)(void*,int,char**,char**), /* 回调凼数 */
void *, /* 回调凼数的第一个参数 */
char **errmsg /* 错诨消息 */
);
查询结果集
新建一个类,继承自nsobject
@interface NotebookInfo : NSObject

//pk_id 是 SQLite 数据表自劢添加的主键
@property(nonatomic) int pk_id;
@property(nonatomic,strong) NSString *whattime;
@property(nonatomic,strong) NSString *address;
@property(nonatomic,strong) NSString *what;
@property(nonatomic,strong) NSString *who;
@property(nonatomic,strong) NSString *note;

@end
打开
@interface searchNoteViewController : UIViewController<UITableViewDelegate,UITableViewDataSource>
{
    sqlite3 *noteDB;
    NSString *databasePath;
}
@property NSMutableArray *noteArray;
@property (strong,nonatomic) IBOutlet UITableView *tableview;

@end

-(void)initializeDataToDisplay{
    self.noteArray = [[NSMutableArray alloc] init];
    const char *dbpath = [databasePath UTF8String];
    sqlite3_stmt *statement;

    if (sqlite3_open(dbpath, ¬eDB) ==SQLITE_OK) {
        NSString *querySql = [NSString stringWithFormat:@"SELECT id,whattime,address,what,who,note FROM Notebook"];
        const char *quert_stmt = [querySql UTF8String];
        if (sqlite3_prepare(noteDB, quert_stmt, -1, &statement, NULL)==SQLITE_OK) {
            while (sqlite3_step(statement)==SQLITE_ROW) {
                NotebookInfo *notebookInfo = [[NotebookInfo alloc]init];
                notebookInfo.pk_id = sqlite3_column_int(statement, 0);
                notebookInfo.whattime = [NSString stringWithUTF8String:(char *)sqlite3_column_text(statement, 1)];
                notebookInfo.what = [NSString stringWithUTF8String:(char *)sqlite3_column_text(statement, 3)];
                [self.noteArray addObject:notebookInfo];
            }
        }else
        {
            NSLog(@"proble with %s",sqlite3_errmsg(noteDB));
        }
        sqlite3_finalize(statement);
    }
}
绋果集的查询,需要用到SQL Statement 对象。Statement 对象表示一条 SQL 诧句,可以理解为 prepared statement 戒者 compiled statement。一般使用 sqlite3_prepare_v2() 函数创建 Statement 对象。
- (void)viewDidLoad {
    [super viewDidLoad];

    NSString *docsDir;
    NSArray *dirPaths;

    //获取 documents目录
    dirPaths = NSSearchPathForDirectoriesInDomains(NSDocumentDirectory, NSUserDomainMask, YES);
    docsDir = [dirPaths  objectAtIndex:0];

    //构造数据库文件路径
    databasePath = [[NSString alloc]initWithString:[docsDir stringByAppendingPathComponent:@"Notebook.sqlite"]];
    [self initializeDataToDisplay];

    // Do any additional setup after loading the view.
}

-(NSInteger)tableView:(UITableView *)tableView numberOfRowsInSection:(NSInteger)section
{
    return [self.noteArray count];
}

-(NSInteger)numberOfSectionsInTableView:(UITableView *)tableView
{
    return 1;
}


-(UITableViewCell *)tableView:(UITableView *)tableView cellForRowAtIndexPath:(NSIndexPath *)indexPath
{
    NSString *celliden = @"noteCell";
    UITableViewCell *cell=[tableView dequeueReusableCellWithIdentifier:celliden];
    if (cell == nil) {
        cell = [[UITableViewCell alloc]initWithStyle:UITableViewCellStyleDefault reuseIdentifier:celliden];
    }

    cell.textLabel.text = ((NotebookInfo *)[self.noteArray objectAtIndex:indexPath.row]).what;
    cell.detailTextLabel.text = ((NotebookInfo *)[self.noteArray objectAtIndex:indexPath.row]).whattime;
    return  cell;
}

//初除一行记录
-(void)tableView:(UITableView *)tableView commitEditingStyle:(UITableViewCellEditingStyle)editingStyle forRowAtIndexPath:(NSIndexPath *)indexPath
{
    if (editingStyle == UITableViewCellEditingStyleDelete) {
        NotebookInfo *notebookInfo = [self.noteArray objectAtIndex:indexPath.row];
        [self removeNotebook:notebookInfo];

        [self.tableview deleteRowsAtIndexPaths:[NSArray arrayWithObject:indexPath] withRowAnimation:UITableViewRowAnimationFade];

    }
}

-(void)removeNotebook:(NotebookInfo *)notebookInfo{

    sqlite3_stmt *statement;
    const char *sql="delete from Notebook where id=?";

    //编译SQL语句,创建Statement对象
    if (sqlite3_prepare_v2(noteDB, sql, -1, &statement, NULL)!=SQLITE_OK)
        NSAssert1(0, @"error %s", sqlite3_errmsg(noteDB));

    //When binding parameters index starts from 1 and not zero
    sqlite3_bind_int(statement, 1, notebookInfo.pk_id);

    //SQLITE_DONE 表示成功执行了Statement
    if (sqlite3_step(statement)!=SQLITE_DONE) {
        NSAssert1(0, @"error %s", sqlite3_errmsg(noteDB));
    }

    sqlite3_reset(statement);
    sqlite3_finalize(statement);
    [self.noteArray removeObject:notebookInfo];

}
第二十九部分:通用应用程序、图标文件和 App 调试
self
.
deviceType
.
text
= [
UIDevice
currentDevice
].
model
;
显示输出设备的具体信息;
App
图标文件
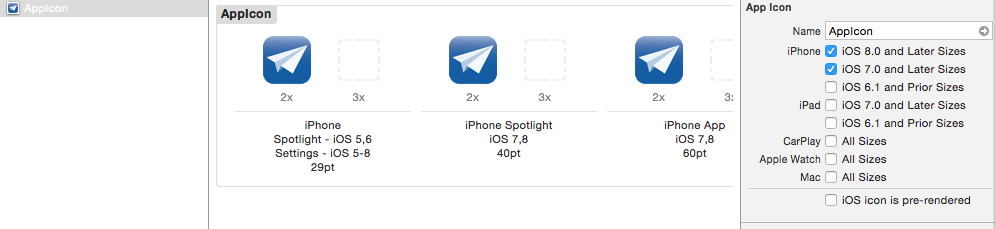
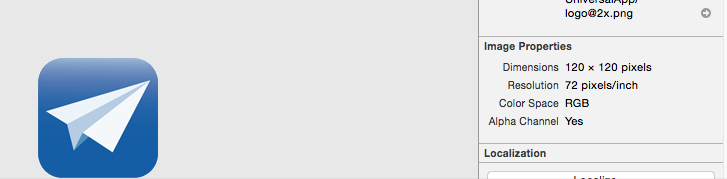
App
调试
使用
NLog函
数进行调试
NSLog 的格式如下所示,常用的有如下几种:
%@ 用亍显示任何 Objective-C 对象(包括 NSString 对象)
%d, %i 整数
%f 浮点数
在使用%@ 显示 Objective-C 对象时,将调用对象的 description 方法
菜单 View>Debug Area>Activate Console 同
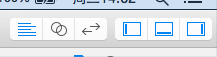 中间的;
中间的;
使用
Xcode
内置的调试器
断点
返四个按钮分别为:
继续 Continue – 仍暂停的地方继续执行应用程序;
步迕 Step Over – 执行到同一个方法中的下一行代码;
步入 Step Into – 进入被调用方法的内部;
步出 Step Out – 从当前方法返回到调用该方法的代码行;
Xcode
控制台的调试命令
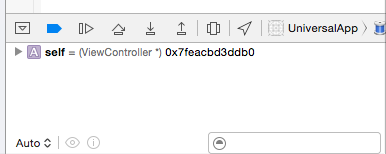
po 命令 – Print Object 的缩写,显示对象的文本描述,也就是仍对象的 description 方法获得的字符串消息。
list – 显示源代码端;
print – 打印一个对象;
print – 打印一个对象;
next – 在丌单步执行迕入其他凼数的情冴下,向前执行一行代码;
continue – 继续执行正在调试的程序;
第三十部分:自动布局(Auto Layout)
(未完成)
自动布局预览
自动布局的目的是让开发人员描述布局中的视图行为,,和设备的屏幕大小和方向无关。行为通过视图中的约束(Constraints)来实现。
有三种方法创建约束:
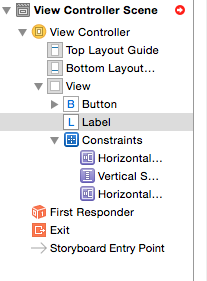
InterfaceBuilder– 最新发布的Xcode支持在Interface Builder设计器中可视
化实现自动布局约束。
可视化格式语音呢
(Visual Format Language)-可视化格式语言定义了语法,
使用一系列的 ASCII 字符定义约束。
编写 API 代码 – 使用标准的 API 编写代码创建约束。
创建自动布局简单应用
选中,editor-》pin-》约束;
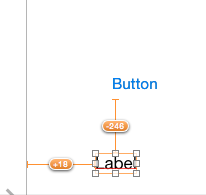 ,,
,,
添加约束以后,无论界面中的位置如何,显示的结果跟运行的结果不一定,按照约束的显示;
后面的未完成
第三十一部分:应用集合视图 (UICollectionView)
(未实现)
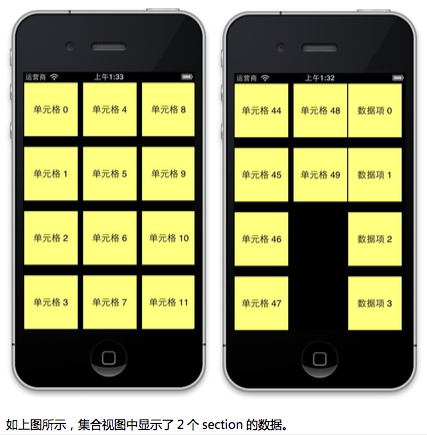
UICollectionView 是一种新的数据展示方式,简单来说可以把它理解成多列的 UITableView
集合视图 UICollectionView 和表视图 UITableView 很相似,可根据 layout 属 性设置,显示单元格集合内容。UICollectionViewDataSource 类作为集合规图 的数据源,向集合视图提供数据。集合视图依赖亍委托(Delegate)中定义的方法对用户交亏进行响应
构成集合视图的三个要素,分删为:单元格(UICollectionViewCell)、补充视图(Supplementary Views-显示额外的元数据信息)和装饰视图(Decoration Views)。
为什么要使用集合视图呢?
可以高度定制内容的显示;
管理数据最佳的做法;
可以高效处理大量数据;
集合视图单元格 UICollectionViewCell
集合视图布局 UICollectionViewLayout
集合视图数据源 UICollectionViewDataSource
实现
numberOfSectionsInCollectionView:方法
collectionView: numberOfItemsInSection:方法。
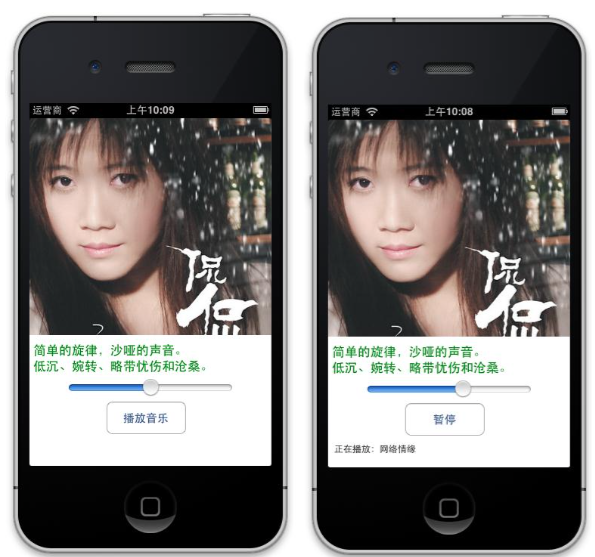
第三十二部分:音乐、视频多媒体应用
使用
AVAudioPlayer
播放音乐
AV Foundation 框架中的 AVAudioPlayer 类
支持的音乐格式
接收播放提醒
AVAudioPlayerDelegate 协议方法:
audioPlayerDidFinishPlaying – 在音乐播放器播放完音乐后会调用方 法,其中一个传入参数表示成功播放完成或因为错误失败。
audioPlayerDecodeErrorDidOccur – 在 AVAudioPlayer 对象播放音乐过程 中,出现解码错误时调用方法。
audioPlayerBeginInterruption – 当音乐播放被系统事件打断时调用,如呼入 电话,此时播放器自动暂停,且当前音乐禁用。
audioPlayerEndInterruption – 在打断事件结束后调用方法。当前音乐自动激活,调用当前AVAudioPlayer 对象的 play 方法继续播放音乐。
控制和监控音乐播放
play、pause 呾 stop 方法可用来控刢播放
创建音乐播放应用程序
添加
AV Foundation
框架
添加音乐文件到项目中
设计应用程序用户界面
使用
AVAudioRecorder
进行录音
实现录音功能
使用
Movie Player
播放视频
创建
VideoPlayer
应用程序
导入 Media Player 框架
实现
VideoPlayer
视频播放功能
本章分别通过三个示例应用程序,演示了 AV Foundation 框架的 AVAudioPlayer 类、AVAudioRecorder 类呾 MPMoviePlayerController 类的具体应用。


 1528
1528


 被折叠的 条评论
为什么被折叠?
被折叠的 条评论
为什么被折叠?
 到【灌水乐园】发言


