


首先,我们阐述为什么android需要插件化:
1:由于业务的增长,app的方法数逐渐达到65535(有人说用于检索方法数的列表大小使用short存储的,其实我看了源码之后并没有发现相关信息,并对此说法产生了怀疑,不过最后找到的结果就是,65535这个限制可能是由于dalvik的bytecode大小限制的,具体的可以查看官方文档)。
2:一个模块的变化都要整体编译一次app,维护成本太大了,用插件开发app会好很多
对于以上问题解决方案不少,著名的有h5,hybird,不过这些都没有native的体验好,于是之后又有react-native。不过本文不是阐述react-native,所以这里不加阐述。
国内也跟进,360推出了DroidPlugin*git*
我也开始学习他的这个项目,所以才有本文。也很感激网上有很多前辈已经贴出相关的文章,可供我参考借鉴
关于代理技术的话,熟悉spring的读者应该非常熟悉,spring利用动态代理实现AOP,极大的方便了开发
我们举个例子。如果,老板欠了我们的工资不发,我们是需要通过法律途径解决的,不过,我们大多数人应该不是自己去诉讼,而是请一位律师,这位律师就好比一个代理,帮助我们完成整个诉讼流程,我们自己只需在一旁只认老板罪行就行
我们定义一个接口,里面有各种诉讼流程
/**
 * Created by chan on 16/4/10.
 */
public interface ILawsuit {
    /**
     * 提交诉讼
     */
    void submit();

    /**
     * 举证
     */
    void burden();

    /**
     * 辩护
     */
    void defend();

    /**
     * 结束
     */
    void finish();
}
我们的代表-小明,决定站起来做这个诉讼人
/**
 * Created by chan on 16/4/10.
 */
public class XiaoMing implements ILawsuit {

    @Override
    public void submit() {
        System.out.println("老板拖欠工资");
    }

    @Override
    public void burden() {
        System.out.print("合同书在这里,这是我的工资流水");
    }

    @Override
    public void defend() {
        System.out.println("证据都在这里  别BB");
    }

    @Override
    public void finish() {
        System.out.println("诉讼成功");
    }
}
律师:
/**
 * Created by chan on 16/4/10.
 */
public class Lawyer implements ILawsuit {
    private ILawsuit m_iLawsuit;

    public Lawyer(ILawsuit iLawsuit) {
        m_iLawsuit = iLawsuit;
    }

    @Override
    public void submit() {
        System.out.println("拟仲裁材料");
        m_iLawsuit.submit();
    }

    @Override
    public void burden() {
        System.out.println("指导委托人准备的材料");
        m_iLawsuit.burden();
    }

    @Override
    public void defend() {
        System.out.println("争取到委托人辩护的机会");

        //委托人开始辩护
        m_iLawsuit.defend();
    }

    @Override
    public void finish() {
        System.out.println("交涉");
        //显然证据确凿 肯定成功
        m_iLawsuit.finish();
    }
}
我们看到律师在委托人做具体事情之前,已经为其铺好垫,他只需简单的履行自己的职责,而无需关注外部环境发生了什么。
理解了代理是什么,我们开始真正的开始了
细想一下之前的例子,我们不难得出,在android里面如果我们需要Hook的话,这个hookd点要容易找到,小明毕竟是个具体的人,他是个代表嘛。自然我们hook时,应当针对单例的对象,或者静态的对象,因为他们只有一份,且相对不会发生改变。
好像有点抽象,我们还是举个例子吧。比如,我们现在要在每次启动一个activity之前都要打印一条信息。
最笨的方式就是用一个BaseActivity集成Activity,但是,如果我们这个项目已经进行了N多年,想象一下,这得修改多少源码,且这破坏了我们的设计原则,我们尽量扩展而不是修改代码。那些已有的代码都是经历时间考验的,修改之后可靠性会下降。
那么我们就HOOK吧。 先查看源码找一找线索
当我们启动一个Activity的时候,肯定都会调用startActivity**之类的代码
比如:
startActivity(intent);我们切进去看下:
    /**
     * Same as {@link #startActivity(Intent, Bundle)} with no options
     * specified.
     *
     * @param intent The intent to start.
     *
     * @throws android.content.ActivityNotFoundException
     *
     * @see {@link #startActivity(Intent, Bundle)}
     * @see #startActivityForResult
     */
    @Override
    public void startActivity(Intent intent) {
        this.startActivity(intent, null);
    }
它调用了activity的 startActivity(Intent, Bundle)
再跟踪:
 @Override
    public void startActivity(Intent intent, @Nullable Bundle options) {
        if (options != null) {
            startActivityForResult(intent, -1, options);
        } else {
            // Note we want to go through this call for compatibility with
            // applications that may have overridden the method.
            startActivityForResult(intent, -1);
        }
    }
又调用了startActivityForResult(Intent intent, int requestCode)
public void startActivityForResult(Intent intent, int requestCode) {
        startActivityForResult(intent, requestCode, null);
    }
又调用了startActivityForResult(Intent intent, int requestCode, @Nullable Bundle options)
/**
     * Launch an activity for which you would like a result when it finished.
     * When this activity exits, your
     * onActivityResult() method will be called with the given requestCode.
     * Using a negative requestCode is the same as calling
     * {@link #startActivity} (the activity is not launched as a sub-activity).
     *
     * <p>Note that this method should only be used with Intent protocols
     * that are defined to return a result.  In other protocols (such as
     * {@link Intent#ACTION_MAIN} or {@link Intent#ACTION_VIEW}), you may
     * not get the result when you expect.  For example, if the activity you
     * are launching uses the singleTask launch mode, it will not run in your
     * task and thus you will immediately receive a cancel result.
     *
     * <p>As a special case, if you call startActivityForResult() with a requestCode
     * >= 0 during the initial onCreate(Bundle savedInstanceState)/onResume() of your
     * activity, then your window will not be displayed until a result is
     * returned back from the started activity.  This is to avoid visible
     * flickering when redirecting to another activity.
     *
     * <p>This method throws {@link android.content.ActivityNotFoundException}
     * if there was no Activity found to run the given Intent.
     *
     * @param intent The intent to start.
     * @param requestCode If >= 0, this code will be returned in
     *                    onActivityResult() when the activity exits.
     * @param options Additional options for how the Activity should be started.
     * See {@link android.content.Context#startActivity(Intent, Bundle)
     * Context.startActivity(Intent, Bundle)} for more details.
     *
     * @throws android.content.ActivityNotFoundException
     *
     * @see #startActivity
     */
    public void startActivityForResult(Intent intent, int requestCode, @Nullable Bundle options) {
        if (mParent == null) {
            Instrumentation.ActivityResult ar =
                mInstrumentation.execStartActivity(
                    this, mMainThread.getApplicationThread(), mToken, this,
                    intent, requestCode, options);
            if (ar != null) {
                mMainThread.sendActivityResult(
                    mToken, mEmbeddedID, requestCode, ar.getResultCode(),
                    ar.getResultData());
            }
            if (requestCode >= 0) {
                // If this start is requesting a result, we can avoid making
                // the activity visible until the result is received.  Setting
                // this code during onCreate(Bundle savedInstanceState) or onResume() will keep the
                // activity hidden during this time, to avoid flickering.
                // This can only be done when a result is requested because
                // that guarantees we will get information back when the
                // activity is finished, no matter what happens to it.
                mStartedActivity = true;
            }

            cancelInputsAndStartExitTransition(options);
            // TODO Consider clearing/flushing other event sources and events for child windows.
        } else {
            if (options != null) {
                mParent.startActivityFromChild(this, intent, requestCode, options);
            } else {
                // Note we want to go through this method for compatibility with
                // existing applications that may have overridden it.
                mParent.startActivityFromChild(this, intent, requestCode);
            }
        }
    }
可以看到最后它是调用了Instrumentation类的execStartActivity(Context who, IBinder contextThread, IBinder token, Activity target,Intent intent, int requestCode, Bundle options, UserHandle user)方法
 public ActivityResult execStartActivity(
            Context who, IBinder contextThread, IBinder token, Activity target,
            Intent intent, int requestCode, Bundle options, UserHandle user) {
        IApplicationThread whoThread = (IApplicationThread) contextThread;
        if (mActivityMonitors != null) {
            synchronized (mSync) {
                final int N = mActivityMonitors.size();
                for (int i=0; i<N; i++) {
                    final ActivityMonitor am = mActivityMonitors.get(i);
                    if (am.match(who, null, intent)) {
                        am.mHits++;
                        if (am.isBlocking()) {
                            return requestCode >= 0 ? am.getResult() : null;
                        }
                        break;
                    }
                }
            }
        }
        try {
            intent.migrateExtraStreamToClipData();
            intent.prepareToLeaveProcess();
            int result = ActivityManagerNative.getDefault()
                .startActivityAsUser(whoThread, who.getBasePackageName(), intent,
                        intent.resolveTypeIfNeeded(who.getContentResolver()),
                        token, target != null ? target.mEmbeddedID : null,
                        requestCode, 0, null, options, user.getIdentifier());
            checkStartActivityResult(result, intent);
        } catch (RemoteException e) {
            throw new RuntimeException("Failure from system", e);
        }
        return null;
    }
继续跟踪是不可能了,我们无法找到一个稳定的hook点
不如就从Instrumentation这个类下手,看下它是从哪里初始化的:
 final void attach(Context context, ActivityThread aThread,
            Instrumentation instr, IBinder token, int ident,
            Application application, Intent intent, ActivityInfo info,
            CharSequence title, Activity parent, String id,
            NonConfigurationInstances lastNonConfigurationInstances,
            Configuration config, String referrer, IVoiceInteractor voiceInteractor) {
        attachBaseContext(context);

        mFragments.attachHost(null /*parent*/);

        mWindow = new PhoneWindow(this);
        mWindow.setCallback(this);
        mWindow.setOnWindowDismissedCallback(this);
        mWindow.getLayoutInflater().setPrivateFactory(this);
        if (info.softInputMode != WindowManager.LayoutParams.SOFT_INPUT_STATE_UNSPECIFIED) {
            mWindow.setSoftInputMode(info.softInputMode);
        }
        if (info.uiOptions != 0) {
            mWindow.setUiOptions(info.uiOptions);
        }
        mUiThread = Thread.currentThread();

        mMainThread = aThread;
        mInstrumentation = instr;
        mToken = token;
        mIdent = ident;
        mApplication = application;
        mIntent = intent;
        mReferrer = referrer;
        mComponent = intent.getComponent();
        mActivityInfo = info;
        mTitle = title;
        mParent = parent;
        mEmbeddedID = id;
        mLastNonConfigurationInstances = lastNonConfigurationInstances;
        if (voiceInteractor != null) {
            if (lastNonConfigurationInstances != null) {
                mVoiceInteractor = lastNonConfigurationInstances.voiceInteractor;
            } else {
                mVoiceInteractor = new VoiceInteractor(voiceInteractor, this, this,
                        Looper.myLooper());
            }
        }

        mWindow.setWindowManager(
                (WindowManager)context.getSystemService(Context.WINDOW_SERVICE),
                mToken, mComponent.flattenToString(),
                (info.flags & ActivityInfo.FLAG_HARDWARE_ACCELERATED) != 0);
        if (mParent != null) {
            mWindow.setContainer(mParent.getWindow());
        }
        mWindowManager = mWindow.getWindowManager();
        mCurrentConfig = config;
    }
attach ?这是从哪里来的,看过android源码的人都知道,attach是由ActivityThread这个类调用的,显然我们可以把下手目标指向ActivityThread了。搜索一下,可以看到:
private Activity performLaunchActivity(ActivityClientRecord r, Intent customIntent) {
        // System.out.println("##### [" + System.currentTimeMillis() + "] ActivityThread.performLaunchActivity(" + r + ")");

        ActivityInfo aInfo = r.activityInfo;
        if (r.packageInfo == null) {
            r.packageInfo = getPackageInfo(aInfo.applicationInfo, r.compatInfo,
                    Context.CONTEXT_INCLUDE_CODE);
        }

        ComponentName component = r.intent.getComponent();
        if (component == null) {
            component = r.intent.resolveActivity(
                mInitialApplication.getPackageManager());
            r.intent.setComponent(component);
        }

        if (r.activityInfo.targetActivity != null) {
            component = new ComponentName(r.activityInfo.packageName,
                    r.activityInfo.targetActivity);
        }

        Activity activity = null;
        try {
            java.lang.ClassLoader cl = r.packageInfo.getClassLoader();
            activity = mInstrumentation.newActivity(
                    cl, component.getClassName(), r.intent);
            StrictMode.incrementExpectedActivityCount(activity.getClass());
            r.intent.setExtrasClassLoader(cl);
            r.intent.prepareToEnterProcess();
            if (r.state != null) {
                r.state.setClassLoader(cl);
            }
        } catch (Exception e) {
            if (!mInstrumentation.onException(activity, e)) {
                throw new RuntimeException(
                    "Unable to instantiate activity " + component
                    + ": " + e.toString(), e);
            }
        }

        try {
            Application app = r.packageInfo.makeApplication(false, mInstrumentation);

            if (localLOGV) Slog.v(TAG, "Performing launch of " + r);
            if (localLOGV) Slog.v(
                    TAG, r + ": app=" + app
                    + ", appName=" + app.getPackageName()
                    + ", pkg=" + r.packageInfo.getPackageName()
                    + ", comp=" + r.intent.getComponent().toShortString()
                    + ", dir=" + r.packageInfo.getAppDir());

            if (activity != null) {
                Context appContext = createBaseContextForActivity(r, activity);
                CharSequence title = r.activityInfo.loadLabel(appContext.getPackageManager());
                Configuration config = new Configuration(mCompatConfiguration);
                if (DEBUG_CONFIGURATION) Slog.v(TAG, "Launching activity "
                        + r.activityInfo.name + " with config " + config);
                activity.attach(appContext, this, getInstrumentation(), r.token,
                        r.ident, app, r.intent, r.activityInfo, title, r.parent,
                        r.embeddedID, r.lastNonConfigurationInstances, config,
                        r.referrer, r.voiceInteractor);

                if (customIntent != null) {
                    activity.mIntent = customIntent;
                }
                r.lastNonConfigurationInstances = null;
                activity.mStartedActivity = false;
                int theme = r.activityInfo.getThemeResource();
                if (theme != 0) {
                    activity.setTheme(theme);
                }

                activity.mCalled = false;
                if (r.isPersistable()) {
                    mInstrumentation.callActivityOnCreate(activity, r.state, r.persistentState);
                } else {
                    mInstrumentation.callActivityOnCreate(activity, r.state);
                }
                if (!activity.mCalled) {
                    throw new SuperNotCalledException(
                        "Activity " + r.intent.getComponent().toShortString() +
                        " did not call through to super.onCreate()");
                }
                r.activity = activity;
                r.stopped = true;
                if (!r.activity.mFinished) {
                    activity.performStart();
                    r.stopped = false;
                }
                if (!r.activity.mFinished) {
                    if (r.isPersistable()) {
                        if (r.state != null || r.persistentState != null) {
                            mInstrumentation.callActivityOnRestoreInstanceState(activity, r.state,
                                    r.persistentState);
                        }
                    } else if (r.state != null) {
                        mInstrumentation.callActivityOnRestoreInstanceState(activity, r.state);
                    }
                }
                if (!r.activity.mFinished) {
                    activity.mCalled = false;
                    if (r.isPersistable()) {
                        mInstrumentation.callActivityOnPostCreate(activity, r.state,
                                r.persistentState);
                    } else {
                        mInstrumentation.callActivityOnPostCreate(activity, r.state);
                    }
                    if (!activity.mCalled) {
                        throw new SuperNotCalledException(
                            "Activity " + r.intent.getComponent().toShortString() +
                            " did not call through to super.onPostCreate()");
                    }
                }
            }
            r.paused = true;

            mActivities.put(r.token, r);

        } catch (SuperNotCalledException e) {
            throw e;

        } catch (Exception e) {
            if (!mInstrumentation.onException(activity, e)) {
                throw new RuntimeException(
                    "Unable to start activity " + component
                    + ": " + e.toString(), e);
            }
        }

        return activity;
    }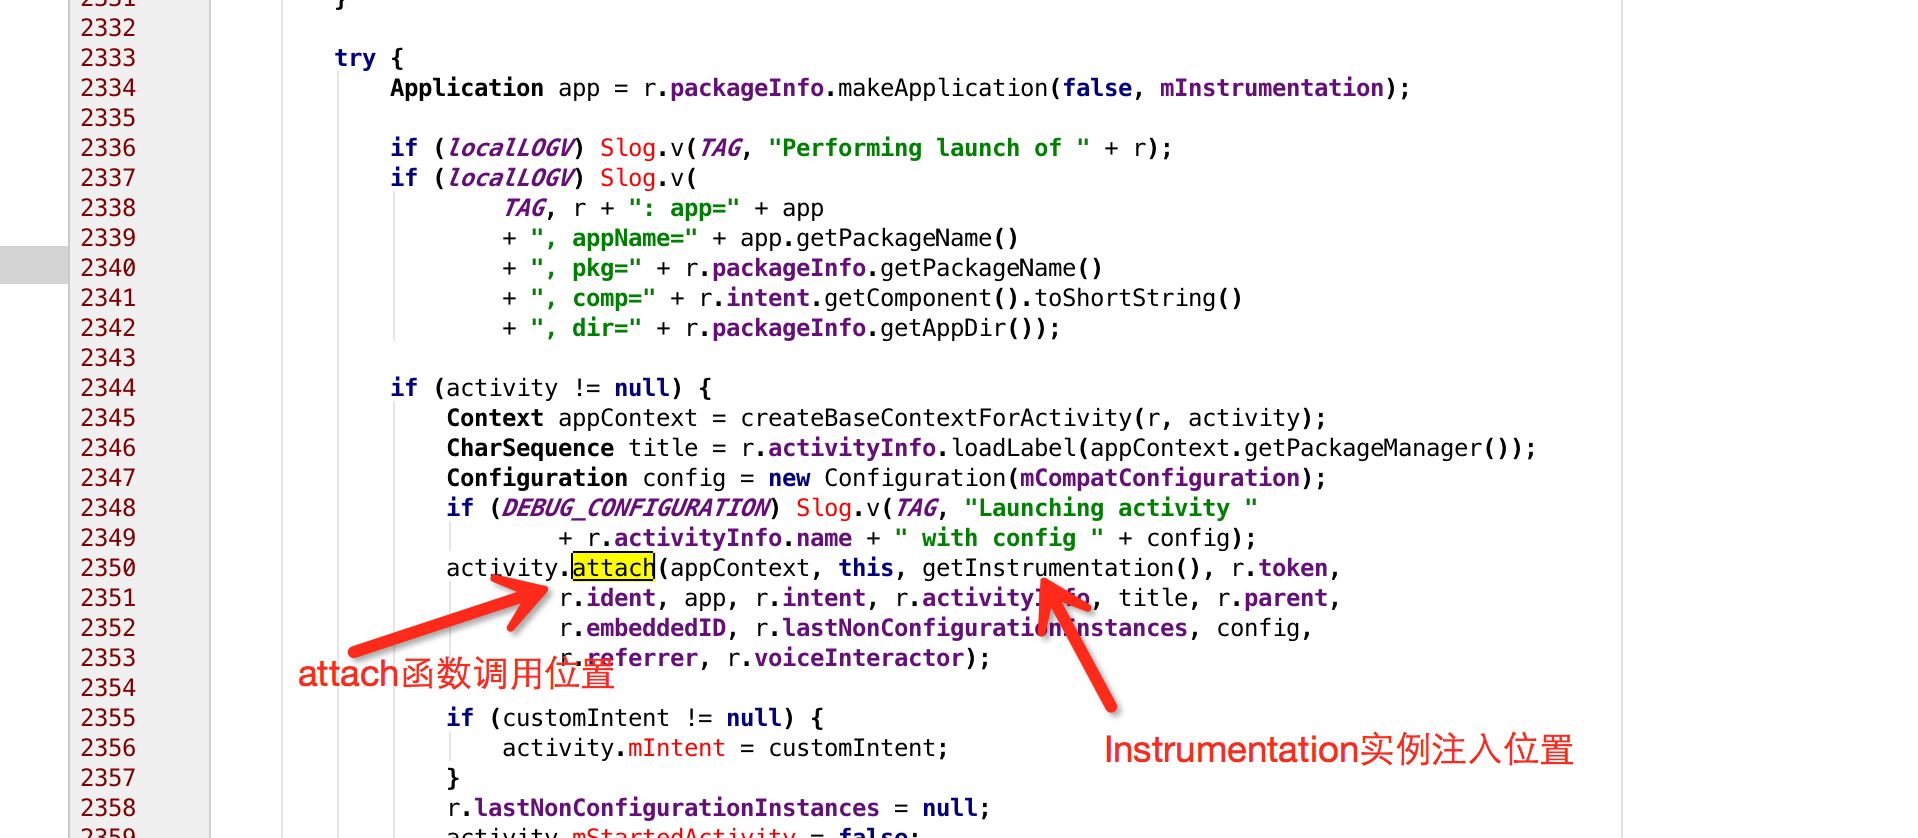
恩?在这里初始化的?
切进去看下:

可以看到mInstrumentation是ActivityThread的一个成员变量,不过,既然找到ActvityThread了,所有的问题都解决了,为什么,因为每个应用在运行时都只有一个ActivityThread,它用来代表主线程,它是单例的。
我们在这里可以看到:
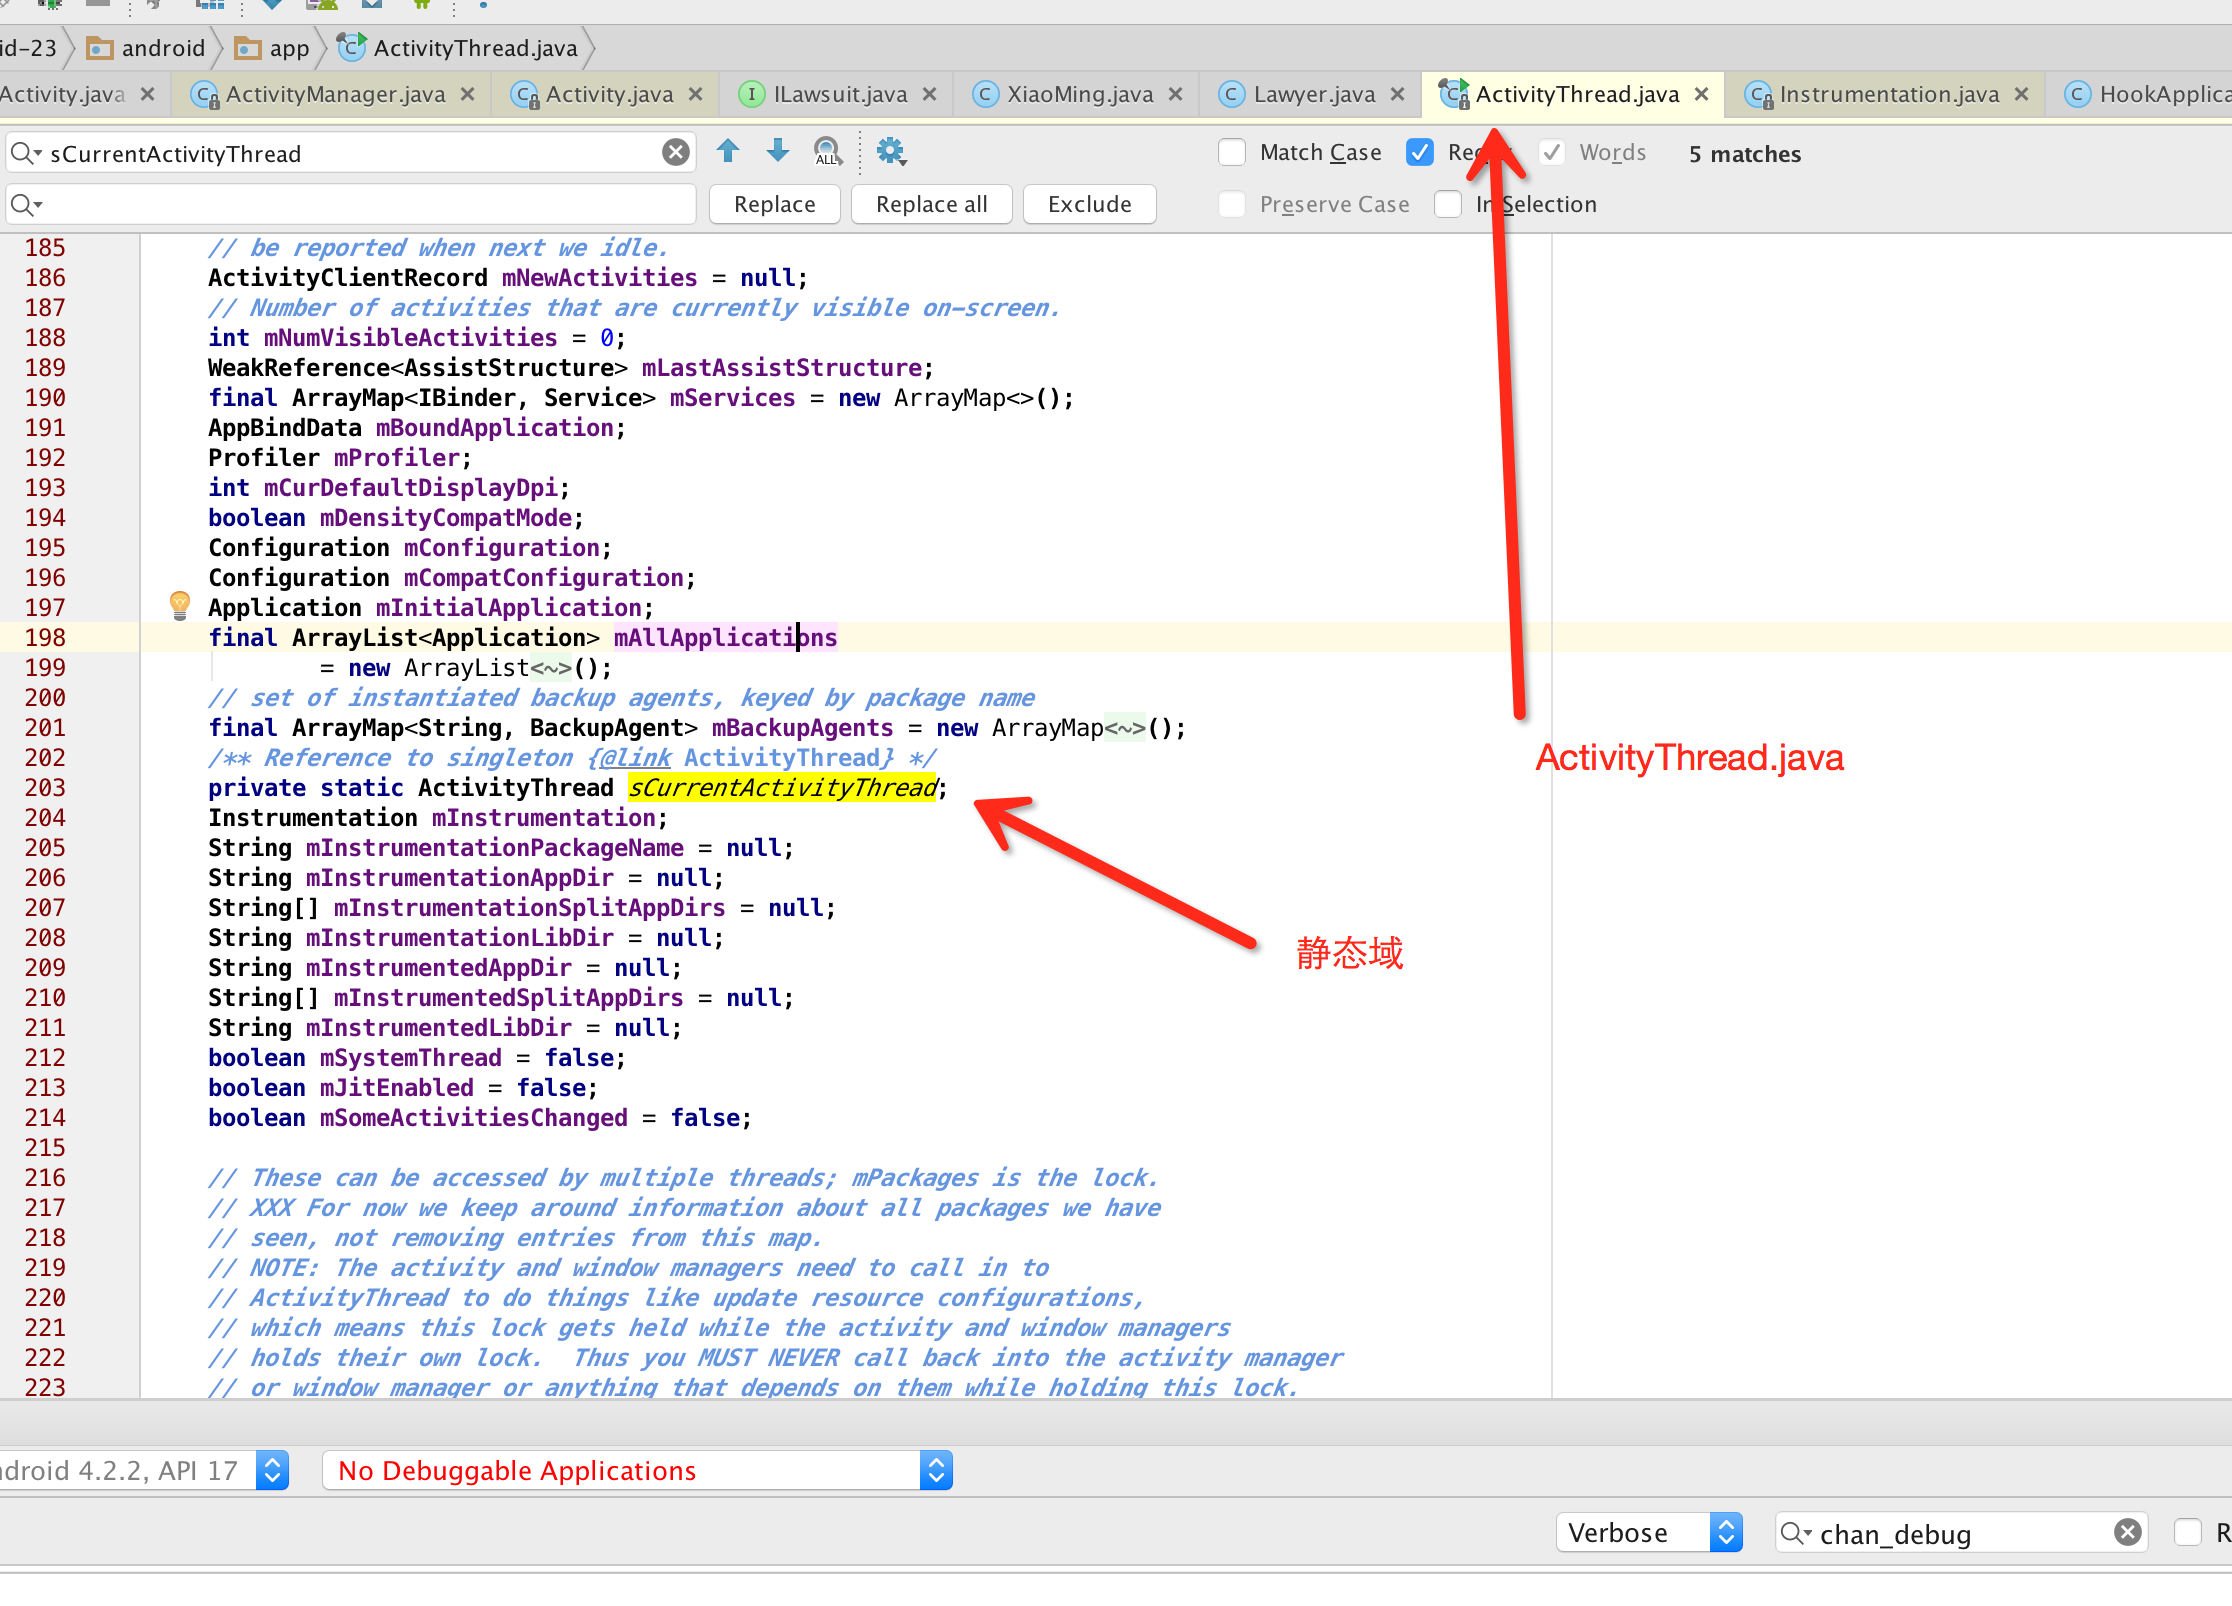
要获取它也很容易,调用currentActivityThread就行了
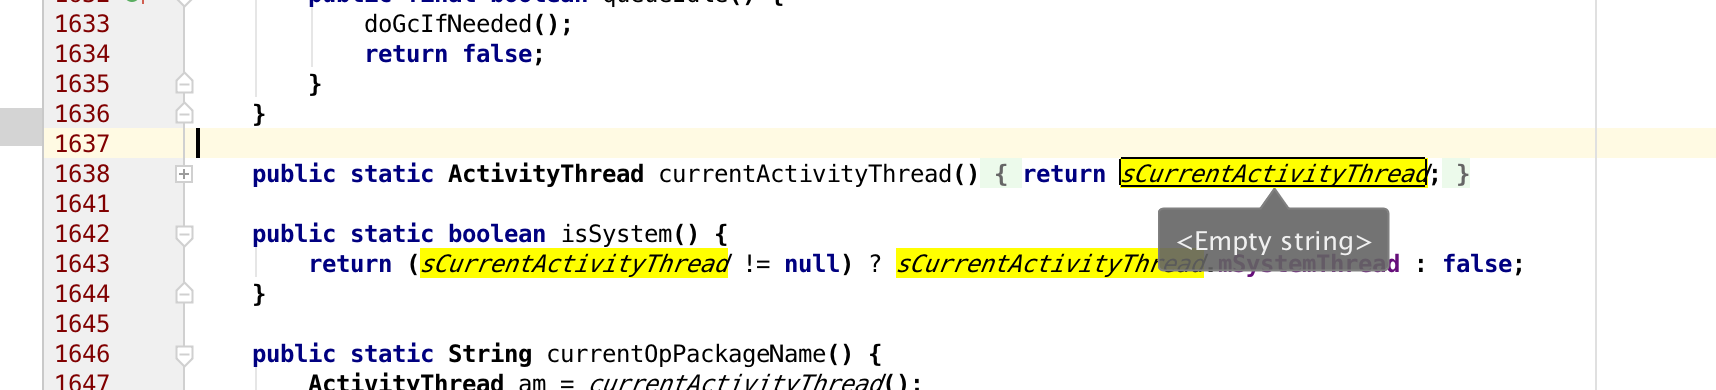
简直让人欣喜若狂啊,终于找到一个静态变量了,回忆之前我们讲的,在hook的时候,我们寻找hook点,尽量要找静态,或者单例的对象。
我们定义一个Instrumentation的代理,它会在原来执行execStartActivity之前打印一段话。
import android.app.Activity;
import android.app.Instrumentation;
import android.content.Context;
import android.content.Intent;
import android.os.Bundle;
import android.os.IBinder;
import android.util.Log;

import java.lang.reflect.Method;

/**
 * Created by chan on 16/4/8.
 */
public class InstrumentationProxy extends Instrumentation {

    private Instrumentation m_base;

    public InstrumentationProxy(Instrumentation base) {
        m_base = base;
    }

    /**
     * @param who
     * @param contextThread
     * @param token
     * @param target
     * @param intent
     * @param requestCode
     * @param options
     * @return
     * {@hide}
     */
    public ActivityResult execStartActivity(
            Context who, IBinder contextThread, IBinder token, Activity target,
            Intent intent, int requestCode, Bundle options) {

        Log.d("chan_debug", "I am crazy");

        // 开始调用原始的方法, 调不调用随你,但是不调用的话, 所有的startActivity都失效了.
        // 由于这个方法是隐藏的,因此需要使用反射调用;首先找到这个方法
        try {
            Method execStartActivity = Instrumentation.class.getDeclaredMethod(
                    "execStartActivity",
                    Context.class, IBinder.class, IBinder.class, Activity.class,
                    Intent.class, int.class, Bundle.class);
            execStartActivity.setAccessible(true);
            return (ActivityResult) execStartActivity.invoke(m_base, who,
                    contextThread, token, target, intent, requestCode, options);
        } catch (Exception e) {
            // 某该死的rom修改了  需要手动适配
            throw new RuntimeException("do not support!!! pls adapt it");
        }
    }
}
现在万事俱备 开始Hook!
小知识:在修改Instrumentation的时候,我们越早越好,读者可以自己尝试不同的Hook时机,如果过晚的话,效果不会出来,非常让人沮丧
我们尽量最早的hook,所以我们打算在application里面。
自定义一个application
/**
 * Created by chan on 16/4/8.
 */
public class HookApplication extends Application {

    @TargetApi(Build.VERSION_CODES.KITKAT)
    @Override
    protected void attachBaseContext(Context base) {
        super.attachBaseContext(base);

        Class<?> activityThreadClass = null;
        try {
            //加载activity thread的class
            activityThreadClass = Class.forName("android.app.ActivityThread", false, getClassLoader());

            //找到方法currentActivityThread
            Method method = activityThreadClass.getDeclaredMethod("currentActivityThread");
            //由于这个方法是静态的,所以传入Null就行了
            Object currentActivityThread = method.invoke(null);

            //把之前ActivityThread中的mInstrumentation替换成我们自己的
            Field field = activityThreadClass.getDeclaredField("mInstrumentation");
            field.setAccessible(true);
            Instrumentation instrumentation = (Instrumentation) field.get(currentActivityThread);
            InstrumentationProxy instrumentationProxy = new InstrumentationProxy(instrumentation);
            field.set(currentActivityThread, instrumentationProxy);
        } catch (ClassNotFoundException | IllegalAccessException | NoSuchFieldException
                | NoSuchMethodException | InvocationTargetException e) {
            e.printStackTrace();
        }
    }
}
看不懂的话我可以参考之前的源码分析过程。
这时候我们run一下看看


 3193
3193


 被折叠的 条评论
为什么被折叠?
被折叠的 条评论
为什么被折叠?
 到【灌水乐园】发言


