


 本文详细探讨了如何在Android中从外部加载APK,涉及类加载器的概念,如DexClassLoader和PathClassLoader。重点在于理解如何创建LoadApk对象,包括获取ApplicationInfo和CompatibilityInfo。通过分析源码,揭示了在加载过程中需要解决的问题和兼容性挑战,特别是对PackageParser的处理,以及在不同API级别下的适配策略。
在阅读本博文的时候,我假设你已经阅读了我之前写的几篇。猛击此处
通过前面的几篇博客,我们解决了如何启动一个并没有在ActivityManifest.xml中声明的activity。但是有很多细心的读者私信我说,我们所有的例子里,插件都是和主工程在一起的呀,我们如何从外部加载一个apk或者dex呢?
本节就是解决这个问题。
在学习本节之前,有一些非常重要的概念需要提一下。比如类加载器的概念。
我们知道在java里面,有很多种加载器,如果按层次划分的话,可以分为
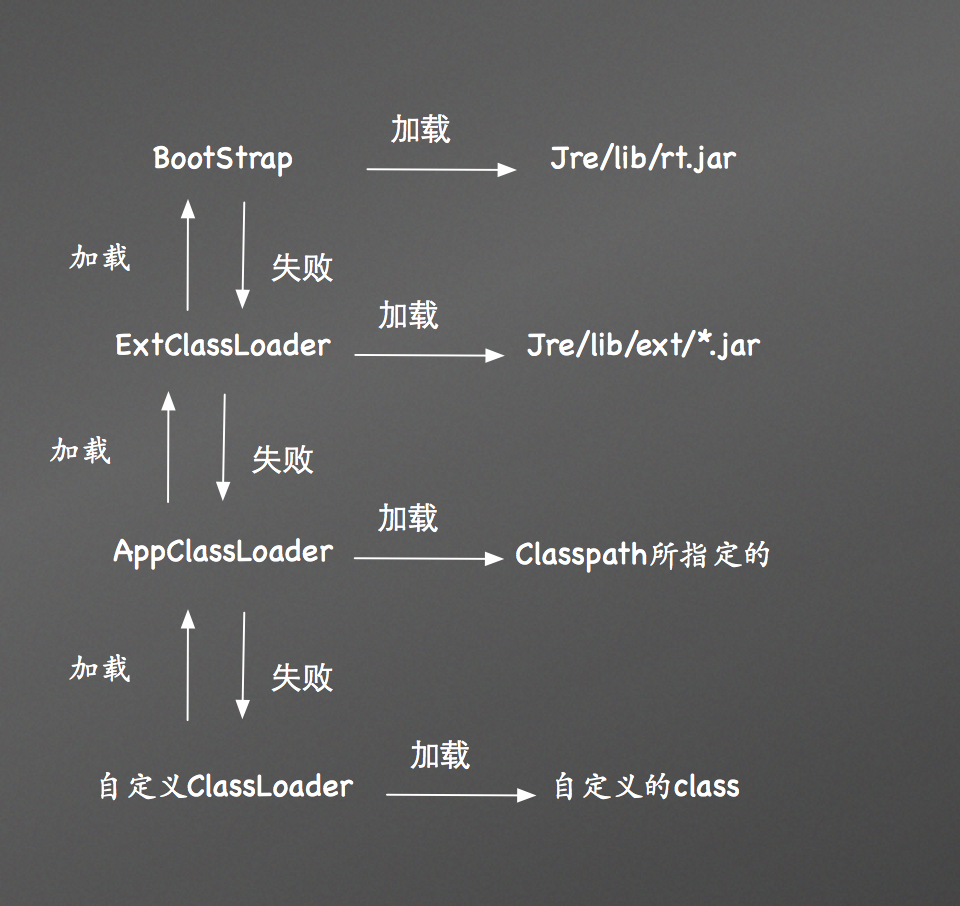
在加载类的时候,他们采用委托机制,比如,我们自定义的ClassLoader要加载一个类,它首先会委托AppClassLoader去加载,AppClassLoader又会委托ExtClassLoader去加载,而ExtClassLoader呢又去委托BootStrap加载,如果BootStrap加载成功了,那就返回,否则会让ExtClassLoader加载,如果ExtClassLoader也没加载成功,那就让AppClassLoader加载,以此类推,如果到自定义ClassLoader都还没成功加载类,那么就会抛出ClassNotFound异常。这种机制可以很大程度的避免重复加载一个类——子加载器首先尝试让父加载器加载。因而我们不难得出,在自定义一个类加载器的时候,我们还要为其指定一个父类加载器。当然本文并不是讨论这个的。具体的读者可以参阅姜维前辈的博文:姜维
在android中,系统也提供了两个类加载器:DexClassLoader和PathClassLoader
PathClassLoader用于加载/data/app中的apk,也就是已经安装了的apk,所以它就成了系统的默认类加载器。
而对于DexClassLoader呢,他可以用来任意位置的apk/dex/jar文件。
我们看下源码:
/*
 * Copyright (C) 2008 The Android Open Source Project
 *
 * Licensed under the Apache License, Version 2.0 (the "License");
 * you may not use this file except in compliance with the License.
 * You may obtain a copy of the License at
 *
 *      http://www.apache.org/licenses/LICENSE-2.0
 *
 * Unless required by applicable law or agreed to in writing, software
 * distributed under the License is distributed on an "AS IS" BASIS,
 * WITHOUT WARRANTIES OR CONDITIONS OF ANY KIND, either express or implied.
 * See the License for the specific language governing permissions and
 * limitations under the License.
 */

package dalvik.system;

import java.io.File;
import java.io.IOException;
import java.net.MalformedURLException;
import java.net.URL;
import java.util.zip.ZipFile;

/**
 * Provides a simple {
  @link ClassLoader} implementation that operates on a
 * list of jar/apk files with classes.dex entries.  The directory that
 * holds the optimized form of the files is specified explicitly.  This
 * can be used to execute code not installed as part of an application.
 *
 * The best place to put the optimized DEX files is in app-specific
 * storage, so that removal of the app will automatically remove the
 * optimized DEX files.  If other storage is used (e.g. /sdcard), the
 * app may not have an opportunity to remove them.
 */
public class DexClassLoader extends ClassLoader {


    /**
     * Creates a {
  @code DexClassLoader} that finds interpreted and native
     * code.  Interpreted classes are found in a set of DEX files contained
     * in Jar or APK files.
     *
     * The path lists are separated using the character specified by
     * the "path.separator" system property, which defaults to ":".
     *
     * @param dexPath
     *  the list of jar/apk files containing classes and resources
     * @param dexOutputDir
     *  directory where optimized DEX files should be written
     * @param libPath
     *  the list of directories containing native libraries; may be null
     * @param parent
     *  the parent class loader
     */
    public DexClassLoader(String dexPath, String dexOutputDir, String libPath,
        ClassLoader parent) {
        ...
    }
    ...
由注释我们看出,第一个参数是,jar/file文件的位置
第二个参数指定存放dex文件的位置
第三个参数用于指定存放原生库的位置(so文件)
第四个参数就是制定一个父类加载器
很简单,但是由于篇幅限制,我们不打算做个demo,我们会把DexClassLoader的使用放到下面我们的例子里。由于不是很复杂,所以这么做也是合情合理
还记得之前的源码分析吗,当AMS做完一切准备工作,让UI线程开始启动一个新的activity之后,ActivityThread便开始加载一个新的activity
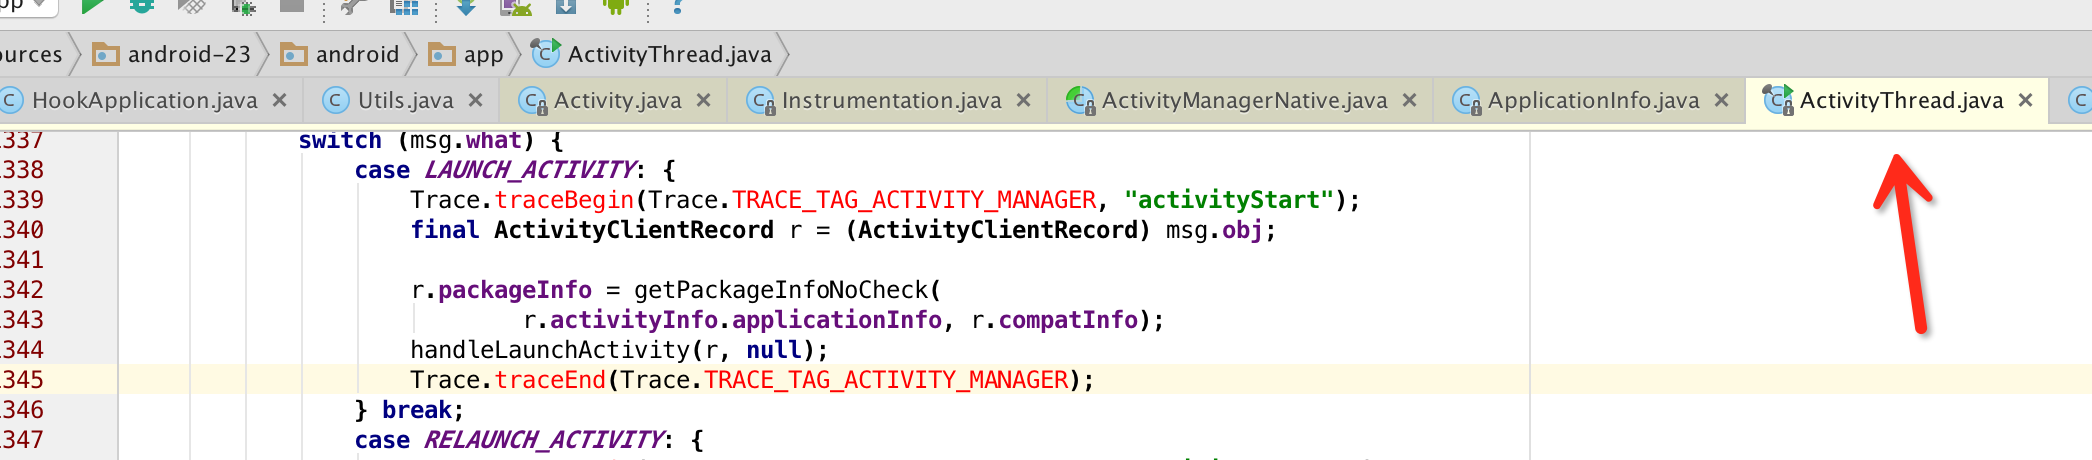
之后再handleLaunchActivity函数中:
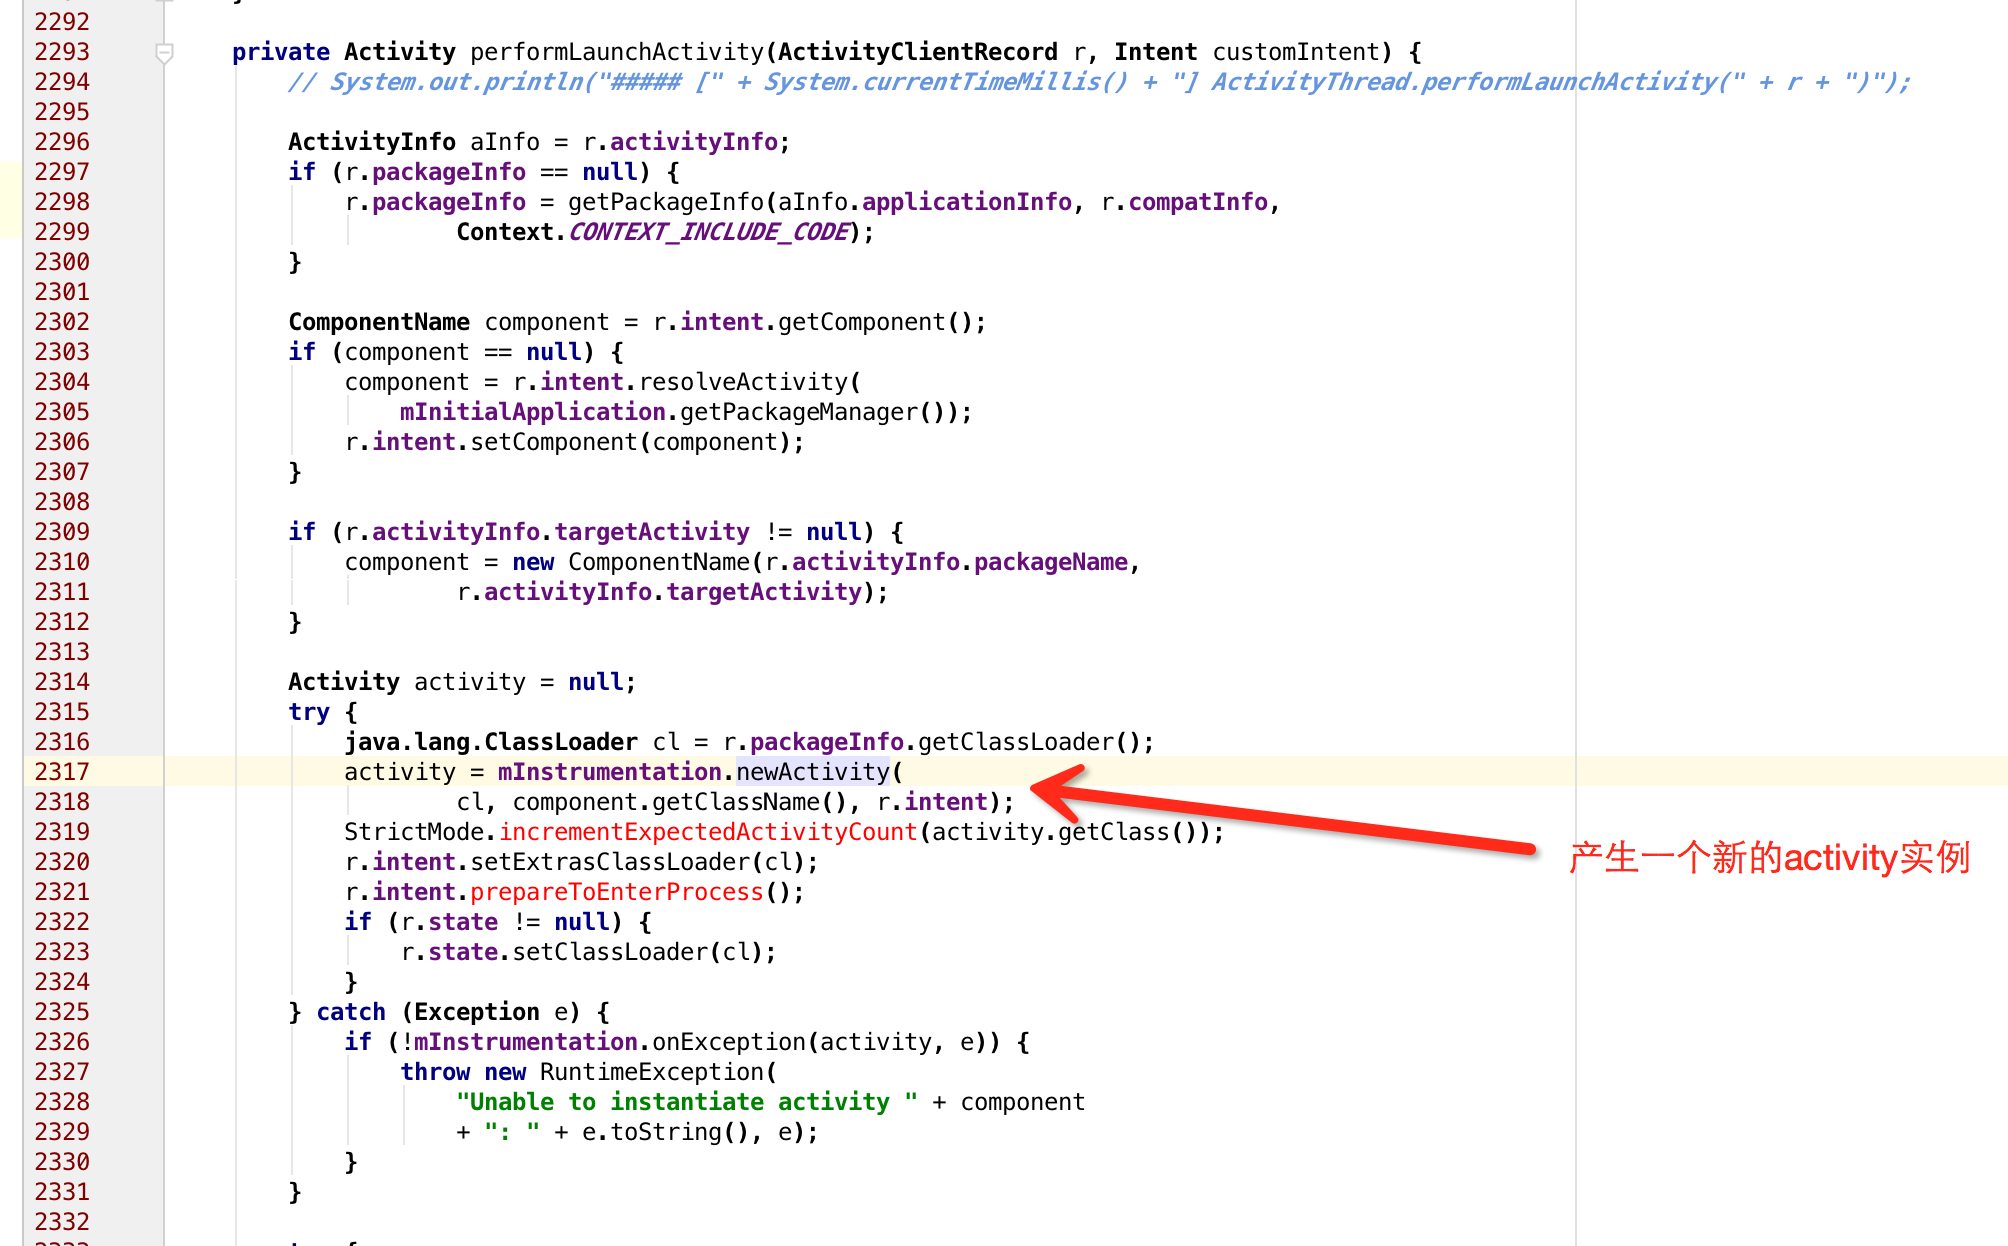
调用mInstrumentation.newActivity方法,我们看下函数签名:
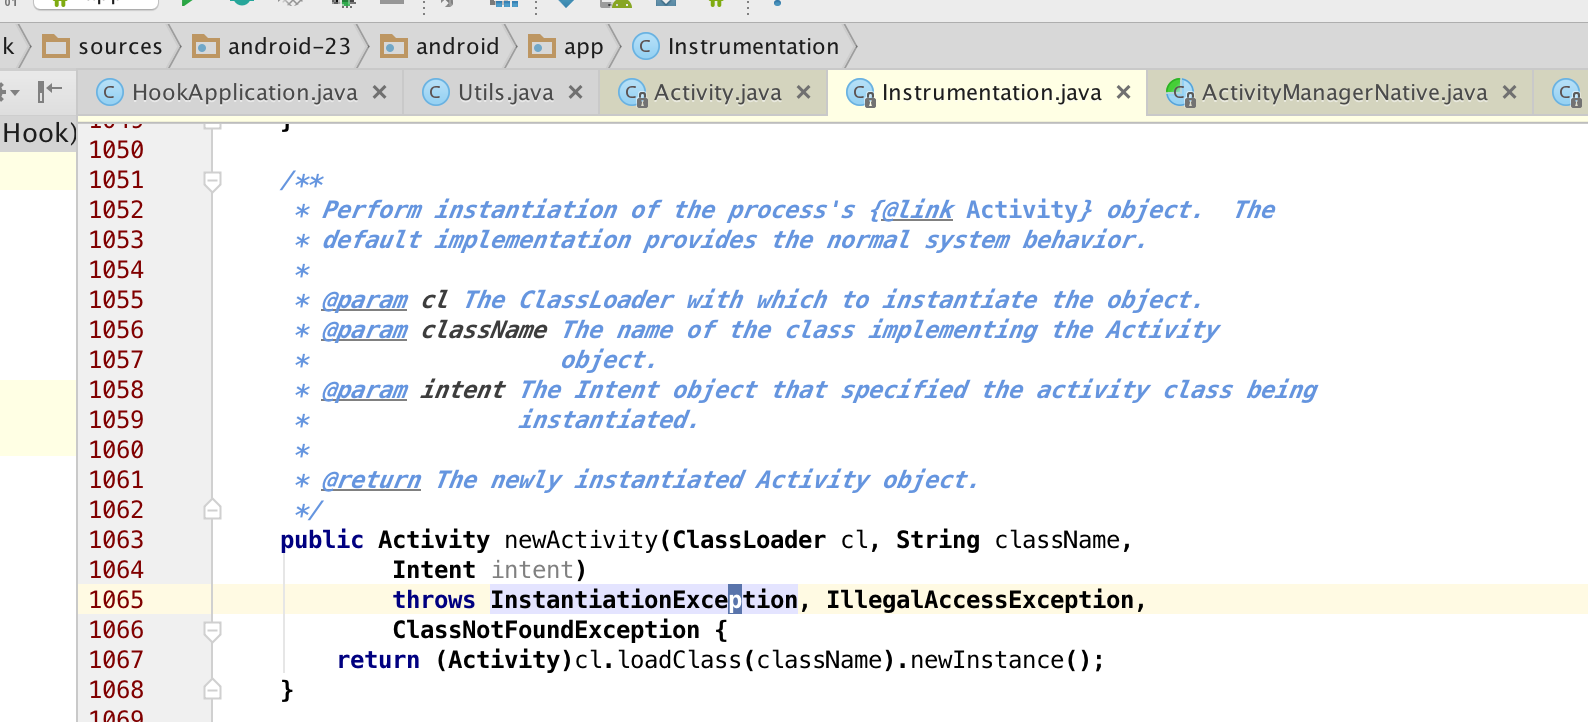
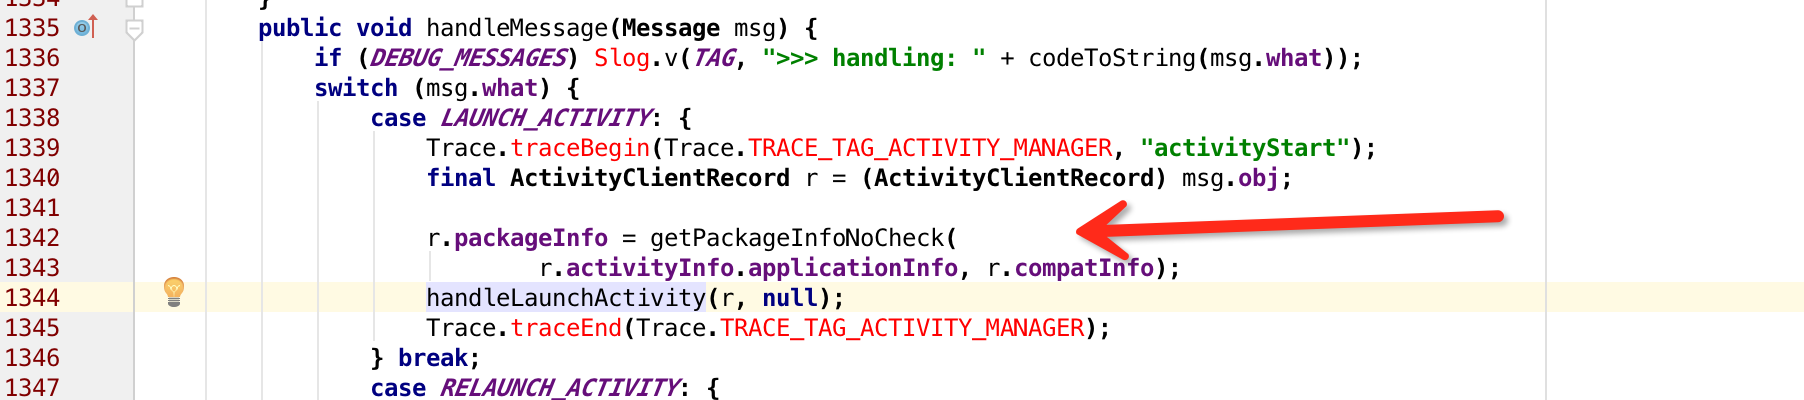
通过class加载一个类,并且实例化。而这个cl是什么呢,根据上面的代码我们可以知道是r.packageInfo.getClassLoader的返回值,而这个r.packageInfo是在H的handleMessage中被赋值的:
我们看下这个field
  static final class ActivityClientRecord {
        ...
        LoadedApk packageInfo;
        ...
}
而LoadedApk又是什么呢:
/**
 * Local state maintained about a currently loaded .apk.
 * @hide
 */
public final class LoadedApk {

    ...
}
它代表了一个apk所对应的内存表示,也就是apk被加载到内存后的信息,比如代码,资源等等。
那么到这里,我们要知道,如果我们要从外部加载一个apk,首先就要获得这个LoadApk对象,因为之后activity的实例化,都会用到LoadApk中的类加载器。因而我们首先要解决的事情就是如何产生一个LoadApk
我们要保证一切万无一失,最好就是模仿android系统的行为,如果我们能和android系统产生一个LoadApk的方式一样,那就做到了万无一失。
回溯上文,一个LoadApk的产生是通过:
   r.packageInfo = getPackageInfoNoCheck(
                            r.activityInfo.applicationInfo, r.compatInfo);
我们看下函数签名:
    public final LoadedApk getPackageInfoNoCheck(ApplicationInfo ai,
            CompatibilityInfo compatInfo) {
        return getPackageInfo(ai, compatInfo, null, false, true, false);
    }
函数调用了getPackageInfo:
    private LoadedApk getPackageInfo(ApplicationInfo aInfo, CompatibilityInfo compatInfo,
            ClassLoader baseLoader, boolean securityViolation, boolean includeCode,
            boolean registerPackage) {
        final boolean differentUser = (UserHandle.myUserId() != UserHandle.getUserId(aInfo.uid));
        synchronized (mResourcesManager) {
            WeakReference<LoadedApk> ref;
            if (differentUser) {
                // Caching not supported across users
                ref = null;
            } else if (includeCode) {
                //includeCode的值为true 所以必定会调用这个函数
                //它的作用是,先从缓存中获取LoadApk
                ref = mPackages.get(aInfo.packageName);
            } else {
                ref = mResourcePackages.get(aInfo.packageName);
            }

            LoadedApk packageInfo = ref != null ? ref.get() : null;
            //如果并没有缓存 那就产生一个新的实例
            if (packageInfo == null || (packageInfo.mResources != null
                    && !packageInfo.mResources.getAssets().isUpToDate())) {
                if (localLOGV) Slog.v(TAG, (includeCode ? "Loading code package "
                        : "Loading resource-only package ") + aInfo.packageName
                        + " (in " + (mBoundApplication != null
                                ? mBoundApplication.processName : null)
                        + ")");
                //产生一个新的实例
                packageInfo =
                    new LoadedApk(this, aInfo, compatInfo, baseLoader,
                            securityViolation, includeCode &&
                            (aInfo.flags&ApplicationInfo.FLAG_HAS_CODE) != 0, registerPackage);

                if (mSystemThread && "android".equals(aInfo.packageName)) {
                    packageInfo.installSystemApplicationInfo(aInfo,
                            getSystemContext().mPackageInfo.getClassLoader());
 最低0.47元/天 解锁文章


 2248
2248

 被折叠的 条评论
为什么被折叠?
被折叠的 条评论
为什么被折叠?
 到【灌水乐园】发言


