


第三方下载网址:http://pan.baidu.com/s/1ntHWClj
步骤如下:
第一步:下载第三方库MJRefresh
第二步:将头文件MJRefresh.h导入到pch文件或UITabView所在的控制器中。
第三步:将UITabView所在的控制器关闭ARC 方法如下:
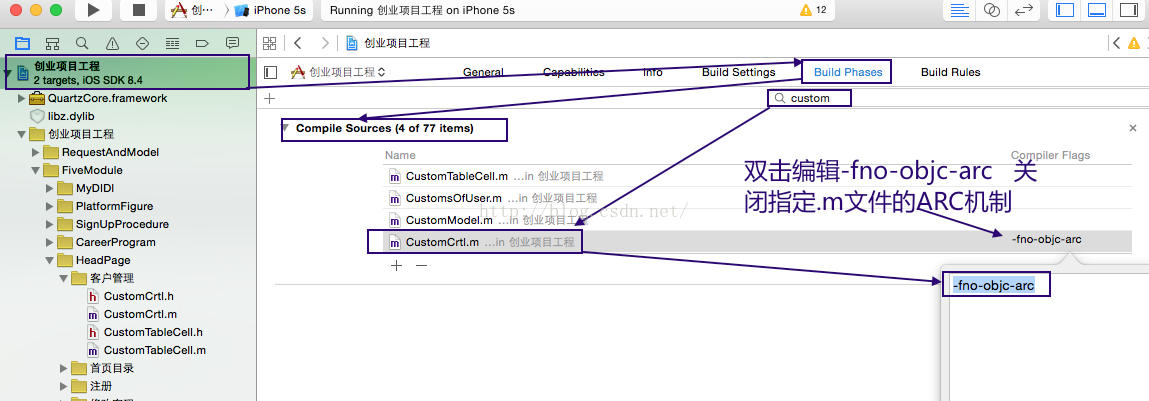
重写控制器的dealloc方法,在此方法内将属于此控制器的对象release一次
具体代码如下:
新建数据请求的类如下:
//
//  MethodsofRest.h
//  创业项目工程
//
//  Created by apple on 15/9/23.
//  Copyright (c) 2015年 LiuXun. All rights reserved.
//

#import <Foundation/Foundation.h>

@interface MethodsofRest : NSObject <ASIHTTPRequestDelegate>

@property (nonatomic, strong) NSString *jsonStr;
@property(nonatomic, strong) NSString *url;
@property(nonatomic, strong)ASIHTTPRequest *reques;
-(id) init:(NSString *) url;
-(NSString *) jsonString;

@end
//
//  MethodsofRest.m
//  创业项目工程
//
//  Created by apple on 15/9/23.
//  Copyright (c) 2015年 LiuXun. All rights reserved.
//

#import "MethodsofRest.h"

@implementation MethodsofRest
-(id) init:(NSString *) url
{
    if (self = [super init]) {
        self.url = url;
    }
    return self;
}
-(void) requestFinished:(ASIHTTPRequest *)request
{
    NSString *json = request.responseString;
    self.jsonStr = json;
}
-(void) requestFailed:(ASIHTTPRequest *)request
{
    NSLog(@"数据请求失败");
}
-(NSString *)jsonString
{
    _reques = [[ASIHTTPRequest  alloc] initWithURL:[NSURL URLWithString:self.url]];
    [_reques setRequestMethod:@"GET"];
    _reques.delegate = self;
    [_reques startSynchronous];  // 如果要独立抽取到一个类中,必须要用同步请求
    return self.jsonStr;
}
@end
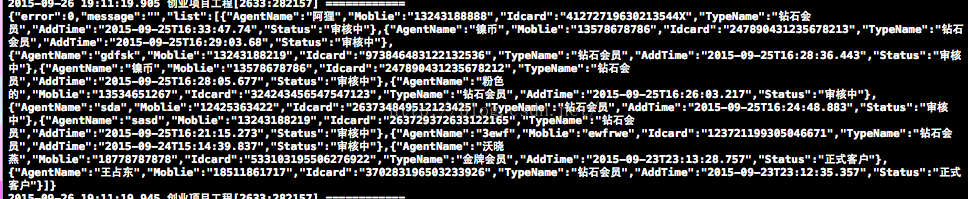
观察获取的json字符串如下:整体是一个大字典 即一个大的Model,里面有一个字典数组 即小Model数组
//
//  CustomModel.h
//  创业项目工程
//
//  Created by apple on 15/9/26.
//  Copyright (c) 2015年 LiuXun. All rights reserved.
//

#import <Foundation/Foundation.h>

@interface CustomModel : NSObject  <NSCoding>

@property(nonatomic, strong) NSString *AgentName;
@property(nonatomic, strong) NSString *Moblie;
@property(nonatomic, strong) NSString *Idcard;
@property(nonatomic, strong) NSString *TypeName;
@property(nonatomic, strong) NSString *AddTime;
@property(nonatomic, strong) NSString *Status;

-(instancetype) initWithDict:(NSDictionary *) dict;
+(instancetype) customWithDict:(NSDictionary *) dict;

@end
//
//  CustomModel.m
//  创业项目工程
//
//  Created by apple on 15/9/26.
//  Copyright (c) 2015年 LiuXun. All rights reserved.
//

#import "CustomModel.h"

@implementation CustomModel
-(instancetype) initWithDict:(NSDictionary *) dict
{
    if (self = [super init]) {
        [self setValuesForKeysWithDictionary:dict];
    }
    return self;
}
+(instancetype) customWithDict:(NSDictionary *) dict
{
    return [[self alloc] initWithDict:dict];
}

 /*为了增加程序的拓展性,可以为model类添加编码解码方法*/
-(void) encodeWithCoder:(NSCoder *)aCoder
{
    [aCoder encodeObject:self.AgentName forKey:@"AgentName"];
    [aCoder encodeObject:self.Moblie forKey:@"Moblie"];
    [aCoder encodeObject:self.Idcard forKey:@"Idcard"];
    [aCoder encodeObject:self.TypeName forKey:@"TypeName"];
    [aCoder encodeObject:self.AddTime forKey:@"AddTime"];
    [aCoder encodeObject:self.Status forKey:@"Status"];
}

-(id) initWithCoder:(NSCoder *)aDecoder
{
    if (self = [super init]) {
        self.AgentName = [aDecoder decodeObjectForKey:@"AgentName"];
        self.Moblie = [aDecoder decodeObjectForKey:@"Moblie"];
        self.Idcard = [aDecoder decodeObjectForKey:@"Idcard"];
        self.TypeName = [aDecoder decodeObjectForKey:@"TypeName"];
        self.AddTime = [aDecoder decodeObjectForKey:@"AddTime"];
        self.Status = [aDecoder decodeObjectForKey:@"Status"];
    }
    return self;
}

/*为了便于调试程序,为其重写description方法*/
-(NSString *)description
{
    NSString *t = [NSString stringWithFormat:@"%@-%@-%@-%@-%@-%@",self.AgentName, self.Moblie,self.Idcard,self.TypeName,self.AddTime,self.Status];
    return t;
}

@end
编辑CustomsOfUser.h如下:
//
//  CustomsOfUser.h
//  创业项目工程
//
//  Created by apple on 15/9/26.
//  Copyright (c) 2015年 LiuXun. All rights reserved.
//

#import <Foundation/Foundation.h>

@interface CustomsOfUser : NSObject <NSCoding>

@property(nonatomic, assign) int  error;
@property(nonatomic, strong) NSString *message;
@property (nonatomic, strong) NSArray *list;

-(instancetype) initWithDict:(NSDictionary *) dict;
+(instancetype) customsOfUserWithDict:(NSDictionary *) dict;

@end
//
//  CustomsOfUser.m
//  创业项目工程
//
//  Created by apple on 15/9/26.
//  Copyright (c) 2015年 LiuXun. All rights reserved.
//

#import "CustomsOfUser.h"

@implementation CustomsOfUser

-(instancetype) initWithDict:(NSDictionary *) dict
{
    if (self = [super init]) {
        [self setValuesForKeysWithDictionary:dict]; // 先统一对应赋值以下
        //再对数组内的字典对象转为model对象进行赋值存放
        NSMutableArray *modelArray = [NSMutableArray array];
        for (NSDictionary *dictCustoms in  dict[@"list"]) {
            CustomModel * model = [CustomModel  customWithDict:dictCustoms];
            [modelArray addObject:model];
        }
        self.list = modelArray;
    }
    return self;
}
+(instancetype) customsOfUserWithDict:(NSDictionary *) dict
{
    return [[self alloc] initWithDict:dict];
}

   /*为了以后可以写入把对象写入文件,在此添加编码解码方法*/
-(void)encodeWithCoder:(NSCoder *)aCoder
{
    [aCoder encodeObject:[NSNumber numberWithInt:self.error] forKey:@"error"];
    [aCoder encodeObject:self.message forKey:@"message"];
    [aCoder encodeObject:self.list forKey:@"list"];
}

-(id)initWithCoder:(NSCoder *)aDecoder
{
    if (self  = [super init]) {
        self.error = [[aDecoder decodeObjectForKey:@"error"] intValue];
        self.message = [aDecoder decodeObjectForKey:@"message"];
        self.list = [aDecoder decodeObjectForKey:@"list"];
    }
    return self;
}

@end
用户Model新建完成
下一步新建UItabView的自定义单元格
编辑CustomTableCell.h如下:
//
//  CustomTableCell.h
//  创业项目工程
//
//  Created by apple on 15/9/26.
//  Copyright (c) 2015年 LiuXun. All rights reserved.
//

#import <UIKit/UIKit.h>

@interface CustomTableCell : UITableViewCell

@property (nonatomic, strong) CustomModel *model;

@property (nonatomic, strong) UIImageView *imgvBack;
@property (nonatomic, strong) UILabel *lblNam;
@property (nonatomic, strong) UILabel *lblPhone;
@property (nonatomic, strong) UILabel *lblID;
@property (nonatomic, strong) UILabel *lblType;
@property (nonatomic, strong) UILabel *lblAddTime;
@property(nonatomic, strong) UILabel *lblStatus;
@end
//
// CustomTableCell.m
// 创业项目工程
//
// Created by apple on 15/9/26.
// Copyright (c) 2015年 LiuXun. All rights reserved.
//
#import "CustomTableCell.h"
@implementation CustomTableCell
-(id)initWithStyle:(UITableViewCellStyle)style reuseIdentifier:(NSString *)reuseIdentifier
{
if (self = [super initWithStyle:style reuseIdentifier:reuseIdentifier]) {
UIImageView *imgv = [[UIImageView alloc] init];
[self.contentView addSubview:imgv];
self.imgvBack = imgv;
UILabel *lbl1 = [[UILabel alloc] init];
[self.contentView addSubview:lbl1];
self.lblNam = lbl1;
UILabel *lbl2 = [[UILabel alloc] init];
[self.contentView addSubview:lbl2];
self.lblPhone = lbl2;
UILabel *lbl3 = [[UILabel alloc] init];
[self.contentView addSubview:lbl3];
self.lblID = lbl3;
UILabel *lbl4 = [[UILabel alloc] init];
[self.contentView addSubview:lbl4];
self.lblType = lbl4;
UILabel *lbl5 = [[UILabel alloc] init];
[self.contentView addSubview:lbl5];
self.lblAddTime = lbl5;
UILabel *lbl6 = [[UILabel alloc] init];
[self.contentView addSubview:lbl6];
self.lblStatus = lbl6;
}
return self;
}
/*重写Model的set方法,进行数据加载和属性设置*/
-(void) setModel:(CustomModel *)model
{
_model = model;
[self setFrame];
[self setData];
}
-(void) setFrame
{
self.imgvBack.image = [UIImage imageNamed:@"kehubg@2x"];
[self.imgvBack mas_makeConstraints:^(MASConstraintMaker *make) {
make.left.equalTo(self).offset(-10);
make.right.equalTo(self).offset(10);
make.top.and.bottom.equalTo(self).offset(0);
}];
[self.lblNam mas_makeConstraints:^(MASConstraintMaker *make) {
make.left.equalTo(self).offset(10);
make.right.equalTo(self).offset(-40);
make.top.equalTo(self).offset(10);
make.height.equalTo(self).multipliedBy(0.18);
}];
[self.lblPhone mas_makeConstraints:^(MASConstraintMaker *make) {
make.left.equalTo(self).offset(10);
make.right.equalTo(self).offset(-40);
make.top.equalTo(self.lblNam.mas_bottom);
make.height.equalTo(self).multipliedBy(0.18);
}];
[self.lblID mas_makeConstraints:^(MASConstraintMaker *make) {
make.left.equalTo(self).offset(10);
make.right.equalTo(self).offset(-40);
make.top.equalTo(self.lblPhone.mas_bottom);
make.height.equalTo(self).multipliedBy(0.18);
}];
[self.lblAddTime mas_makeConstraints:^(MASConstraintMaker *make) {
make.left.equalTo(self).offset(10);
make.right.equalTo(self).offset(-40);
make.top.equalTo(self.lblID.mas_bottom);
make.height.equalTo(self).multipliedBy(0.18);
}];
[self.lblStatus mas_makeConstraints:^(MASConstraintMaker *make) {
make.left.equalTo(self).offset(10);
make.right.equalTo(self).offset(-40);
make.top.equalTo(self.lblAddTime.mas_bottom);
make.bottom.equalTo(self).offset(-10);
}];
[self.lblType mas_makeConstraints:^(MASConstraintMaker *make) {
make.right.equalTo(self);
make.centerY.equalTo(self);
make.height.equalTo(self.mas_height).multipliedBy(0.5f);
make.width.equalTo(self.mas_width).multipliedBy(0.25);
}];
}
-(void) setData
{
NSString *name = self.model.AgentName;
NSString *phone = self.model.Moblie;
NSString *ID = self.model.Idcard;
NSString *addTime = self.model.AddTime;
NSString * status = self.model.Status;
NSString *type = self.model.TypeName;
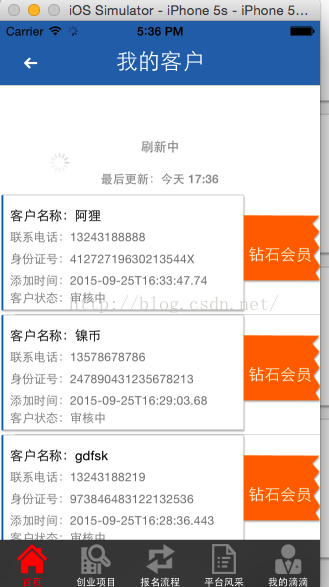
self.lblNam.text = [NSString stringWithFormat:@"客户名称:%@",name];
self.lblPhone.text = [NSString stringWithFormat:@"联系电话:%@",phone];
self.lblID.text = [NSString stringWithFormat:@"身份证号:%@",ID];
self.lblAddTime.text = [NSString stringWithFormat:@"添加时间:%@",addTime];
self.lblStatus.text = [NSString stringWithFormat:@"客户状态:%@",status];
self.lblType.text = [NSString stringWithFormat:@"%@",type];
self.lblType.textAlignment = NSTextAlignmentCenter;
[self.lblNam setFont:[UIFont systemFontOfSize:13]];
[self.lblPhone setFont:[UIFont systemFontOfSize:12]];
[self.lblID setFont:[UIFont systemFontOfSize:12]];
[self.lblAddTime setFont:[UIFont systemFontOfSize:12]];
[self.lblStatus setFont:[UIFont systemFontOfSize:12]];
[self.lblType setFont:[UIFont systemFontOfSize:16]];
self.lblPhone.textColor = [UIColor grayColor];
self.lblID.textColor = [UIColor grayColor];
self.lblAddTime.textColor = [UIColor grayColor];
self.lblStatus.textColor = [UIColor grayColor];
self.lblType.textColor = [UIColor whiteColor];
}
@end
接下来 最重要的就是MJRefresh第三方库的使用:
CustomCrtl.h
//
//  CustomCrtl.h
//  创业项目工程
//
//  Created by apple on 15/9/24.
//  Copyright (c) 2015年 LiuXun. All rights reserved.
//
#import "NavBaseCrtl.h"

@interface CustomCrtl : NavBaseCrtl<UITableViewDataSource,UITableViewDelegate>

// 上下刷新用的视图
@property (nonatomic, strong) UITableView *tableView;

// 表格中要用到的数据存放到这个数组
@property(nonatomic, strong) NSMutableArray *listArray;

// 这个变量是用来判断可以刷新的次数
@property(nonatomic, assign) int page;

@end
//
//  CustomCrtl.m
//  创业项目工程
//
//  Created by apple on 15/9/24.
//  Copyright (c) 2015年 LiuXun. All rights reserved.
//

#import "CustomCrtl.h"
#import "MJRefresh.h"

@implementation CustomCrtl

-(NSArray *) AcquireCustomModels:(int) page
{     /*根据刷新的页码将返回的json串转换为Model数组返回*/
    NSString *path = [NSString stringWithFormat:@"http://www.ddpro.com.cn/api/user/userlist?userName=%@&page=%d&pageSize=10",@"",page];

    MethodsofRest *rest = [[MethodsofRest alloc] init:path];
    NSString *jsonStr = [rest jsonString];
    NSDictionary *customsDic = [jsonStr JSONValue];
    CustomsOfUser *customsmodel = [CustomsOfUser customsOfUserWithDict:customsDic];
    NSArray *models = customsmodel.list;
    return models;
}

-(void)loadData
{
    /*刷新一次,让此参数加一*/
    self.page ++;

    NSArray *array = [self AcquireCustomModels:self.page];  // 一次加载一个Page的内容
    if (array.count !=0) { // 因为数组即使没有内容也不会为空,一般从数组中的元素个数判断是否有内容
        [self.listArray addObjectsFromArray:array];
    }
    else
    {
        [self.tableView footerEndRefreshing]; // 让上拉刷新尾部控件停止刷新状态
    }
    [self.tableView reloadData];
}
- (void)viewDidLoad
{
    [super viewDidLoad];

    [self setLeftItem:YES andCenterName:@"我的客户"];
    //初始化用到的数组
    self.listArray = [NSMutableArray arrayWithCapacity:1];
    //这一段是创建一个可以刷新的表格视图
    self.tableView = [[UITableView alloc] initWithFrame:CGRectMake(0, 64, self.view.frame.size.width, self.view.frame.size.height) ];
    self.tableView.delegate = self;
    self.tableView.dataSource = self;
    self.tableView.rowHeight = 120;
    self.tableView.showsVerticalScrollIndicator = NO;
    [self.view addSubview:self.tableView];

    //刚进来这个视图时先刷新一次表格视图
    [self setupRefresh]; //开始时刷新一次数据
}

-(void) setupRefresh   // 用于刷新数据
{
    // 下拉刷新
    [self.tableView addHeaderWithTarget:self action:@selector(headRefreshing) ];
    [self.tableView headerBeginRefreshing]; //主动让下拉刷新头部控件进入刷新状态

    // 上拉加载更多 (进入刷新状态就会调用self的footerRereshing)
    [self.tableView  addFooterWithTarget:self action:@selector(footerRereshing)];

    // 设置上下拉时的文字(也可以不设置,默认的文字在MJRefreshConst中修改)
     self.tableView.headerPullToRefreshText =@"下拉可以刷新"; // 设置头部控件的文字
    self.tableView.headerReleaseToRefreshText =@"松开马上刷新";   // 下拉即将刷新时显示的文字
    self.tableView.headerRefreshingText = @"刷新中";  // 设置下拉松开刷新数据时显示的文字

    self.tableView.footerPullToRefreshText = @"上拉可以加载更多数据";  // 设置尾部控件的文字
    self.tableView.footerReleaseToRefreshText =@"松开马上加载更多数据"; // 上拉未松开时尾部显示的文字
    self.tableView.footerRefreshingText = @"加载中......"; // 设置上拉松开后显示的文字
}

// 下拉刷新
-(void)headRefreshing
{
    [self  loadData];
       [self.tableView headerEndRefreshing];  // 让头部控件停止刷新状态
}
// 上拉加载
-(void)footerRereshing
{
    [self  loadData];

}

#pragma mark - TableView*

- (NSInteger)tableView:(UITableView *)tableView numberOfRowsInSection:(NSInteger)section
{
    return [self.listArray count];
}

-(UITableViewCell *) tableView:(UITableView *)tableView cellForRowAtIndexPath:(NSIndexPath *)indexPath
{
    static NSString *CustomId = @"Custom_ID";
    CustomTableCell *cell = [tableView dequeueReusableCellWithIdentifier:CustomId];
    if (cell == nil) {
        cell = [[CustomTableCell alloc] initWithStyle:UITableViewCellStyleDefault reuseIdentifier:CustomId];
    }
    CustomModel *customModel = self.listArray[indexPath.row];
    cell.model =  customModel;
    return cell;
}


- (void)didReceiveMemoryWarning
{
    [super didReceiveMemoryWarning];
    NSLog(@"内存不足");
}

-(void)viewWillAppear:(BOOL)animated
{
    [self.tableView reloadData];   // 当从别的页面跳转过来时要重新刷新一次视图
}

-(void)afterPressLeft
{
      // [self release]; // 注意:在此是绝对不可对自身进行release,以为pop方法会自动release
       [self.navigationController popToRootViewControllerAnimated:YES];
}

-(void)dealloc
{
    [self.tableView release];
    [self.listArray  release];
    [super dealloc];
}
@end
注意:如果忘记了使用方法 打开MJRefresh.h如下所示:直接查找使用即可
/**
 * 代码地址: https://github.com/CoderMJLee/MJRefresh
 * 代码地址: http://code4app.com/ios/%E5%BF%AB%E9%80%9F%E9%9B%86%E6%88%90%E4%B8%8B%E6%8B%89%E4%B8%8A%E6%8B%89%E5%88%B7%E6%96%B0/52326ce26803fabc46000000
 * 友情提示: 遇到一些小问题, 最好及时下载最新的代码试试
 */

#import "UIScrollView+MJRefresh.h"

/**
 MJ友情提示:
 1. 添加头部控件的方法
 [self.tableView addHeaderWithTarget:self action:@selector(headerRereshing)];
 或者
 [self.tableView addHeaderWithCallback:^{ }];

 2. 添加尾部控件的方法
 [self.tableView addFooterWithTarget:self action:@selector(footerRereshing)];
 或者
 [self.tableView addFooterWithCallback:^{ }];

 3. 可以在MJRefreshConst.h和MJRefreshConst.m文件中自定义显示的文字内容和文字颜色

 4. 本框架兼容iOS6\iOS7,iPhone\iPad横竖屏

 5.自动进入刷新状态
 1> [self.tableView headerBeginRefreshing];
 2> [self.tableView footerBeginRefreshing];

 6.结束刷新
 1> [self.tableView headerEndRefreshing];
 2> [self.tableView footerEndRefreshing];
*/


 942
942

 被折叠的 条评论
为什么被折叠?
被折叠的 条评论
为什么被折叠?
 到【灌水乐园】发言


