


知识清单
基础知识清单
SpringMVC框架(重点)
- MVC在B/S系统中的应用方式
- SpringMVC框架原理(DispatcherServlet前端控制器、处理器映射器、处理器适配器、视图解析器)
SpringMVC入门程序
- 需求:商品列表查询
- 常用的处理器映射器,处理器适配器
- 注解的处理器映射器,处理器适配器用于注解开发(重点)
注解开发基础
- 常用注解的使用
- 参数绑定
- 自定义参数绑定
SpringMVC与Struts的区别
高级知识清单(第二部分)
使用SpringMVC上传图片
集合参数的绑定
validation校验器
异常处理器的使用(用于系统异常处理)
Restful支持
拦截器
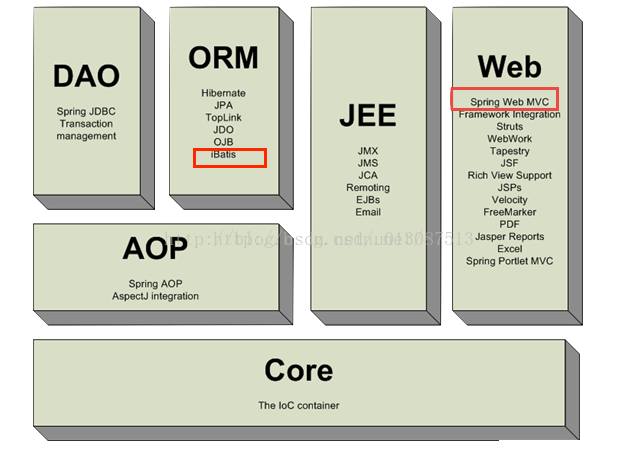
SpringMVC框架
SpringMVC是什么?
springmvc是Spring的一个模块,提供web层解决方案(就与MVC设计架构)
MVC在B/S系统中的应用
MVC是一种设计模式,在B/S中的应用如下图所示:

SpringMVC的框架
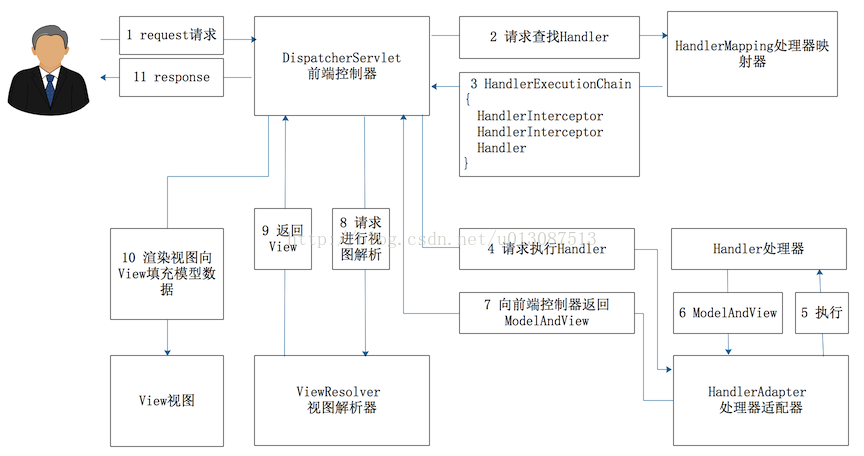
执行过程大致如下:
第一步:用户发起request请求,请求至DispatcherServlet前端控制器。
第二步:DispatcherServlet前端控制器请求HandlerMapping处理器映射器查找Handler。DispatcherServlet: 前端控制器,相当于中央调度器,各个组件都和前端控制器进行交互,降低了各个组件之间的耦合度。
第三步:HandlerMapping处理器映射器,根据url及一些配置规则(xml配置、注解配置)查找Handler,将Handler返回给DispatcherServlet前端控制器。
第四步:DispatcherServlet前端控制器调用适配器执行Handler,有了适配器通过适配器去扩展对不同Handler执行方式(比如:原始servlet开发,注解开发)
第五步:适配器执行Handler;Handler是后端控制器,可以当成模型。
第六步:Handler执行完后后返回ModelAndView。ModelAndView: SpringMVC的一个对象,对model和view进行封装。
第七步:适配器将ModelAndView返回给DispatcherServlet前端控制器。
第八步:DispatcherServlet调用视图解析器进行视图解析,解析后生成view,视图解析器根据逻辑视图名解析出真正的视图。view:SpringMVC视图封装对象,提供了很多view,比如jsp、freemarker、pdf、execel.......。
第九步:ViewResolver视图解析器给前端控制器返回view。
第十步:DispatcherServlet调用view的渲染视图的方法,将模型数据填充到request域。
第十一步:DispatcherServlet向用户响应结果(jsp页面、json数据......).
DispatcherServlet:前端控制器,由SpringMVC提供。
HandlerMapping:处理器映射器,由SpringMVC提供。
HandlerAdapter:处理器适配器,由SpringMVC提供。
Handler:处理器,需要程序员开发。
ViewResolver:视图解析器,由SpringMVC提供。
view:真正的视图页面,由程序员编写。
入门程序
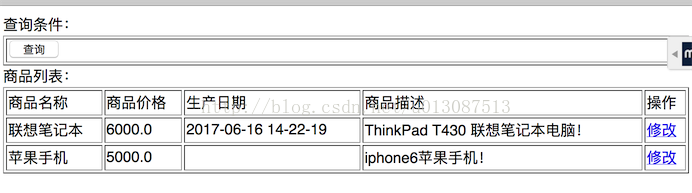
需求
实现商品列表查询
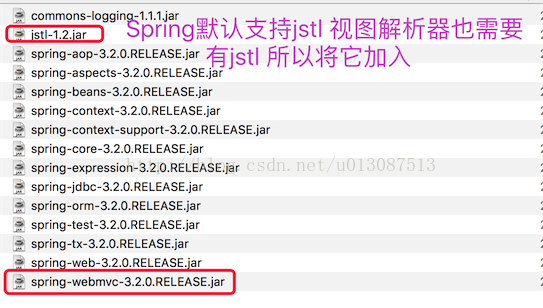
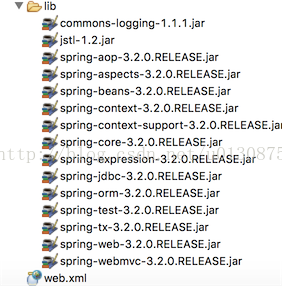
需要的jar包
使用spring3.2.0(带springmvc模块)  如下图所示
如下图所示
如下图所示
前端控制器
在web.xml中进行配置
<!-- 前端控制器 -->
	<servlet>
		<servlet-name>springmvc</servlet-name>
		<servlet-class>org.springframework.web.servlet.DispatcherServlet</servlet-class>
		<!-- 加载SpringMVC配置 -->
		<init-param>
			<!-- 配置文件的位置 -->
			<!-- 如果不配置contextConfigLocation,
				 默认查找的配置文件名称classpath下的: servlet名称+"servlet.xml"即springmvc-servlet.xml
			 -->
			<param-name>contextConfigLocation</param-name>
			<param-value>classpath:springmvc.xml</param-value>
		</init-param>
	</servlet>
	<servlet-mapping>
		<servlet-name>springmvc</servlet-name>
		<!--
		可以配置/, 此工程 所有请求全部由springmvc解析,此种方式可以实现
		RESTful方式,需要特殊处理对静态文本的解析不能由springmvc解析
		可以配置*.do或*.action, 所有请求的url扩展名为.do或.action由springmvc解析,此种方法
		不可以使用/*,如果配置/*,返回的jsp也由springmvc解析,这是不对的
		 -->
		<url-pattern>*.action</url-pattern>
	</servlet-mapping>
springmvc.xml
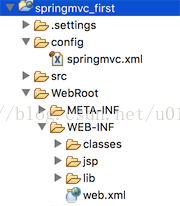
在springmvc.xml中配置springmvc架构的三大组件(处理器映射器、处理器适配器、视图解析器)工程结构
处理器映射器
在springmvc.xml中进行配置:
BeanNameURLHandlerMapping:根据url( xxx.action ) 匹配Spring容器的name。
找到对应的Bean(程序员编写的Handler)
<!-- 根据bean的name进行查找Handler 将action的url配置在bean的name中 -->
<bean class="org.springframework.web.servlet.handler.BeanNameUrlHandlerMapping"/>处理器适配器
在springmvc.xml中配置:
<!-- 配置处理器适配器 springmvc框架根据HandlerAdapter接口判断是否是处理器适配器 -->
		<bean class="org.springframework.web.servlet.mvc.SimpleControllerHandlerAdapter"/>
程序员编写Handler要根据所配置的适配器的要求编写。
SimpleControllerHandlerAdapter适配器要求:通过supports方法知道Handler必须要实现哪个接口
查看HandlerAdapter(适配器接口)源代码如下:
public interface HandlerAdapter {
	// 已经去除文档注释
	boolean supports(Object handler);

	ModelAndView handle(HttpServletRequest request, HttpServletResponse response, Object handler) throws Exception;

	long getLastModified(HttpServletRequest request, Object handler);

}public class SimpleControllerHandlerAdapter implements HandlerAdapter {
public boolean supports(Object handler) {
return (handler instanceof Controller);
}
public ModelAndView handle(HttpServletRequest request, HttpServletResponse response, Object handler)
throws Exception {
return ((Controller) handler).handleRequest(request, response);
}
public long getLastModified(HttpServletRequest request, Object handler) {
if (handler instanceof LastModified) {
return ((LastModified) handler).getLastModified(request);
}
return -1L;
}
}Handler的编写
需要实现Controller接口public class ItemController1 implements Controller {
public ModelAndView handleRequest(HttpServletRequest request, HttpServletResponse response) throws Exception {
// 使用静态数据将商品信息展示在jsp页面上
// 商品列表
List<Items> itemsList = new ArrayList<Items>();
Items items_1 = new Items();
items_1.setName("联想笔记本");
items_1.setPrice(6000f);
items_1.setCreatetime(new Date());
items_1.setDetail("ThinkPad T430 联想笔记本电脑!");
Items items_2 = new Items();
items_2.setName("苹果手机");
items_2.setPrice(5000f);
items_2.setDetail("iphone6苹果手机!");
itemsList.add(items_1);
itemsList.add(items_2);
ModelAndView modelAndView = new ModelAndView();
// 将数据填充到request
// request.setAttribute("itemList", itemsList);
modelAndView.addObject("itemsList", itemsList);
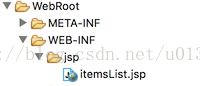
// 指定转发到JSP页面
modelAndView.setViewName("/WEB-INF/jsp/itemsList.jsp");
return modelAndView;
}
}配置Handler
在springmvc.xml中配置Handler,由Spring管理Handler。<!-- 配置Handler 由于使用了BeanNameUrlHandlerMapping处理器映射器,name配置为url -->
<bean name="/itemList.action" class="lx.springmvc.first.ItemController1"/>配置视图解析器
配置视图解析,能够解析jsp视图<!-- 配置视图解析器 -->
<bean class="org.springframework.web.servlet.view.InternalResourceViewResolver">
</bean>工程部署
访问:http://localhost:8080/springmvc_first/itemList.action
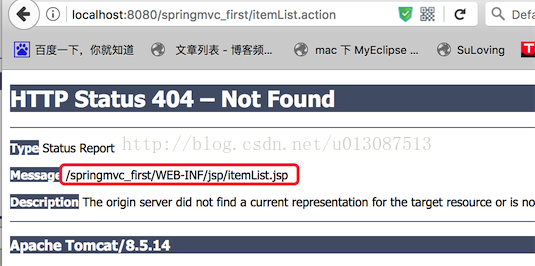
异常
地址中Handler名称输入错误
HandlerMapping没有找到Handler,message中不显示jsp路径,这种错误一般是由于输入地址操作导致

要转向的JSP页面不存在
其它非注解处理器映射器和适配器
BeanNameUrlHandlerMapping(映射器)
根据请求url (xxx.action)匹配Spring容器中bean的name
找到对应的bean(程序编写的Handler)
SimpleUrlHandlerMapping(映射器)
<!-- 简单url映射 集中配置bean的id对应的url -->
<bean class="org.springframework.web.servlet.handler.SimpleUrlHandlerMapping">
<property name="mappings">
<props>
<prop key="itemsTest1.action">itemController1</prop>
<prop key="itemsTest2.action">itemController1</prop>
</props>
</property>
</bean>SimpleControllerHandlerAdapter(适配器)
要求程序编写的Handler (controller)需要实现Controller接口。HttpRequestHandlerAdapter(适配器)
在springmvc.xml中配置:HttpRequestHandlerAdapter
要求编写的Handler实现 HttpRequestHandler接口
配置HttpRequestHandlerAdapter适配器
<!-- 配置HttpRequestHandlerAdapter适配器 -->
<bean class="org.springframework.web.servlet.mvc.HttpRequestHandlerAdapter"/>开发Handler
public class ItemController2 implements HttpRequestHandler {
public void handleRequest(HttpServletRequest request, HttpServletResponse response) throws ServletException, IOException {
// 使用静态数据将商品信息展示在jsp页面上
// 商品列表
List<Items> itemsList = new ArrayList<Items>();
Items items_1 = new Items();
items_1.setName("联想笔记本");
items_1.setPrice(6000f);
items_1.setCreatetime(new Date());
items_1.setDetail("ThinkPad T430 联想笔记本电脑!");
Items items_2 = new Items();
items_2.setName("苹果手机");
items_2.setPrice(5000f);
items_2.setDetail("iphone6苹果手机!");
itemsList.add(items_1);
itemsList.add(items_2);
request.setAttribute("itemsList", itemsList);
request.getRequestDispatcher("/WEB-INF/jsp/itemsList.jsp").forward(request, response);
}
}配置Handler
<!-- Handler2 -->
<bean id="itemController2" class="lx.springmvc.first.ItemController2" /><!-- 简单url映射 集中配置bean的id对应的url -->
<bean class="org.springframework.web.servlet.handler.SimpleUrlHandlerMapping">
<property name="mappings">
<props>
<prop key="itemsTest1.action">itemController1</prop>
<prop key="itemsTest2.action">itemController2</prop>
</props>
</property>
</bean>DispatcherServlet.properties
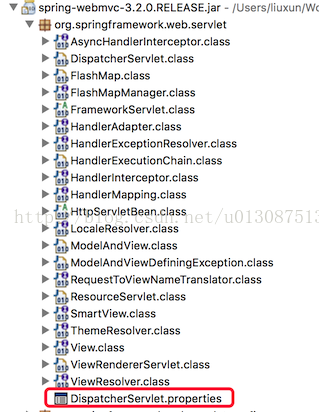
DispatcherServlet前端控制器加载DispatcherServlet.properties配置文件,从而默认加载各个组件。
如果在springmvc.xml中配置了处理器映射器和适配器,以springmvc.xml的为准。
注解映射器和适配器
注解映射器
Spring3.1之前默认加载器是org.springframework.web.servlet.mvc.annotation.DefaultAnnotationHandlerMapping,3.1之后要使用org.springframework.web.servlet.mvc.method.annotation.RequestMappingHandlerMapping。
在springmvc.xml中配置RequestMappingHandlerMapping:
<!-- 注解处理器映射器 -->
<bean class="org.springframework.web.servlet.mvc.method.annotation.RequestMappingHandlerMapping"/>注解适配器
Spring3.1之前默认加载映射器是org.springframework.web.servlet.mvc.annotation.AnnotationMethodHandlerAdapter,3.1之后要使用org.springframework.web.servlet.mvc.method.annotation.RequestMappingHandlerAdapter
RequestMappingHandlerAdapter 注解适配器不要求Handler实现任何接口,但它需要和RequestMappingHandlerMapping注解映射器配对使用,主要解析Handler方法中的形参。在springmvc.xml中配置RequestMappingHandlerAdapter如下:
<!-- 注解适配器 -->
<bean class="org.springframework.web.servlet.mvc.method.annotation.RequestMappingHandlerAdapter"/>注解开发Handler
@Controller
public class ItemController3 {
// 商品列表,@RequestMapping中的url建议和方法名一致,方便开发维护
@RequestMapping("/queryItems")
public ModelAndView queryItems() throws ServletException, IOException {
// 使用静态数据将商品信息展示在jsp页面上
// 商品列表
List<Items> itemsList = new ArrayList<Items>();
Items items_1 = new Items();
items_1.setName("联想笔记本");
items_1.setPrice(6000f);
items_1.setCreatetime(new Date());
items_1.setDetail("ThinkPad T430 联想笔记本电脑!");
Items items_2 = new Items();
items_2.setName("苹果手机");
items_2.setPrice(5000f);
items_2.setDetail("iphone6苹果手机!");
itemsList.add(items_1);
itemsList.add(items_2);
ModelAndView modelAndView = new ModelAndView();
modelAndView.addObject("itemsList",itemsList);
// 指定逻辑视图名
modelAndView.setViewName("/WEB-INF/jsp/itemsList.jsp");
return modelAndView;
}
}配置Handler
<!-- 注解配置Handler,单个配置 -->
<!-- <bean class="lx.springmvc.first.ItemController3"/> -->
<!-- 使用Spring组件扫描 -->
<context:component-scan base-package="lx.springmvc.first"/>
注意:要想使用注解扫描器,Spring的版本要在4.0以上,不然会抛出异常。
小结
DispatcherServlet:前端控制器,相当于中央调度器,可以降低组件之间的耦合度。
HandlerMapping:处理器映射器,负责根据url查找Handler。
HandlerAdapter:处理器适配器,负责根据适配器要求的规则去执行处理器。可以通过扩展适配器支持不同类型的Handler。
ViewResolver:视图解析器,根据逻辑视图名解析成真正的视图。
<!-- 配置视图解析器 -->
<bean class="org.springframework.web.servlet.view.InternalResourceViewResolver">
<property name="prefix" value="/WEB-INF/jsp/"/>
<property name="suffix" value=".jsp"/>
</bean>
注意:逻辑视图名只是在ModelAndView对象中设置视图时适用,对于原始的Servlet(使用request和response进行转发或重定向)不适用。
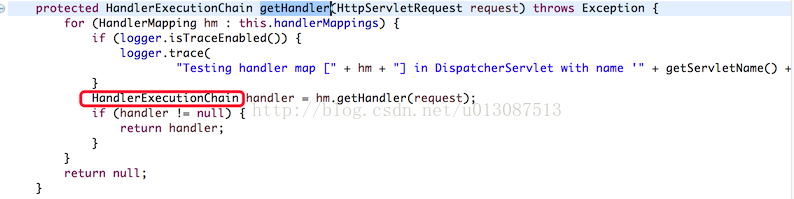
执行过程中关键源代码如下:
1.DispatcherServlet通过HandlerMapping查找Handler
2.DispatcherServlet通过适配器去执行Handler,得到ModelAndView (在DispatcherServlet中的doDispatch方法中执行整个流程)

3.视图解析
视图解析后得到一个view
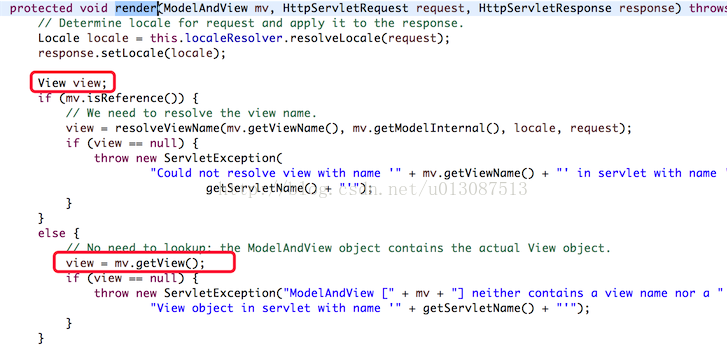
4.进行视图渲染
所谓的视图渲染就是将Model中的数据填充到request域
springmvc入门源码
代码已经上传GitHub https://github.com/LX1993728/springmvc_first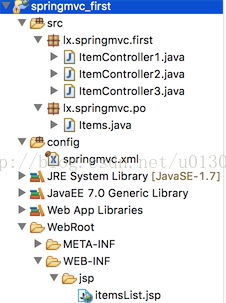
web.xml
<?xml version="1.0" encoding="UTF-8"?>
<web-app xmlns:xsi="http://www.w3.org/2001/XMLSchema-instance"
xmlns="http://xmlns.jcp.org/xml/ns/javaee"
xsi:schemaLocation="http://xmlns.jcp.org/xml/ns/javaee http://xmlns.jcp.org/xml/ns/javaee/web-app_3_1.xsd"
id="WebApp_ID" version="3.1">
<display-name>springmvc_first</display-name>
<!-- 前端控制器 -->
<servlet>
<servlet-name>springmvc</servlet-name>
<servlet-class>org.springframework.web.servlet.DispatcherServlet</servlet-class>
<!-- 加载SpringMVC配置 -->
<init-param>
<!-- 配置文件的位置 -->
<!-- 如果不配置contextConfigLocation,
默认查找的配置文件名称classpath下的: servlet名称+"servlet.xml"即springmvc-servlet.xml
-->
<param-name>contextConfigLocation</param-name>
<param-value>classpath:springmvc.xml</param-value>
</init-param>
</servlet>
<servlet-mapping>
<servlet-name>springmvc</servlet-name>
<!--
可以配置/, 此工程 所有请求全部由springmvc解析,此种方式可以实现
RESTful方式,需要特殊处理对静态文本的解析不能由springmvc解析
可以配置*.do或*.action, 所有请求的url扩展名为.do或.action由springmvc解析,此种方法
不可以使用/*,如果配置/*,返回的jsp也由springmvc解析,这是不对的
-->
<url-pattern>*.action</url-pattern>
</servlet-mapping>
<welcome-file-list>
<welcome-file>index.html</welcome-file>
<welcome-file>index.htm</welcome-file>
<welcome-file>index.jsp</welcome-file>
<welcome-file>default.html</welcome-file>
<welcome-file>default.htm</welcome-file>
<welcome-file>default.jsp</welcome-file>
</welcome-file-list>
</web-app><?xml version="1.0" encoding="UTF-8"?>
<beans xmlns="http://www.springframework.org/schema/beans"
xmlns:xsi="http://www.w3.org/2001/XMLSchema-instance" xmlns:mvc="http://www.springframework.org/schema/mvc"
xmlns:context="http://www.springframework.org/schema/context"
xmlns:aop="http://www.springframework.org/schema/aop" xmlns:tx="http://www.springframework.org/schema/tx"
xsi:schemaLocation="http://www.springframework.org/schema/beans
http://www.springframework.org/schema/beans/spring-beans-3.2.xsd
http://www.springframework.org/schema/mvc
http://www.springframework.org/schema/mvc/spring-mvc-3.2.xsd
http://www.springframework.org/schema/context
http://www.springframework.org/schema/context/spring-context-3.2.xsd
http://www.springframework.org/schema/aop
http://www.springframework.org/schema/aop/spring-aop-3.2.xsd
http://www.springframework.org/schema/tx
http://www.springframework.org/schema/tx/spring-tx-3.2.xsd ">
<!-- 配置Handler 由于使用了BeanNameUrlHandlerMapping处理器映射器,name配置为url -->
<bean id="itemController1" name="/itemList.action" class="lx.springmvc.first.ItemController1" />
<!-- Handler2 -->
<bean id="itemController2" class="lx.springmvc.first.ItemController2" />
<!-- 注解配置Handler,单个配置 -->
<bean class="lx.springmvc.first.ItemController3"/>
<!-- 使用Spring组件扫描 -->
<!-- <context:component-scan base-package="lx.springmvc.first"/> -->
<!-- 配置处理器映射器 springmvc框架根据HandlerMapping接口判断是否是处理器映射器 -->
<!-- 根据bean的name进行查找Handler 将action的url配置在bean的name中 -->
<bean class="org.springframework.web.servlet.handler.BeanNameUrlHandlerMapping" />
<!-- 简单url映射 集中配置bean的id对应的url -->
<bean class="org.springframework.web.servlet.handler.SimpleUrlHandlerMapping">
<property name="mappings">
<props>
<prop key="itemsTest1.action">itemController1</prop>
<prop key="itemsTest2.action">itemController2</prop>
</props>
</property>
</bean>
<!-- 注解处理器映射器 -->
<bean class="org.springframework.web.servlet.mvc.method.annotation.RequestMappingHandlerMapping"/>
<!-- 配置处理器适配器 springmvc框架根据HandlerAdapter接口判断是否是处理器适配器 -->
<bean class="org.springframework.web.servlet.mvc.SimpleControllerHandlerAdapter" />
<!-- 配置HttpRequestHandlerAdapter适配器 -->
<bean class="org.springframework.web.servlet.mvc.HttpRequestHandlerAdapter"/>
<!-- 注解适配器 -->
<bean class="org.springframework.web.servlet.mvc.method.annotation.RequestMappingHandlerAdapter"/>
<!-- 配置视图解析器 -->
<bean class="org.springframework.web.servlet.view.InternalResourceViewResolver">
<property name="prefix" value="/WEB-INF/jsp/"/>
<property name="suffix" value=".jsp"/>
</bean>
</beans> <%@ page language="java" contentType="text/html; charset=UTF-8"
pageEncoding="UTF-8"%>
<%@ taglib uri="http://java.sun.com/jsp/jstl/core" prefix="c" %>
<%@ taglib uri="http://java.sun.com/jsp/jstl/fmt" prefix="fmt"%>
<!DOCTYPE html PUBLIC "-//W3C//DTD HTML 4.01 Transitional//EN" "http://www.w3.org/TR/html4/loose.dtd">
<html>
<head>
<meta http-equiv="Content-Type" content="text/html; charset=UTF-8">
<title>查询商品列表</title>
</head>
<body>
<form action="${pageContext.request.contextPath }/item/queryItem.action" method="post">
查询条件:
<table width="100%" border=1>
<tr>
<td><input type="submit" value="查询"/></td>
</tr>
</table>
商品列表:
<table width="100%" border=1>
<tr>
<td>商品名称</td>
<td>商品价格</td>
<td>生产日期</td>
<td>商品描述</td>
<td>操作</td>
</tr>
<c:forEach items="${itemsList }" var="item">
<tr>
<td>${item.name }</td>
<td>${item.price }</td>
<td><fmt:formatDate value="${item.createtime}" pattern="yyyy-MM-dd HH-mm-ss"/></td>
<td>${item.detail }</td>
<td><a href="${pageContext.request.contextPath }/item/editItem.action?id=${item.id}">修改</a></td>
</tr>
</c:forEach>
</table>
</form>
</body>
</html>package lx.springmvc.first;
import java.util.ArrayList;
import java.util.Date;
import java.util.List;
import javax.servlet.http.HttpServletRequest;
import javax.servlet.http.HttpServletResponse;
import org.springframework.web.servlet.ModelAndView;
import org.springframework.web.servlet.mvc.Controller;
import lx.springmvc.po.Items;
/**
* 入门程序,商品列表查询
*
* @author liuxun
*
*/
public class ItemController1 implements Controller {

	public ModelAndView handleRequest(HttpServletRequest request, HttpServletResponse response) throws Exception {
		// 使用静态数据将商品信息展示在jsp页面上
		// 商品列表
		List<Items> itemsList = new ArrayList<Items>();

		Items items_1 = new Items();
		items_1.setName("联想笔记本");
		items_1.setPrice(6000f);
		items_1.setCreatetime(new Date());
		items_1.setDetail("ThinkPad T430 联想笔记本电脑!");

		Items items_2 = new Items();
		items_2.setName("苹果手机");
		items_2.setPrice(5000f);
		items_2.setDetail("iphone6苹果手机!");

		itemsList.add(items_1);
		itemsList.add(items_2);

		ModelAndView modelAndView = new ModelAndView();
		// 将数据填充到request
		// request.setAttribute("itemList", itemsList);
		modelAndView.addObject("itemsList", itemsList);
		// 指定转发到JSP页面
		modelAndView.setViewName("/WEB-INF/jsp/itemsList.jsp");
		return modelAndView;
	}

}
package lx.springmvc.first;
import java.io.IOException;
import java.util.ArrayList;
import java.util.Date;
import java.util.List;
import javax.servlet.ServletException;
import javax.servlet.http.HttpServletRequest;
import javax.servlet.http.HttpServletResponse;
import org.springframework.web.HttpRequestHandler;
import lx.springmvc.po.Items;
/**
* 入门程序,商品列表查询
*
* @author liuxun
*
*/
public class ItemController2 implements HttpRequestHandler {

	public void handleRequest(HttpServletRequest request, HttpServletResponse response) throws ServletException, IOException {
		// 使用静态数据将商品信息展示在jsp页面上
		// 商品列表
		List<Items> itemsList = new ArrayList<Items>();

		Items items_1 = new Items();
		items_1.setName("联想笔记本");
		items_1.setPrice(6000f);
		items_1.setCreatetime(new Date());
		items_1.setDetail("ThinkPad T430 联想笔记本电脑!");

		Items items_2 = new Items();
		items_2.setName("苹果手机");
		items_2.setPrice(5000f);
		items_2.setDetail("iphone6苹果手机!");

		itemsList.add(items_1);
		itemsList.add(items_2);

		request.setAttribute("itemsList", itemsList);
		request.getRequestDispatcher("/WEB-INF/jsp/itemsList.jsp").forward(request, response);
	}

}
package lx.springmvc.first;

import java.io.IOException;
import java.util.ArrayList;
import java.util.Date;
import java.util.List;

import javax.servlet.ServletException;

import org.springframework.stereotype.Controller;
import org.springframework.web.bind.annotation.RequestMapping;
import org.springframework.web.servlet.ModelAndView;

import lx.springmvc.po.Items;

/**
 * 入门程序,商品列表查询
 *
 * @author liuxun
 *
 */
@Controller
public class ItemController3 {
    // 商品列表,@RequestMapping中的url建议和方法名一致,方便开发维护
	@RequestMapping("/queryItems")
	public ModelAndView queryItems() throws ServletException, IOException {
		// 使用静态数据将商品信息展示在jsp页面上
		// 商品列表
		List<Items> itemsList = new ArrayList<Items>();

		Items items_1 = new Items();
		items_1.setName("联想笔记本");
		items_1.setPrice(6000f);
		items_1.setCreatetime(new Date());
		items_1.setDetail("ThinkPad T430 联想笔记本电脑!");

		Items items_2 = new Items();
		items_2.setName("苹果手机");
		items_2.setPrice(5000f);
		items_2.setDetail("iphone6苹果手机!");

		itemsList.add(items_1);
		itemsList.add(items_2);

		ModelAndView modelAndView = new ModelAndView();
		modelAndView.addObject("itemsList",itemsList);
		// 指定逻辑视图名
		modelAndView.setViewName("itemsList");

        return modelAndView;
	}

}
SpringMVC和Mybatis整合工程搭建
整合思路
在Mybatis和Spring整合的基础上 添加springmvc
Spring要管理springmvc编写的Handler(controller)、mybatis的SqlSessionFactory、mapper
第一步:整合Dao,Spring和mybatis整合
第二步:整合Service,Spring管理Service接口,Service中可以调用Spring容器中的dao (mapper)
第三步:整合controller,Spring管理controller接口,在controller调用Service
导入jar包
mybatis:3.2.7
Spring:3.2.0
mybatis的jar
mybatis和Spring整合包
Spring的相关Jar包(包括SpringMVC的包)
数据库驱动包
log4j日志
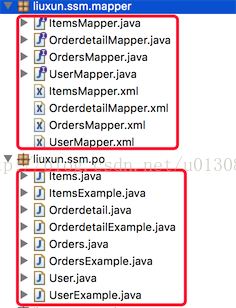
工程结构
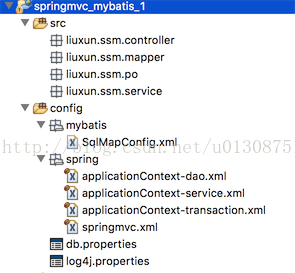
配置文件
applicationContext-dao.xml——配置数据源、SqlSessionFactory、mapper扫描器
applicationContext-service.xml——配置Service接口
applicationContext-transaction.xml——事务管理
springmvc.xml——SpringMVC的配置,配置处理器映射器、适配器、视图解析器
SqlMapConfig.xml——mybatis的配置文件,配置别名、settings、mapper
applicationContext-dao.xml
配置mybatis的数据源、sqlSessionFactory、mapper扫描器
<!-- 加载配置文件 -->
	<context:property-placeholder location="classpath:db.properties" />
	<!-- 数据库连接池 -->
	<bean id="dataSource" class="org.apache.commons.dbcp.BasicDataSource"
		destroy-method="close">
      <property name="driverClassName">${jdbc.driver}</property>
      <property name="url">${jdbc.url}</property>
      <property name="username">${jdbc.username}</property>
      <property name="password">${jdbc.password}</property>
      <property name="maxActive" value="10"/>
      <property name="maxIdle" value="5"/>
	</bean>

	<!-- SqlSessionFactory -->
    <bean id="sqlSessionFactory" class="org.mybatis.spring.SqlSessionFactoryBean">
	    <!-- 数据源 -->
	    <property name="dataSource" ref="dataSource"/>
	    <!-- mybatis配置文件 -->
	    <property name="configLocation" value="classpath:mybatis/SqlMapConfig.xml"/>
    </bean>

    <!--
    MapperScannerConfigurer: mapper扫描器,将包下边的mapper接口自动创建代理对象,
    自动创建到Spring容器中,bean的id是mapper的类名(首字母小写)
     -->
     <bean class="org.mybatis.spring.mapper.MapperScannerConfigurer">
	     <!-- 配置扫描包的路径
	     如果要扫描多个包,中间使用半角逗号隔开
	     要求mapper.xml和mapper.java同名且在同一目录
	      -->
	     <property name="basePackage" value="liuxun.ssm.mapper"/>
	     <!-- 使用SqlSessionFactoryBeanName -->
	     <property name="sqlSessionFactoryBeanName" value="sqlSessionFactory"/>
     </bean>
applicationContext-transaction.xml
在此配置文件配置事务,声明式事务控制<!-- 事务管理器 -->
<bean id="transactionManager"
class="org.springframework.jdbc.datasource.DataSourceTransactionManager">
<property name="dataSource" ref="dataSource" />
</bean>
<!-- 通知 -->
<tx:advice id="txAdvice" transaction-manager="transactionManager">
<tx:attributes>
<tx:method name="save*" propagation="REQUIRED" />
<tx:method name="insert*" propagation="REQUIRED" />
<tx:method name="update*" propagation="REQUIRED" />
<tx:method name="delete*" propagation="REQUIRED" />
<tx:method name="find*" propagation="SUPPORTS" read-only="true" />
<tx:method name="select*" propagation="SUPPORTS" read-only="true" />
<tx:method name="get*" propagation="SUPPORTS" read-only="true" />
</tx:attributes>
</tx:advice>
<!-- aop -->
<aop:config>
<aop:advisor advice-ref="txAdvice" pointcut="execution(* liuxun.ssm.service.impl.*.*(..))" />
</aop:config>前端控制器配置
<!-- 前端控制器 -->
	<servlet>
		<servlet-name>springmvc</servlet-name>
		<servlet-class>org.springframework.web.servlet.DispatcherServlet</servlet-class>
		<!-- 加载springmvc配置 -->
		<init-param>
			<param-name>contextConfigLocation</param-name>
			<!-- 配置文件的地址 如果不配置contextConfigLocation,
			 默认查找的配置文件名称classpath下的:servlet名称+"-serlvet.xml"
			 即:springmvc-serlvet.xml
			 -->
			<param-value>classpath:spring/springmvc.xml</param-value>
		</init-param>
	</servlet>
	<servlet-mapping>
		<servlet-name>springmvc</servlet-name>
		<!-- 可以配置/ ,此工程 所有请求全部由springmvc解析,此种方式可以实现 RESTful方式,需要特殊处理对静态文件的解析不能由springmvc解析
			可以配置*.do或*.action,所有请求的url扩展名为.do或.action由springmvc解析,此种方法常用 不可以/*,如果配置/*,返回jsp也由springmvc解析,这是不对的。 -->
		<url-pattern>*.action</url-pattern>
	</servlet-mapping>
配置springmvc.xml
<!-- 使用spring组件扫描 -->
	<context:component-scan base-package="liuxun.ssm.controller" />

	<!-- 通过使用mvc的annotation-driven 可以替代下边的处理器映射器和适配器 -->
	<!-- <mvc:annotation-driven></mvc:annotation-driven> -->

	<!-- 注解处理器映射器 -->
	<bean
		class="org.springframework.web.servlet.mvc.method.annotation.RequestMappingHandlerMapping"></bean>

    <!-- 注解适配器 -->
    <bean class="org.springframework.web.servlet.mvc.method.annotation.RequestMappingHandlerAdapter"></bean>

    <!-- 配置视图解析器 要求将jstl的包加到classpath -->
	<!-- ViewResolver -->
	<bean class="org.springframework.web.servlet.view.InternalResourceViewResolver">
		<property name="prefix" value="/WEB-INF/jsp/"/>
		<property name="suffix" value=".jsp"/>
	</bean>
商品列表开发
需求
查询商品列表
mapper
功能描述:根据条件查询商品信息,返回商品列表
一般情况下对查询mapper需要自定义mapper
首先针对单表进行逆向工程,生成代码(包括PO类、mapper.xml、mapper.java)如下图所示:
mapper.xml
为了避免影响逆向工程生成的代码,一般不去修改,新建一个自定义的mapper(.xml和.java)
新建ItemsMapperCustom.xml 添加如下配置
<sql id="query_items_where">
     <if test="itemsCustom!=null">
     	<if test="itemsCustom.name!=null and itemsCustom.name.trim().length >0">
     	 and name like '%${itemsCustom.name.trim()}%'
     	</if>
     	<if test="itemsCustom.id!=null">
     		and id = #{itemsCustom.id}
     	</if>
     </if>
   </sql>

   <!-- 商品查询
   parameterType:输入查询条件
    -->
  <select id="findItemsList" parameterType="liuxun.ssm.po.ItemsQueryVo" resultType="liuxun.ssm.po.ItemsCustom">
	  SELECT * FROM items
	  <where>
	  	<include refid="query_items_where"/>
	  </where>
  </select>
包装类:ItemsQueryVo
public class ItemsQueryVo {

	// 商品信息
	private ItemsCustom itemsCustom;

       // setter与getter
       ......
}
mapper.java
新建接口ItemsMapperCustom.java// 商品查询列表
public List<ItemsCustom> findItemsList(ItemsQueryVo itemsQueryVo) throws Exception;Service
public class ItemsServiceImpl implements ItemsService {

	// 注入mapper
	@Autowired
	private ItemsMapperCustom itemsMapperCustom;

	@Autowired
	private ItemsMapper itemsMapper;

	public List<ItemsCustom> findItemsList(ItemsQueryVo itemsQueryVo) throws Exception {
		return itemsMapperCustom.findItemsList(itemsQueryVo);
	}

}
在applicationContext-service.xml中配置Service
<!-- 商品管理的Service -->
   <bean  id="itemsService" class="liuxun.ssm.service.impl.ItemsServiceImpl"></bean>
controller
@Controller
public class ItemsController {

	// 注入Service
	@Autowired
	private ItemsService itemsService;

	@RequestMapping("queryItems")
	public ModelAndView queryItems(HttpServletRequest request) throws Exception {

		// 调用Service查询商品列表
		List<ItemsCustom> itemsList = itemsService.findItemsList(null);

		ModelAndView modelAndView = new ModelAndView();
		modelAndView.addObject("itemsList", itemsList);
		// 指定逻辑视图名
		modelAndView.setViewName("itemsList");

		return modelAndView;
	}
}
jsp
在web.xml中配置Spring监听器
<!-- 配置Spring容器监听器 -->
	<context-param>
		<param-name>contextConfigLocation</param-name>
		<param-value>classpath:spring/applicationContext-*.xml</param-value>
	</context-param>
	<listener>
		<listener-class>org.springframework.web.context.ContextLoaderListener</listener-class>
	</listener>
注解开发基础
商品修改
需求
功能描述:商品信息修改
操作流程:
1.在商品列表页面点击修改链接。
2.打开商品修改页面,显示了当前商品的信息。
(根据商品的id查询商品信息)
3.修改商品信息,点击提交
(更新商品信息)
mapper
已使用逆向工程生成代码:
根据商品id查询商品信息
更新商品信息

Service
// 根据商品id查询商品信息
	public ItemsCustom findItemsById(int id) throws Exception;

	// 更新商品信息
	/**
	 * 定义Service接口,遵循单一职责,将业务参数细化(不要使用包装类型,比如Map)
	 * @param id  修改商品的id
	 * @param itemsCustom  修改商品的信息
	 * @throws Exception
	 */
	public void updateItems(Integer id,ItemsCustom itemsCustom) throws Exception;
@RequestMapping
设置方法对应的url(完成url映射)
一个方法对应一个url
@RequestMapping("/queryItems")
	public ModelAndView queryItems(HttpServletRequest request) throws Exception {
窄化请求映射
在Class上定义根路径@Controller
//定义url的根路径,访问时 根路径+方法的url
@RequestMapping("/items")
public class ItemsController {限制http请求的方法
通过requestMapping限制url请求的http方法
如果限制请求必须是post,如果get请求就会抛出异常
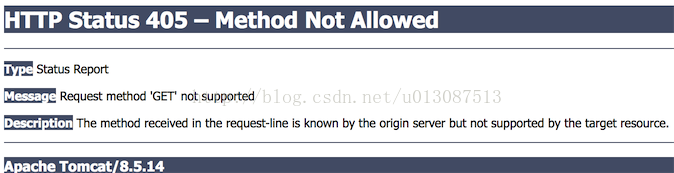
商品修改方法,限制为http的get:
@RequestMapping(value="/editItems",method={RequestMethod.GET})controller方法返回值
返回ModelAndView
@RequestMapping("/queryItems")
	public ModelAndView queryItems(HttpServletRequest request) throws Exception {

		// 调用Service查询商品列表
		List<ItemsCustom> itemsList = itemsService.findItemsList(null);

		ModelAndView modelAndView = new ModelAndView();
		modelAndView.addObject("itemsList", itemsList);
		// 指定逻辑视图名
		modelAndView.setViewName("itemsList");

		return modelAndView;
	}
返回字符串
如果controller方法返回JSP页面,可以简单将方法返回值类型定义为字符串,最终返回逻辑视图名称//方法返回字符串,字符串就是逻辑视图名,Model作用就是将数据填充到request域,在页面展示
@RequestMapping(value="/editItems",method={RequestMethod.GET})
public String editItems(Model model) throws Exception{
// 调用Service查询商品信息
ItemsCustom itemsCustom = itemsService.findItemsById(1);
//将模型数据传到jsp
model.addAttribute("item", itemsCustom);
return "editItem";
}返回void
// 方法返回void
	@RequestMapping(value="/editItems",method={RequestMethod.GET})
	public void editItems(HttpServletRequest request,HttpServletResponse response) throws Exception{

		// 调用Service查询商品信息
		ItemsCustom itemsCustom = itemsService.findItemsById(1);
		request.setAttribute("item", itemsCustom);
		// 注意如果使用request转向页面,这里指定页面的完整路径
		request.getRequestDispatcher("/WEB-INF/jsp/editItem.jsp").forward(request, response);
	}
通过response指定响应结果,例如响应json数据如下:
response.setCharacterEncoding("utf-8");
response.setContentType("application/json;charset=utf-8");
response.getWriter().write("json串");
redirect重定向
如果方法重定向到另一个url,方法返回值为 "redirect:url路径",url路径一般指的具体的路径或别的请求路径 不能是虚拟视图名。
使用redirect进行重定向,request数据无法共享,url的地址栏会发生变化。
forward转发
使用forward进行请求转发,request数据可以共享,url地址栏不会改变。
方法返回值为"forward:url路径"
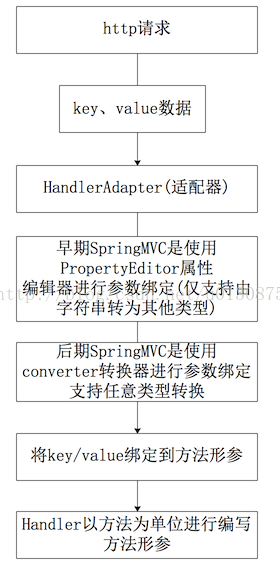
参数绑定
参数绑定过程
默认支持的参数类型
处理器方法形参中添加如下类型的参数,处理器适配器会默认识别并进行赋值的。
HttpServletRequest
通过request对象获取请求信息
HttpServletResponse
通过response处理响应信息
HttpSession
通过Session对象得到Session中存放的对象
Model
通过model向页面传递数据,如下:
// 调用Service查询商品信息
		ItemsCustom itemsCustom = itemsService.findItemsById(id);
		//将模型数据传到jsp
model.addAttribute("item", itemsCustom);@RequestParam
如果request请求的参数名和controller方法的形参参数名一致,适配器自动进行参数绑定。如果不一致可以通过@RequestParam指定request请求的参数名(value属性)绑定到哪个方法形参上。
对于必须要传入的参数,通过@RequestParam中的属性required设置为true,设置后如果不传入此参数则会报错。
对于有些参数如果不传入,还需要设置默认值,使用@RequestParam中属性defaultvalue设置默认值。
可以绑定简单类型
可以绑定整型、字符串、单精/双精度、日期、布尔型
可以绑定简单pojo类型
简单pojo类型只包括简单类型的属性。
绑定过程:request请求的参数名称和pojo的属性名一致,就可以绑定成功。
问题:
如果controller方法形参中有多个pojo且pojo中有重复的属性,使用简单pojo绑定无法有针对性的绑定。
比如:方法形参中有items和User,pojo同时存name属性,从http请求过程的name无法有针对性的绑定到items或user。
可以绑定包装的pojo
包装的pojo里包括的pojo
页面参数定义:
包装类型的属性也是itemsCustom

按照上边的规则进行包装类型的绑定。
自定义绑定使用属性编辑器
SpringMVC没有提供对日期类型的绑定,需要自定义日期类型的绑定。
使用WebDataBinder(了解)
在controller类中定义
//自定义属性编辑器
	@InitBinder
	public void initBinder(WebDataBinder binder) throws Exception {
		// Date.class必须是与controler方法形参pojo属性一致的date类型,这里是java.util.Date
		binder.registerCustomEditor(Date.class, new CustomDateEditor(
				new SimpleDateFormat("yyyy-MM-dd HH:mm:ss"), true));
}使用WebBindingInitializer(了解)
使用WebBindingInitializer让多个控制器共用属性编辑器
自定义WebBindingInitializer,注入到处理器适配器中。
如果想使多个controller共用属性编辑器,需要共同注册相同的属性编辑器,可以实现PropertyEditorRegistrar接口,并且注入到webBindingInitializer中。
编写CustomPropertyEditor
public class CustomPropertyEditor implements PropertyEditorRegistrar {

	public void registerCustomEditors(PropertyEditorRegistry binder) {
		binder.registerCustomEditor(Date.class,
				new CustomDateEditor(new SimpleDateFormat("yyyy-MM-dd HH:mm:ss"), true));
	}

} <!-- 注解适配器 -->
<bean class="org.springframework.web.servlet.mvc.method.annotation.RequestMappingHandlerAdapter">
<!-- 在webBindingInitializer中注入自定义属性编辑器,自定义转换器 -->
<property name="webBindingInitializer" ref="customBinder"/>
</bean>
<!-- 自定义webBinder -->
<bean id="customBinder" class="org.springframework.web.bind.support.ConfigurableWebBindingInitializer">
<!-- propertyEditorRegistrars用于属性编辑器 -->
<property name="propertyEditorRegistrars">
<list>
<ref bean="customPropertyEditor"/>
</list>
</property>
</bean>
<!-- 注册属性编辑器 -->
<bean id="customPropertyEditor" class="liuxun.ssm.controller.propertyeditor.CustomPropertyEditor"/>
编写自定义转换器 实现PropertyEditorRegistrar接口
注册自定义的属性编辑器。
注册webBinder(org.springframework.web.bind.support.ConfigurableWebBindingInitializer类型),并将已经注册的属性编辑器注入到propertyEditorRegistrars的list属性集合中。
最后将已注册的webBinder注入到注解适配器中。
自定义参数绑定使用转换器(重点)
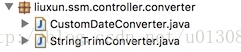
实现Converter接口
定义日期类型转换器和字符串去除前后空格的转换器
配置转换器
配置方式:
自定义转换器实现Converter<K,V> 接口 K:原始数据类型 V:转换后的数据类型
自定义日期转换器
自定义日期转换器
/**
 * 自定义日期转换器
 * @author liuxun
 *
 */
public class CustomDateConverter implements Converter<String, Date> {

	@Override
	public Date convert(String source) {

		// 进行日期转换
		try {
			return new SimpleDateFormat("yyyy-MM-dd HH:mm:ss").parse(source);
		} catch (ParseException e) {
			e.printStackTrace();
		}
		return null;
	}

}/**
* 自定义去除字符串前后空格的转换器
* @author liuxun
*
*/
public class StringTrimConverter implements Converter<String, String>{
@Override
public String convert(String source) {
//去掉字符串两边空格,如果去除后为空设置为null
if (source!=null) {
source = source.trim();
if (source.equals("")) {
return null;
}
}
return source;
}
}
注册FormattingConversionServiceFactoryBean,并将自定义的转换器注入到converters数组属性中
<!-- 注册转换器 -->
	<bean id="conversionService" class="org.springframework.format.support.FormattingConversionServiceFactoryBean">
		<property name="converters">
			<list>
				<bean class="liuxun.ssm.controller.converter.CustomDateConverter"/>
				<bean class="liuxun.ssm.controller.converter.StringTrimConverter"/>
			</list>
		</property>
</bean><!-- 自定义webBinder -->
<bean id="customBinder" class="org.springframework.web.bind.support.ConfigurableWebBindingInitializer">
<!-- 使用converter进行参数转换 -->
<property name="conversionService" ref="conversionService"/>
</bean> <!-- 注解适配器 -->
<bean class="org.springframework.web.servlet.mvc.method.annotation.RequestMappingHandlerAdapter">
<!-- 在webBindingInitializer中注入自定义属性编辑器,自定义转换器 -->
<property name="webBindingInitializer" ref="customBinder"/>
</bean>问题处理
post乱码
在web.xml中加入
<!-- post乱码处理 -->
	<filter>
		<filter-name>CharacterEncodingFilter</filter-name>
		<filter-class>org.springframework.web.filter.CharacterEncodingFilter</filter-class>
		<init-param>
			<param-name>encoding</param-name>
			<param-value>utf-8</param-value>
		</init-param>
	</filter>
	<filter-mapping>
		<filter-name>CharacterEncodingFilter</filter-name>
		<url-pattern>/*</url-pattern>
</filter-mapping>get乱码
对于get请求中文参数出现乱码解决方法有两个
修改Tomcat配置文件添加编码与工程一致 如下:
<Connector URIEncoding="utf-8" connectionTimeout="20000" port="8080" protocol="HTTP/1.1" redirectPort="8443"/>String userName=new String(request.getParamter("userName").getBytes("ISO8859-1"),"utf-8")
ISO8859-1是tomcat默认编码,需要将tomcat编码后的内容按utf-8编码
(具体源码在第二篇中综合展示)


 636
636


 被折叠的 条评论
为什么被折叠?
被折叠的 条评论
为什么被折叠?
 到【灌水乐园】发言


