


 本文详细介绍了Spring框架中Web容器的启动过程,包括web.xml配置、ContextLoaderListener监听器的作用及其实现原理,以及WebApplicationContext的创建流程。
-
前言
1.由于大家平常用Spring基本都是Web项目中,那么今天就从Web的角度来看看IOC容器是怎么启动并管理Bean的。
2.本文及后续代码版本:Spring3.0.5。所以如发现代码(或图)不一致请注意Spring版本。
3.还是建议大家在前几遍读源码的时候,先把路走通,再回头研究细节。 -
Web容器接口体系
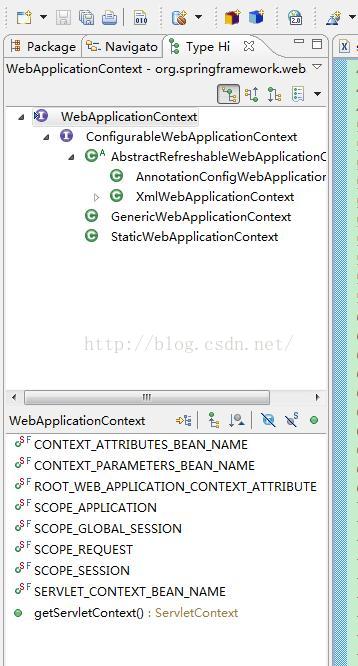
为了方便在Web环境中使用IOC容器,Spring为Web应用提供了上下文接口WebApplicationContext来满足启动过程的需要。这个WebApplicationContext接口的类层次关系如图所示:
在接口设计中,最后是通过ApplicationContext接口与BeanFactory接口对接的,而对于具体功能的实现,很多都是封装在AbstractRefreshableWebApplicationContext中完成的。再从代码的角度看下这个继承体系:
-
Web容器的启动
1.web.xml中的配置
为了使用Spring,我们一般都会在web.xml中配一个监听器。如下:
<context-param><param-name>contextConfigLocation</param-name><param-value>classpath:applicationContext.xml</param-value></context-param><listener><listener-class>org.springframework.web.context.ContextLoaderListener</listener-class></listener>
那么容器启动的入口也就在这里了,context-param字面意思都可以理解,就是ServletContext的参数,这里我们配置了一个xml的路径。我们重点关注listener,这个Spring的ContextLoaderListener实现了ServletContextListener接口,这个接口是在Servlet API中定义的,提供了与Servlet生命周期结合的回调,比如contextInitialized和contextDestroy。那么,作为ServletContext的监听者,如果ServletContext发生变化,监听器就会做出相应的事件。比如:在服务器(tomcat等)启动时,ServletContextListener的contextInitialized方法被调用,服务器将要关闭时,contextDestroy方法被调用。我们来看下ContextLoaderListener的代码:
代码1.1:ContextLoaderListener源码
public class ContextLoaderListener extends ContextLoader implements ServletContextListener {private ContextLoader contextLoader;/*** 初始化容器* Initialize the root web application context.*/public void contextInitialized(ServletContextEvent event) {//这个方法实现的本意是提供一个占位符方法createContextLoader()给子类机会创建客户化的环境加载,但是,后来这个证明不是非常有用的,已经鼓励不再使用了,事实上,子类可以通过重写本方法达到同样的目的this.contextLoader = createContextLoader();if (this.contextLoader == null) {this.contextLoader = this;}this.contextLoader.initWebApplicationContext(event.getServletContext());}/*** Create the ContextLoader to use. Can be overridden in subclasses.* @return the new ContextLoader* @deprecated in favor of simply subclassing ContextLoaderListener itself* (which extends ContextLoader, as of Spring 3.0)*/@Deprecatedprotected ContextLoader createContextLoader() {return null;}/*** Return the ContextLoader used by this listener.* @return the current ContextLoader* @deprecated in favor of simply subclassing ContextLoaderListener itself* (which extends ContextLoader, as of Spring 3.0)*/@Deprecatedpublic ContextLoader getContextLoader() {return this.contextLoader;}/*** 销毁容器的方法* Close the root web application context.*/public void contextDestroyed(ServletContextEvent event) {if (this.contextLoader != null) {this.contextLoader.closeWebApplicationContext(event.getServletContext());}ContextCleanupListener.cleanupAttributes(event.getServletContext());}}
我们先重点关注容器的启动,也就是contextInitialized方法,从代码中可以看到它是调用的ContextLoader的initWebApplicationContext方法。我们来看下这个方法的代码:
public WebApplicationContext initWebApplicationContext(ServletContext servletContext) {//判断ServletContext中是否已经有根上下文存在,存在抛出异常if (servletContext.getAttribute(WebApplicationContext.ROOT_WEB_APPLICATION_CONTEXT_ATTRIBUTE) != null) {throw new IllegalStateException("Cannot initialize context because there is already a root application context present - " +"check whether you have multiple ContextLoader* definitions in your web.xml!");}Log logger = LogFactory.getLog(ContextLoader.class);servletContext.log("Initializing Spring root WebApplicationContext");if (logger.isInfoEnabled()) {logger.info("Root WebApplicationContext: initialization started");}long startTime = System.currentTimeMillis();try {//载入双亲上下文(通常是不存在)ApplicationContext parent = loadParentContext(servletContext);// 创建WebApplicationContextthis.context = createWebApplicationContext(servletContext, parent);//把创建的根context保存到Servlet环境中servletContext.setAttribute(WebApplicationContext.ROOT_WEB_APPLICATION_CONTEXT_ATTRIBUTE, this.context);//取得线程的类加载器ClassLoader ccl = Thread.currentThread().getContextClassLoader();if (ccl == ContextLoader.class.getClassLoader()) {//如果线程和本类拥有相同的类加载器,则使用静态变量保存即可,因为同一类加载器加载同一份静态变量currentContext = this.context;}else if (ccl != null) {//如果线程和本类拥有不同的类加载器,则使用线程的类加载器作为key在保存在一个映射对象里,保证析构时能拿到Webcontext进行关闭操作currentContextPerThread.put(ccl, this.context);}if (logger.isDebugEnabled()) {logger.debug("Published root WebApplicationContext as ServletContext attribute with name [" +WebApplicationContext.ROOT_WEB_APPLICATION_CONTEXT_ATTRIBUTE + "]");}if (logger.isInfoEnabled()) {long elapsedTime = System.currentTimeMillis() - startTime;logger.info("Root WebApplicationContext: initialization completed in " + elapsedTime + " ms");}return this.context;}catch (RuntimeException ex) {logger.error("Context initialization failed", ex);servletContext.setAttribute(WebApplicationContext.ROOT_WEB_APPLICATION_CONTEXT_ATTRIBUTE, ex);throw ex;}catch (Error err) {logger.error("Context initialization failed", err);servletContext.setAttribute(WebApplicationContext.ROOT_WEB_APPLICATION_CONTEXT_ATTRIBUTE, err);throw err;}}
这里我们重点关注createWebApplicationContext(servletContext, parent)这个方法,这里是真正生产容器的地方。至于载入双亲上下文的方法,是根据我们ServletContext的参数取的,很明显,我们在上面的web.xml中只配置了xml的路径,并没有配置双亲上下文。想研究的同学可以去看下代码,这里不再多述。那么我们来看看这个创建容器的方法。
代码1.2:ContextLoader的createWebApplicationContext方法
protected WebApplicationContext createWebApplicationContext(ServletContext sc, ApplicationContext parent) {//取得配置的Web应用程序环境类,如果没有配置,则使用缺省的类XmlWebApplicationContextClass<?> contextClass = determineContextClass(sc);//如果配置的Web应用程序环境类不是可配置的Web应用程序环境的子类,则抛出异常,停止初始化if (!ConfigurableWebApplicationContext.class.isAssignableFrom(contextClass)) {throw new ApplicationContextException("Custom context class [" + contextClass.getName() +"] is not of type [" + ConfigurableWebApplicationContext.class.getName() + "]");}//实例化需要产生的IOC容器,并设置容器的各种参数,然后通过refresh启动容器初始化ConfigurableWebApplicationContext wac =(ConfigurableWebApplicationContext) BeanUtils.instantiateClass(contextClass);// 设置IOC容器的的IDif (sc.getMajorVersion() == 2 && sc.getMinorVersion() < 5) {// 如果 Servlet规范 <= 2.4,则使用web.xml里定义的应用程序名字定义Web应用程序名String servletContextName = sc.getServletContextName();wac.setId(ConfigurableWebApplicationContext.APPLICATION_CONTEXT_ID_PREFIX +ObjectUtils.getDisplayString(servletContextName));}else {// 如果Servlet规范是 2.5, 则使用配置的ContextPath定义Web应用程序名try {String contextPath = (String) ServletContext.class.getMethod("getContextPath").invoke(sc);wac.setId(ConfigurableWebApplicationContext.APPLICATION_CONTEXT_ID_PREFIX +ObjectUtils.getDisplayString(contextPath));}catch (Exception ex) {//如果Servlet规范是2.5,但是不能取得ContextPath,抛出异常throw new IllegalStateException("Failed to invoke Servlet 2.5 getContextPath method", ex);}}//设置双亲上下文wac.setParent(parent);//保存Servlet环境wac.setServletContext(sc);//这里其实就是设置xml的位置wac.setConfigLocation(sc.getInitParameter(CONFIG_LOCATION_PARAM));//提供子类可互换Web应用程序环境的机会customizeContext(sc, wac);//刷新Web应用程序环境以加载Bean定义【重点】wac.refresh();return wac;}
这个refresh方法是我们后面讲IOC容器的重点,这里web容器启动也就到这里了。后面是真正的IOC怎么加载Resource、解析BeanDefinition、注册、依赖注入。
参考文献:
【Spring技术内幕】第二版


 2万+
2万+

 被折叠的 条评论
为什么被折叠?
被折叠的 条评论
为什么被折叠?
 到【灌水乐园】发言


