


去App Store搜索并下载“LightBlue”这个App,对调试你的app和理解Core Bluetooth会很有帮助。
================================
Demo下载地址:http://download.csdn.net/detail/jimoduwu/7146875
================================
Core Bluetooth for iOS 6
CoreBluetooth的API是基于BLE4.0的标准的。这个框架涵盖了BLE标准的所有细节。仅仅只有新的iOS设备和Mac是和BLE标准兼容的:iPhone4S,iPhone5,MacMini,New iPad,MacBook Air,MacBook Pro。还有iPhone iOS6的模拟器也支持。这是非常有用的,在你没有一个真正的iOS设备而用模拟器去调试你的程序。
相关的类
在CoreBluetooth框架中,有两个主要的角色:周边和中央(Peripheral and Central) ,整个框架都是围绕这两个主要角色设计的,他俩之间有一系列的回调交换数据。下图1展示了周边和中央(Peripheral and Central),还有他俩之间的关系。
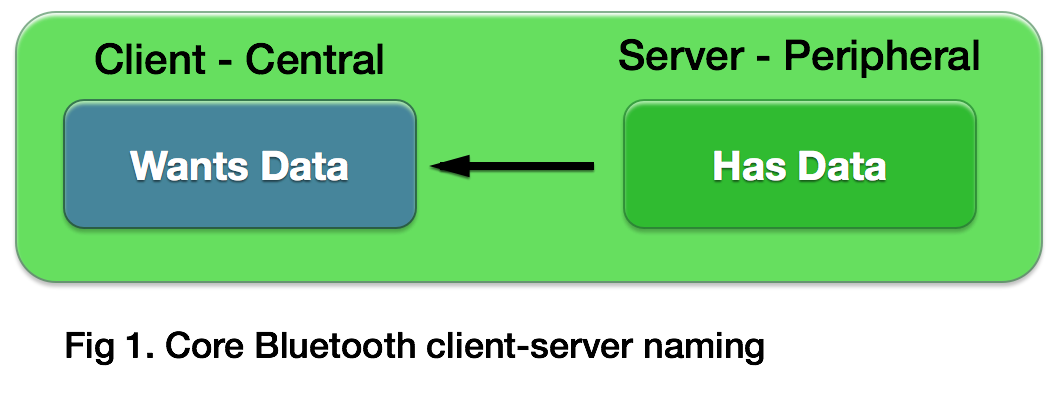
周边(Peripheral)是生成或者保存了数据的设备,中央(Central)是使用这些数据的设备。所有可用的iOS设备可以作为周边(Peripheral)也可以作为中央(Central),但不可以同时既是周边也是中央。
周边和中央这两个角色在CoreBluetooth框架中是用两个类来表示的,CBPeripheralManager这个类代表周边,CBCentralManager 这个类代表中央。
在中央这边,一个CBPeripheral 对象代表着相应的和中央连接着的周边;同样的,在周边这边,一个CBCentral 对象代表着相应的和周边连接着的中央。
你可以认为周边是一个广播数据的设备,他广播到外部世界说他这儿有数据,并且也说明了能提供的服务。另一边,中央开始扫描附近有没有服务,如果中央发现了想要的服务,然后中央就会请求连接周边,一旦连接建立成功,两个设备之间就开始交换传输数据了。
除了中央和周边,我们还要考虑他俩交换的数据结构。这些数据在服务中被结构化,每个服务由不同的特征(Characteristics)组成,特征是包含一个单一逻辑值的属性类型。如果你去http://developer.bluetooth.org链接,你可以找到标准服务和特征的列表。
在中央这边,CBService 类代表服务,CBCharacteristic 类代表特征。在周边这边,CBMutableService 类代表服务,CBMutableCharacteristic 类代表特征。下图2展示了到目前为止我们所讲的所有类。
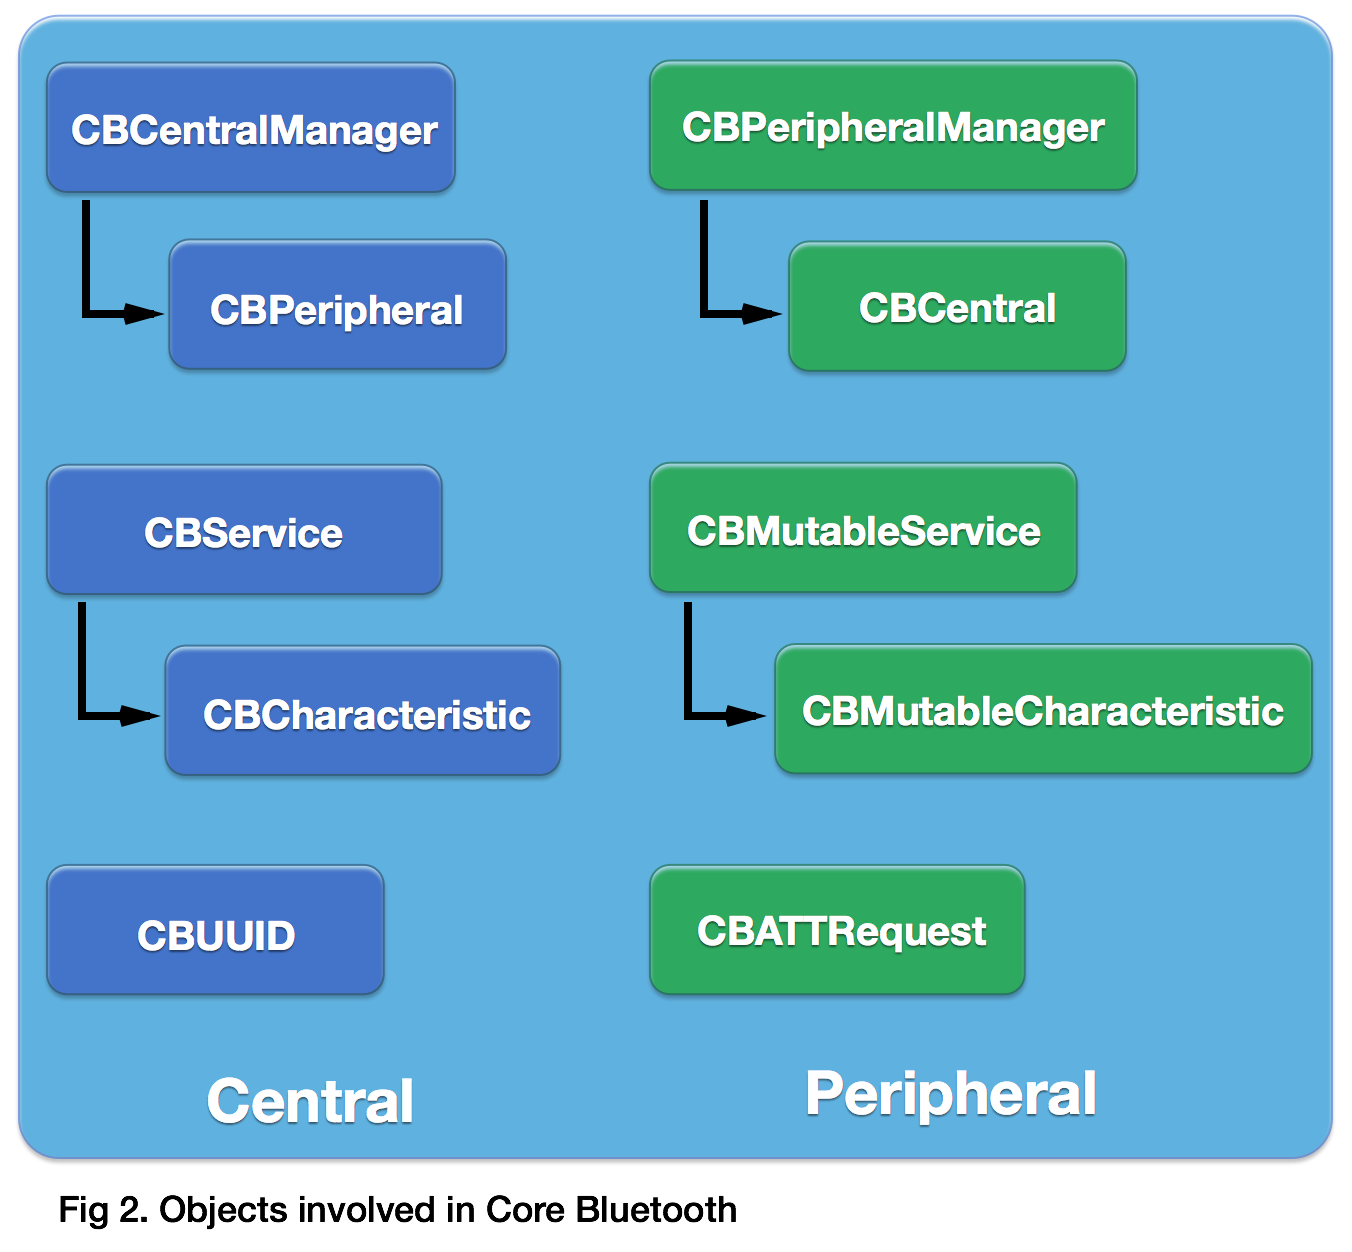
CBUUID 和CBATTRequest 是两个苹果公司给我们提供的帮助类,以便于开发者更简单地操作数据,稍后你将看到怎么使用这两个类。
用法
很不幸,苹果公司的CoreBluetooth文档目前不是很完整,一些复杂的类确实没有文档说明。你只能通过去看WWCD视频去理解这个框架是怎么工作的。因为在前一段时间我已经做过了这些,所以决定分享给大家。在NeuroSky,我们已经用CoreBluetooth框架开发了一些App。我很希望在这个教程可以帮到你。如果你想学到更多关于CoreBluetooth的知识,你可以出席我们的培训课,在这儿查看下一堂课: http://training.invasivecode.com
创建一个周边:
让我们开始创建一个完整的例子,你需要两个iOS设备。我将告诉你怎么连接2个iOS设备,通过蓝牙交换数据,记住检查你的iOS设备是不是在上边列出的支持BLE的列表中。
开始创建一个周边,跟着以下步骤(计划):
1.创建并且开始Peripheral Manager
2.设置并且发布这个周边的所提供的服务。
3.广播这个服务。
4.和中央相互作用。
用Single-View Application模板创建一个新的Xcode工程。命名为BlueServer (使用ARC)。工程创建完成后,添加CoreBluetooth.framework 框架。然后打开ViewController.h文件,并且添加以下代码:
#import <CoreBluetooth/CoreBluetooth.h>
使view controller继承CBPeripheralManagerDelegate 协议,然后添加这个属性:
@property (nonatomic, strong) CBPeripheralManager *manager;
在ViewController.m中,添加以下代码到viewDidLoad方法中:
self.manager = [[CBPeripheralManager alloc] initWithDelegate:self queue:nil];
这行代码创建了一个Peripheral Manager(计划中的第一项)。第一个参数是设置代理,这儿就是view controller,第二个参数设置为nil,因为Peripheral Manager将Run在主线程中。如果你想用不同的线程做更加复杂的事情,你需要创建一个队列(queue)并将它放在这儿。
一旦Peripheral Manager被创建,我们应该及时地检查它的状态,看正在运行App的这个设备是不是支持BLE标准。所以要实现以下这个代理方法,在这儿你可以做更复杂的一些事情和友好地提醒用户,如果设备不支持BLE。
- (void)peripheralManagerDidUpdateState:(CBPeripheralManager *)peripheral {
switch (peripheral.state) {
case CBPeripheralManagerStatePoweredOn:
[self setupService];
break;
default:
NSLog(@"Peripheral Manager did change state");
break;
}
}
这儿,我检查了周边的状态,如果他的状态是CBPeripheralManagerStatePoweredOn,这个设备是支持BLE并且可用的。
服务和特征(Service and Characteristic)
setupService 方法是一个帮助方法,我即将创建它,让它去准备服务和特征,对于这个例子,我们仅仅需要只有一个特征的一个服务。
每一个服务和特征都需要用一个UUID(unique identifier)去标识,UUID是一个16bit或者128bit的值。如果你要创建你的中央-周边App,你需要创建你自己的128bit的UUID。你必须要确定你自己的UUID不能和其他已经存在的服务冲突。如果你正要创建一个自己的设备,需要实现标准委员会需求的UUID;如果你只是创建一个中央-周边App(就像我们现在做的这样),我建议你打开Mac OS X的Terminal.app,用uuidgen命令生成一个128bit的UUID。你应该用该命令两次,生成两个UUID,一个是给服务用的,一个是给特征用的。然后,你需要添加他们到中央和周边App中。现在,在view controller的实现之前,我们添加以下的代码:
static NSString * const kServiceUUID = @"312700E2-E798-4D5C-8DCF-49908332DF9F";
static NSString * const kCharacteristicUUID = @"FFA28CDE-6525-4489-801C-1C060CAC9767";
注意:你自己用uuidgen生成的UUID和我的是不一样的。
现在,以下是setupService 方法的实现:
- (void)setupService {
// Creates the characteristic UUID
CBUUID *characteristicUUID = [CBUUID UUIDWithString:kCharacteristicUUID];
// Creates the characteristic
self.customCharacteristic = [[CBMutableCharacteristic alloc] initWithType:
characteristicUUID properties:CBCharacteristicPropertyNotify
value:nil permissions:CBAttributePermissionsReadable];
// Creates the service UUID
CBUUID *serviceUUID = [CBUUID UUIDWithString:kServiceUUID];
// Creates the service and adds the characteristic to it
self.customService = [[CBMutableService alloc] initWithType:serviceUUID
primary:YES];
// Sets the characteristics for this service
[self.customService setCharacteristics:
@[self.customCharacteristic]];
// Publishes the service
[self.peripheralManager addService:self.customService];
}
首先,我用+UUIDWithString:方法给特征创建了一个UUID对象,然后我用这个UUID对象创建了一个特征。注意:我给初始化特征方法的第三个参数赋值nil,这是,我告诉CoreBluetooth,我将稍后添加一个特征的值。当你想要创建一个动态的数据,一般都这么做。如果你已经有了一直静态的值要,你可以将它赋值在这儿。
在初始化特征的方法中,第一个参数是刚刚创建的UUID,第二个参数决定这个特征怎么使用。一下是所有可能的值:
■CBCharacteristicPropertyBroadcast: permits broadcasts of
the characteristic value using a characteristic configuration
descriptor. Not allowed for local characteristics.
■CBCharacteristicPropertyRead: permits reads of the
characteristic value.
■CBCharacteristicPropertyWriteWithoutResponse:
permits writes of the characteristic value,
without a response.
■CBCharacteristicPropertyWrite: permits writes of
the characteristic value.
■CBCharacteristicPropertyNotify: permits notifications
of the characteristic value, without a response.
■CBCharacteristicPropertyIndicate: permits indications
of the characteristic value.
■CBCharacteristicPropertyAuthenticatedSignedWrites:
permits signed writes of the characteristic value
■CBCharacteristicPropertyExtendedProperties: if set,
additional characteristic properties are defined in
the characteristic extended properties descriptor.
Not allowed for local characteristics.
■CBCharacteristicPropertyNotifyEncryptionRequired :
if set, only trusted devices can enable notifications
of the characteristic value.
■CBCharacteristicPropertyIndicateEncryptionRequired:
if set, only trusted devices can enable indications
of the characteristic value.
最后一个参数是属性的读、写、加密的权限,可能的值是以下的:
■CBAttributePermissionsReadable
■CBAttributePermissionsWriteable
■CBAttributePermissionsReadEncryptionRequired
■CBAttributePermissionsWriteEncryptionRequired
在创建了一个特征以后,又用了一次+UUIDWithString:方法,创建了一个服务。最后,我将特征添加到了服务上。记住,每一个服务可以包含多个特征。参见下图3.
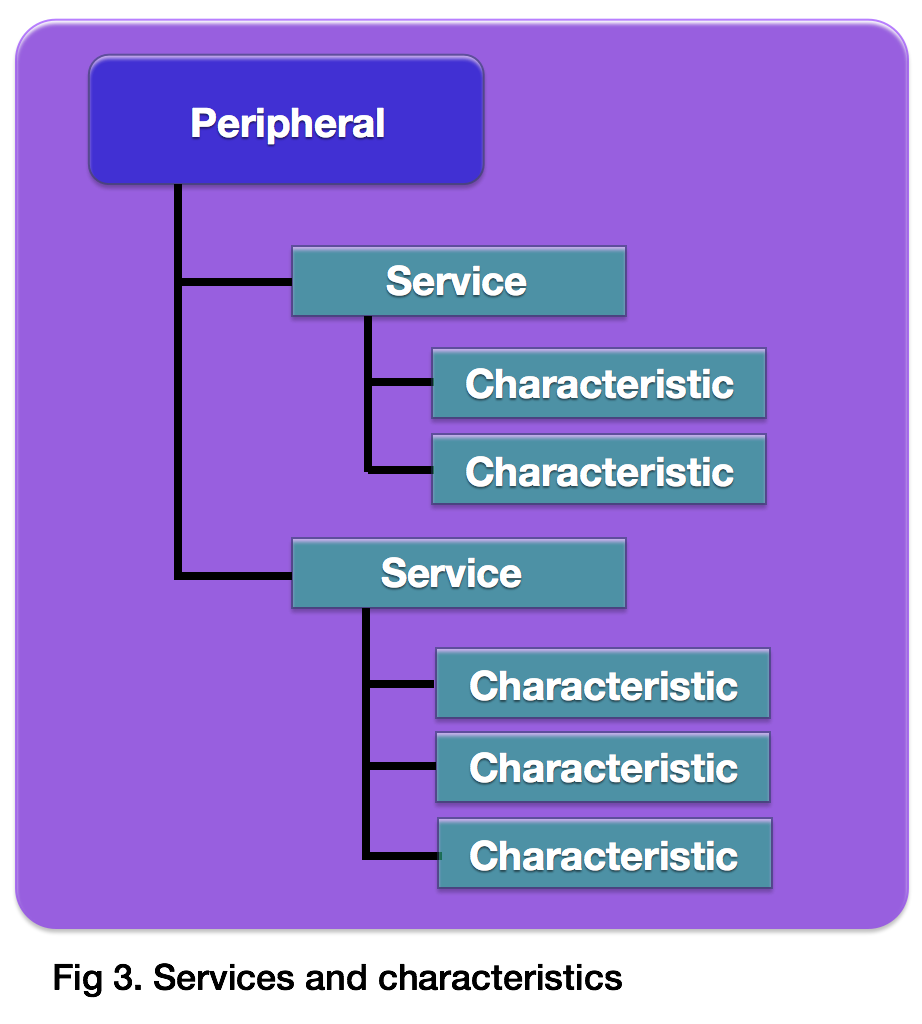
因此,我们需要创建一个特征的数组并且把这个数组传给服务。在这个例子中,数组仅仅包含一个特征。
代码的最后一行把服务添加到周边管理者(Peripheral Manager)是用于发布服务。一旦完成这个,周边管理者会通知他的代理方法-peripheralManager:didAddService:error:。现在,如果没有Error,你可以开始广播服务了:
- (void)peripheralManager:(CBPeripheralManager *)peripheral
didAddService:(CBService *)service error:(NSError *)error {
if (error == nil) {
// Starts advertising the service
[self.peripheralManager startAdvertising:
@{ CBAdvertisementDataLocalNameKey :
@"ICServer", CBAdvertisementDataServiceUUIDsKey :
@[[CBUUID UUIDWithString:kServiceUUID]] }];
}
}
当周边管理者开始广播服务,他的代理接收-peripheralManagerDidStartAdvertising:error: 消息,并且当中央预定了这个服务,他的代理接收 -peripheralManager:central:didSubscribeToCharacteristic:消息,这儿是你给中央生成动态数据的地方。
现在,要发送数据到中央,你需要准备一些数据,然后发送updateValue:forCharacteristic:onSubscribedCentrals: 到周边。
创建一个中央
现在,我们已经有了一个周边,让我们创建我们的中央。中央就是那个处理周边发送来的数据的设备。在下图1中,CBCentralManager对象代表中央。
创建一个新的Xcode工程,命名为BlueClient,记得使用ARC。添加CoreBluetooth.framework框架到你的工程,并且导入头文件到view controller,以下代码:
#import <CoreBluetooth/CoreBluetooth.h>
在中央这边,你的类必须要继承这两个协议:CBCentralManagerDelegate和CBPeripheralDelegate,以下代码:
@interface ViewController : UIViewController <CBCentralManagerDelegate,
CBPeripheralDelegate>
并且添加以下两个属性:
@property (nonatomic, strong) CBCentralManager *manager;
@property (nonatomic, strong) NSMutableData *data;
现在,我要创建一个中央对象了:
self.manager = [[CBCentralManager alloc] initWithDelegate:self queue:nil];
和创建周边时一样,第一个参数代表CBCentralManager 代理,在这个例子中就是这个view controller;第二个参数设置为nil,因为Peripheral Manager将Run在主线程中。如果你想用不同的线程做更加复杂的事情,你需要创建一个队列(queue)并将它放在这儿。
当Central Manager被初始化,我们要检查它的状态,以检查运行这个App的设备是不是支持BLE。实现以下的代理方法:
- (void)centralManagerDidUpdateState:
(CBCentralManager *)central {
switch (central.state) {
case CBCentralManagerStatePoweredOn:
// Scans for any peripheral
[self.manager scanForPeripheralsWithServices:
@[ [CBUUID UUIDWithString:kServiceUUID] ]
options:@{CBCentralManagerScanOptionAllowDuplicatesKey :
@YES }];
break;
default:
NSLog(@"Central Manager did change state");
break;
}
}
-scanForPeripheralsWithServices:options: 方法是用于告诉Central Manager,要开始寻找一个指定的服务了。如果你将第一个参数设置为nil,Central Manager就会开始寻找所有的服务。
kServiceUUID 和创建周边的那个工程中用的是一样的UUID。所以,再添加一次以下两行代码:
static NSString * const kServiceUUID = @"312700E2-E798-4D5C-8DCF-49908332DF9F";
static NSString * const kCharacteristicUUID = @"FFA28CDE-6525-4489-801C-1C060CAC9767";
记住UUID是你自己用uuidgen命令生成的。
一旦一个周边在寻找的时候被发现,中央的代理会收到以下回调:
- (void)centralManager:(CBCentralManager *)
central didDiscoverPeripheral:(CBPeripheral *)peripheral
advertisementData:(NSDictionary *)advertisementData
RSSI:(NSNumber *)RSSI
这个调用通知Central Manager代理(在这个例子中就是view controller),一个附带着广播数据和信号质量(RSSI-Received Signal Strength Indicator)的周边被发现。这是一个很酷的参数,知道了信号质量,你可以用它去判断远近。
任何广播、扫描的响应数据保存在advertisementData 中,可以通过CBAdvertisementData 来访问它。现在,你可以停止扫描,而去连接周边了:
- (void)centralManager:(CBCentralManager *)central
didDiscoverPeripheral:(CBPeripheral *)peripheral
advertisementData:(NSDictionary *)advertisementData
RSSI:(NSNumber *)RSSI {
// Stops scanning for peripheral
[self.manager stopScan];
if (self.peripheral != peripheral) {
self.peripheral = peripheral;
NSLog(@"Connecting to peripheral %@", peripheral);
// Connects to the discovered peripheral
[self.manager connectPeripheral:peripheral options:nil];
}
}
options 参数是一个可选的NSDictionary,如果需要,可以用以下的键(Key),它们的值始终是一个boolean。
■CBConnectPeripheralOptionNotifyOnConnectionKey.
This is a NSNumber (Boolean) indicating that the
system should display an alert for a given peripheral,
if the application is suspended when a successful
connection is made. This is useful for applications
that have not specified the Central background mode
and cannot display their own alert. If more than one
application has requested notification for a given
peripheral, the one that was most recently in the
foreground will receive the alert.
■CBConnectPeripheralOptionNotifyOnDisconnectionKey.
This is a NSNumber (Boolean) indicating that the
system should display a disconnection alert for a
given peripheral, if the application is suspended
at the time of the disconnection. This is useful for
applications that have not specified the Central
background mode and cannot display their own
alert. If more than one application has requested
notification for a given peripheral, the one that was
most recently in the foreground will receive the alert.
■CBConnectPeripheralOptionNotifyOnNotificationKey.
This is a NSNumber (Boolean) indicating that the
system should display an alert for all notifications
received from a given peripheral, if the application
is suspended at the time. This is useful for
applications that have not specified the Central
background mode and cannot display their own
alert. If more than one application has requested
notification for a given peripheral, the one that
was most recently in the foreground will receive the alert.
基于连接的结果,代理(这个例子中是view controller)会接收centralManager:didFailToConnectPeripheral:error:或者centralManager:didConnectPeripheral:。如果成功了,你可以问广播服务的那个周边。因此,在didConnectPeripheral 回调中,你可以写以下代码:
- (void)centralManager:(CBCentralManager *)central
didConnectPeripheral:(CBPeripheral *)peripheral {
// Clears the data that we may already have
[self.data setLength:0];
// Sets the peripheral delegate
[self.peripheral setDelegate:self];
// Asks the peripheral to discover the service
[self.peripheral discoverServices:
@[ [CBUUID UUIDWithString:kServiceUUID] ]];
}
现在,周边开始用一个回调通知它的代理。在上一个方法中,我请求周边去寻找服务,周边代理接收-peripheral:didDiscoverServices:。如果没有Error,可以请求周边去寻找它的服务所列出的特征,像以下这么做:
- (void)peripheral:(CBPeripheral *)aPeripheral
didDiscoverServices:(NSError *)error {
if (error) {
NSLog(@"Error discovering service:
%@", [error localizedDescription]);
[self cleanup];
return;
}
for (CBService *service in aPeripheral.services) {
NSLog(@"Service found with UUID: %@",
service.UUID);
// Discovers the characteristics for a given service
if ([service.UUID isEqual:[CBUUID
UUIDWithString:kServiceUUID]]) {
[self.peripheral discoverCharacteristics:
@[[CBUUID UUIDWithString:
kCharacteristicUUID]] forService:service];
}
}
}
现在,如果一个特征被发现,周边代理会接收-peripheral:didDiscoverCharacteristicsForService:error:。现在,一旦特征的值被更新,用-setNotifyValue:forCharacteristic:,周边被请求通知它的代理。
- (void)peripheral:(CBPeripheral *)peripheral
didDiscoverCharacteristicsForService:
(CBService *)service error:(NSError *)error {
if (error) {
NSLog(@"Error discovering characteristic:
%@", [error localizedDescription]);
[self cleanup];
return;
}
if ([service.UUID isEqual:[CBUUID UUIDWithString:
kServiceUUID]]) {
for (CBCharacteristic *characteristic in
service.characteristics) {
if ([characteristic.UUID isEqual:[CBUUID
UUIDWithString:kCharacteristicUUID]]) {
[peripheral setNotifyValue:YES
forCharacteristic:characteristic];
}
}
}
}
这儿,如果一个特征的值被更新,然后周边代理接收-peripheral:didUpdateNotificationStateForCharacteristic:error:。你可以用-readValueForCharacteristic:读取新的值:
- (void)peripheral:(CBPeripheral *)peripheral
didUpdateNotificationStateForCharacteristic:
(CBCharacteristic *)characteristic error:(NSError *)error {
if (error) {
NSLog(@"Error changing notification state:
%@", error.localizedDescription);
}
// Exits if it's not the transfer characteristic
if (![characteristic.UUID isEqual:[CBUUID
UUIDWithString:kCharacteristicUUID]]) {
return;
}
// Notification has started
if (characteristic.isNotifying) {
NSLog(@"Notification began on %@", characteristic);
[peripheral readValueForCharacteristic:characteristic];
} else { // Notification has stopped
// so disconnect from the peripheral
NSLog(@"Notification stopped on %@.
Disconnecting", characteristic);
[self.manager cancelPeripheralConnection:self.peripheral];
}
}
当周边发送新的值,周边代理接收-peripheral:didUpdateValueForCharacteristic:error:。这个方法的第二个参数包含特征。你可以用value属性读取他的值。这是一个包含特征的值的NSData。
结语:
I showed you a basic example on how to use the
Core Bluetooth framework. I hope that this
small tutorial, the WWDC videos and the
documentation (the available one) can help
you create new iOS applications using the
Bluetooth LE. Check also the examples
coming with the documentation. There,
you will find all the delegate methods
I used in this tutorial.


 4647
4647


 被折叠的 条评论
为什么被折叠?
被折叠的 条评论
为什么被折叠?
 到【灌水乐园】发言


