


之前就遇到表格里内嵌复选框的问题,网上查了好多资料也没有完全解决,今天花时间研究和实验后基本搞定。
使用的是自定义委托的方式,重写了panit函数和editorEvent函数实现指定列内嵌复选框,单击实现选中状态切换、选中状态下按空格键也可改变选中状态以及改变单元格大小时复选框始终在中间。
主要思路:paint函数里进行复选框的绘制,并实时读取模型数据显示状态,editorEvent函数里判断单元格点击情况进行处理。
源代码如下:
checkdelegate.h
#ifndef CHECKDELEGATE_H
#define CHECKDELEGATE_H

#include <QStyledItemDelegate>
#include <QtGui>

class CheckBoxDelegate : public QStyledItemDelegate
{
    Q_OBJECT
public:
    CheckBoxDelegate(QObject *parent = 0);
protected:
    void paint(QPainter* painter,const QStyleOptionViewItem& option,const QModelIndex& index) const;
    bool editorEvent(QEvent *event,QAbstractItemModel *model,const QStyleOptionViewItem &option,const QModelIndex &index);
};


#endif // CHECKDELEGATE_H
checkdelegate.cpp
#include "checkdelegate.h"
#include <QMouseEvent>
#include <QPainter>
#include <QStyleOption>

static QRect CheckBoxRect(const QStyleOptionViewItem &viewItemStyleOptions)/*const*/
{
    //绘制按钮所需要的参数
    QStyleOptionButton checkBoxStyleOption;
    //按照给定的风格参数 返回元素子区域
    QRect checkBoxRect = QApplication::style()->subElementRect( QStyle::SE_CheckBoxIndicator, &checkBoxStyleOption);
    //返回QCheckBox坐标
    QPoint checkBoxPoint(viewItemStyleOptions.rect.x() + viewItemStyleOptions.rect.width() / 2 - checkBoxRect.width() / 2,
                         viewItemStyleOptions.rect.y() + viewItemStyleOptions.rect.height() / 2 - checkBoxRect.height() / 2);
    //返回QCheckBox几何形状
    return QRect(checkBoxPoint, checkBoxRect.size());
}

CheckBoxDelegate::CheckBoxDelegate(QObject *parent):
    QStyledItemDelegate(parent)
{

}

void CheckBoxDelegate::paint(QPainter* painter, const QStyleOptionViewItem& option,const QModelIndex& index)const
{
    bool checked = index.model()->data(index, Qt::DisplayRole).toBool();

    if(index.column() == 0){
        qDebug() << checked;
        QStyleOptionButton checkBoxStyleOption;
        checkBoxStyleOption.state |= QStyle::State_Enabled;
        checkBoxStyleOption.state |= checked? QStyle::State_On : QStyle::State_Off;
        checkBoxStyleOption.rect = CheckBoxRect(option);

        QApplication::style()->drawControl(QStyle::CE_CheckBox,&checkBoxStyleOption,painter);
    }else{
        QStyledItemDelegate::paint(painter, option, index);
    }
}

bool CheckBoxDelegate::editorEvent(QEvent *event,
                                QAbstractItemModel *model,
                                const QStyleOptionViewItem &option,
                                const QModelIndex &index) {
    if(index.column() == 0){
    if((event->type() == QEvent::MouseButtonRelease) ||
            (event->type() == QEvent::MouseButtonDblClick)){
        QMouseEvent *mouseEvent = static_cast<QMouseEvent*>(event);
        if(mouseEvent->button() != Qt::LeftButton ||
                !CheckBoxRect(option).contains(mouseEvent->pos())){
            return true;
        }
        if(event->type() == QEvent::MouseButtonDblClick){
            return true;
        }
    }else if(event->type() == QEvent::KeyPress){
        if(static_cast<QKeyEvent*>(event)->key() != Qt::Key_Space &&
                static_cast<QKeyEvent*>(event)->key() != Qt::Key_Select){
            return false;
        }
    }else{
        return false;
    }

    bool checked = index.model()->data(index, Qt::DisplayRole).toBool();
    return model->setData(index, !checked, Qt::EditRole);
    }else{
        return QStyledItemDelegate::editorEvent(event, model, option, index);
    }
}
#include <QtGui/QApplication>
#include "checkdelegate.h"
#include <QtGui>
int main(int argc, char *argv[])
{
QApplication a(argc, argv);
QTableView tb;
QStandardItemModel *md = new QStandardItemModel(/*&tb*/);
md->setRowCount(5);
md->setColumnCount(5);
for(int i = 0;i<4;i++){
md->setData(md->index(1,i+1),QString("1"),Qt::EditRole);
}
CheckBoxDelegate *ck = new CheckBoxDelegate(/*&tb*/);
tb.setModel(md);
tb.setItemDelegate(ck);
tb.show();
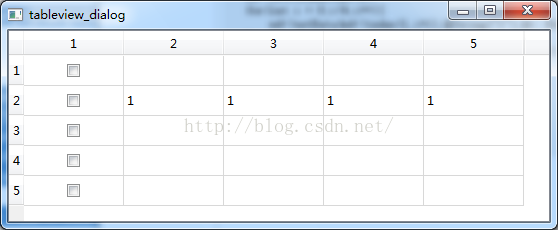
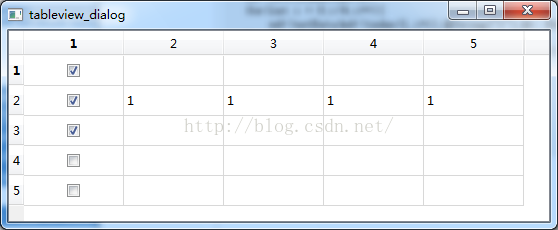
return a.exec();
}效果图:


 909
909


 被折叠的 条评论
为什么被折叠?
被折叠的 条评论
为什么被折叠?
 到【灌水乐园】发言


