


1.首先下载ueditor1_4_3-utf8-jsp并解压,下载地址:http://ueditor.baidu.com/website/download.html
2,在MyE
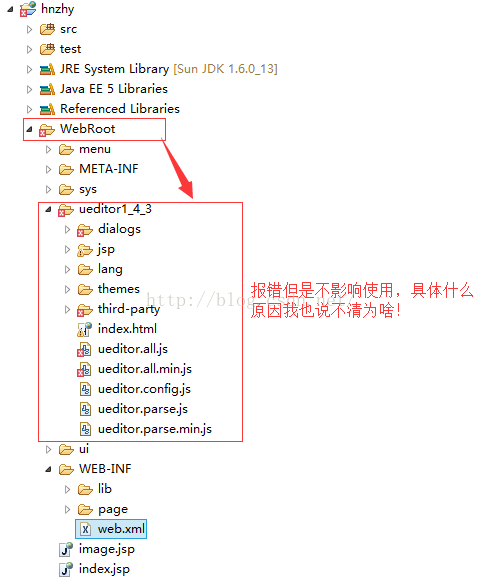
clipse里新建一个 hnzhy项目(我新建的项目为hnzhy),建好项目后,会有一个WebRoot文件夹,在此目录下新建文件夹ueditor1_4_3,
然后把解压的ueditor1_4_3-utf8-jsp目录下的所有文件都复制到新建文件夹ueditor1_4_3下
如下图所示:
3,在index.jsp中配置引用ueditor:


5.,打开ueditor1_4_3/jsp/config.json文件:修改图片访问路径前缀imageUrlPrefix的值为符合项目访问的值,如下图:

6.修改ueditor1_4_3/ueditor.config.js的window.UEDITOR_HOME_URL为符合项目访问的路径,如下图:

7.
在ueditor1_4_3/ueditor.config.js中也可修改编辑器的大小,如下图:


这样即可!
8.在tomcat中启动项目后,输入地址http://localhost:8080/UeditorDemo/index.jsp就会出现编辑器,选择图片上传按钮即可上传图片,
注意:
一:如果在java项目中引入百度编辑器时,百度编辑器不显示的话,则可以看看jsp引入js和css路径,如下图:
二:在SSH框架中可能上传图片时,会报错:未找到上传数据,解决办法如下:
1.新建立一个过滤器filter
public class UeditorFilter extends StrutsPrepareAndExecuteFilter {
	 public void doFilter(ServletRequest req, ServletResponse res, FilterChain chain) throws IOException, ServletException {
		  HttpServletRequest request = (HttpServletRequest) req;
		  String url = request.getRequestURI();
		  if (url.endsWith("controller.jsp")) {
		   chain.doFilter(req, res);
		  }
		  // 拦截使用默认的拦截
		  else {
		   super.doFilter(req, res, chain);
		  }
	 }
}
2.配置web.xml
<filter>
	  <filter-name>struts2</filter-name>
	  <filter-class>cn.edu.hactcm.hnzhy.filter.UeditorFilter</filter-class>
 	</filter>
	<filter-mapping>
	  <filter-name>struts2</filter-name>
	  <url-pattern>/*</url-pattern>
	</filter-mapping>

	<welcome-file-list>
	  <welcome-file>index.jsp</welcome-file>
	</welcome-file-list>
这样即可!


 2884
2884

 被折叠的 条评论
为什么被折叠?
被折叠的 条评论
为什么被折叠?
 到【灌水乐园】发言


