


1.Springmvc架构
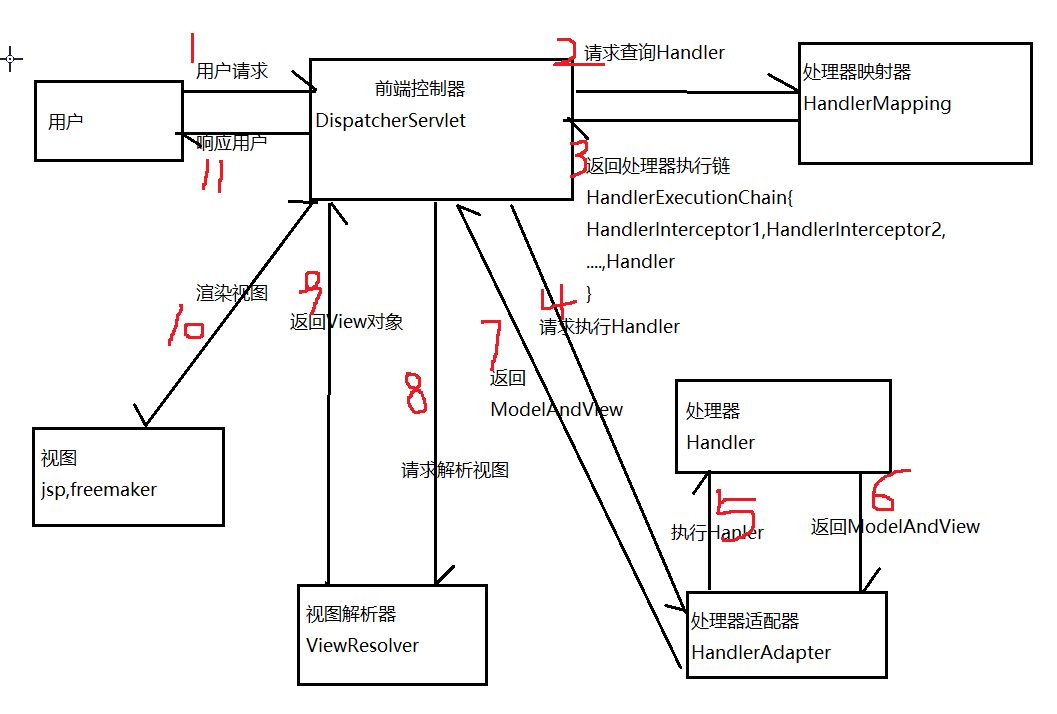
2.Springmvc组件
三大组件:处理器映射器,处理器适配器,视图解析器
处理器映射器:注解式处理器映射器,对类中标记了@ResquestMapping的方法进行映射,根据@ResquestMapping定义的url匹配@ResquestMapping标记的方法,匹配成功返回HandlerMethod对象给前端控制器。
<!-- 配置处理器映射器 -->
<bean
class="org.springframework.web.servlet.mvc.method.annotation.RequestMappingHandlerMapping" />
处理器适配器:对标记@ResquestMapping的方法进行适配
<!-- 配置处理器适配器 -->
<bean
class="org.springframework.web.servlet.mvc.method.annotation.RequestMappingHandlerAdapter" />
解决办法:
SpringMVC使用<mvc:annotation-driven>自动加载RequestMappingHandlerMapping和RequestMappingHandlerAdapter
可以在springmvc.xml配置文件中使用<mvc:annotation-driven>替代注解处理器和适配器的配置。
<!-- 注解驱动 -->
<mvc:annotation-driven />
视图解析器:视图解析器使用SpringMVC框架默认的InternalResourceViewResolver,这个视图解析器支持JSP视图解析。
<!-- 配置视图解析器 -->
<bean
class="org.springframework.web.servlet.view.InternalResourceViewResolver">
<!-- 配置逻辑视图的前缀 -->
<property name="prefix" value="/WEB-INF/jsp/" />
<!-- 配置逻辑视图的后缀 -->
<property name="suffix" value=".jsp" />
</bean>
最终jsp物理地址:前缀+逻辑视图名+后缀
3.参数绑定
参数类型推荐使用包装数据类型,因为基础数据类型不可以为null
整形:Integer、int
字符串:String
单精度:Float、float
双精度:Double、double
布尔型:Boolean、boolean
说明:对于布尔类型的参数,请求的参数值为true或false。或者1或0
请求url:
http://localhost:8080/xxx.action?id=2&status=false
处理器方法:
public String editItem(Model model,Integer id,Boolean status)
3.1简单参数的绑定(@RequestParam)
当请求的参数名称和处理器形参名称一致时会将请求参数与形参进行绑定,若不一致,就需要@RequestParam
value:参数名字,即入参的请求参数名字,如value=“itemId”表示请求的参数 区中的名字为itemId的参数的值将传入
required:是否必须,默认是true,表示请求中一定要有相应的参数,否则将报错
TTP Status 400 - Required Integer parameter 'XXXX' is not present
defaultValue:默认值,表示如果请求中没有同名参数时的默认值
public String queryItemById(@RequestParam(value = "itemId", required = true, defaultValue = "1") Integer id,ModelMap modelMap) {}
这里需要传入的是id,实际传入的是itemId,需要用@RequestParam转换一下
3.2pojo参数绑定
如果提交的参数很多,或者提交的表单中的内容很多的时候,可以使用简单类型接受数据,也可以使用pojo接收数据,但是pojo对象中的属性名和表单中input的name属性一致。
3.3自定义参数绑定
由于日期数据有很多种格式,springmvc没办法把字符串转换成日期类型。所以需要自定义参数绑定
一般使用<mvc:annotation-driven/>注解驱动加载处理器适配器,可以在此标签上进行配置
//Converter<S, T>
//S:source,需要转换的源的类型
//T:target,需要转换的目标类型
public class DateConverter implements Converter<String, Date> {
@Override
public Date convert(String source) {
try {
// 把字符串转换为日期类型
SimpleDateFormat simpleDateFormat = new SimpleDateFormat("yyy-MM-dd HH:mm:ss");
Date date = simpleDateFormat.parse(source);
return date;
} catch (ParseException e) {
// TODO Auto-generated catch block
e.printStackTrace();
}
// 如果转换异常则返回空
return null;
}
}
<!-- 配置注解驱动 -->
<!-- 如果配置此标签,可以不用配置... -->
<mvc:annotation-driven conversion-service="conversionService" />
<!-- 转换器配置 -->
<bean id="conversionService" class="org.springframework.format.support.FormattingConversionServiceFactoryBean">
<property name="converters">
<set>
<bean class="cn.itcast.springmvc.converter.DateConverter" />
</set>
</property>
</bean>
3.3高级参数绑定
3.3.1绑定数组
3.3.2将数据绑定到list集合
将pojo放入list集合中,注意:接收List类型的数据必须是pojo的属性,如果方法的形参为ArrayList类型无法正确接收到数据
4.RequestMapping
4.1url路径映射
@RequestMapping(value="item")或@RequestMapping("/item"),value的值是数组,可以将多个url映射到同一个方法
4.2请求方法的限定
限定GET方法
@RequestMapping(method = RequestMethod.GET)
如果通过POST访问则报错:
HTTP Status 405 - Request method 'POST' not supported
例如:
@RequestMapping(value = "itemList",method = RequestMethod.POST)
限定POST方法
@RequestMapping(method = RequestMethod.POST)
如果通过GET访问则报错:
HTTP Status 405 - Request method 'GET' not supported
GET和POST都可以
@RequestMapping(method = {RequestMethod.GET,RequestMethod.POST})
5.Controller返回值
5.1Redirect重定向
Contrller方法返回字符串可以重定向到一个url地址
// 重定向后浏览器地址栏变更为重定向的地址,
// 重定向相当于执行了新的request和response,所以之前的请求参数都会丢失
// 如果要指定请求参数,需要在重定向的url后面添加 ?itemId=1 这样的请求参数
return "redirect:/itemEdit.action?itemId=" + item.getId();
5.2Forward转发
Controller方法执行后继续执行另一个Controller方法
// 修改商品成功后,继续执行另一个方法
// 使用转发的方式实现。转发后浏览器地址栏还是原来的请求地址,
// 转发并没有执行新的request和response,所以之前的请求参数都存在
return "forward:/itemEdit.action";
6.异常处理器
springmvc在处理请求过程中出现异常信息交由异常处理器进行处理,自定义异常处理器可以实现一个系统的异常处理逻辑。
系统的dao、service、controller出现都通过throws Exception向上抛出,最后由springmvc前端控制器交由异常处理器进行异常处理
6.1自定义异常类
为了区别不同的异常,通常根据异常类型进行区分,这里我们创建一个自定义系统异常。
如果controller、service、dao抛出此类异常说明是系统预期处理的异常信息。
public class MyException extends Exception {
// 异常信息
private String message;
public MyException() {
super();
}
public MyException(String message) {
super();
this.message = message;
}
public String getMessage() {
return message;
}
public void setMessage(String message) {
this.message = message;
}
}
6.2自定义异常处理器
public class CustomHandleException implements HandlerExceptionResolver {
@Override
public ModelAndView resolveException(HttpServletRequest request, HttpServletResponse response, Object handler,
Exception exception) {
// 定义异常信息
String msg;
// 判断异常类型
if (exception instanceof MyException) {
// 如果是自定义异常,读取异常信息
msg = exception.getMessage();
} else {
// 如果是运行时异常,则取错误堆栈,从堆栈中获取异常信息
Writer out = new StringWriter();
PrintWriter s = new PrintWriter(out);
exception.printStackTrace(s);
msg = out.toString();
}
// 把错误信息发给相关人员,邮件,短信等方式
// 返回错误页面,给用户友好页面显示错误信息
ModelAndView modelAndView = new ModelAndView();
modelAndView.addObject("msg", msg);
modelAndView.setViewName("error");
return modelAndView;
}
}
在springmvc.xml中添加:
<!-- 配置全局异常处理器 -->
<bean
id="customHandleException" class="cn.itcast.ssm.exception.CustomHandleException"/>
7.上传图片
7.1配置虚拟路径
在tomcat上配置图片虚拟目录,在tomcat下conf/server.xml中添加:
<Context docBase="D:\develop\upload\temp" path="/pic" reloadable="false"/>
访问http://localhost:8080/pic即可访问D:\develop\upload\temp下的图片。
也可以通过eclipse配置,如下图:
复制一张图片到存放图片的文件夹,使用浏览器访问
测试效果,如下图:
7.2jar包以及视图解析器
在springmvc.xml中配置文件上传解析器
<!-- 文件上传,id必须设置为multipartResolver -->
<bean id="multipartResolver"
class="org.springframework.web.multipart.commons.CommonsMultipartResolver">
<!-- 设置文件上传大小 -->
<property name="maxUploadSize" value="5000000" />
</bean>
7.3图片上传代码示例
@RequestMapping("updateItem")
public String updateItemById(Item item, MultipartFile pictureFile) throws Exception {
// 图片上传
// 设置图片名称,不能重复,可以使用uuid
String picName = UUID.randomUUID().toString();
// 获取文件名
String oriName = pictureFile.getOriginalFilename();
// 获取图片后缀
String extName = oriName.substring(oriName.lastIndexOf("."));
// 开始上传
pictureFile.transferTo(new File("C:/upload/image/" + picName + extName));
// 设置图片名到商品中
item.setPic(picName + extName);
// ---------------------------------------------
// 更新商品
this.itemService.updateItemById(item);
return "forward:/itemEdit.action";
}
8.Json数据交互
8.1@RequestBody
@RequestBody注解用于读取http请求的内容(字符串),通过springmvc提供的HttpMessageConverter接口将读到的内容(json数据)转换为java对象并绑定到Controller方法的参数上。
@RequestBody注解实现接收http请求的json数据,将json数据转换为java对象进行绑定
8.2@ResponseBody
@ResponseBody注解用于将Controller的方法返回的对象,通过springmvc提供的HttpMessageConverter接口转换为指定格式的数据如:json,xml等,通过Response响应给客户端
@ResponseBody注解实现将Controller方法返回java对象转换为json响应给客户端。
8.3Json请求,Json响应(jackson)
如果需要springMVC支持json,必须加入json的处理jar
8.4Json转换器
如果不使用注解驱动<mvc:annotation-driven />,就需要给处理器适配器配置json转换器
在springmvc.xml配置文件中,给处理器适配器加入json转换器:
<!--处理器适配器 -->
<bean class="org.springframework.web.servlet.mvc.method.annotation.RequestMappingHandlerAdapter">
<property name="messageConverters">
<list>
<bean class="org.springframework.http.converter.json.MappingJacksonHttpMessageConverter"></bean>
</list>
</property>
</bean>
9.RESTful支持
9.1资源操作
传统方式操作资源
http://127.0.0.1/item/queryItem.action?id=1 查询,GET
http://127.0.0.1/item/saveItem.action 新增,POST
http://127.0.0.1/item/updateItem.action 更新,POST
http://127.0.0.1/item/deleteItem.action?id=1 删除,GET或POST
使用RESTful操作资源
http://127.0.0.1/item/1 查询,GET
http://127.0.0.1/item 新增,POST
http://127.0.0.1/item 更新,PUT
http://127.0.0.1/item/1 删除,DELETE
9.2从url上获取参数(@PathVariable)
@RequestMapping("item/{id}")
@ResponseBody
public Item queryItemById(@PathVariable() Integer id) {}
{xxx}叫做占位符,请求的URL可以是“item /1”或“item/2”
使用(@PathVariable() Integer id)获取url上的数据
如果@RequestMapping中表示为"item/{id}",id和形参名称一致,@PathVariable不用指定名称。如果不一致,例如"item/{ItemId}"则需要指定名称@PathVariable("itemId")
注意两个区别
1. @PathVariable是获取url路径上数据的。@RequestParam获取静态的url请求参数的(包括post表单提交)
1. @Controller
2. @RequestMapping("/owners/{ownerId}")
3. public class RelativePathUriTemplateController {
4.
5. @RequestMapping("/pets/{petId}")
6. public void findPet(@PathVariable String ownerId, @PathVariable String petId, Model model) {
7. // implementation omitted
8. }
9. }
上面代码把URI template 中变量 ownerId的值和petId的值,绑定到方法的参数上。若方法参数名称和需要绑定的uri template中变量名称不一致,需要在@PathVariable("name")指定uri template中的名称
2. 如果加上@ResponseBody注解,就不会走视图解析器,不会返回页面,目前返回的json数据。如果不加,就走视图解析器,返回页面
9.3最佳实践
9.3.1响应设计
错误2点:
第一违反了仅仅用来传输数据的原则,status:200不是响应状态码,一般称之为业务状态码。
第二违反了拿来就用的原则,数据被包装了2层
9.3.2指定响应属性字段
如介绍,按需提取,需要什么就提取什么,而不是全部提取。例如:根据id查询用户信息,可能我就需要用户名称就行,但是结果却返回跟用户相关的所有信息,
包括年龄,性别等。。。。,这都不是我想要的数据,我仅仅需要姓名而已。
9.3.3http的响应状态码
9.4操作资源时注意更新和删除
9.4.1更新操作
默认情况下,PUT请求是无法提交表单数据的,需要在web.xml中添加过滤器解决:
<!-- 解决PUT请求无法提交表单数据的问题 -->
<filter>
<filter-name>HttpMethodFilter</filter-name>
<filter-class>org.springframework.web.filter.HttpPutFormContentFilter</filter-class>
</filter>
<filter-mapping>
<filter-name>HttpMethodFilter</filter-name>
<url-pattern>/*</url-pattern>
</filter-mapping>
9.4.2删除操作
需要在web.xml中添加过滤器解决DELETE请求无法提交表单数据的问题:
<!--
将POST请求转化为DELETE或者是PUT
要用_method指定真正的请求参数
-->
<filter>
<filter-name>HiddenHttpMethodFilter</filter-name>
<filter-class>org.springframework.web.filter.HiddenHttpMethodFilter</filter-class>
</filter>
<filter-mapping>
<filter-name>HiddenHttpMethodFilter</filter-name>
<url-pattern>/*</url-pattern>
</filter-mapping>
10.拦截器
10.1自定义拦截器类
public class HandlerInterceptor1 implements HandlerInterceptor {
// controller执行后且视图返回后调用此方法
// 这里可得到执行controller时的异常信息
// 这里可记录操作日志
@Override
public void afterCompletion(HttpServletRequest arg0, HttpServletResponse arg1, Object arg2, Exception arg3)
throws Exception {
System.out.println("HandlerInterceptor1....afterCompletion");
}
// controller执行后但未返回视图前调用此方法
// 这里可在返回用户前对模型数据进行加工处理,比如这里加入公用信息以便页面显示
@Override
public void postHandle(HttpServletRequest arg0, HttpServletResponse arg1, Object arg2, ModelAndView arg3)
throws Exception {
System.out.println("HandlerInterceptor1....postHandle");
}
// Controller执行前调用此方法
// 返回true表示继续执行,返回false中止执行
// 这里可以加入登录校验、权限拦截等
@Override
public boolean preHandle(HttpServletRequest arg0, HttpServletResponse arg1, Object arg2) throws Exception {
System.out.println("HandlerInterceptor1....preHandle");
// 设置为true,测试使用
return true;
}
}
10.2拦截器配置
在springmvc.xml中配置拦截器
<!-- 配置拦截器 -->
<mvc:interceptors>
<mvc:interceptor>
<!-- 所有的请求都进入拦截器 -->
<mvc:mapping path="/**" />
<!-- 配置具体的拦截器 -->
<bean class="cn.itcast.ssm.interceptor.HandlerInterceptor1" />
</mvc:interceptor>
<mvc:interceptor>
<!-- 所有的请求都进入拦截器 -->
<mvc:mapping path="/**" />
<!-- 配置具体的拦截器 -->
<bean class="cn.itcast.ssm.interceptor.HandlerInterceptor2" />
</mvc:interceptor>
</mvc:interceptors>
总结:
preHandle按拦截器定义顺序调用
postHandler按拦截器定义逆序调用
afterCompletion按拦截器定义逆序调用
postHandler在拦截器链内所有拦截器返成功调用
afterCompletion只有preHandle返回true才调用
10.3拦截器应用案例
判断用户是否登录
Jsp页面
<%@ page language="java" contentType="text/html; charset=UTF-8"
pageEncoding="UTF-8"%>
<!DOCTYPE html PUBLIC "-//W3C//DTD HTML 4.01 Transitional//EN" "http://www.w3.org/TR/html4/loose.dtd">
<html>
<head>
<meta http-equiv="Content-Type" content="text/html; charset=UTF-8">
<title>Insert title here</title>
</head>
<body>
<form action="${pageContext.request.contextPath }/user/login.action">
<label>用户名:</label>
<br>
<input type="text" name="username">
<br>
<label>密码:</label>
<br>
<input type="password" name="password">
<br>
<input type="submit">
</form>
</body>
</html>
登录的controller
@Controller
@RequestMapping("user")
public class UserController {
/**
* 跳转到登录页面
*
* @return
*/
@RequestMapping("toLogin")
public String toLogin() {
return "login";
}
/**
* 用户登录
*
* @param username
* @param password
* @param session
* @return
*/
@RequestMapping("login")
public String login(String username, String password, HttpSession session) {
// 校验用户登录
System.out.println(username);
System.out.println(password);
// 把用户名放到session中
session.setAttribute("username", username);
return "redirect:/item/itemList.action";
}
}
拦截器的编写
@Override
public boolean preHandle(HttpServletRequest request, HttpServletResponse response, Object arg2) throws Exception {
// 从request中获取session
HttpSession session = request.getSession();
// 从session中获取username
Object username = session.getAttribute("username");
// 判断username是否为null
if (username != null) {
// 如果不为空则放行
return true;
} else {
// 如果为空则跳转到登录页面
response.sendRedirect(request.getContextPath() + "/user/toLogin.action");
}
return false;
}
在springmvc.xml配置拦截器
<mvc:interceptor>
<!-- 配置商品被拦截器拦截 -->
<mvc:mapping path="/item/**" />
<!-- 配置具体的拦截器 -->
<bean class="cn.itcast.ssm.interceptor.LoginHandlerInterceptor" />
</mvc:interceptor>
11.springmvc与struts2不同
1、 springmvc的入口是一个servlet即前端控制器,而struts2入口是一个filter过滤器。
2、 springmvc是基于方法开发(一个url对应一个方法),请求参数传递到方法的形参,可以设计为单例或多例(建议单例),struts2是基于类开发,传递参数是通过类的属性,只能设计为多例。
3、 Struts采用值栈存储请求和响应的数据,通过OGNL存取数据, springmvc通过参数解析器是将request请求内容解析,并给方法形参赋值,将数据和视图封装成ModelAndView对象,最后又将ModelAndView中的模型数据通过request域传输到页面。Jsp视图解析器默认使用jstl。
12.springmvc和mybatis整合
需要的jar包:
1. spring(包括springmvc)
2. mybatis
3. mybatis-spring整合包
4. 数据库驱动
第三方连接池。
Dao层:
1、SqlMapConfig.xml,空文件即可,但是需要文件头。
2、applicationContext-dao.xml
a) 数据库连接池
b) SqlSessionFactory对象,需要spring和mybatis整合包下的。
c) 配置mapper文件扫描器。
Service层:
1、applicationContext-service.xml包扫描器,扫描@service注解的类。
2、applicationContext-trans.xml配置事务。
Controller层:
1、Springmvc.xml
a) 包扫描器,扫描@Controller注解的类。
b) 配置注解驱动
c) 配置视图解析器
Web.xml文件:
1、配置spring
配置前端控制器


 1万+
1万+


 被折叠的 条评论
为什么被折叠?
被折叠的 条评论
为什么被折叠?
 到【灌水乐园】发言


