


在做文本app的时候经常会用到翻页效果,我了解的翻页效果有三种。最基本的是用transition动画的CurlDown和CurlUp来实现,这种实现非常简单,但是不能控制过程。然后是类似开源库Leaves提供的方法一样,可以控制中间过程,不过只能左右水平翻页。再者就是apple的iBooks以及目前大多数电子书应用都能实现的“最真实的翻页”,不但可以水平控制,而且可以有“折角”,效果也很流畅。
第三种的实现难度略大,暂且不提,这里一起看一下经典的Leaves库,这个库的代码写得非常清晰易懂,适合初学者学习。
代码结构:
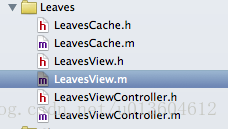
Leaves代码遵循MVC设计模式。LeavesCache是model,主要功能是获得当前页图片、缓存某一页图片以及对数据的清空等操作。LeavesView是View,主要是展示平常状态下以及翻页过程中的图像、层等内容,是接下来详细研究的类。LeavesViewController是Controller,一般当我们整个视图都是LeavesView时我们可以继承这个控制器,这个控制器已经将dataSource设为自己,所以我们只需重写dataSource协议方法即可。
LeavesCache类:
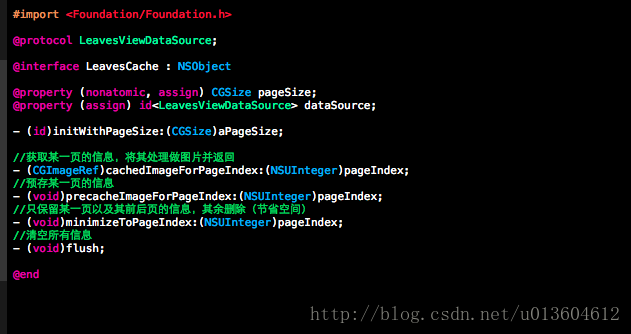
其中pageSize指每一页的大小,在view中被设置为self.bounds。dataSource为数据源。
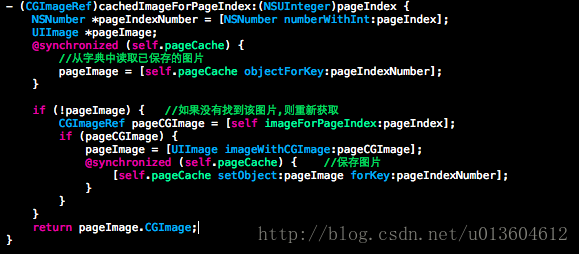
加载图片的方法是,定义一个字典pageCache用来存储已经被加载过的图像,每次需要获取图片时从这里面获取,如果为nil,则说明或者是第一次加载,或者已经被删掉了,需要调用私有方法imageForPageIndex:来重新获取。
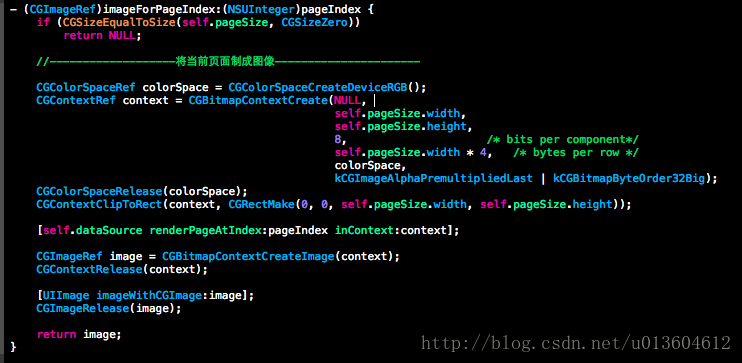
该方法中用Quartz2D来截取屏幕获得图片,这里返回的是CGImageRef,目的是方便为图层的contents赋值。
有了这两个操作,剩下的就简单了,主要就是调用这两个方法进行加载、预加载、清空等。
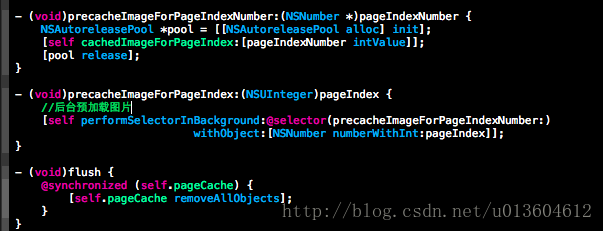
而最后的minimizeToPageIndex:方法,正如其注释:Uncache all pages except previous, current, and next(除去当前页、前一页和后一页以外其余全部清除),目的是节省空间,在View中每次翻到某一页即调用该方法。
LeavesView:
在LeavesView的头文件中对每个属性和方法都做了详尽的注释,比如点击进入下一页的间距targetWidth,是否支持预加载的backgroundRendering等。关键是实现文件中的一些私有属性的理解:
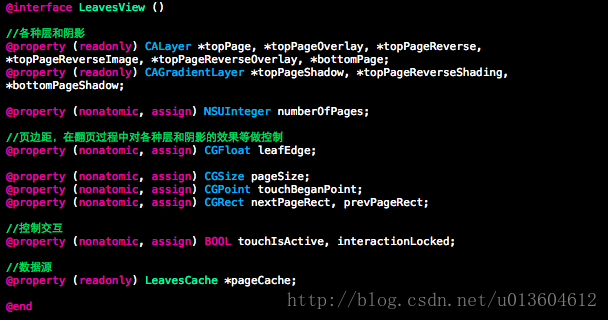
关于其中各种层和阴影的理解,都体现在接下来的方法initCommon中,该方法是初始化这些层并为其设置基本属性的方法:
- (void)initCommon {
	self.clipsToBounds = YES;

    //最顶层
	_topPage = [[CALayer alloc] init];
	_topPage.masksToBounds = YES;
	_topPage.contentsGravity = kCAGravityLeft;
	_topPage.backgroundColor = [[UIColor whiteColor] CGColor];

    //翻页过程中的最顶层
	_topPageOverlay = [[CALayer alloc] init];
	_topPageOverlay.backgroundColor = [[[UIColor blackColor] colorWithAlphaComponent:0.2] CGColor];

    //翻页过程中压在上一页上的阴影层
	_topPageShadow = [[CAGradientLayer alloc] init];
	_topPageShadow.colors = [NSArray arrayWithObjects:
							(id)[[[UIColor blackColor] colorWithAlphaComponent:0.6] CGColor],
							(id)[[UIColor clearColor] CGColor],
							nil];
    //映射的起止点,类比PS里渐变的鼠标开始点与松开点
	_topPageShadow.startPoint = CGPointMake(1,0.5);
	_topPageShadow.endPoint = CGPointMake(0,0.5);


    //书页背面的一层
	_topPageReverse = [[CALayer alloc] init];
	_topPageReverse.backgroundColor = [[UIColor whiteColor] CGColor];
	_topPageReverse.masksToBounds = YES;

    //书背面显示倒影图片的一层
	_topPageReverseImage = [[CALayer alloc] init];
	_topPageReverseImage.masksToBounds = YES;
	_topPageReverseImage.contentsGravity = kCAGravityRight;

    //书背面页的最顶层
	_topPageReverseOverlay = [[CALayer alloc] init];
	_topPageReverseOverlay.backgroundColor = [[[UIColor whiteColor] colorWithAlphaComponent:0.8] CGColor];

    //书背面页的阴影层
	_topPageReverseShading = [[CAGradientLayer alloc] init];
	_topPageReverseShading.colors = [NSArray arrayWithObjects:
									(id)[[[UIColor blackColor] colorWithAlphaComponent:0.6] CGColor],
									(id)[[UIColor clearColor] CGColor],
									nil];
	_topPageReverseShading.startPoint = CGPointMake(1,0.5);
	_topPageReverseShading.endPoint = CGPointMake(0,0.5);

    //下一页的一层
	_bottomPage = [[CALayer alloc] init];
	_bottomPage.backgroundColor = [[UIColor whiteColor] CGColor];
	_bottomPage.masksToBounds = YES;

    //压在下一页上的阴影层
	_bottomPageShadow = [[CAGradientLayer alloc] init];
	_bottomPageShadow.colors = [NSArray arrayWithObjects:
							   (id)[[[UIColor blackColor] colorWithAlphaComponent:0.6] CGColor],
							   (id)[[UIColor clearColor] CGColor],
							   nil];
	_bottomPageShadow.startPoint = CGPointMake(0,0.5);
	_bottomPageShadow.endPoint = CGPointMake(1,0.5);

	[_topPage addSublayer:_topPageShadow];
	[_topPage addSublayer:_topPageOverlay];
	[_topPageReverse addSublayer:_topPageReverseImage];
	[_topPageReverse addSublayer:_topPageReverseOverlay];
	[_topPageReverse addSublayer:_topPageReverseShading];
	[_bottomPage addSublayer:_bottomPageShadow];
	[self.layer addSublayer:_bottomPage];
	[self.layer addSublayer:_topPage];
	[self.layer addSublayer:_topPageReverse];

	_leafEdge = 1.0;<span style="white-space:pre">	</span>//表示出于未翻页状态
        _backgroundRendering = NO;
	_pageCache = [[LeavesCache alloc] initWithPageSize:self.bounds.size];
}
其中用到了CoreAnimation的相关知识,比如普通层CALayer,控制颜色渐变的CAGradientLayer等。
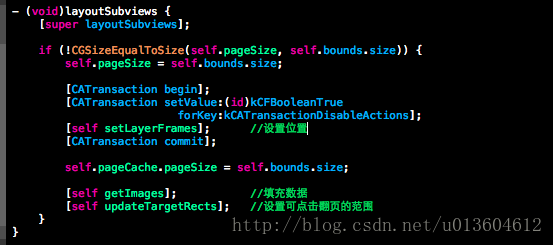
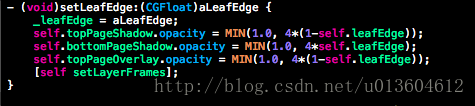
初始化完成以后便可以在layoutSubview方法中为其设置位置和填充数据,这里分别抽成了两个方法:
- (void)setLayerFrames {
	self.topPage.frame = CGRectMake(self.layer.bounds.origin.x,
			                self.layer.bounds.origin.y,
                                        self.leafEdge * self.bounds.size.width,
		       		        self.layer.bounds.size.height);


	self.topPageReverse.frame = CGRectMake(self.layer.bounds.origin.x + (2*self.leafEdge-1) * self.bounds.size.width, self.layer.bounds.origin.y, (1-self.leafEdge) * self.bounds.size.width,self.layer.bounds.size.height);


	self.bottomPage.frame = self.layer.bounds;


	self.topPageShadow.frame = CGRectMake(self.topPageReverse.frame.origin.x - 40, 0, 40,
self.bottomPage.bounds.size.height);


	self.topPageReverseImage.frame = self.topPageReverse.bounds;
	self.topPageReverseImage.transform = CATransform3DMakeScale(-1, 1, 1);


	self.topPageReverseOverlay.frame = self.topPageReverse.bounds;


	self.topPageReverseShading.frame = CGRectMake(self.topPageReverse.bounds.size.width - 50, 0, 50 + 1,self.topPageReverse.bounds.size.height);


	self.bottomPageShadow.frame = CGRectMake(self.leafEdge * self.bounds.size.width, 0, 40,
self.bottomPage.bounds.size.height);


	self.topPageOverlay.frame = self.topPage.bounds;
}
刚读到这里的时候可能会对self.leafEdge的控制感到迷惑,到了touch相关方法的时候就能了解了。
设置图片的方法:
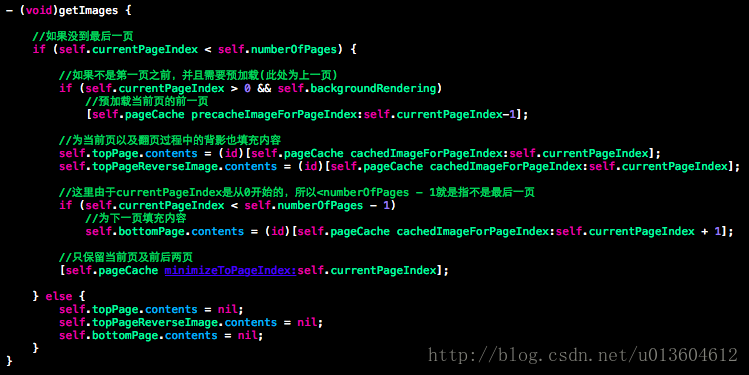
有了这两个辅助方法,就可以在layoutSubview方法中完成基本界面了
接下来还有两个值得注意的地方,其余的均为辅助方法了。
一个是对页数的控制,即self.currentPageIndex。currentPageIndex仿照数组,是从0开始的。而且重写了setter:
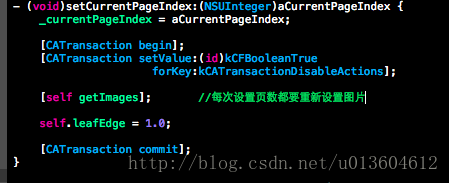
也就是说每次设置currentPageIndex都要重新设置图片,所以设置currentPageIndex的原则是:如果是上一页,则直接设置,因为对于上一页而言,本页面正好是bottomLayer对应的层,而对于下一页,只有当完全翻页以后才能设置currentPageIndex,否则图片就不相符了。说起来抽象,具体看代码:
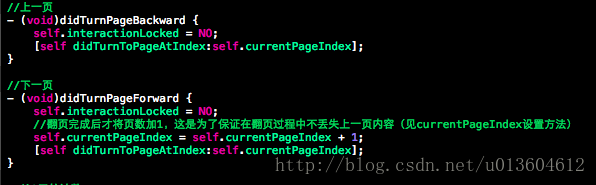
touchesBegin:withEvent:方法
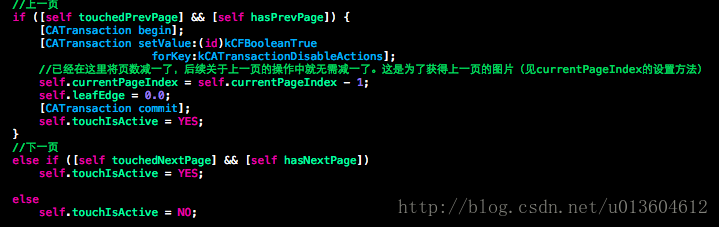
touchesEnded:withEvent:方法
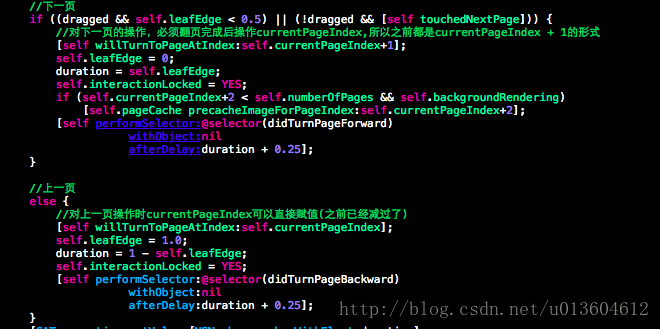
还有一个问题就是在touch过程中对leafEdge的控制
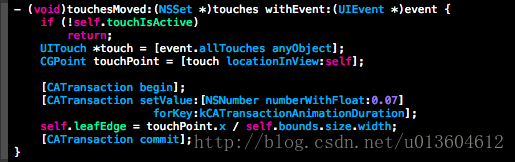
这样就可以实现对层的位置(见上述方法)、以及层阴影的透明度等进行控制了。
可以在touchesMoved方法中打印一下leafEdge,这样可以直观的看到该属性是如何控制这些的。
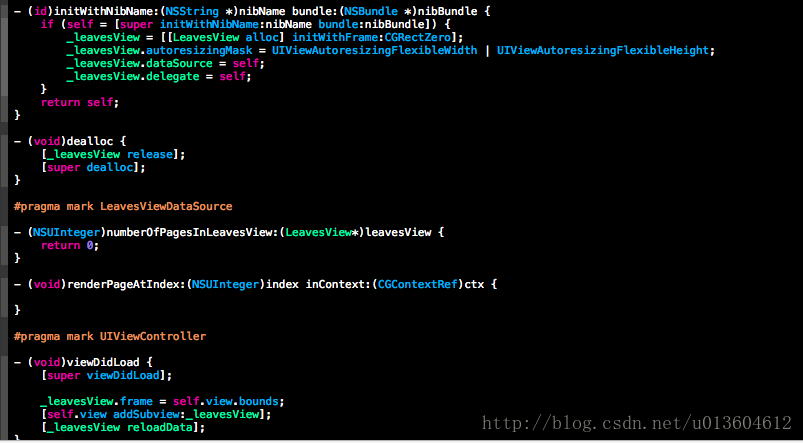
LeavesViewController:
这个控制器就没什么特别的了,仅仅是将LeavesView添加到了视图中并设置了代理,抽象实现了方法而已
通过这种方法的话可以想象那种完美的翻页效果该如何实现:在touchesMove方法中通过计算判断移动方向,然后再对层位置、阴影位置等做出调整 - -|| 想想就觉得复杂。。。


 837
837


 被折叠的 条评论
为什么被折叠?
被折叠的 条评论
为什么被折叠?
 到【灌水乐园】发言


