一、新建一个textView
02 | UITextView *textView = [[[UITextView alloc] init] autorelease]; |
05 | textView.delegate = self; |
08 | textView.font = [UIFont systemFontOfSize:16]; |
11 | textView.contentInset = UIEdgeInsetsMake(-11, -6, 0, 0); |
14 | textView.scrollEnabled = NO; |
17 | [textView becomeFirstResponder]; |
1 | [self.view addSubview:textView]; |
二、键盘操作
2 | textView.returnKeyType = UIReturnKeyDefault; |
5 | textView.keyboardType = UIKeyboardTypeDefault; |
三、隐藏键盘的几种方式
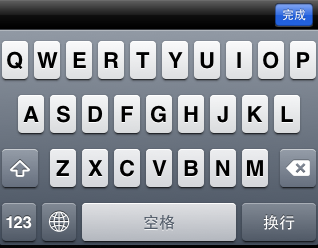
个人还是认为最方便的是在键盘上加上一个ToolBar,在上面加上一个按钮来隐藏键盘
①在键盘上加上隐藏按钮
02 | UIToolbar * topView = [[UIToolbar alloc]initWithFrame:CGRectMake(0, 0, 320, 30)]; |
05 | [topView setBarStyle:UIBarStyleBlack]; |
08 | UIBarButtonItem * button1 =[[UIBarButtonItem alloc]initWithBarButtonSystemItem: UIBarButtonSystemItemFlexibleSpace target:self action:nil]; |
10 | UIBarButtonItem * button2 = [[UIBarButtonItem alloc]initWithBarButtonSystemItem: UIBarButtonSystemItemFlexibleSpace target:self action:nil]; |
13 | UIBarButtonItem * doneButton = [[UIBarButtonItem alloc]initWithTitle:@"完成" style:UIBarButtonItemStyleDone target:self action:@selector(resignKeyboard)]; |
16 | NSArray * buttonsArray = [NSArray arrayWithObjects:button1,button2,doneButton,nil]; |
17 | [topView setItems:buttonsArray]; |
19 | [textView setInputAccessoryView:topView]; |
2 | - (void)resignKeyboard { |
3 | [textView resignFirstResponder]; |
最终效果
还有几种也可隐藏键盘的方式
②用回车键,前提是你的textView中不需要用到回车键
1 | -(BOOL)textView:(UITextView *)textView shouldChangeTextInRange:(NSRange)range replacementText:(NSString *)text { |
2 | if ([text isEqualToString:@"\n"]) |
4 | [textView resignFirstResponder]; return NO; |
③触摸空白处隐藏键盘
1 | -(void)touchesBegan:(NSSet *)touches withEvent:(UIEvent *)event |
4 | [textView resignFirstResponder]; |
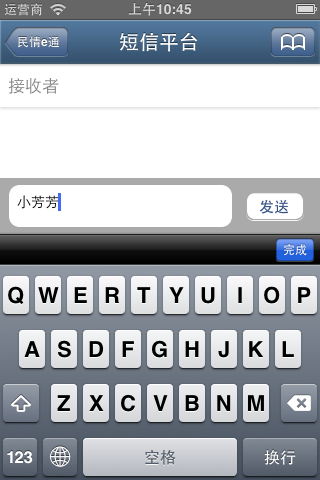
四、使键盘不挡住输入框
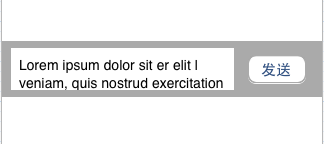
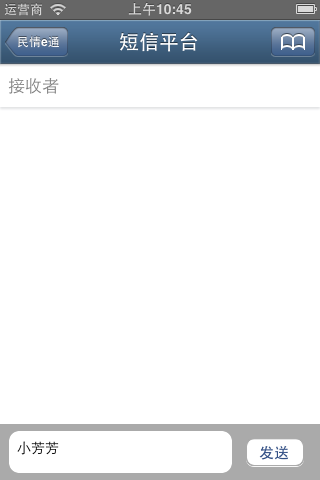
在view中添加一个子view,设置此子view的tag值为1000,在此view上添加一个textView和一个发送按钮,如下图;我们要达到textView的键盘弹出时,整个View往上平移,键盘消失,view往下平移的效果,模拟发送短信的界面。
设置textView圆角
2 | [self.textView.layer setCornerRadius:10]; |
①、在viewWillAppear中添加键盘监听事件
4 | [[NSNotificationCenter defaultCenter] addObserver:self selector:@selector(keyboardDidShow:) name:UIKeyboardDidShowNotification object:nil]; |
7 | [[NSNotificationCenter defaultCenter] addObserver:self selector:@selector(keyboardDidHidden) name:UIKeyboardDidHideNotification object:nil]; |
②、完成①selector中键盘弹出keyboardDidShow:和消失keyboardDidHidden方法
在.m文件#import后面添加
2 | #define kAnimationDuration 0.2 |
键盘出现
02 | -(void)keyboardDidShow:(NSNotification *)notification |
06 | NSValue *keyboardObject = [[notification userInfo] objectForKey:UIKeyboardFrameEndUserInfoKey]; |
10 | [keyboardObject getValue:&keyboardRect]; |
15 | [UIView beginAnimations:nil context:nil]; |
18 | [UIView setAnimationDuration:kAnimationDuration]; |
21 | [(UIView *)[self.view viewWithTag:1000] setFrame:CGRectMake(0, self.view.frame.size.height-keyboardRect.size.height-kViewHeight, 320, kViewHeight)]; |
23 | [UIView commitAnimations]; |
键盘消失
02 | -(void)keyboardDidHidden |
05 | [UIView beginAnimations:nil context:nil]; |
06 | [UIView setAnimationDuration:kAnimationDuration]; |
08 | [(UIView *)[self.view viewWithTag:1000] setFrame:CGRectMake(0, self.view.frame.size.height-kViewHeight, 320, kViewHeight)]; |
09 | [UIView commitAnimations]; |
效果图:
iOS7光标问题
PS:有网友遇到textView在ios7上出现编辑进入最后一行时光标消失,看不到最后一行,变成盲打,stackOverFlow网站上有大神指出,是ios7本身bug,加上下面一段代码即可(网友调试得出,在此mark一下,有问题,欢迎大神们指出)
01 | -(void)textViewDidChange:(UITextView *)textView { |
02 | CGRect line = [textView caretRectForPosition: |
03 | textView.selectedTextRange.start]; |
04 | CGFloat overflow = line.origin.y + line.size.height |
05 | - ( textView.contentOffset.y + textView.bounds.size.height |
06 | - textView.contentInset.bottom - textView.contentInset.top ); |
10 | CGPoint offset = textView.contentOffset; |
11 | offset.y += overflow + 7; |
13 | [UIView animateWithDuration:.2 animations:^{ |
14 | [textView setContentOffset:offset]; |


 1056
1056


 被折叠的 条评论
为什么被折叠?
被折叠的 条评论
为什么被折叠?
 到【灌水乐园】发言


