


闲话少说啊,最近项目随大流,用上了传说中的Retrofit进行网络交互,个人负责的模块上有个检测文件上传的进度【这里吐槽一下砸门办公室的网速真TM差,真想把PM打一顿】。以前使用的XUtils中有个方法自带了上传回调的方法,现在用了这个Retrofit,虽说网上有些人说过怎么检测,但大多没有什么代码,按照他们的说法,我好像没成功,自己来吧。对于Retrofit2.0本屌丝也是个新手,有些地方刚开始学习,大神勿喷。
服务器端代码
这个比较简单,由于是从web端转Android的,使用了servelt接收上传文件即可,主要是使用了apache的两个文件处理包:commons-fileupload-1.2.1.jar,commons-io-1.4.jar,具体代码如下: 在文章末尾会有war代码链接:
public class UploadFileServlet extends HttpServlet {

    private static final long serialVersionUID = -3926471828171571807L;

    public void doPost(HttpServletRequest request, HttpServletResponse response)
            throws ServletException, IOException {
        response.setContentType("text/html");
        PrintWriter out = response.getWriter();

        // 创建文件项目工厂对象
        DiskFileItemFactory factory = new DiskFileItemFactory();

        // 设置文件上传路径
        String upload = this.getServletContext().getRealPath("/");
        // 获取系统默认的临时文件保存路径,该路径为Tomcat根目录下的temp文件夹
        String temp = System.getProperty("java.io.tmpdir");
        // 设置缓冲区大小为 5M
        factory.setSizeThreshold(1024 * 1024 * 5);
        // 设置临时文件夹为temp
        factory.setRepository(new File(temp));
        // 用工厂实例化上传组件,ServletFileUpload 用来解析文件上传请求
        ServletFileUpload servletFileUpload = new ServletFileUpload(factory);

        // 解析结果放在List中
        try {
            List<FileItem> list = servletFileUpload.parseRequest(request);

            for (FileItem item : list) {
                String name = item.getFieldName();
                InputStream is = item.getInputStream();

                System.out.println( "the current name is " + name);

                if (name.contains("file")) {
                    try {
                        inputStream2File(is,upload + "\\" + System.currentTimeMillis() + item.getName());
                    } catch (Exception e) {
                        e.printStackTrace();
                    }
                }else {
                        String key  = item.getName() ;
                        String value = item.getString() ;
                        System.out.println(key + "---" + value);
                }
            }

            out.write("success");
        } catch (FileUploadException e) {
            e.printStackTrace();
            out.write("failure");
        }

        out.flush();
        out.close();
    }

    // 流转化成字符串
    public static String inputStream2String(InputStream is) throws IOException {
        ByteArrayOutputStream baos = new ByteArrayOutputStream();
        int i = -1;
        while ((i = is.read()) != -1) {
            baos.write(i);
        }
        return baos.toString();
    }

    // 流转化成文件
    public static void inputStream2File(InputStream is, String savePath)
            throws Exception {
        System.out.println("the file path is  :" + savePath);
        File file = new File(savePath);
        InputStream inputSteam = is;
        BufferedInputStream fis = new BufferedInputStream(inputSteam);
        FileOutputStream fos = new FileOutputStream(file);
        int f;
        while ((f = fis.read()) != -1) {
            fos.write(f);
        }
        fos.flush();
        fos.close();
        fis.close();
        inputSteam.close();

    }

    @Override
    protected void doGet(HttpServletRequest req, HttpServletResponse resp)
            throws ServletException, IOException {
        doPost(req, resp) ;
    }
大部分代码都有注释,相信大家基本能看懂,如果只是针对Android开发,这段可以不看,毕竟现在php也很牛逼,实现相应的功能也不算是大问题。
Android端代码
由于对Retrofit也是接触不久,很多知识点不是特别懂,为此将自己的步骤记录一下:
1.gradle配置:
    compile 'com.squareup.retrofit2:retrofit:2.0.0-beta4'
    compile 'com.squareup.retrofit2:converter-gson:2.0.0-beta4'
    compile 'com.squareup.retrofit2:adapter-rxjava:2.0.0-beta4'
    compile 'com.squareup.okhttp3:logging-interceptor:3.1.2'
    compile 'io.reactivex:rxandroid:1.1.0'
2.编写Retrofit帮助类:
public class RetrofitUtil {

    public static Retrofit retrofit;
    private static OkHttpClient okHttpClient = new OkHttpClient();

    static {
        //设定连接时间为5s
        okHttpClient.newBuilder().connectTimeout(5000, TimeUnit.MILLISECONDS);
        //设置log配置
        HttpLoggingInterceptor logging = new HttpLoggingInterceptor();
        logging.setLevel(HttpLoggingInterceptor.Level.BODY);
    }

    public static <T> T createService(Class<T> clazz) {
        if (retrofit == null) {
            synchronized (RetrofitUtil.class) {
                Retrofit.Builder builder = new Retrofit.Builder();
                //此处是本人的Tomcat服务器,在使用时应该换成自己的
                retrofit = builder.baseUrl("http://192.168.100.104:8080/UploadFileServer/")
                        .client(okHttpClient)
                        .addConverterFactory(GsonConverterFactory.create())
                        .addCallAdapterFactory(RxJavaCallAdapterFactory.create())
                        .build();
            }
        }
        return retrofit.create(clazz);
    }
}
3.编写网络请求接口:
public interface UploadService {

    @POST("upload")
    @Multipart
    Observable<ResponseBody> uploadFileInfo(@QueryMap Map<String, String> options,
                                            @PartMap Map<String, RequestBody> externalFileParameters) ;

}
4.分析上传进度:
在retrofit上传文件中,都需要将file转换成RequestBody,一般都是这样:
RequestBody body = RequestBody.create(MediaType.parse("multipart/form-data"), file) ;刚开始的思路是使用Retrofit.addConverterFactory() 一直去找相应的转换器,后来发现了一个google官方的下载监听的类:
ChunkingConverter,自己也仿了一个,但是发现没什么卵用,尼玛那方法它就是不走,走不通啊,咋办了,后来还是把眼镜瞄在了RequestBody上面了,想到你RequestBody上传时肯定会写数据流吧,那好吧,我就包装一个RequestBody试试,代码如下:
首先发个上传监听接口:
public interface ProgressListener {
        void onProgress(long hasWrittenLen, long totalLen, boolean hasFinish);
    }
现在是RequestBody的包装类:
public class UploadFileRequestBody extends RequestBody {

    private RequestBody mRequestBody;
    private ProgressListener mProgressListener;

    private BufferedSink bufferedSink;


    public UploadFileRequestBody(File file , ProgressListener progressListener) {
        this.mRequestBody = RequestBody.create(MediaType.parse("multipart/form-data"), file) ;
        this.mProgressListener = progressListener ;
    }

    public UploadFileRequestBody(RequestBody requestBody, ProgressListener progressListener) {
        this.mRequestBody = requestBody;
        this.mProgressListener = progressListener;
    }

    //返回了requestBody的类型,想什么form-data/MP3/MP4/png等等等格式
    @Override
    public MediaType contentType() {
        return mRequestBody.contentType();
    }

    //返回了本RequestBody的长度,也就是上传的totalLength
    @Override
    public long contentLength() throws IOException {
        return mRequestBody.contentLength();
    }

    @Override
    public void writeTo(BufferedSink sink) throws IOException {
        if (bufferedSink == null) {
            //包装
            bufferedSink = Okio.buffer(sink(sink));
        }
        //写入
        mRequestBody.writeTo(bufferedSink);
        //必须调用flush,否则最后一部分数据可能不会被写入
        bufferedSink.flush();
    }

    private Sink sink(Sink sink) {
        return new ForwardingSink(sink) {
            //当前写入字节数
            long bytesWritten = 0L;
            //总字节长度,避免多次调用contentLength()方法
            long contentLength = 0L;

            @Override
            public void write(Buffer source, long byteCount) throws IOException {
                super.write(source, byteCount);
                if (contentLength == 0) {
                    //获得contentLength的值,后续不再调用
                    contentLength = contentLength();
                }
                //增加当前写入的字节数
                bytesWritten += byteCount;
                //回调上传接口
                mProgressListener.onProgress(bytesWritten, contentLength, bytesWritten == contentLength);
            }
        };
    }
好了,基本的类都介绍完了,看看我们的MainActivity:
public class MainActivity extends AppCompatActivity {

    UploadImageView uploadImageView ;

    String picPath = Environment.getExternalStorageDirectory() + "/test.jpg"  ;

    @Override
    protected void onCreate(Bundle savedInstanceState) {
        super.onCreate(savedInstanceState);
        setContentView(R.layout.activity_main);
        Toolbar toolbar = (Toolbar) findViewById(R.id.toolbar);
        setSupportActionBar(toolbar);

        FloatingActionButton fab = (FloatingActionButton) findViewById(R.id.fab);
        fab.setOnClickListener(new View.OnClickListener() {
            @Override
            public void onClick(View view) {
                Snackbar.make(view, "Replace with your own action", Snackbar.LENGTH_LONG)
                        .setAction("Action", null).show();
            }
        });

        initViews();
    }

    private void initViews() {
        uploadImageView = (UploadImageView) findViewById(R.id.iv_image);
        uploadImageView.setImageBitmap(BitmapFactory.decodeFile(picPath));
    }

    public void uploadFile(View v) {
        File file = new File(picPath);
        UploadService uploadFileService = RetrofitUtil.createService(UploadService.class);
        Map<String, String> optionMap = new HashMap<>();
        optionMap.put("Platformtype", "Android");
        optionMap.put("userName","zhangsan") ;

        Map<String, RequestBody> requestBodyMap = new HashMap<>();
        UploadFileRequestBody fileRequestBody = new UploadFileRequestBody(file, new DefaultProgressListener(mHandler,1));
        requestBodyMap.put("file\"; filename=\"" + file.getName(), fileRequestBody);

        uploadFileService.uploadFileInfo(optionMap, requestBodyMap).
                subscribeOn(Schedulers.io()).
                observeOn(AndroidSchedulers.mainThread()).
                subscribe(new Subscriber<ResponseBody>() {
                    @Override
                    public void onCompleted() {}

                    @Override
                    public void onError(Throwable e) {
                        System.out.println("---the error is ---" + e);
                    }

                    @Override
                    public void onNext(ResponseBody s) {
                        try {
                            System.out.println("---the next string is --" + s.string());
                        } catch (IOException e) {
                            e.printStackTrace();
                        }
                    }
                });
    }

    private Handler mHandler = new Handler() {
        @Override
        public void handleMessage(Message msg) {
            switch (msg.arg1) {
                case 1:
                    if (msg.what > 0) {
                        uploadImageView.updatePercent(msg.what);
                    }
                    break;
            }
        }
    };
对应的layout为:
这里写代码片<RelativeLayout xmlns:android="http://schemas.android.com/apk/res/android"
    xmlns:app="http://schemas.android.com/apk/res-auto"
    xmlns:tools="http://schemas.android.com/tools"
    android:layout_width="match_parent"
    android:layout_height="match_parent"
    android:paddingBottom="@dimen/activity_vertical_margin"
    android:paddingLeft="@dimen/activity_horizontal_margin"
    android:paddingRight="@dimen/activity_horizontal_margin"
    android:paddingTop="@dimen/activity_vertical_margin"
    app:layout_behavior="@string/appbar_scrolling_view_behavior"
    tools:context="micro.com.knight.uploadfilebyretrofit.MainActivity"
    tools:showIn="@layout/activity_main">

    <Button
        android:layout_width="wrap_content"
        android:layout_height="wrap_content"
        android:id="@+id/btn"
        android:onClick="uploadFile"
        android:text="uploadFile" />

    <micro.com.knight.uploadfilebyretrofit.view.UploadImageView
        android:layout_below="@id/btn"
        android:id="@+id/iv_image"
        android:layout_width="300dp"
        android:layout_height="250dp" />

</RelativeLayout>
对应的图片为:

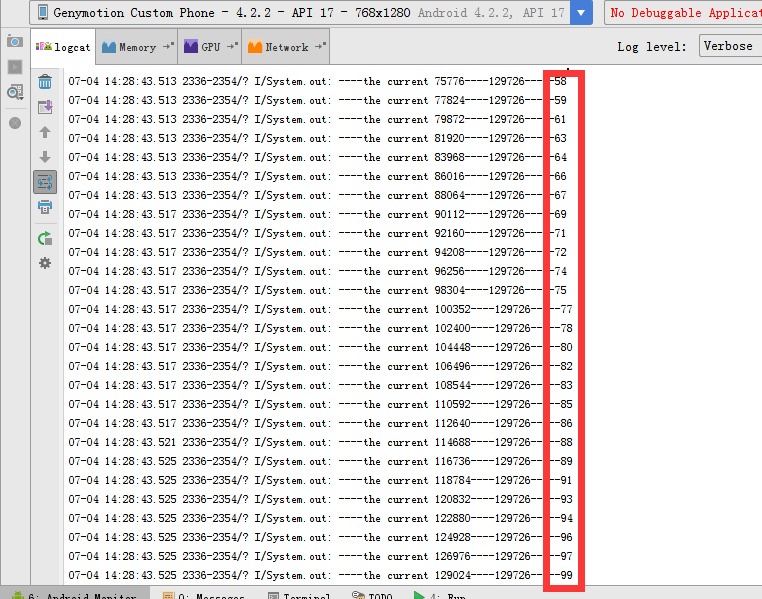
点击按钮之后,由于是局域网上的服务器,所以速度会特别快,本想做个有个上传进度的提示,可惜太快了,就没做,那就让我们看看log文件得了:
再来看看服务器中的文件是否上传了:

好了 服务器上的图片也上传好了,基本上满足要求了,今天就扯到这里了,以后估计需要经常扯扯啊。。。。
代码


 877
877

 被折叠的 条评论
为什么被折叠?
被折叠的 条评论
为什么被折叠?
 到【灌水乐园】发言


