


1.持久性作业,就是保持调度定时的状态;
2.作业管理,对调度作业进行有效的管理;
3.类Corn的定时支持,可以用Corn的方式来执行作业;
4.线程处理模型 Timer是单线程作业的,但是Quartz支持线程缓冲池。
在Spring中可以很方便的使用Quartz来实现定时任务等功能,我先介绍一下不使用Spring的Quartz实现,主要就是讲解Schedule(任务调度器),Job(作业任务)和Trigger(触发器)三者的关系。
●Job:是一个接口,只有一个方法void execute(JobExecutionContext context),开发者实现该接口定义运行任务,JobExecutionContext类提供了调度上下文的各种信息。
●JobDetail:Quartz在每次执行Job时,都重新创建一个Job实例,所以它不直接接受一个Job的实例,相反它接收一个Job实现类,以便运行时通过newInstance()的反射机制实例化Job。因此需要通过一个类来描述Job的实现类及其它相关的静态信息,如Job名字、描述、关联监听器等信息,JobDetail承担了这一角色。
●Trigger:是一个类,描述触发Job执行的时间触发规则。主要有SimpleTrigger和CronTrigger这两个子类。当仅需触发一次或者以固定时间间隔周期执行,SimpleTrigger是最适合的选择;而CronTrigger则可以通过Cron表达式定义出各种复杂时间规则的调度方案:如每早晨9:00执行,周一、周三、周五下午5:00执行等。
●Scheduler:代表一个Quartz的独立运行容器,Trigger和JobDetail可以注册到Scheduler中,两者在Scheduler中拥有各自的组及名称,组及名称是Scheduler查找定位容器中某一对象的依据,Trigger的组及名称必须唯一,JobDetail的组和名称也必须唯一(但可以和Trigger的组和名称相同,因为它们是不同类型的)。Scheduler定义了多个接口方法,允许外部通过组及名称访问和控制容器中Trigger和JobDetail。
Scheduler可以将Trigger绑定到某一JobDetail中,这样当Trigger触发时,对应的Job就被执行。一个Job可以对应多个Trigger,但一个Trigger只能对应一个Job。可以通过SchedulerFactory创建一个Scheduler实例。Scheduler拥有一个SchedulerContext,它类似于ServletContext,保存着Scheduler上下文信息,Job和Trigger都可以访问SchedulerContext内的信息。SchedulerContext内部通过一个Map,以键值对的方式维护这些上下文数据,SchedulerContext为保存和获取数据提供了多个put()和getXxx()的方法。可以通过Scheduler# getContext()获取对应的SchedulerContext实例。
下面简单的helloword代码感受一下Quartz的工作流程:
在实际web应用中,我们可用通过使用spring框架来使用Quartz实现定时任务,而且很方便,一共有三种方式:
(在Srping3.0版本后,使用Quartz需要加入依赖:
否则会报错) 我使用的是spring4.3.4和quartz-2.3.3。(注意: Spring3.x和quartz1.x的整合与Spring4.x有区别 )
与Spring框架整合定时任务的实现方式有以下几种:
- Java自带的java.util.Timer类,这个类允许你调度一个java.util.TimerTask任务。使用这种方式可以让你的程序按照某一个频度执行,但不能在指定时间运行。一般用的较少,这篇文章将不做详细介绍。
- 使用Quartz,这是一个功能比较强大的的调度器,可以让你的程序在指定时间执行,也可以按照某一个频度执行,配置起来稍显复杂,稍后会详细介绍。
- Spring3.0以后自带的task,可以将它看成一个轻量级的Quartz,而且使用起来比Quartz简单许多,详请参考博客地址(spring中定时任务的用法)。
从作业类的继承方式来讲,可以分为两类
- 作业类需要继承自特定的作业类基类,如Quartz中需要继承自org.springframework.scheduling.quartz.QuartzJobBean;java.util.Timer中需要继承自java.util.TimerTask。
- 作业类即普通的java类,不需要继承自任何基类。
- 注:个人推荐使用第二种方式,因为这样所以的类都是普通类,不需要事先区别对待。
任务调度的触发时机来分,这里主要是针对作业使用的触发器,主要有以下两种
- 每隔指定时间则触发一次,在Quartz中对应的触发器为: org.springframework.scheduling.quartz.SimpleTriggerBean(spring3)
org.springframework.scheduling.quartz.SimpleTriggerFactoryBean(spring4) - 每到指定时间则触发一次,在Quartz中对应的调度器为:
org.springframework.scheduling.quartz.CronTriggerBean(spring3)
org.springframework.scheduling.quartz.CronTriggerFactoryBean(spring4) - 注:并非每种任务都可以使用这两种触发器,如java.util.TimerTask任务就只能使用第一种。Quartz和spring task都可以支持这两种触发条件。
SimpleTrigger 当需要在规定的时间执行一次或在规定的时间段以一定的时间间隔重复触发执行Job时,SimpleTrigger就可以满足要求;SimpleTrigger的属性有:开始时间、结束时间、重复次数和重复的时间间隔,重复次数属性的值可以为0、正整数、或常量 SimpleTrigger.REPEAT_INDEFINITELY,重复的时间间隔属性值必须为0或长整型的正整数,以毫秒作为时间单位,当重复的时 间间隔为0时,意味着与Trigger同时触发执行(或几乎与Scheduler开始时同时触发执行)。如果有指定结束时间属性值,则结束时间属性优先于重复次数属性,这样的好处在于:当我们需要创建一个每间隔10秒钟触发一次直到指定的结束时间的 Trigger,而无需去计算从开始到结束的所重复的次数,我们只需简单的指定结束时间和使用REPEAT_INDEFINITELY作为重复次数的属性 值即可(我们也可以指定一个比在指定结束时间到达时实际执行次数大的重复次数)。
CronTrigger 支持比 SimpleTrigger 更具体的调度,而且也不是很复杂。基于 cron 表达式,CronTrigger 支持类似日历的重复间隔,而不是单一的时间间隔。
1.第一种方式,需要继承JobBean,并重写executeInternal(JobExecutionContext context),然后配置spring-quratz.xml文件,里配置三部分:1.任务调用类;2.任务调用方式;3.任务调用工厂:
package com.xinwei.test;

import java.util.Date;

import org.quartz.JobDataMap;
import org.quartz.JobExecutionContext;
import org.quartz.JobExecutionException;
import org.springframework.scheduling.quartz.QuartzJobBean;

/**
 * 继承QuartzJobBean,并重写executeInternal方法
 * @author
 *
 */
public class PrintMessage extends QuartzJobBean{

	@Override
	protected void executeInternal(JobExecutionContext context) throws JobExecutionException {
	    // 获取参数
        JobDataMap mergedJobDataMap = context.getMergedJobDataMap();
        String name = (String) mergedJobDataMap.get("name");
        System.out.println(new Date().toLocaleString() + "定时任务执行中 ......" + "传递的参数为" + name);
	}

}
<?xml version="1.0" encoding="UTF-8"?>
<beans xmlns="http://www.springframework.org/schema/beans"
	xmlns:xsi="http://www.w3.org/2001/XMLSchema-instance" xmlns:mvc="http://www.springframework.org/schema/mvc"
	xmlns:context="http://www.springframework.org/schema/context"
	xmlns:aop="http://www.springframework.org/schema/aop" xmlns:tx="http://www.springframework.org/schema/tx"
	xmlns:task="http://www.springframework.org/schema/task"
	xsi:schemaLocation="http://www.springframework.org/schema/beans
	http://www.springframework.org/schema/beans/spring-beans-4.3.xsd
	http://www.springframework.org/schema/mvc
	http://www.springframework.org/schema/mvc/spring-mvc-4.3.xsd
	http://www.springframework.org/schema/context
	http://www.springframework.org/schema/context/spring-context-4.3.xsd
	http://www.springframework.org/schema/aop
	http://www.springframework.org/schema/aop/spring-aop-4.3.xsd
	http://www.springframework.org/schema/tx
	http://www.springframework.org/schema/tx/spring-tx-4.3.xsd
	http://www.springframework.org/schema/task
	http://www.springframework.org/schema/task/spring-task-4.3.xsd">

    <!-- job的定义 -->
    <bean name="myJob" class="org.springframework.scheduling.quartz.JobDetailFactoryBean">
        <property name="jobClass" value="com.xinwei.test.PrintMessage" />
        <!-- 回调参数的定义 -->
        <property name="jobDataAsMap">
            <map>
                <entry key="name" value="zhangsan" />
            </map>
        </property>
    </bean>

    <!-- SimpleTrigger 触发器 -->
    <bean id="simpleTrigger" class="org.springframework.scheduling.quartz.SimpleTriggerFactoryBean">
        <property name="jobDetail" ref="myJob" />
        <property name="startDelay" value="0" /><!-- 调度工厂实例化后,经过0秒开始执行调度 -->
        <property name="repeatInterval" value="2000" /><!-- 每2秒调度一次 -->
    </bean>

    <!-- CronTriggerBean 触发器 -->
    <bean id="cronTrigger" class="org.springframework.scheduling.quartz.CronTriggerFactoryBean">
        <property name="jobDetail" ref="myJob" />
        <!-- 每3秒执行一次 -->
        <property name="cronExpression" value="0/3 * * * * ?" />
    </bean>

    <!-- 配置调度工厂 -->
    <bean class="org.springframework.scheduling.quartz.SchedulerFactoryBean">
        <property name="triggers">
            <list>
                <ref bean="simpleTrigger" />
                <ref bean="cronTrigger" />
            </list>
        </property>
    </bean>
</beans>
2.第二种方式,不需要继承基类,这样仍然是pojo,而是在spring-quratz.xml配置文件中,配置包装类,其他两个配置与上述一样:
package com.xinwei.test;

import java.util.Date;

public class DateMessage {
	public void doSomething() {
		System.err.println("****:" + new Date().toLocaleString());
	}
}
<?xml version="1.0" encoding="UTF-8"?>
<beans xmlns="http://www.springframework.org/schema/beans"
	xmlns:xsi="http://www.w3.org/2001/XMLSchema-instance" xmlns:mvc="http://www.springframework.org/schema/mvc"
	xmlns:context="http://www.springframework.org/schema/context"
	xmlns:aop="http://www.springframework.org/schema/aop" xmlns:tx="http://www.springframework.org/schema/tx"
	xmlns:task="http://www.springframework.org/schema/task"
	xsi:schemaLocation="http://www.springframework.org/schema/beans
	http://www.springframework.org/schema/beans/spring-beans-4.3.xsd
	http://www.springframework.org/schema/mvc
	http://www.springframework.org/schema/mvc/spring-mvc-4.3.xsd
	http://www.springframework.org/schema/context
	http://www.springframework.org/schema/context/spring-context-4.3.xsd
	http://www.springframework.org/schema/aop
	http://www.springframework.org/schema/aop/spring-aop-4.3.xsd
	http://www.springframework.org/schema/tx
	http://www.springframework.org/schema/tx/spring-tx-4.3.xsd
	http://www.springframework.org/schema/task
	http://www.springframework.org/schema/task/spring-task-4.3.xsd">

	<!-- 要执行任务的任务类 -->
    <bean id="dateMessage" class="com.xinwei.test.DateMessage"></bean>

    <!-- 将需要执行的定时任务注入JOB中 -->
    <bean name="myJob"
        class="org.springframework.scheduling.quartz.MethodInvokingJobDetailFactoryBean">
        <property name="targetObject" ref="dateMessage"></property>
        <!-- 任务类中需要执行的方法 -->
        <property name="targetMethod" value="doSomething"></property>
        <!-- 是否并发执行 -->
        <property name="concurrent" value="false"></property>
    </bean>

    <!-- SimpleTrigger 触发器 -->
    <bean id="simpleTrigger"
        class="org.springframework.scheduling.quartz.SimpleTriggerFactoryBean">
        <property name="jobDetail" ref="myJob" />
        <property name="startDelay" value="0" /><!-- 调度工厂实例化后,经过0秒开始执行调度 -->
        <property name="repeatInterval" value="2000" /><!-- 每2秒调度一次 -->
    </bean>

    <!-- CronTriggerBean 触发器 -->
    <bean id="cronTrigger"
        class="org.springframework.scheduling.quartz.CronTriggerFactoryBean">
        <property name="jobDetail" ref="myJob" />
        <!-- 每3秒执行一次 -->
        <property name="cronExpression" value="0/3 * * * * ?" />
    </bean>

    <!-- 配置调度工厂 -->
    <bean class="org.springframework.scheduling.quartz.SchedulerFactoryBean">
        <property name="triggers">
            <list>
                <ref bean="simpleTrigger" />
                <ref bean="cronTrigger" />
            </list>
        </property>
    </bean>
</beans>
3.第三种方式,通过@Scheduled注解的方式实现,需要修改applicationContext.xml三个部分内容:
1.xmlns添加:
2.xsi:schemaLocation添加:
3.applicationContext.xml中添加:
最后在我们的定时任务上添加上@Scheduled注解即可,一般都采用cronTrigger方式,即@Scheduled(cron=“相应的定时表达式”)
个人建议采用第二种和第三种的方式实现Quartz比较简洁方便,下面顺便在网上查阅关于cron表达式的资料,不过我记得好像有一些工具可以方便生成这些表达式(Visual Cron Editor)目前没有具体的研究过,当然有些表达式也可以百度查阅到:
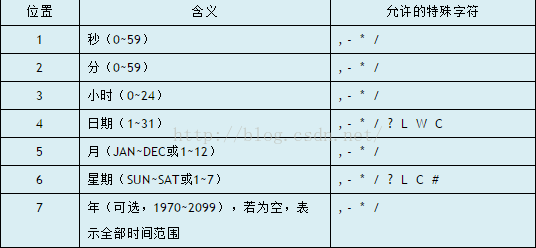
Cron表达式包含6个必要组件和一个可选组件,如下表所示:
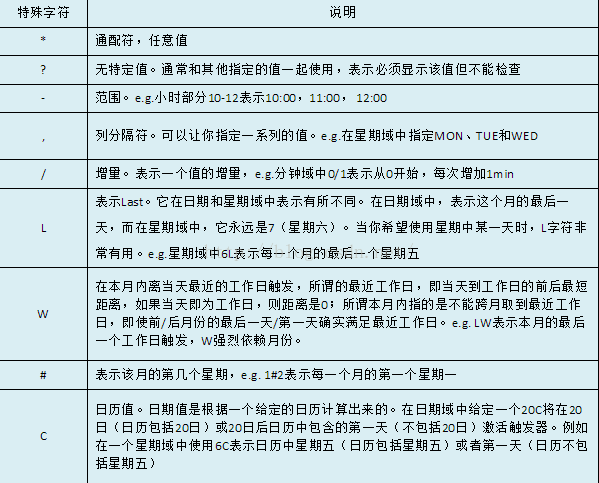
特殊字符的含义,见下表:
Cron表达式举例:
"30 * * * * ?" 每半分钟触发任务
"30 10 * * * ?" 每小时的10分30秒触发任务
"30 10 1 * * ?" 每天1点10分30秒触发任务
"30 10 1 20 * ?" 每月20号1点10分30秒触发任务
"30 10 1 20 10 ? *" 每年10月20号1点10分30秒触发任务
"30 10 1 20 10 ? 2011" 2011年10月20号1点10分30秒触发任务
"30 10 1 ? 10 * 2011" 2011年10月每天1点10分30秒触发任务
"30 10 1 ? 10 SUN 2011" 2011年10月每周日1点10分30秒触发任务
"15,30,45 * * * * ?" 每15秒,30秒,45秒时触发任务
"15-45 * * * * ?" 15到45秒内,每秒都触发任务
"15/5 * * * * ?" 每分钟的每15秒开始触发,每隔5秒触发一次
"15-30/5 * * * * ?" 每分钟的15秒到30秒之间开始触发,每隔5秒触发一次
"0 0/3 * * * ?" 每小时的第0分0秒开始,每三分钟触发一次
"0 15 10 ? * MON-FRI" 星期一到星期五的10点15分0秒触发任务
"0 15 10 L * ?" 每个月最后一天的10点15分0秒触发任务
"0 15 10 LW * ?" 每个月最后一个工作日的10点15分0秒触发任务
"0 15 10 ? * 5L" 每个月最后一个星期四的10点15分0秒触发任务
"0 15 10 ? * 5#3" 每个月第三周的星期四的10点15分0秒触发任务
参考文档:Spring框架中的Quartz学习使用
深入学习:quartz详解2:quartz由浅入深


 2228
2228

 被折叠的 条评论
为什么被折叠?
被折叠的 条评论
为什么被折叠?
 到【灌水乐园】发言


