


线程:线程就是程序中单独顺序的流控制。线程本身不能运行,它只能用于程序中。
Java 中如果我们自己没有产生线程,那么系统就会给我们产生一个线程(主线程,main 方法就在主线程上运行),我们的程序都是由线程来执行的。
在Java中通过run方法为线程指明要完成的任务,有两种技术来为线程提供run方法。
1. 继承Thread类并重写run方法。
Thread类:是专门用来创建线程和对线程进行操作的类。Thread中定义了许多方法对线程进行操作。
• Thread类在缺省情况下run方法什么都不做。可以通过继承Thread类并重写Thread类的run方法实现用户线程。
继承Thread类并重写run方法。总体结构如下:
public class MyThread extends Thread {
public void run() {
… …
}
}
MyThread t = new MyThread();
t. start();
public class ThreadTest
{
	public static void main(String[] args)
	{
		Thread1 t1 = new Thread1("first thread");
		Thread1 t2 = new Thread1("second thread");

		System.out.println(t1.getName());
		System.out.println(t2.getName());

		t1.start();
		t2.start();
	}
}

class Thread1 extends Thread
{
	public Thread1(String name)
	{
		super(name);
	}

	@Override
	public void run()
	{
		for(int i = 0; i < 100; i++)
		{
			System.out.println("hello world: " + i);
		}
	}
}

class Thread2 extends Thread
{
	public Thread2(String name)
	{
		super(name);
	}

	@Override
	public void run()
	{
		for(int i = 0; i < 100; i++)
		{
			System.out.println("welcome: " + i);
		}
	}
}
2. 通过定义实现Runnable接口的类进而实现run方法。
通过建立一个实现了Runnable接口的类,并以它作为线程的目标对象来创建一个线程。
Runnable接口:定义了一个抽象方法run()。定义如下:
public interface java.lang.Runnable{
public abstract void run();
}
实现Runnable接口的类实现run方法。创建的总体框架如下:
• class MyRunner implements Runnable {
public void run() {
…
}
}
MyRunner r = new MyRunner();
Thread t = new Thread( ThreadGroup group,Runnable target, Stringname);
例如: Thread t = new Thread( r, “aa”);
public class ThreadTest3
{
	public static void main(String[] args)
	{
		Runnable r = new HelloThread();

		Thread t1 = new Thread(r);

		//r = new HelloThread();

		Thread t2 = new Thread(r);

		t1.start();
		t2.start();
	}
}

class HelloThread implements Runnable
{
	int i;

	@Override
	public void run()
	{
		int i = 0;

		while(true)
		{
			System.out.println("number: " + this.i++);

			try
			{
				Thread.sleep((long)(Math.random() * 1000));
			}
			catch (InterruptedException e)
			{
				e.printStackTrace();
			}

			if(50 == this.i)
			{
				break;
			}
		}
	}
}
总结:
1. 两种方法均需执行线程的start方法为线程分配必须的系统资源、调度线程运行并执行线程的run方法。
2. 在具体应用中,采用哪种方法来构造线程体要视情况而定。通常,当一个线程已继承了另一个类时,就应该用第二种方法来构造,即实现Runnable接口。
3. 线程的消亡不能通过调用一个stop()命令。而是让run()方法自然结束。
停止线程推荐方式:
public class MyThread implements Runnable
{ private boolean flag=true;
public void run()
{ while (flag)
{…}
}
public void stopRunning()
{ flag=false;}
}
public class ControlThread
{ private Runnable r=new MyThread();
private Thread t=new Thread(r);
public void startThread()
{ t.start(); }
publi void stopThread()
{ r.stopRunning();}
}
线程生命周期:
线程的生命周期:一个线程从创建到消亡的过程。
线程的生命周期可分为四个状态:1. 创建状态2. 可运行状态3. 不可运行状态4. 消亡状态
线程的状态转换图:
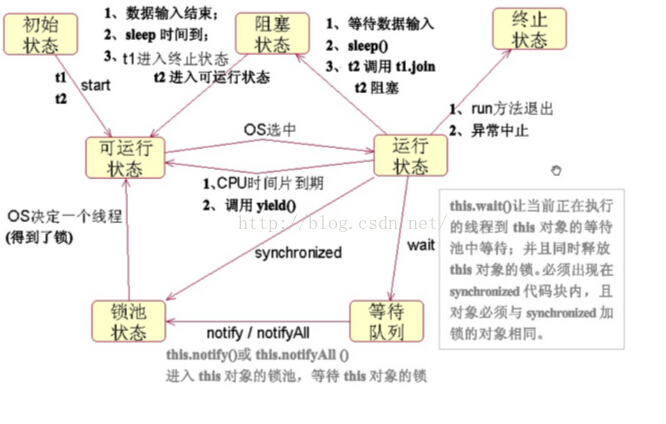
注意:
wait():是Object类中的,使一个线程处于等待状态,并且释放所持有的对象锁,只有调用notify()或notifyAll()唤醒。
sleep():是Thread类中的,使一个线程处于睡眠状态,是一种静方法,此方法要捕捉InterruptedException异常,不会释放对象锁。
线程同步:
在多线程环境中,可能会有两个甚至更多的线程试图同时访问一个有限的资源。必须对这种潜在资源冲突进行预防。
解决方法:在线程使用一个资源时为其加锁即可。访问资源的第一个线程为其加上锁以后,其他线程便不能再使用那个资源,除非被解锁。
怎样实现同步
对于访问某个关键共享资源的所有方法,都必须把它们设为synchronized
例如:
synchronized void f() { /* ... */ }
synchronized void g() { /* ... */ }
如果想保护某些资源不被多个线程同时访问,可以强制通过synchronized方法访问那些资源。调用synchronized方法时,对象就会被锁定 。
public class ThreadTest
{
	public static void main(String[] args)
	{
		Example2 e = new Example2();

		TheThread3 t1 = new TheThread3(e);

		e = new Example2();

		TheThread4 t2 = new TheThread4(e);

		t1.start();
		t2.start();
	}
}

class Example2
{
	private Object object = new Object();

	public void execute()
	{
		synchronized (this)
		{
			for (int i = 0; i < 20; i++)
			{
				try
				{
					Thread.sleep((long) (Math.random() * 1000));
				}
				catch (InterruptedException e)
				{
					e.printStackTrace();
				}

				System.out.println("hello: " + i);
			}
		}

	}

	public void execute2()
	{
		synchronized(this)
		{
			for (int i = 0; i < 20; i++)
			{
				try
				{
					Thread.sleep((long) (Math.random() * 1000));
				}
				catch (InterruptedException e)
				{
					e.printStackTrace();
				}

				System.out.println("world: " + i);
			}
		}


	}
}

class TheThread3 extends Thread
{
	private Example2 example;

	public TheThread3(Example2 example)
	{
		this.example = example;
	}

	@Override
	public void run()
	{
		this.example.execute();
	}
}

class TheThread4 extends Thread
{
	private Example2 example;

	public TheThread4(Example2 example)
	{
		this.example = example;
	}

	@Override
	public void run()
	{
		this.example.execute2();
	}
}
public class ProducerConsumer {
	public static void main(String[] args) {
		SyncStack ss = new SyncStack();
		Producer p = new Producer(ss);
		Consumer c = new Consumer(ss);
		new Thread(p).start();
		new Thread(p).start();
		new Thread(p).start();
		new Thread(c).start();
	}
}

class WoTou {
	int id;
	WoTou(int id) {
		this.id = id;
	}
	public String toString() {
		return "WoTou : " + id;
	}
}

class SyncStack {
	int index = 0;
	WoTou[] arrWT = new WoTou[6];

	public synchronized void push(WoTou wt) {
		while(index == arrWT.length) {
			try {
				this.wait();
			} catch (InterruptedException e) {
				e.printStackTrace();
			}
		}
		this.notifyAll();
		arrWT[index] = wt;
		index ++;
	}

	public synchronized WoTou pop() {
		while(index == 0) {
			try {
				this.wait();
			} catch (InterruptedException e) {
				e.printStackTrace();
			}
		}
		this.notifyAll();
		index--;
		return arrWT[index];
	}
}

class Producer implements Runnable {
	SyncStack ss = null;
	Producer(SyncStack ss) {
		this.ss = ss;
	}

	public void run() {
		for(int i=0; i<20; i++) {
			WoTou wt = new WoTou(i);
			ss.push(wt);
System.out.println("生产了:" + wt);
			try {
				Thread.sleep((int)(Math.random() * 200));
			} catch (InterruptedException e) {
				e.printStackTrace();
			}
		}
	}
}

class Consumer implements Runnable {
	SyncStack ss = null;
	Consumer(SyncStack ss) {
		this.ss = ss;
	}

	public void run() {
		for(int i=0; i<20; i++) {
			WoTou wt = ss.pop();
System.out.println("消费了: " + wt);
			try {
				Thread.sleep((int)(Math.random() * 1000));
			} catch (InterruptedException e) {
				e.printStackTrace();
			}
		}
	}
}
模拟死锁:
public class TestDeadLock implements Runnable {
	public int flag = 1;
	static Object o1 = new Object(), o2 = new Object();
	public void run() {
System.out.println("flag=" + flag);
		if(flag == 1) {
			synchronized(o1) {
				try {
					Thread.sleep(500);
				} catch (Exception e) {
					e.printStackTrace();
				}
				synchronized(o2) {
					System.out.println("1");
				}
			}
		}
		if(flag == 0) {
			synchronized(o2) {
				try {
					Thread.sleep(500);
				} catch (Exception e) {
					e.printStackTrace();
				}
				synchronized(o1) {
					System.out.println("0");
				}
			}
		}
	}

	public static void main(String[] args) {
		TestDeadLock td1 = new TestDeadLock();
		TestDeadLock td2 = new TestDeadLock();
		td1.flag = 1;
		td2.flag = 0;
		Thread t1 = new Thread(td1);
		Thread t2 = new Thread(td2);
		t1.start();
		t2.start();

	}
}


 5406
5406


 被折叠的 条评论
为什么被折叠?
被折叠的 条评论
为什么被折叠?
 到【灌水乐园】发言


