


本文内容来自raywenderlich的Intermediate iOS Animation,记录下学习的内容。
iOS Layer动画(Swift)
概念
隐式动画
参考隐式动画
隐式动画是指不指定任何动画类型,例如当改变layer的backgroundColor属性,就会有动画的效果,如下,改变layer的backgroundColor:
self.colorLayer.backgroundColor = [UIColor colorWithRed:red green:green blue:blue alpha:1.0].CGColor;
就会有动画的效果,有个渐变的过程
当改变一个属性,Core Animation是如何判断动画类型和持续时间的呢?
实际上动画执行的时间取决于当前事务的设置,动画类型取决于图层行为。
事务实际上是Core Animation用来包含一系列属性动画集合的机制,任何用指定事务去改变可以做动画的图层属性都不会立刻发生变化,而是当事务一旦提交的时候开始用一个动画过渡到新值。
事务是通过CATransaction类来做管理
- 用类方法
+begin和+commit分别来入栈或者出栈 +setAnimationDuration:方法设置当前事务的动画时间,+animationDuration方法来获取动画时间(默认0.25秒)+setCompletionBlock:动画结束的时候提供一个完成的动作+setDisableActions:对所有属性打开或者关闭隐式动画
Core Animation在每个run loop周期中自动开始一次新的事务(run loop是iOS负责收集用户输入,处理未完成的定时器或者网络事件,最终重新绘制屏幕的东西),即使你不显式地使用[CATransaction begin]开始一次事务,在一个特定run loop循环中的任何属性的变化都会被收集起来,然后做一次0.25秒的动画。
把改变属性时
CALayer自动应用的动画称作行为,当CALayer的属性被修改时候,它会调用-actionForKey:方法,传递属性的名称。剩下的操作都在CALayer的头文件中有详细的说明,实质上是如下几步:
- 图层首先检测它是否有委托,并且是否实现
CALayerDelegate协议指定的-actionForLayer:forKey方法。如果有,直接调用并返回结果。 - 如果没有委托,或者委托没有实现
-actionForLayer:forKey方法,图层接着检查包含属性名称对应行为映射的actions字典。 - 如果
actions字典没有包含对应的属性,那么图层接着在它的style字典接着搜索属性名。 - 最后,如果在
style里面也找不到对应的行为,那么图层将会直接调用定义了每个属性的标准行为的-defaultActionForKey:方法。
所以一轮完整的搜索结束之后,
-actionForKey:要么返回空(这种情况下将不会有动画发生),要么是CAAction协议对应的对象,最后CALayer拿这个结果去对先前和当前的值做动画。
于是这就解释了UIKit是如何禁用隐式动画的:每个UIView对它关联的图层都扮演了一个委托,并且提供了-actionForLayer:forKey的实现方法。当不在一个动画块的实现中,UIView对所有图层行为返回nil,但是在动画block范围之内,它就返回了一个非空值
显式动画
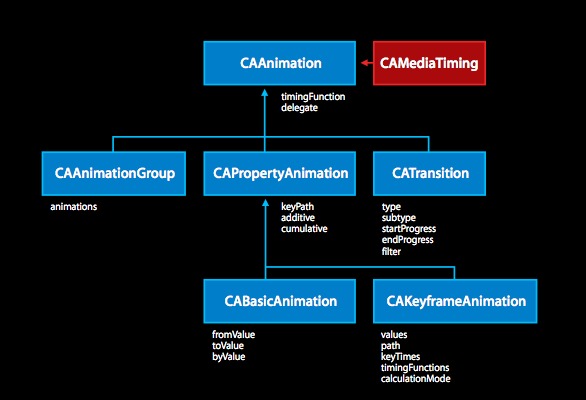
属性动画(CAPropertyAnimation)作用于图层的某个单一属性,并指定了它的一个目标值,或者一连串将要做动画的值。属性动画分为两种:基础和关键帧。CAPropertyAnimation通过指定动画的keyPath作用于一个单一属性
CAPropertyAnimation的父类是CAAnimation,CAAnimation同时也是Core Animation所有动画类型的抽象基类。CAAnimation同时实现了一些协议,包括CAAction(允许CAAnimation的子类可以提供图层行为),以及CAMediaTiming。CAAnimation提供了:
- 一个计时函数
- 一个委托(用于反馈动画状态)
- 一个
removedOnCompletion,用于标识动画是否该在结束后自动释放(默认YES,为了防止内存泄露)
基础动画(CABasicAnimation)是CAPropertyAnimation的一个子类,并添加了如下的属性:
fromValue-动画开始之前属性的值toValue-代表了动画结束之后的值byValue-代表了动画执行过程中改变的相对值
图层时间
参考图层时间
CAMediaTiming协议定义了在一段动画内用来控制逝去时间的属性的集合,CALayer和CAAnimation都实现了这个协议
duration-动画的时间repeatCount-动画重复的次数,设为INFINITY表示无限循环repeatDuration-动画重复的时间,设为INFINITY表示无限循环autoreverses-在动画完成后是否倒回回放
相对时间
beginTime-动画开始之前的的延迟时间speed-一个时间的倍数,默认1.0,减少它会减慢图层/动画的时间,增加它会加快速度。如果2.0的速度,那么对于一个duration为1的动画,实际上在0.5秒的时候就已经完成了timeOffset-增加timeOffset只是让动画快进到某一点,例如,对于一个持续1秒的动画来说,设置timeOffset为0.5意味着动画将从一半的地方开始
CACurrentMediaTime()方法获取当前的绝对时间
Layer动画属性
1.位置和大小

- bounds
- position
- transform
2.Border

- borderColor
- borderWidth
- cornerRadius
3.Shadow

- shadowOffset
- shadowOpacity
- shadowPath
- shadowRadius
4.Contents

- contents
- mask
- opacity
基本Layer动画(Basic Layer Animation)
这里使用到的是CABasicAnimation,创建基本动画使用keyPath,支持的keyPath的请参考支持的键路径的完整列表
动画的效果很基本,使用到了fromValue、toValue、duration属性,创建好CABasicAnimation后,加入到对应的layer就行,如heading.layer.addAnimation(flyRight, forKey: nil),需要注意的是这里的flyRight是复制的,并不是引用的(This object is copied by the render tree, not referenced. Therefore, subsequent modifications to the object are not propagated into the render tree),所以修改flyRight将对原来的动画并没有影响。
这里动画的效果如下:
代码如下:
上部的Label和TextField主要改变了position.x
  override func viewDidLayoutSubviews() {
    super.viewDidLayoutSubviews()

    if !didInitialLayout {
      presentationAnimations()
      didInitialLayout = true
    }

    animateInfo()

  }

  func presentationAnimations() {

    let flyRight = CABasicAnimation(keyPath: "position.x")
    flyRight.fromValue = -view.bounds.width / 2
    flyRight.toValue = view.bounds.size.width / 2
    flyRight.duration = 0.5
    heading.layer.addAnimation(flyRight, forKey: nil)
    username.layer.addAnimation(flyRight, forKey: nil)
    password.layer.addAnimation(flyRight, forKey: nil)

  }
下面从右至左的Infolabel,改变了position.x和opacity,有fadeIn的效果
  func animateInfo() {
    //add text info
    info.frame = CGRect(x: 0.0, y: loginButton.center.y + 30.0,
                                width: view.frame.size.width, height: 30)
    info.backgroundColor = UIColor.clearColor()
    info.font = UIFont(name: "HelveticaNeue", size: 12.0)
    info.textAlignment = .Center
    info.textColor = UIColor.whiteColor()
    info.text = "Tap on a field and enter username and password"
    view.insertSubview(info, belowSubview: loginButton)

    let flyLeft = CABasicAnimation(keyPath: "position.x")
    flyLeft.fromValue = self.view.bounds.width + info.layer.position.x
    flyLeft.toValue = self.view.bounds.width / 2
    flyLeft.duration = 2.0
    info.layer.addAnimation(flyLeft, forKey: nil)

    let fadeIn = CABasicAnimation(keyPath: "opacity")
    fadeIn.fromValue = 0.0
    fadeIn.toValue = 1.0
    fadeIn.duration = 2.0
    info.layer.addAnimation(fadeIn, forKey: nil)

  }
Core Animation 模型(Core Animation Models)
Core Animation 维护了两个平行 layer 层次结构: model layer tree(模型层树) 和 presentation layer tree(表示层树)。前者中的 layers 反映了我们能直接看到的 layers 的状态,而后者的 layers 则是动画正在表现的值的近似。
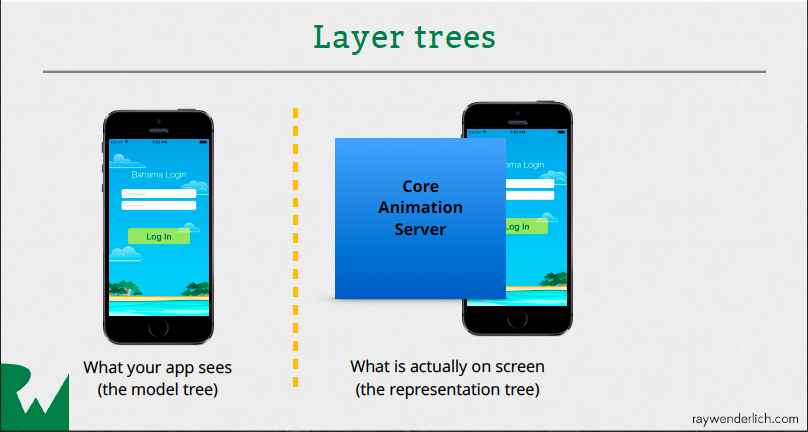
如下,所示点击Log in按钮时,button的颜色由green变成ochre brown。
let startColor = UIColor(red: 0.63, green: 0.84, blue: 0.35, alpha: 1.0)
let tintColor = UIColor(red: 0.85, green: 0.83, blue: 0.45, alpha: 1.0)

let tint = CABasicAnimation(keyPath: "backgroundColor")
tint.fromValue = startColor.CGColor
tint.toValue = tintColor.CGColor
tint.duration = 1.0

loginButton.layer.addAnimation(tint, forKey: nil)
效果如下,会发现在变成ochre brown后,会突然回到原来的颜色:

原因是在我们的代码中并没有更新model layer,这个tint动画发送到
Core Animation Server 在屏幕上渲染,当动画完成后,就从屏幕上移除。在屏幕上显示的就是原来的model layer tree。所以,正确的做法是添加上如下代码:
loginButton.layer.backgroundColor = tintColor.CGColor
补充
参考显式动画
有两种方式更新属性值:在动画开始之前或者动画结束之后
动画开始之前
注意要禁用隐式动画
CALayer *layer = self.colorLayer.presentationLayer ?: self.colorLayer;
 animation.fromValue = (__bridge id)layer.backgroundColor;
[CATransaction begin];
[CATransaction setDisableActions:YES];
self.colorLayer.backgroundColor = color.CGColor;
[CATransaction commit];
动画开始之后
CAAnimationDelegate代理的-animationDidStop:finished:方法,在动画执行结束之后调用
- (void)animationDidStop:(CABasicAnimation *)anim finished:(BOOL)flag
{
    //set the backgroundColor property to match animation toValue
    [CATransaction begin];
    [CATransaction setDisableActions:YES];
    self.colorLayer.backgroundColor = (__bridge CGColorRef)anim.toValue;
    [CATransaction commit];
}
动画时间(Animation Timing)
通过设置动画的timingFunction,使动画更美观,看起来更自然,CAMediaTimingFunction常用的值有:
kCAMediaTimingFunctionLinear-线性的计时函数,线性步调对于那些立即加速并且保持匀速到达终点的场景会有意义kCAMediaTimingFunctionEaseIn-慢慢加速,然后突然停止kCAMediaTimingFunctionEaseOut-全速开始,慢慢减速停止kCAMediaTimingFunctionEaseInEaseOut-慢慢加速然后再慢慢减速
如下设置timingFunction
flyRight.timingFunction = CAMediaTimingFunction(name: kCAMediaTimingFunctionEaseOut)
beginTime可以设置动画延时执行,CACurrentMediaTime()获取动画当前的时间
flyRight.beginTime = CACurrentMediaTime() + 0.33
fillMode
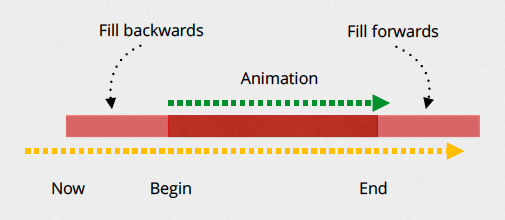
fillMode的作用就是决定当前对象过了非active时间段的行为. 比如动画开始之前,动画结束之后。如果是一个动画CAAnimation,则需要将其removedOnCompletion设置为NO,要不然fillMode不起作用. 下面来讲各个fillMode的意义
kCAFillModeRemoved 这个是默认值,也就是说当动画开始前和动画结束后,动画对layer都没有影响,动画结束后,layer会恢复到之前的状态
kCAFillModeForwards 当动画结束后,layer会一直保持着动画最后的状态
kCAFillModeBackwards 这个和kCAFillModeForwards是相对的,就是在动画开始前,你只要将动画加入了一个layer,layer便立即进入动画的初始状态并等待动画开始.你可以这样设定测试代码,将一个动画加入一个layer的时候延迟5秒执行.然后就会发现在动画没有开始的时候,只要动画被加入了layer,layer便处于动画初始状态
kCAFillModeBoth 理解了上面两个,这个就很好理解了,这个其实就是上面两个的合成.动画加入后开始之前,layer便处于动画初始状态,动画结束后layer保持动画最后的状态.
示例动画效果如下,动画会有延时执行的效果:
代码如下:
  func presentationAnimations() {

    let flyRight = CABasicAnimation(keyPath: "position.x")
    flyRight.fromValue = -view.bounds.size.width/2
    flyRight.toValue = view.bounds.size.width/2
    flyRight.duration = 0.5

    flyRight.timingFunction = CAMediaTimingFunction(name: kCAMediaTimingFunctionEaseOut)
    //flyRight.speed = 0.5

    flyRight.fillMode = kCAFillModeBackwards

    heading.layer.addAnimation(flyRight, forKey: nil)

    flyRight.beginTime = CACurrentMediaTime() + 0.33
    username.layer.addAnimation(flyRight, forKey: nil)

    flyRight.beginTime = CACurrentMediaTime() + 0.5
    password.layer.addAnimation(flyRight, forKey: nil)

    animateInfo()
  }
其它有关时间的属性,参考谈谈iOS Animation
timeOffset
这个timeOffset可能是这几个属性中比较难理解的一个,官方的文档也没有讲的很清楚. local time也分成两种一种是active local time 一种是basic local time.
timeOffset则是active local time的偏移量.
你将一个动画看作一个环,timeOffset改变的其实是动画在环内的起点,比如一个duration为5秒的动画,将timeOffset设置为2(或者7,模5为2),那么动画的运行则是从原来的2秒开始到5秒,接着再0秒到2秒,完成一次动画.
speed
speed属性用于设置当前对象的时间流相对于父级对象时间流的流逝速度,比如一个动画beginTime是0,但是speed是2,那么这个动画的1秒处相当于父级对象时间流中的2秒处. speed越大则说明时间流逝速度越快,那动画也就越快.比如一个speed为2的layer其所有的父辈的speed都是1,它有一个subLayer,speed也为2,那么一个8秒的动画在这个运行于这个subLayer只需2秒(8 / (2 * 2)).所以speed有叠加的效果.
动画群组(Animation Groups)
CAAnimationGroup可以将多个动画一起执行,CAAnimationGroup继承自CAAnimation,它一个animations数组的属性,用来组合别的动画
组合动画效果如下,集合了缩放、旋转和Opacity:

代码如下:
func animateLoginButton() {
    let groupAnimation = CAAnimationGroup()
    groupAnimation.duration = 0.5
    groupAnimation.beginTime = CACurrentMediaTime() + 0.5
    groupAnimation.fillMode = kCAFillModeBackwards
    groupAnimation.timingFunction = CAMediaTimingFunction(name: kCAMediaTimingFunctionEaseIn)

    let scaleDown = CABasicAnimation(keyPath: "transform.scale")
    scaleDown.fromValue = 3.5
    scaleDown.toValue = 1.0

    let rotate = CABasicAnimation(keyPath: "transform.rotation")
    rotate.fromValue = CGFloat(M_PI_4)
    rotate.toValue = 0.0

    let fadeIn = CABasicAnimation(keyPath: "opacity")
    fadeIn.fromValue = 0.0
    fadeIn.toValue = 1.0

    groupAnimation.animations = [scaleDown, rotate, fadeIn]

    loginButton.layer.addAnimation(groupAnimation, forKey: nil)

}
动画代理(Animation Delegate)
使用CAAnimation的代理方法
animationDidStart(anim: CAAnimation!)animationDidStop(anim: CAAnimation!,finished flag: Bool)
这里的关键在于如何区别不同的CAAnimation,可以通过KVC来为CAAnimation设置不同的key和value,如下:
flyRight.setValue("form", forKey: "name")
flyRight.setValue(heading.layer, forKey: "layer")
然后在代理方法中获取name和layer
name = anim.valueForKey("name") as? String
本例子的效果如下,在顶部的Label和TextField完成动画后,会有一个bounce的弹性效果,背景的cloud会移动:
代码如下:
给flyRight设置代理,并设置Value
  func presentationAnimations() {

    let flyRight = CABasicAnimation(keyPath: "position.x")
    flyRight.fromValue = -view.bounds.size.width/2
    flyRight.toValue = view.bounds.size.width/2
    flyRight.duration = 0.5

    flyRight.timingFunction = CAMediaTimingFunction(name: kCAMediaTimingFunctionEaseOut)
    //flyRight.speed = 1.5

    flyRight.fillMode = kCAFillModeBackwards
    flyRight.delegate = self
    flyRight.setValue("form", forKey: "name")
    flyRight.setValue(heading.layer, forKey: "layer")

    heading.layer.addAnimation(flyRight, forKey: nil)

    flyRight.setValue(username.layer, forKey: "layer")
    flyRight.beginTime = CACurrentMediaTime() + 0.33
    username.layer.addAnimation(flyRight, forKey: nil)

    flyRight.setValue(password.layer, forKey: "layer")
    flyRight.beginTime = CACurrentMediaTime() + 0.5
    password.layer.addAnimation(flyRight, forKey: nil)

    animateInfo()
    animateLoginButton()

    //云 动画
    animateCloud(cloud1.layer)
    animateCloud(cloud2.layer)
    animateCloud(cloud3.layer)
    animateCloud(cloud4.layer)
  }
cloud的动画是改变position.x,对不同位置有不同时间
func animateCloud(cloudLayer: CALayer) {
    let cloudSpeed = 30.0 / Double(view.frame.size.width)
    let duration = NSTimeInterval(view.frame.size.width - cloudLayer.frame.origin.x) * cloudSpeed

    let cloudMove = CABasicAnimation(keyPath: "position.x")
    cloudMove.duration = duration
    cloudMove.fromValue = cloudLayer.frame.origin.x
    cloudMove.toValue = view.frame.size.width + cloudLayer.frame.size.width
    cloudMove.delegate = self
    cloudMove.timingFunction = CAMediaTimingFunction(name: kCAMediaTimingFunctionLinear)

    cloudMove.setValue("cloud", forKey: "name")
    cloudMove.setValue(cloudLayer, forKey: "layer")

    cloudLayer.addAnimation(cloudMove, forKey: nil)

}
最后,在animationDidStop代理方法中,判断不同的动画:
override func animationDidStop(anim: CAAnimation, finished flag: Bool) {

    guard let name = anim.valueForKey("name") as? String,
        let layer = anim.valueForKey("layer") as? CALayer else {
            return
    }

    if name == "form" {
        let  bounce = CABasicAnimation(keyPath: "transform.scale")
        bounce.fromValue = 1.2
        bounce.toValue = 1.0
        bounce.duration = 0.5
        layer.addAnimation(bounce, forKey: nil)
    } else if name == "cloud" {

        layer.frame.origin.x = -layer.frame.size.width
        delay(seconds: 0.1, completion: {
            self.animateCloud(layer)
        })

    }


}


 379
379


 被折叠的 条评论
为什么被折叠?
被折叠的 条评论
为什么被折叠?
 到【灌水乐园】发言


