


利用DOM进行web响应
1、 DOM简介
document object model
2、 文档对象
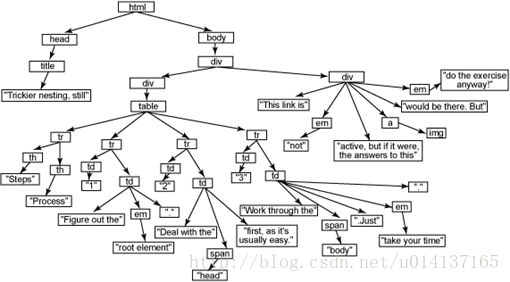
浏览器将web页面转换成对象表示,例如下面一段HTML代码。
    <html>
    <head>
      <title>Trickier nesting, still</title>
    </head>
    <body>
      <div id="main-body">
       <div id="contents">
        <table>
         <tr><th>Steps</th><th>Process</th></tr>
         <tr><td>1</td><td>Figure out the <em>root element</em>.</td></tr>
         <tr><td>2</td><td>Deal with the <span id="code">head</span> first,
             as it's usually easy.</td></tr>
         <tr><td>3</td><td>Work through the <span id="code">body</span>.
             Just <em>take your time</em>.</td></tr>
        </table>
       </div>
       <div id="closing">
        This link is <em>not</em> active, but if it were, the answers
        to this <a href="answers.html"><img src="exercise.gif" /></a> would
        be there. But <em>do the exercise anyway!</em>
       </div>
      </div>
    </body>
    </html>
从HTML元素开始,把HTML元素当做根元素,head和body元素是html根元素的孩子,tilte是head的孩子,整个树这样组织下去,这段代码的DOM树形式展示如下图所示。
图片来源于原作者
3、通过DOM建立web应用
下面通过一个更换图片的例子展示一下web应用中如何通过DOM获取、更改和删除页面中的元素的。
3.1 网页显示图片
<form >
    <img src="topHat.gif" id="hat"/><br/>
    <input id="button1" type="button" value="showRabbit!" onClick="showRabbit();" />
</form>
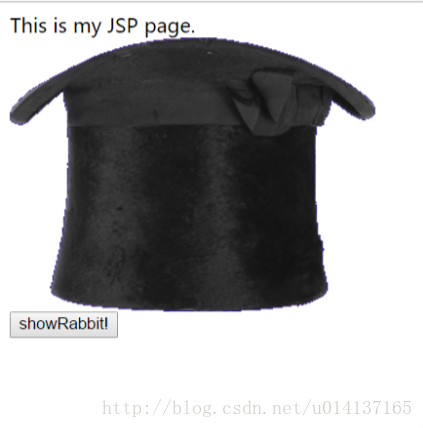
这段代码是在页面上显示一个图片和一个button按钮。没有使用submit而是使用button的理由是,我们不需要连接服务器请求资源,而是通过dom更换图片的资源。
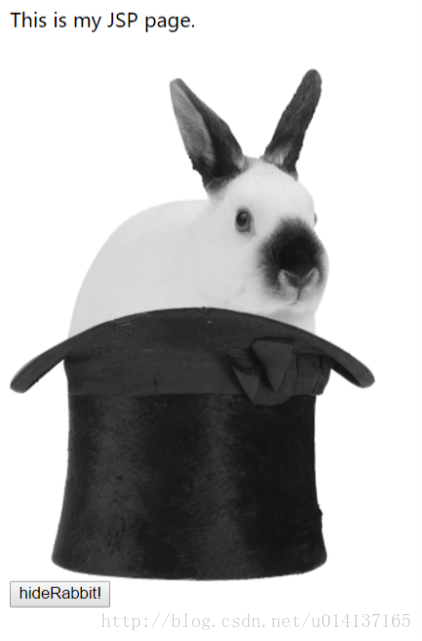
3.2 更换图片
想要更换显示的图片,有多种方法,以下方法由复杂到简单(假设使用图片B更换已经显示的图片A):
- 添加元素
- 新建一个img元素
- 设置img元素的属性,src为图片B
- 获得图片A的img元素
- 获得图片A的img元素的父元素(容器)
- 将新img元素放入容器中
- 删除图片A的img元素
对应的代码如下:
function showRabbit(){
    var oldImg= document.getElementById("hat");
    var newImg=document.createElement("img");
    newImg.setAttribute("src", "rabbit-hat.gif");
    var imgParents=oldImg.parentNode;
    imgParents.insertBefore(newImg, oldImg);
    imgParents.removeChild(oldImg);
}
- 更换元素
- 新建一个img元素
- 设置img元素的属性,src为图片B
- 获得图片A的img元素
- 获得图片A的img元素的父元素(容器)
- 更换父元素中的img元素
对应的代码如下:
function showRabbit(){
    var oldImg= document.getElementById("hat");
    var newImg=document.createElement("img");
    newImg.setAttribute("src", "rabbit-hat.gif");
    var imgParents=oldImg.parentNode;
    imgParents.insertBefore(newImg, oldImg);
    imgParents.removeChild(oldImg);
    imgParents.replaceChild(newImg, oldImg);
}
- 更换属性
- 获得图片A的img元素
- 更换img元素的src属性,将图片改为B
对应的代码如下:
function showRabbit(){
    var image=document.getElementById("hat");
    image.setAttribute("src", "rabbit-hat.gif");
 }
通过input标签中的onClick属性来触发函数。
<input id="button1" type="button" value="showRabbit!" onClick="showRabbit();" />
3.3 反复更换图片
- 增加按钮的id属性,获取按钮元素
- 修改按钮的标签
- 修改按钮的onClick函数
两个onClick函数如下:
     function showRabbit(){
        var oldimg= document.getElementById("hat");
        var newimg=document.createElement("img");
        newimg.setAttribute("src", "rabbit-hat.gif");
        var imgParents=oldimg.parentNode;
        imgParents.insertBefore(newimg, oldimg);
        imgParents.removeChild(oldimg);

        var button=document.getElementById("button1");
        button.setAttribute("value","hideRabbit!");
        button.onClick=hideRabbit;
     }

     function hideRabbit(){
        var image=document.getElementById("hat");
        image.setAttribute("src", "topHat.gif");

        var button=document.getElementById("button1");
        button.setAttribute("value", "showRabbit!");
        button.onClick=showRabbit;
     }


 9678
9678


 被折叠的 条评论
为什么被折叠?
被折叠的 条评论
为什么被折叠?
 到【灌水乐园】发言


