spring,structs2和Mybatis整合以及单元测试

最近一个项目使用的是struts2+Spring3+mybatis3的技术框架,由于开发人员都不熟悉如何进行单元测试,今天有空,简单研究了一下如何用junit4来测试基于这个框架的代码。由于struts的action只是负责前台的请求转发,而所有的业务都是在service层处理,因此一般情况下只需对service进行单元测试,而不需要对action进行单元测试。下面介绍一个简单的例子:

开发环境:

SystemWindows xp
IDEeclipse Java EE 3.6
DatabaseMySQL

开发依赖库:

JavaEE5Spring 3.0.5Mybatis 3.0.4myBatis-spring-1.0junit4.8.1

一、准备工作:

1、下载jar
Spring3 jar下载:

http://ebr.springsource.com/repository/app/library/version/detail?name=org.springframework.spring&version=3.0.5.RELEASE

MyBatis3 jar 下载:
http://www.mybatis.org/java.html
junit 4 jar下载:
http://www.junit.org/


2、 添加的jar包如下:


3、创建mysql的数据库表,步骤如下:

1、进入mysql的安装路径,假设在:C:\Program Files\MySQL\MySQL Server 5.1\bin;
2、输入命令:mysql -uroot -p,enter,输入密码:admin;
3、mysql>use test;
5、mysql>grant all privileges on test.* to test@'localhost' identified by 'test';
6、mysql>flush privileges;

4、mysql>
  create table account_bak(account_id int not null auto_increment,
                     username varchar(20),
                     password varchar(20),
                     create_time datetime,
                     primary key(account_id));


二、spring 和mybatis整合
1、在eclipse中创建一个java project,目录结构如下:


这是一个标准的maven工程的目录结构,下面逐一介绍上图涉及到的文件。
2、创建mybatis的配置文件mybatis.xml

<?xml version="1.0" encoding="UTF-8" ?>

<!DOCTYPE configuration PUBLIC "-//mybatis.org//DTD Config 3.0//EN" "http://mybatis.org/dtd/mybatis-3-config.dtd">

<configuration>


</configuration>

上面的配置文件中,可以加入一些公共、常用的MyBatis方面的全局配置。handlerobjectFactoryplugin、以及mappers的映射路径(由于在spring配置文件spring.xml中的SqlSessionFactoryBean有配置mapperlocation,这里就不需要配置)等。这个文件名称和下面的spring.xml中的configLocation中的值对应,不是随便写的。
3、创建spring的配置文件spring.xml

<?xml version="1.0" encoding="UTF-8"?>
<beans xmlns="http://www.springframework.org/schema/beans"
 xmlns:xsi="http://www.w3.org/2001/XMLSchema-instance" xmlns:p="http://www.springframework.org/schema/p"
 xmlns:context="http://www.springframework.org/schema/context"
 xmlns:jee="http://www.springframework.org/schema/jee" xmlns:tx="http://www.springframework.org/schema/tx"
 xsi:schemaLocation="
   http://www.springframework.org/schema/beans 
   http://www.springframework.org/schema/beans/spring-beans-2.5.xsd
   http://www.springframework.org/schema/context 
   http://www.springframework.org/schema/context/spring-context-2.5.xsd
   http://www.springframework.org/schema/jee 
   http://www.springframework.org/schema/jee/spring-jee-2.5.xsd
   http://www.springframework.org/schema/tx 
   http://www.springframework.org/schema/tx/spring-tx-2.5.xsd">

 <bean
  class="org.springframework.aop.framework.autoproxy.DefaultAdvisorAutoProxyCreator" />
 
 <bean id="dataSource"
  class="org.springframework.jdbc.datasource.DriverManagerDataSource">
  <property name="driverClassName" value="com.mysql.jdbc.Driver" />
  <property name="url" value="jdbc:mysql://localhost:3306/test?useUnicode=true&amp;characterEncoding=UTF-8" />
  <property name="username" value="test" />
  <property name="password" value="test" />
 </bean>
 
 <!-- 配置事务管理器,注意这里的dataSource和SqlSessionFactoryBean的dataSource要一致,不然事务就没有作用了 -->
 <bean id="transactionManager"
  class="org.springframework.jdbc.datasource.DataSourceTransactionManager">
  <property name="dataSource" ref="dataSource" />
 </bean>

 <tx:annotation-driven transaction-manager="transactionManager" />
 <!-- myBatis文件 -->

 <bean id="sqlSessionFactory" class="org.mybatis.spring.SqlSessionFactoryBean">
  <property name="configLocation" value="classpath:mybatis.xml" />
  <property name="mapperLocations"
   value="classpath*:com/glen/model/*.xml" />
  <property name="dataSource" ref="dataSource" />
 </bean>
 
 <bean id="accountDao" class="com.glen.dao.AccountDao">
  <property name="sessionFactory" ref="sqlSessionFactory"/>
 </bean>
 
 <bean id="accountService" class="com.glen.service.AccountService">
  <property name="accountDao" ref="accountDao"/>
 </bean>
 
 <context:annotation-config />
 <context:component-scan base-package="com.glen" />

</beans>

4、JavaBeanModelEntity)相关类、及mybatis 的mapper对象

javabean:

package com.glen.model;

import java.io.Serializable;
import java.util.Date;

public class Account implements Serializable {

 private static final long serialVersionUID = -7970848646314840509L;
 
 private Integer accountId;
 private String username;
 private String password;
 private Date createTime;

 public Account() {
  super();
 }
//下面是getter、setters

account-resultMap.xml

<?xml version="1.0" encoding="UTF-8"?>

<!DOCTYPE mapper PUBLIC "-//mybatis.org//DTD Mapper 3.0//EN"

    "http://mybatis.org/dtd/mybatis-3-mapper.dtd">

<mapper namespace="accountMap">

    <resultMap type="com.hoo.entity.Account" id="accountResultMap">

       <id property="accountId" column="account_id"/>

       <result property="username" column="username"/>

       <result property="password" column="password"/>

       <result property="createTime" column="create_time"/>

    </resultMap>

</mapper>


account-mapper.xml


<?xml version="1.0" encoding="UTF-8"?>
<!DOCTYPE mapper PUBLIC "-//mybatis.org//DTD Mapper 3.0//EN" 
 "http://mybatis.org/dtd/mybatis-3-mapper.dtd">

<mapper namespace="account">

 
 <select id="getList" parameterType="com.glen.model.Account" resultType="list" resultMap="accountResultMap">
   select * from account where username like '%' #{username} '%'
 </select>
 
 <select id="getAllAccount" resultType="list" resultMap="accountResultMap">
   select * from account
 </select>
  
 
 <!-- accountResultMap是account-resultmap.xml中定义的resultmap -->
 <select id="get" parameterType="com.glen.model.Account" resultType="com.glen.model.Account" resultMap="accountResultMap">
  <![CDATA[
   select * from account where account_id = #{accountId}
        ]]>
 </select>
 
 
 <!-- 自动生成id策略 -->
 <insert id="add" useGeneratedKeys="true" keyProperty="accountId" parameterType="com.glen.model.Account">
  insert into account(account_id, username, password)
  values(#{accountId,jdbcType=BIGINT}, #{username}, #{password})
<!--将最后插入的逐渐返回到java对象-->
  <selectKey resultType="int" keyProperty="accountId">
   SELECT LAST_INSERT_ID()
  </selectKey>
  
 </insert>
  
 <update id="edit" parameterType="com.glen.model.Account">
  update account set
  username = #{username},
  password = #{password}
  where account_id = #{accountId}
 </update>
 
 <delete id="remove" parameterType="com.glen.model.Account">
  delete from account where account_id = #{accountId}
 </delete>
  
</mapper> 


5、创建dao:


package com.glen.dao;

import javax.annotation.Resource;

import org.apache.ibatis.session.SqlSession;
import org.apache.ibatis.session.SqlSessionFactory;
import org.springframework.stereotype.Repository;

import com.glen.model.Account;


public class AccountDao {

 private SqlSessionFactory sessionFactory;

 public AccountDao() {

 }

 public SqlSessionFactory getSessionFactory() {
  return sessionFactory;
 }

 public void setSessionFactory(SqlSessionFactory sessionFactory) {
  this.sessionFactory = sessionFactory;
 }

 public void insert(Account account) {

  SqlSession session = sessionFactory.openSession();
  session.insert("account.add", account);
 }
 
 public Account getAccountById(Account account) {
  
  SqlSession session = sessionFactory.openSession();
  Account accountFromDb = (Account)session.selectOne("account.get", account);
  return accountFromDb;
 }
}


6、创建service:


package com.glen.service;

import javax.annotation.Resource;

import org.springframework.stereotype.Service;

import com.glen.dao.AccountDao;
import com.glen.model.Account;


public class AccountService {
 
 private AccountDao accountDao;
 
 /**
  * 新增一个帐户。
  * @param account
  */
 public void insertAccount(Account account) {
  
  accountDao.insert(account);
 }

 /**
  * 根据帐户ID查找帐户信息
  * @param account
  * @return
  */
 public Account getAccountById(Account account) {
  
  return accountDao.getAccountById(account);
 }
 
 public AccountDao getAccountDao() {
  return accountDao;
 }

 public void setAccountDao(AccountDao accountDao) {
  this.accountDao = accountDao;
 }
}


Ok,至此spring 和mybatis就整合好了。

三、用junit进行单元测试
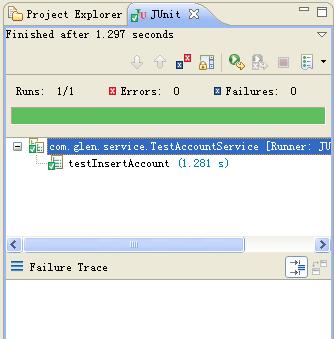
在src/test/java目录下,创建一个测试类:TestAccountService:


package com.glen.service;

import static org.junit.Assert.assertEquals;
import static org.junit.Assert.assertNotNull;

import org.apache.log4j.Logger;
import org.junit.Before;
import org.junit.Test;
import org.springframework.context.ApplicationContext;
import org.springframework.context.support.FileSystemXmlApplicationContext;

import com.glen.model.Account;


public class TestAccountService {
 
 Logger logger = Logger.getLogger("TestAccountService");
 
 AccountService service = null;

 @Before
 public void init() {
  
  ApplicationContext aCtx = new FileSystemXmlApplicationContext(
    "classpath:spring.xml");
  AccountService service = (AccountService) aCtx
    .getBean("accountService");
  assertNotNull(service);
  this.service = service;

 }
 
 @Test
 public void testInsertAccount() {

  // 创建一个帐户
  Account account = new Account();
  // account.setAccountId(1);
  account.setUsername("selina");
  account.setPassword("123456");
  
  //将创建的帐户插入到数据库中
  service.insertAccount(account);
  logger.debug("account id: " + account.getAccountId());
  
  //从数据库获取刚才插入的帐户
  Account accountFromDb = service.getAccountById(account);
  assertNotNull(accountFromDb);
  assertEquals(account.getAccountId(), accountFromDb.getAccountId());
 }

}


测试通过,显示如下界面:


四、使用spring的标记来注入对象
如上所述,我们在spring的配置文件spring.xml中,定义了两个业务模块相关的bean,accountDao和accountService,但是在实际项目中,这样的dao和service会非常多,如果每个都要这样定义,会造成配置文件的体积过大,可阅读性和可维护性都会变差。

那么如何对spring.xml进行瘦身呢?有两种方案,第一种方案是分模块开发,对于模块内部的bean,写在对应模块内部的spring配置文件中,如:spring-account.xml;第二种方案,就是使用spring的标记。下面我想说说的就是,用spring的标记:@Service @Repository @Resource来实现对象的注入。在上面这个例子基础上,做以下步骤的修改:

1、注释掉spring.xml中的两个bean:accountDao和accountService的定义

  <!--  
 <bean id="accountDao" class="com.glen.dao.AccountDao">
  <property name="sessionFactory" ref="sqlSessionFactory"/>
 </bean>
 
 <bean id="accountService" class="com.glen.service.AccountService">
  <property name="accountDao" ref="accountDao"/>
 </bean>
 -->


2、在AccountDao类中添加两个标记:@Repository和 @Resource,


@Repository
public class AccountDao {

 @Resource
 private SqlSessionFactory sessionFactory; 

这里添加@Repository标记,相当于在spring.xml中定义了一个bean,bean的id为这个类对象名称的第一个字母改成小写后的字符串,即:accountDao。添加 @Resource标记,相当于在accountDao这个bean中,引用了一个“sqlSessionFactory”。

3、在AccountService类中添加两个标记:@Service 和 @Resource:

@Service
public class AccountService {
 
 @Resource
 private AccountDao accountDao;


4、运行TestAccountService,同样测试通过。

  • 0
    点赞
  • 0
    收藏
    觉得还不错? 一键收藏
  • 0
    评论

“相关推荐”对你有帮助么?

  • 非常没帮助
  • 没帮助
  • 一般
  • 有帮助
  • 非常有帮助
提交
评论
添加红包

请填写红包祝福语或标题

红包个数最小为10个

红包金额最低5元

当前余额3.43前往充值 >
需支付:10.00
成就一亿技术人!
领取后你会自动成为博主和红包主的粉丝 规则
hope_wisdom
发出的红包
实付
使用余额支付
点击重新获取
扫码支付
钱包余额 0

抵扣说明:

1.余额是钱包充值的虚拟货币,按照1:1的比例进行支付金额的抵扣。
2.余额无法直接购买下载,可以购买VIP、付费专栏及课程。

余额充值