


版权声明:本文为博主原创文章,转载需注明出处.
AlexNet
AlexNet在2012年被提出,并且它以显著的优势赢得了,2012年的ILSCRC比赛的冠军
AlexNet把CNN的基本原理应用到了更深的网络当中,并加入了一些新技术:
1,使用ReLU作为CNN的激活函数,证明了其效果在较深的网络当中超过了Sigmoid.
2,在训练网络时使用Dropout随机忽略一些神经元,来防止模型过拟合,主要用在全连接层使用.
3,在CNN中使用重叠的最大池化,AlexNet使用最大池化来避免平均池化造成的模糊效果,重叠:即池化核的尺寸大于核移动的步长,造成池化输出之间的重叠与覆盖.提升特征的丰富度.
4,使用LRN层,模仿生物神经系统的’侧抑制’机制,对于ReLU这种没有上限边界的激活函数比较有用,因为它会从附近的多个卷积核的响应(response)中,挑选较大的反馈,抑制较小的反馈.不适合Sigmoid这种有固定边界的激活函数.
5,使用GPU来加速网络的训练(AlexNet是使用两块GTX 580)
6,数据增强,随机的对图片进行截取固定大小(224x224),反转,平移等等,加入一些噪声,扩充训练数据,减轻模型的过拟合,提升泛化能力.在进行预测的时候,是取图片的四角和中间的位置,进行数据增强处理,获得10个图片,分别进行预测并对结果求平均值.AlexNet的论文中还提到了,对图片的RGB数据进程PCA处理,并对主成分加入0.1的高斯噪声,还可以降低错误率1%.

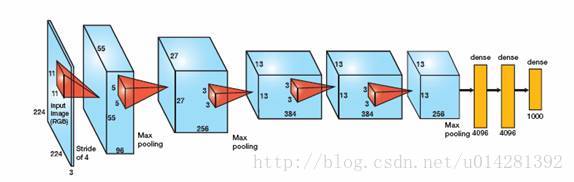
AlexNet的网络结构:
1,首先是输入层
2,Conv 11x11,96,步长4,ReLU
3,LRN(local response norm)
4,max_pool(3x3),步长2
5,Conv 5x5,256,步长1,ReLU
6,LRN
7,max_pool(3x3),步长2
8,Conv 3x3,384,步长1,ReLU
9,max_pool(3x3),步长2
10,Conv 3x3,384,步长1,ReLU
11.max_pool(3x3),步长2
12,Conv 3x3,256,步长1,ReLU
13,max_pool(3x3),步长2
14,FC(fullconnection) 4096,ReLU
15,FC,4096,ReLU
16,FC,1000
ImageNet数据集庞大,AlexNet非常耗时,所以仍用MNIST来测试,由于MNIST是大小为28的图像,所以对网络的大小进行改变,同时省去有些LRN操作,LRN的效果不是特别明显,而且会影响网络训练速度,整体结构,仍按照AlexNet.看看能不能对准确率有所提升.
tensorflow版本为1.1,有些函数的参数的详细注释,参考这篇简单的CNN
import tensorflow as tf
import matplotlib.pyplot as plt
import numpy as np
import time
from tensorflow.examples.tutorials.mnist import input_data
网络参数
#定义网络超参数
learning_rate = 0.0001
train_epochs = 130
batch_size = 256
display = 10
t = 50      # 每轮随机抽的次数
# 网络参数
n_input = 784
n_classes = 10
dropout = 0.75     # dropout正则,保留神经元节点的概率
# 定义占位符
images = tf.placeholder(tf.float32,[None,n_input])
labels = tf.placeholder(tf.float32,[None,n_classes])
keep_prob = tf.placeholder(tf.float32)一系列辅助函数
# 随机抽取训练数据
# 随机选取mini_batch
def get_random_batchdata(n_samples, batchsize):
    start_index = np.random.randint(0, n_samples - batchsize)
    return (start_index, start_index + batchsize)
# 权重,偏置初始化
# 在卷积层和全连接层我使用不同的初始化操作
# 卷积层使用截断正太分布初始化,shape为列表对象
def conv_weight_init(shape,stddev):
weight = tf.Variable(tf.truncated_normal(dtype=tf.float32, shape=shape, stddev=stddev))
return weight
# 全连接层使用xavier初始化
def xavier_init(layer1, layer2, constant = 1):
Min = -constant * np.sqrt(6.0 / (layer1 + layer2))
Max = constant * np.sqrt(6.0 / (layer1 + layer2))
weight = tf.random_uniform((layer1, layer2), minval = Min, maxval = Max, dtype = tf.float32)
return tf.Variable(weight)
# 偏置
def biases_init(shape):
biases = tf.Variable(tf.random_normal(shape, dtype=tf.float32))
return biases卷积 +池化+LRN
def conv2d(image, weight, stride=1):
    return tf.nn.conv2d(image, weight, strides=[1,stride,stride,1],padding='SAME')

def max_pool(tensor, k = 2, stride=2):
    return tf.nn.max_pool(tensor, ksize=[1,k,k,1], strides=[1,stride,stride,1],padding='SAME')

def lrnorm(tensor):
    return tf.nn.lrn(tensor,depth_radius=4, bias=1.0, alpha=0.001/9.0, beta=0.75)
# AlexNet中的LRN不知道是否适合MNIST
初始化权重和偏置
# 初始化权重
# wc = weight convolution
wc1 = conv_weight_init([5, 5, 1, 12], 0.05)
wc2 = conv_weight_init([5, 5, 12, 32], 0.05)
wc3 = conv_weight_init([3, 3, 32, 48], 0.05)
wc4 = conv_weight_init([3, 3, 48, 48], 0.05)
wc5 = conv_weight_init([3, 3, 48, 32], 0.05)
# wf : weight fullconnection
wf1 = xavier_init(4*4*32, 512)
wf2 = xavier_init(512, 512)
wf3 = xavier_init(512, 10)
# 初始化偏置
bc1 = biases_init([12])
bc2 = biases_init([32])
bc3 = biases_init([48])
bc4 = biases_init([48])
bc5 = biases_init([32])
# full connection
bf1 = biases_init([512])
bf2 = biases_init([512])
bf3 = biases_init([10])
5*卷积
# 转换image的shape
imgs = tf.reshape(images,[-1, 28, 28, 1])
# 卷积1
c1 = conv2d(imgs, wc1) # 未激活
conv1 = tf.nn.relu(c1 + bc1)
lrn1 = lrnorm(conv1)
pool1 = max_pool(lrn1)
# 卷积2
conv2 = tf.nn.relu(conv2d(pool1, wc2) + bc2)
lrn2 = lrnorm(conv2)
pool2 = max_pool(lrn2)
# 卷积3--5,不在进行LRN,会严重影响网络前馈,反馈的速度(效果还不明显)
conv3 = tf.nn.relu(conv2d(pool2, wc3) + bc3)
#pool3 = max_pool(conv3)
# 卷积4
conv4 = tf.nn.relu(conv2d(conv3, wc4) + bc4)
#pool4 = max_pool(conv4)
# 卷积5
conv5 = tf.nn.relu(conv2d(conv4, wc5) + bc5)
pool5 = max_pool(conv5)pool5<tf.Tensor 'MaxPool_2:0' shape=(?, 4, 4, 32) dtype=float32>
全连接
# 转换pool5的shape
reshape_p5 = tf.reshape(pool5, [-1, 4*4*32])
fc1 = tf.nn.relu(tf.matmul(reshape_p5, wf1) + bf1)
# 正则化
drop_fc1 = tf.nn.dropout(fc1, keep_prob)
# full connect 2
fc2 = tf.nn.relu(tf.matmul(drop_fc1, wf2) + bf2)
drop_fc2 = tf.nn.dropout(fc2, keep_prob)
# full connect 3 (输出层)未激活
output = tf.matmul(drop_fc2, wf3) + bf3output<tf.Tensor 'add_7:0' shape=(?, 10) dtype=float32>
损失函数和优化器
cost = tf.reduce_mean(tf.nn.softmax_cross_entropy_with_logits(logits=output, labels=labels))
optimizer = tf.train.AdamOptimizer(learning_rate).minimize(cost)
准确率
correct_pred = tf.equal(tf.argmax(labels, 1), tf.argmax(output, 1))
accuracy = tf.reduce_mean(tf.cast(correct_pred, tf.float32))
# 加载数据
mnist = input_data.read_data_sets('MNIST/mnist',one_hot=True)
n_examples = int(mnist.train.num_examples)Extracting MNIST/mnist/train-images-idx3-ubyte.gz
Extracting MNIST/mnist/train-labels-idx1-ubyte.gz
Extracting MNIST/mnist/t10k-images-idx3-ubyte.gz
Extracting MNIST/mnist/t10k-labels-idx1-ubyte.gz
# 变量初始化
init = tf.global_variables_initializer()
sess = tf.Session()
# tensorborad
# 把可视化对象合并到Summary中
# merged = tf.summary.merge_all()
# 可视化(输出路径,graph对象)
# writer = tf.summary.FileWriter('./Visualization',sess.graph)
# writer.close()sess.run(init) # 变量初始化训练和评估
Cost = []
Accu = []
for i in range(train_epochs):
for j in range(t): #每一轮随机抽取batchdata
start_idx, end_idx = get_random_batchdata(n_examples, batch_size)
batch_images = mnist.train.images[start_idx: end_idx]
batch_labels = mnist.train.labels[start_idx: end_idx]
# 更新weights,biases
sess.run(optimizer, feed_dict={images:batch_images, labels:batch_labels,keep_prob:0.65})
c , accu = sess.run([cost,accuracy],feed_dict={images:batch_images,labels:batch_labels,keep_prob:1.0})
Cost.append(c)
Accu.append(accu)
if i % display ==0:
print 'epoch : %d,cost:%.5f,accu:%.5f'%(i+10,c,accu)
#result = sess.run(merged,feed_dict={imgaes:xxx,labels:yyy,keep_prob:1.0})
# merged也需要run一下,i为x轴(对应所以可视化对象的x轴)
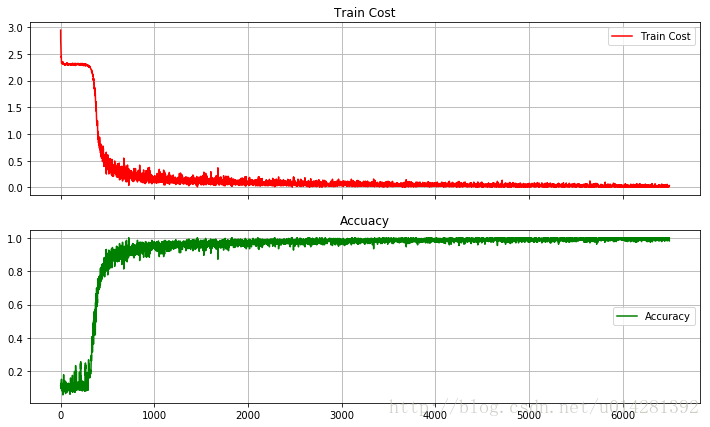
print 'Training Finish !'epoch : 10,cost:2.29978,accu:0.11328
epoch : 20,cost:0.46377,accu:0.87500
epoch : 30,cost:0.10498,accu:0.96875
epoch : 40,cost:0.26420,accu:0.92188
epoch : 50,cost:0.14124,accu:0.96484
epoch : 60,cost:0.06719,accu:0.97656
epoch : 70,cost:0.05444,accu:0.97266
epoch : 80,cost:0.06638,accu:0.98047
epoch : 90,cost:0.04561,accu:0.99219
epoch : 100,cost:0.02032,accu:0.99609
epoch : 110,cost:0.03399,accu:0.98828
epoch : 120,cost:0.04614,accu:0.98438
epoch : 130,cost:0.02753,accu:0.99219
Training Finish !
训练损失和准确率
fig, (ax1, ax2) = plt.subplots(2, sharex=True, figsize=(12,7))
ax1.plot(Cost,label='Train Cost',c='red')
ax1.set_title('Train Cost')
ax1.grid(True)
ax1.legend(loc=0)
ax2.set_title('Accuacy')
ax2.plot(Accu,label='Accuracy',c='green')
ax2.grid(True)
plt.legend(loc=5)
plt.show()
测试准确率
test_images = mnist.test.images
test_labels = mnist.test.labels
test_accuracy = sess.run(accuracy, feed_dict={images:test_images, labels:test_labels, keep_prob:1.0})
print 'Test Accuracy is: %.5f'%(test_accuracy)
Test Accuracy is: 0.98800
测试结果还不到99.2%,主要可能有一下几个原因:
1,没有使用数据增强处理
2,卷积核的数量也减少了许多
3,模型的参数t,还可以适当的增加,因为batchsize=256,随机抽取50次,每轮的训练数据并不能完全覆盖到训练数据,训练数据大小是55000.
3,为了加快训练速度,对网络进行了精简,去掉了3个LRN,两个池化
4,可能MNIST数据太小,不能充分体现AlexNet
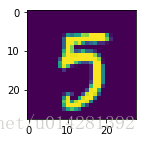
训练样本
# 从训练数据中选取了一个样本,转换为一个28x28的以为数组
fig2,ax2 = plt.subplots(figsize=(2,2))
ax2.imshow(np.reshape(mnist.train.images[28], (28, 28)))
plt.show()
卷积1
# 第一层的卷积输出的特征图(没有进行,激活,LRN,池化)
input_image = mnist.train.images[28:29]
C1 = sess.run(c1, feed_dict={images:input_image})              # [1, 28, 28 ,12]
C1_reshape = sess.run(tf.reshape(C1, [12, 1, 28, 28]))
fig3,ax3 = plt.subplots(nrows=1, ncols=12, figsize = (12,2))
for i in range(12):
    ax3[i].imshow(C1_reshape[i][0])                            # tensor的切片[batch, channels, row, column]
plt.title('C1 16x28x28')
plt.show()

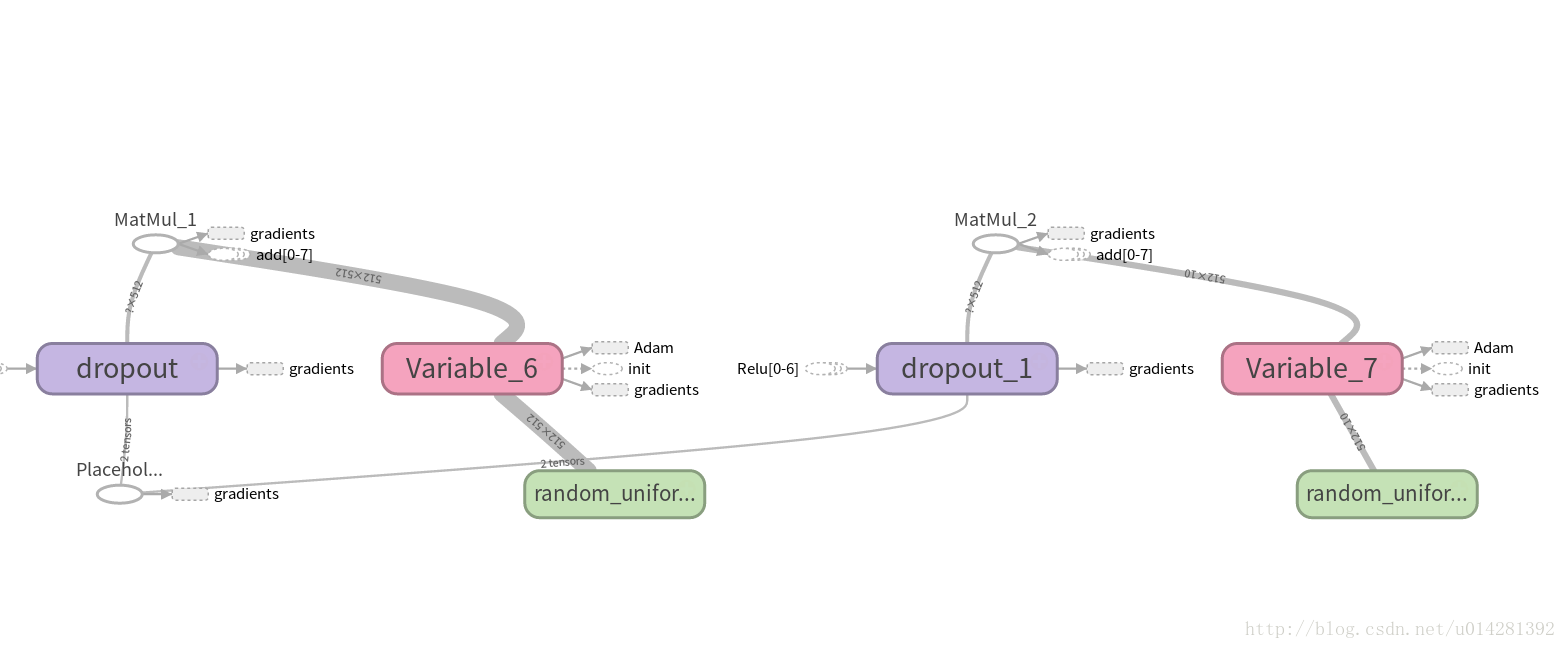
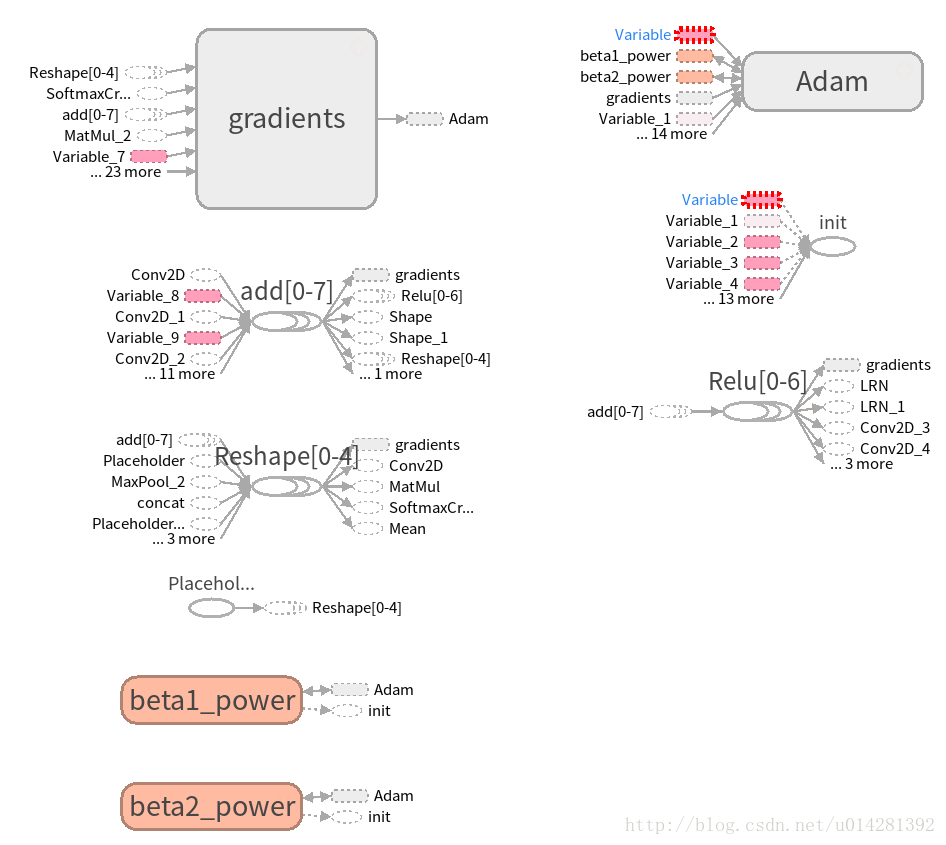
TensorBoard可视化网络
5个卷积层

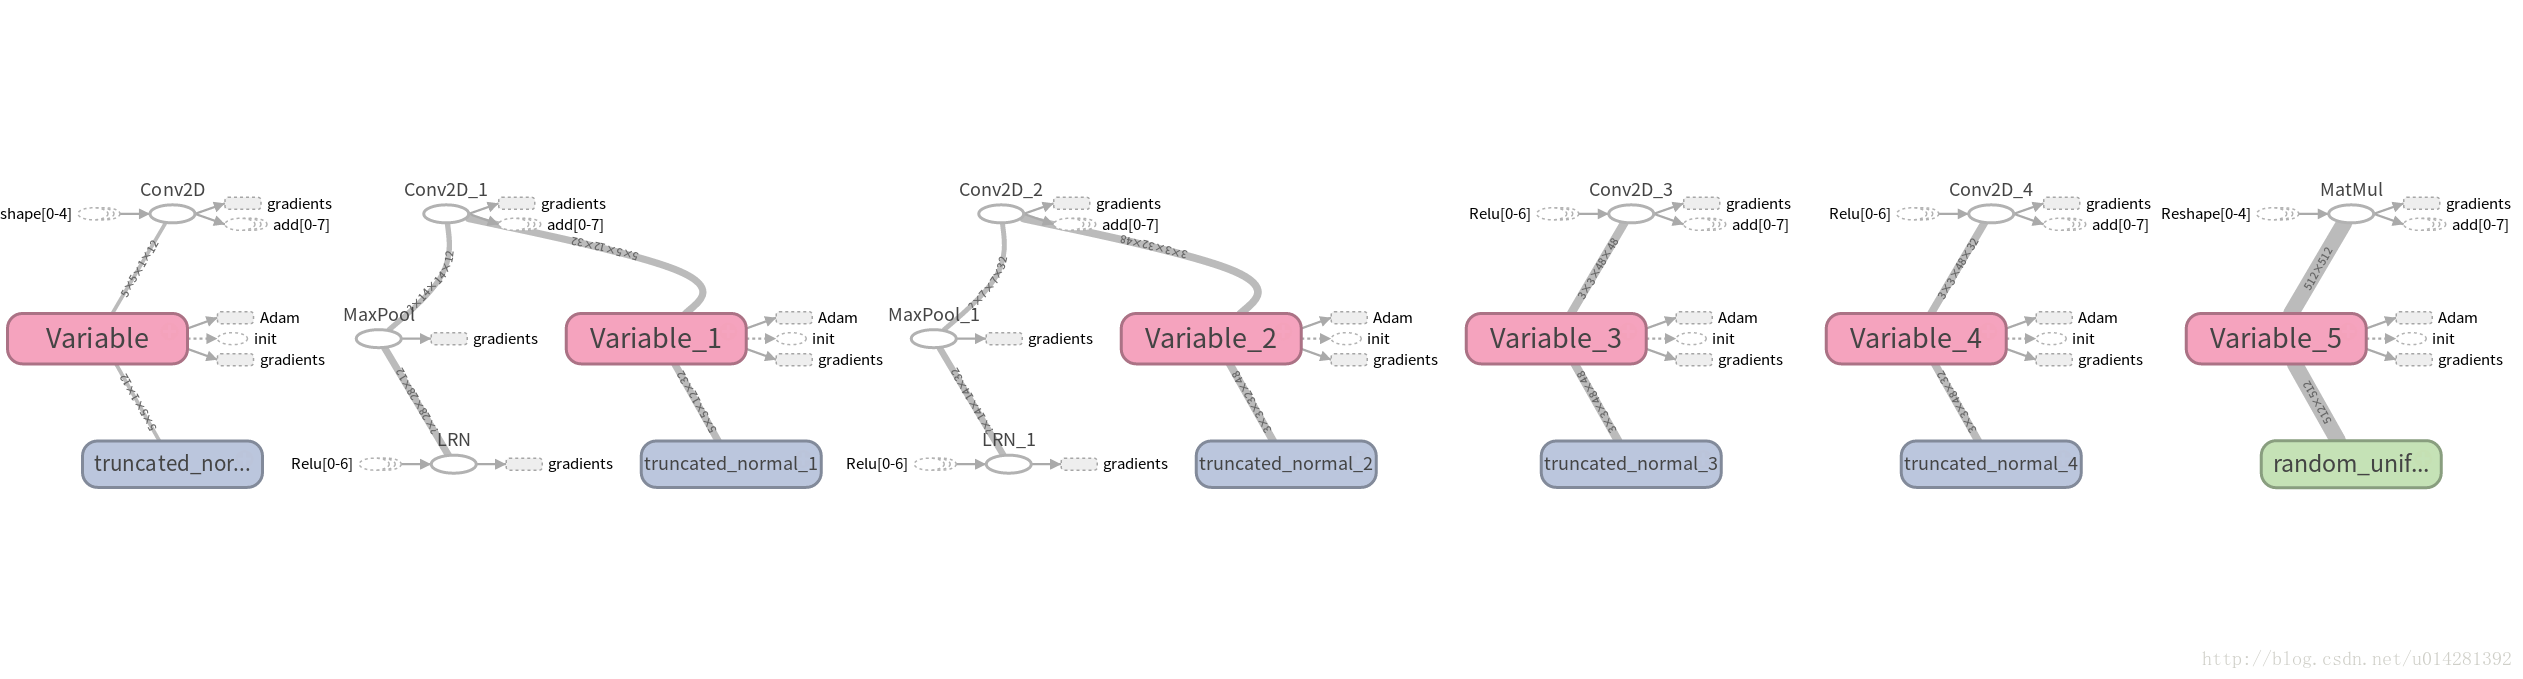
全连接


 3万+
3万+


 被折叠的 条评论
为什么被折叠?
被折叠的 条评论
为什么被折叠?
 到【灌水乐园】发言


