


Hello World
我们看到最简单的Activity中的内容大致是这样的:
- public class MainActivity extends Activity {
- @Override
- public void onCreate(Bundle savedInstanceState) {
- super.onCreate(savedInstanceState);
- setContentView(R.layout.main_activity);
- }
- }
- <RelativeLayout xmlns:android="http://schemas.android.com/apk/res/android"
- xmlns:tools="http://schemas.android.com/tools"
- android:layout_width="match_parent"
- android:layout_height="match_parent"
- android:gravity="center" >
- <TextView
- android:layout_width="match_parent"
- android:layout_height="wrap_content"
- android:text="@string/hello_world" />
- </RelativeLayout>
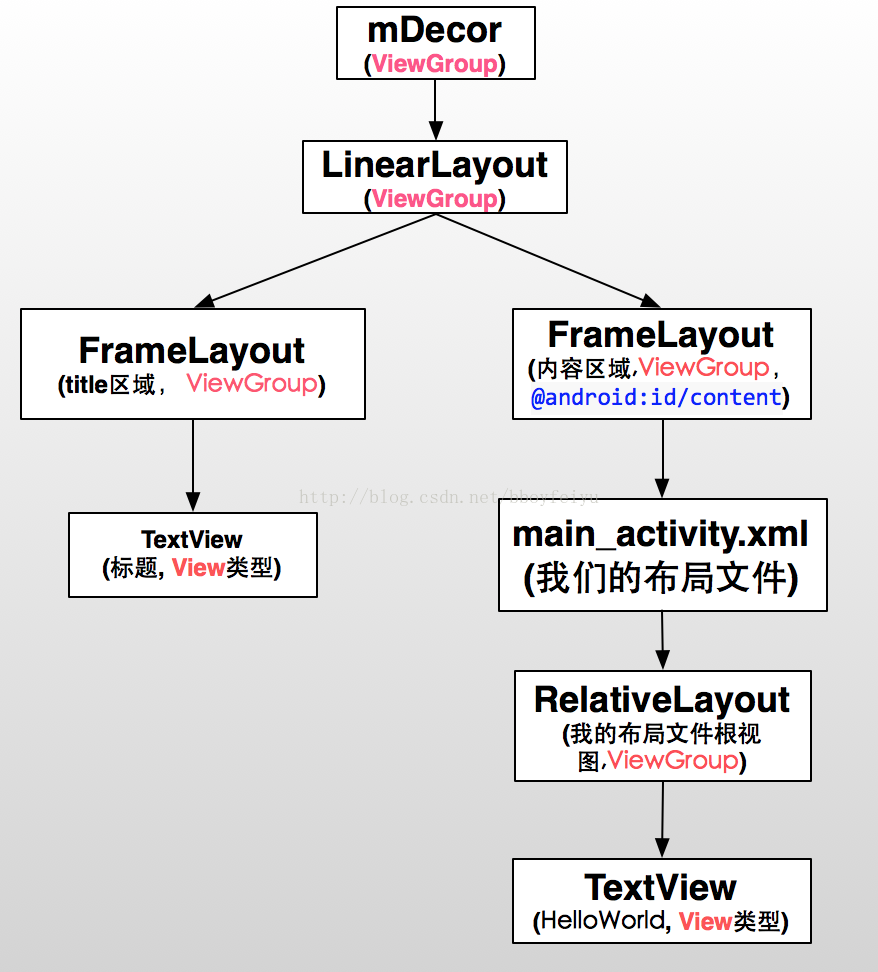
图1
我们在整个过程中做的事情很少,在我们的main_activity.xml我们只有一个显示文本的TextView,但是在上图中却还多了一个title。我们好奇的是整个过程是怎么工作的?对于大型系统来说细节总是复杂的,在下水平有限,所以我们今天只来理一下它的基本脉络。
setContentView
一般来说我们设置页面的内容视图是都是通过setContentView方法,那么我们就以2.3源码为例就来看看Activity中的setContentView到底做了什么吧。
- /**
- * Set the activity content from a layout resource. The resource will be
- * inflated, adding all top-level views to the activity.
- *
- * @param layoutResID Resource ID to be inflated.
- */
- public void setContentView(int layoutResID) {
- getWindow().setContentView(layoutResID);
- }
- public Window getWindow() {
- return mWindow;
- }
- private Window mWindow;
我们可以看到,实际上调用的mWindow的setContentView方法,在Android Touch事件分发过程这篇文章中我们已经指出Window的实现类为PhoneWindow类,我们就移步到PhoneWindow的setConentView吧,核心源码如下 :
- @Override
- public void setContentView(int layoutResID) {
- if (mContentParent == null) {
- installDecor(); // 1、生成DecorView
- } else {
- mContentParent.removeAllViews();
- }
- mLayoutInflater.inflate(layoutResID, mContentParent);// 2、将layoutResId的布局添加到mContentParent中
- final Callback cb = getCallback();
- if (cb != null) {
- cb.onContentChanged();
- }
- }
- // 构建mDecor对象,并且初始化标题栏和Content Parent(我们要显示的内容区域)
- private void installDecor() {
- if (mDecor == null) {
- mDecor = generateDecor(); // 3、构建DecorView
- mDecor.setDescendantFocusability(ViewGroup.FOCUS_AFTER_DESCENDANTS);
- mDecor.setIsRootNamespace(true);
- }
- if (mContentParent == null) {
- mContentParent = generateLayout(mDecor); // 4、获取ContentView容器,即显示内容的区域
- mTitleView = (TextView)findViewById(com.android.internal.R.id.title); 5、设置Title等
- if (mTitleView != null) {
- if ((getLocalFeatures() & (1 << FEATURE_NO_TITLE)) != 0) {
- View titleContainer = findViewById(com.android.internal.R.id.title_container);
- if (titleContainer != null) {
- titleContainer.setVisibility(View.GONE);
- } else {
- mTitleView.setVisibility(View.GONE);
- }
- if (mContentParent instanceof FrameLayout) {
- ((FrameLayout)mContentParent).setForeground(null);
- }
- } else {
- mTitleView.setText(mTitle);
- }
- }
- }
- }
- protected DecorView generateDecor() {
- return new DecorView(getContext(), -1); // 构建mDecor对象
- }
1、构建mDecor对象。mDecor就是整个窗口的顶层视图,它主要包含了Title和Content View两个区域 (参考图1中的两个区域 ),Title区域就是我们的标题栏,Content View区域就是显示我们xml布局内容中的区域。关于mDecor对象更多说明也请参考Android Touch事件分发过程这篇文章;
2、设置一些关于窗口的属性,初始化标题栏区域和内容显示区域;
这里比较复杂的就是generateLayout(mDecor)这个函数,我们一起来分析一下吧。
- // 返回用于显示我们设置的页面内容的ViewGroup容器
- protected ViewGroup generateLayout(DecorView decor) {
- // Apply data from current theme.
- // 1、获取窗口的Style属性
- TypedArray a = getWindowStyle();
- if (false) {
- System.out.println("From style:");
- String s = "Attrs:";
- for (int i = 0; i < com.android.internal.R.styleable.Window.length; i++) {
- s = s + " " + Integer.toHexString(com.android.internal.R.styleable.Window[i]) + "="
- + a.getString(i);
- }
- System.out.println(s);
- }
- // 窗口是否是浮动的
- mIsFloating = a.getBoolean(com.android.internal.R.styleable.Window_windowIsFloating, false);
- int flagsToUpdate = (FLAG_LAYOUT_IN_SCREEN|FLAG_LAYOUT_INSET_DECOR)
- & (~getForcedWindowFlags());
- if (mIsFloating) {
- setLayout(WRAP_CONTENT, WRAP_CONTENT);
- setFlags(0, flagsToUpdate);
- } else {
- setFlags(FLAG_LAYOUT_IN_SCREEN|FLAG_LAYOUT_INSET_DECOR, flagsToUpdate);
- }
- // 设置是否不显示title区域
- if (a.getBoolean(com.android.internal.R.styleable.Window_windowNoTitle, false)) {
- requestFeature(FEATURE_NO_TITLE);
- }
- // 设置全屏的flag
- if (a.getBoolean(com.android.internal.R.styleable.Window_windowFullscreen, false)) {
- setFlags(FLAG_FULLSCREEN, FLAG_FULLSCREEN&(~getForcedWindowFlags()));
- }
- if (a.getBoolean(com.android.internal.R.styleable.Window_windowShowWallpaper, false)) {
- setFlags(FLAG_SHOW_WALLPAPER, FLAG_SHOW_WALLPAPER&(~getForcedWindowFlags()));
- }
- WindowManager.LayoutParams params = getAttributes();
- // 设置输入法模式
- if (!hasSoftInputMode()) {
- params.softInputMode = a.getInt(
- com.android.internal.R.styleable.Window_windowSoftInputMode,
- params.softInputMode);
- }
- if (a.getBoolean(com.android.internal.R.styleable.Window_backgroundDimEnabled,
- mIsFloating)) {
- /* All dialogs should have the window dimmed */
- if ((getForcedWindowFlags()&WindowManager.LayoutParams.FLAG_DIM_BEHIND) == 0) {
- params.flags |= WindowManager.LayoutParams.FLAG_DIM_BEHIND;
- }
- params.dimAmount = a.getFloat(
- android.R.styleable.Window_backgroundDimAmount, 0.5f);
- }
- // 窗口动画
- if (params.windowAnimations == 0) {
- params.windowAnimations = a.getResourceId(
- com.android.internal.R.styleable.Window_windowAnimationStyle, 0);
- }
- // The rest are only done if this window is not embedded; otherwise,
- // the values are inherited from our container.
- if (getContainer() == null) {
- if (mBackgroundDrawable == null) {
- if (mBackgroundResource == 0) {
- mBackgroundResource = a.getResourceId(
- com.android.internal.R.styleable.Window_windowBackground, 0);
- }
- if (mFrameResource == 0) {
- mFrameResource = a.getResourceId(com.android.internal.R.styleable.Window_windowFrame, 0);
- }
- if (false) {
- System.out.println("Background: "
- + Integer.toHexString(mBackgroundResource) + " Frame: "
- + Integer.toHexString(mFrameResource));
- }
- }
- mTextColor = a.getColor(com.android.internal.R.styleable.Window_textColor, 0xFF000000);
- }
- // Inflate the window decor.
- // 2、根据一些属性来选择不同的顶层视图布局,例如设置了FEATURE_NO_TITLE的属性,那么就选择没有Title区域的那么布局;
- // layoutResource布局就是整个Activity的布局,其中含有title区域和content区域,content区域就是用来显示我通过
- // setContentView设置进来的内容区域,也就是我们要显示的视图。
- int layoutResource;
- int features = getLocalFeatures();
- // System.out.println("Features: 0x" + Integer.toHexString(features));
- if ((features & ((1 << FEATURE_LEFT_ICON) | (1 << FEATURE_RIGHT_ICON))) != 0) {
- if (mIsFloating) {
- layoutResource = com.android.internal.R.layout.dialog_title_icons;
- } else {
- layoutResource = com.android.internal.R.layout.screen_title_icons;
- }
- // System.out.println("Title Icons!");
- } else if ((features & ((1 << FEATURE_PROGRESS) | (1 << FEATURE_INDETERMINATE_PROGRESS))) != 0) {
- // Special case for a window with only a progress bar (and title).
- // XXX Need to have a no-title version of embedded windows.
- layoutResource = com.android.internal.R.layout.screen_progress;
- // System.out.println("Progress!");
- } else if ((features & (1 << FEATURE_CUSTOM_TITLE)) != 0) {
- // Special case for a window with a custom title.
- // If the window is floating, we need a dialog layout
- if (mIsFloating) {
- layoutResource = com.android.internal.R.layout.dialog_custom_title;
- } else {
- layoutResource = com.android.internal.R.layout.screen_custom_title;
- }
- } else if ((features & (1 << FEATURE_NO_TITLE)) == 0) {
- // If no other features and not embedded, only need a title.
- // If the window is floating, we need a dialog layout
- if (mIsFloating) {
- layoutResource = com.android.internal.R.layout.dialog_title;
- } else {
- layoutResource = com.android.internal.R.layout.screen_title;
- }
- // System.out.println("Title!");
- } else {
- // Embedded, so no decoration is needed.
- layoutResource = com.android.internal.R.layout.screen_simple;
- // System.out.println("Simple!");
- }
- mDecor.startChanging();
- // 3、加载视图
- View in = mLayoutInflater.inflate(layoutResource, null);
- // 4、将layoutResource的内容添加到mDecor中
- decor.addView(in, new ViewGroup.LayoutParams(MATCH_PARENT, MATCH_PARENT));
- // 5、获取到我们的内容显示区域,这是一个ViewGroup类型的,其实是FrameLayout
- ViewGroup contentParent = (ViewGroup)findViewById(ID_ANDROID_CONTENT);
- if (contentParent == null) {
- throw new RuntimeException("Window couldn't find content container view");
- }
- if ((features & (1 << FEATURE_INDETERMINATE_PROGRESS)) != 0) {
- ProgressBar progress = getCircularProgressBar(false);
- if (progress != null) {
- progress.setIndeterminate(true);
- }
- }
- // 6、设置一些背景、title等属性
- // Remaining setup -- of background and title -- that only applies
- // to top-level windows.
- if (getContainer() == null) {
- Drawable drawable = mBackgroundDrawable;
- if (mBackgroundResource != 0) {
- drawable = getContext().getResources().getDrawable(mBackgroundResource);
- }
- mDecor.setWindowBackground(drawable);
- drawable = null;
- if (mFrameResource != 0) {
- drawable = getContext().getResources().getDrawable(mFrameResource);
- }
- mDecor.setWindowFrame(drawable);
- // System.out.println("Text=" + Integer.toHexString(mTextColor) +
- // " Sel=" + Integer.toHexString(mTextSelectedColor) +
- // " Title=" + Integer.toHexString(mTitleColor));
- if (mTitleColor == 0) {
- mTitleColor = mTextColor;
- }
- if (mTitle != null) {
- setTitle(mTitle);
- }
- setTitleColor(mTitleColor);
- }
- mDecor.finishChanging();
- return contentParent;
1、获取用户设置的一些属性与Flag;
2、根据一些属性选择不同的顶层视图布局,例如FEATURE_NO_TITLE则选择没有title的布局文件等;这里我们看一个与图1中符合的顶层布局吧,即layoutResource = com.android.internal.R.layout.screen_title的情形:
- <?xml version="1.0" encoding="utf-8"?>
- <LinearLayout xmlns:android="http://schemas.android.com/apk/res/android"
- android:orientation="vertical"
- android:fitsSystemWindows="true">
- <!-- Popout bar for action modes -->
- <ViewStub android:id="@+id/action_mode_bar_stub"
- android:inflatedId="@+id/action_mode_bar"
- android:layout="@layout/action_mode_bar"
- android:layout_width="match_parent"
- android:layout_height="wrap_content" />
- <!-- title区域-->
- <FrameLayout
- android:layout_width="match_parent"
- android:layout_height="?android:attr/windowTitleSize"
- style="?android:attr/windowTitleBackgroundStyle">
- <TextView android:id="@android:id/title"
- style="?android:attr/windowTitleStyle"
- android:background="@null"
- android:fadingEdge="horizontal"
- android:gravity="center_vertical"
- android:layout_width="match_parent"
- android:layout_height="match_parent" />
- </FrameLayout>
- <!--内容显示区域, 例如main_activity.xml布局就会被放到这个ViewGroup下面 -->
- <FrameLayout android:id="@android:id/content"
- android:layout_width="match_parent"
- android:layout_height="0dip"
- android:layout_weight="1"
- android:foregroundGravity="fill_horizontal|top"
- android:foreground="?android:attr/windowContentOverlay" />
- </LinearLayout>
我们可以看到有两个区域,即title区域和content区域,generateLayout函数中的
- // 5、获取到我们的内容显示区域,这是一个ViewGroup类型的,其实是FrameLayout
- ViewGroup contentParent = (ViewGroup)findViewById(ID_ANDROID_CONTENT);
获取的就是xml中id为content的FrameLayout,这个content就是我们的内容显示区域。
这两个区域就组成了mDecor视图,我们的main_activity.xml就是放在内容视图这个区域的。
3、加载顶层布局文件,转换为View,将其添加到mDecor中;
4、获取内容容器Content Parent,即用于显示我们的内容的区域;
5、设置一些背景图和title等。
在经过这几步,我们就得到了mContentParent,这就是用来装载我们的视图的ViewGroup。再回过头来看setContentView函数:
- public void setContentView(int layoutResID) {
- if (mContentParent == null) {
- installDecor(); // 1、生成DecorView,并且根据窗口属性加载顶级视图布局、获取mContentParent、设置一些基本属性等
- } else {
- mContentParent.removeAllViews();
- }
- mLayoutInflater.inflate(layoutResID, mContentParent);// 2、将layoutResId加载到mContentParent中,这里的layoutResId就是我们的main_activity.xml
- final Callback cb = getCallback();
- if (cb != null) {
- cb.onContentChanged();
- }
- }
- /**
- * Inflate a new view hierarchy from the specified xml resource. Throws
- * {@link InflateException} if there is an error.
- *
- * @param resource ID for an XML layout resource to load (e.g.,
- * <code>R.layout.main_page</code>)
- * @param root Optional view to be the parent of the generated hierarchy.
- * @return The root View of the inflated hierarchy. If root was supplied,
- * this is the root View; otherwise it is the root of the inflated
- * XML file.
- */
- public View inflate(int resource, ViewGroup root) {
- return inflate(resource, root, root != null);
- }
- /**
- * Inflate a new view hierarchy from the specified xml resource. Throws
- * {@link InflateException} if there is an error.
- *
- * @param resource ID for an XML layout resource to load (e.g.,
- * <code>R.layout.main_page</code>)
- * @param root Optional view to be the parent of the generated hierarchy (if
- * <em>attachToRoot</em> is true), or else simply an object that
- * provides a set of LayoutParams values for root of the returned
- * hierarchy (if <em>attachToRoot</em> is false.)
- * @param attachToRoot Whether the inflated hierarchy should be attached to
- * the root parameter? If false, root is only used to create the
- * correct subclass of LayoutParams for the root view in the XML.
- * @return The root View of the inflated hierarchy. If root was supplied and
- * attachToRoot is true, this is root; otherwise it is the root of
- * the inflated XML file.
- */
- public View inflate(int resource, ViewGroup root, boolean attachToRoot) {
- if (DEBUG) System.out.println("INFLATING from resource: " + resource);
- XmlResourceParser parser = getContext().getResources().getLayout(resource);
- try {
- return inflate(parser, root, attachToRoot);
- } finally {
- parser.close();
- }
- }
DecorView
移步 : DecorView 。
ViewGroup
ViewGroup从语义上来说就是视图组,它也继承自View类,它其实就是视图的容器。我们看官方的定义 :
- * A ViewGroup is a special view that can contain other views
- * (called children.) The view group is the base class for layouts and views
- * containers. This class also defines the
- * {@link android.view.ViewGroup.LayoutParams} class which serves as the base
- * class for layouts parameters.

View
View就是UI界面上的一个可见的组件,任何在UI上可见的都为View的子类。我们看官方定义 :
- * This class represents the basic building block for user interface components. A View
- * occupies a rectangular area on the screen and is responsible for drawing and
- * event handling. View is the base class for <em>widgets</em>, which are
- * used to create interactive UI components (buttons, text fields, etc.). The
- * {@link android.view.ViewGroup} subclass is the base class for <em>layouts</em>, which
- * are invisible containers that hold other Views (or other ViewGroups) and define
- * their layout properties.
TextView、Button、ImageView、FrameLayout、LinearLayout、ListView等都是View的子类。
这样,ViewGroup类型的视图管理嵌套在里面的ViewGroup以及View控件组成了丰富多彩的用户界面。例如我们开篇的Hello World的视图结构是这样的 :
总结
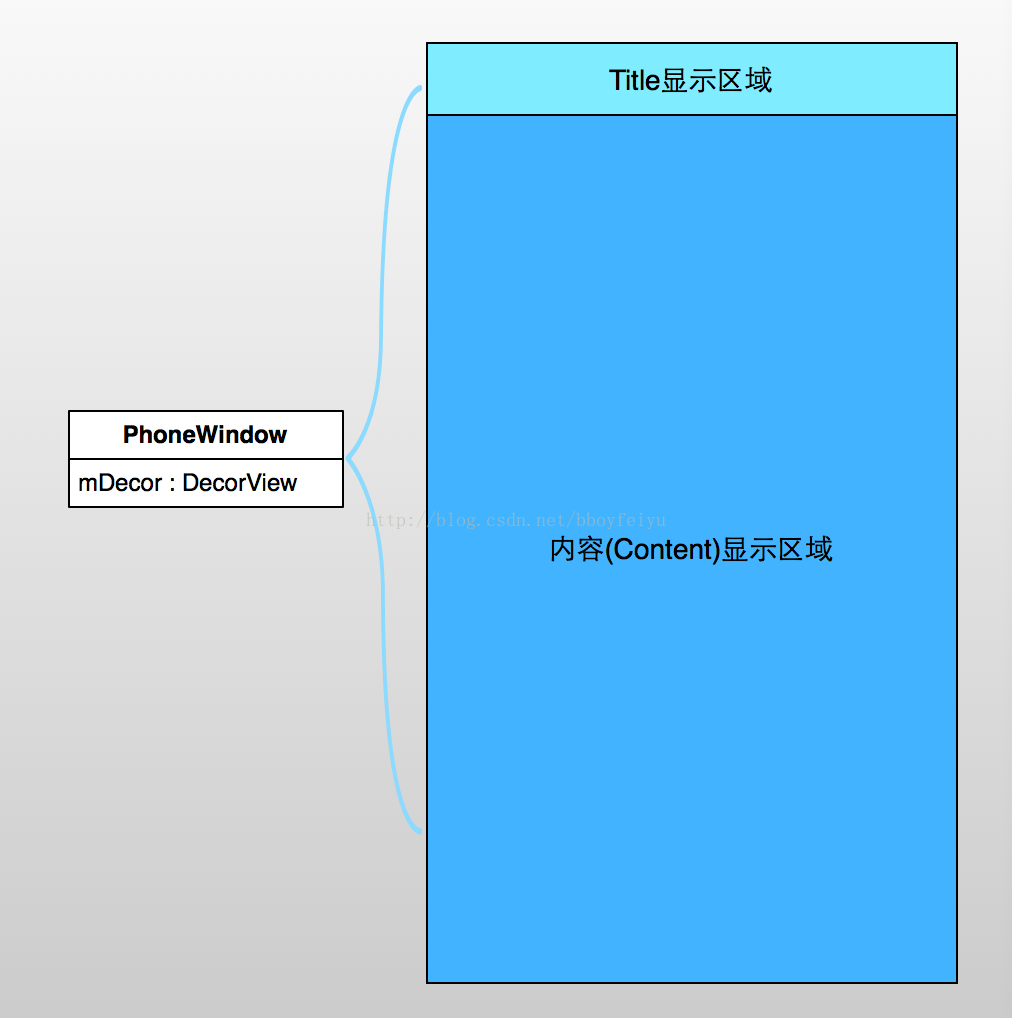
整个窗口由Title区域和Content区域组成,Content区域就是我们要显示内容的区域,在这个区域中mContentParent是根ViewGroup,由mContentParent组织、管理其子视图,从而构建整个视图树。当Activity启动时,就将这些内容就会显示在手机上。


 1653
1653


 被折叠的 条评论
为什么被折叠?
被折叠的 条评论
为什么被折叠?
 到【灌水乐园】发言


