


这个问题花了我两天时间才解决掉,因为在网上没有找到合适的方案,所以想写下来给大家分享下。
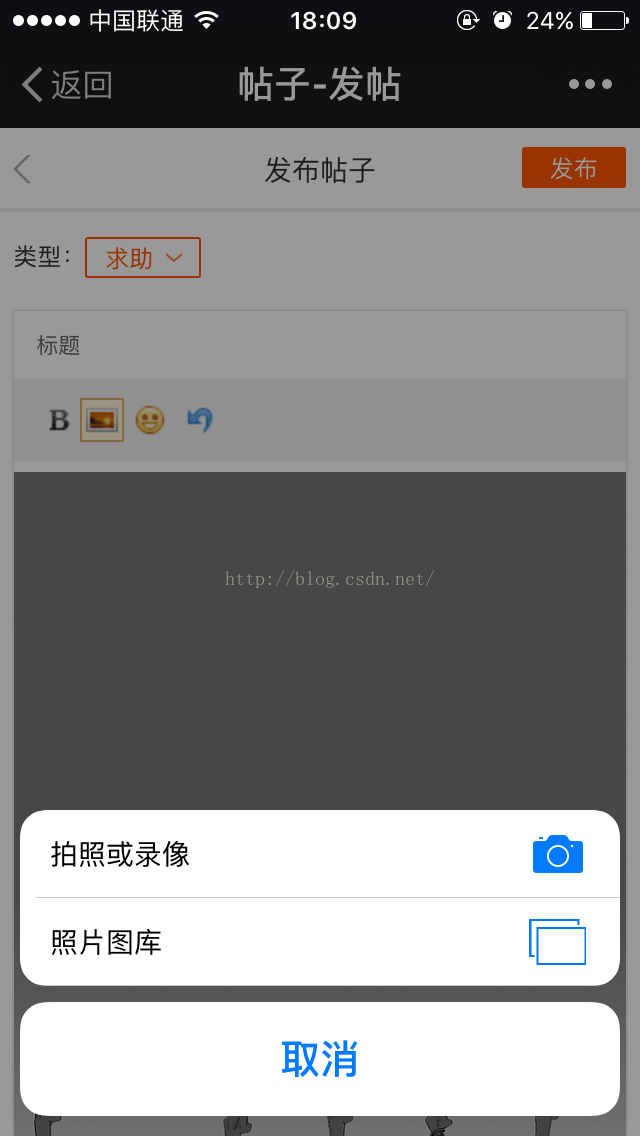
当时使用安卓和苹果手机上面的浏览器访问都可以正常使用,就是用微信扫一扫浏览时,图片上传功能死活不能用,后面各种百度谷歌排查下来是微信浏览器不支持form提交上传图片的方式,下面是项目截图(现在是修改好之后可以使用的截图,不能使用的情况应该是鼠标放入内容区域之后,上传图片图标会变成灰色不能点击):

下面说一下解决方案(我使用的是Ueditor1.4.3(.Net)版本):
大概思路是这样的,既然百度的上传功能不能用了,那就自己写一个吧,把工具栏中的上传图标改成我们自己的Input控件,使用Plupload.js把图片弄成文件流的形式传到后台处理页面,在后台处理页面里面把图片保存起来,然后通过Response.Write输出<p><img src='图片保存路径'></p>这样的代码到前端页面,前端页面接收到返回的html代码之后插入到Ueditor编辑器内容区域即可。
1.Ueditor编辑器的图片上传图标其实是在Js里面拼接生成出来的,根据这一点就可以改百度原生代码了,首先找到Ueditor.all.js文件,找到24430行代码,可以看到以下代码:
wrapper.innerHTML = '<form id="edui_form_' + timestrap + '" target="edui_iframe_' + timestrap + '" method="POST" enctype="multipart/form-data" action="' + me.getOpt('serverUrl') + '" ' +
            'style="display:nonoe;' + btnStyle + '">' +
            '<input id="edui_input_' + timestrap + '"  type="file" accept="image/*" name="' + me.options.imageFieldName + '" ' +
            'style="' + btnStyle + '"/>' +
            '</form>' +
            '<iframe id="edui_iframe_' + timestrap + '" name="edui_iframe_' + timestrap + '" style="display:none;width:0;height:0;border:0;margin:0;padding:0;position:absolute;"></iframe>';
2.修改工具栏生成的代码(我这边的工具栏控制在4个,其它的全部不要,删除工具栏的方式可以自行百度),还是在Ueditor.all.js文件,找到26395行代码,在for循环里面加入一个if判断,用来替换第2个位置的图片上传代码(写到这突然发现,上面第1步是我之前调试时使用的方式,不过都写了就不删了)
for (var i = 0; i < this.items.length; i++) {
                if (i==1) {//自定义代码
                    buff[i] = '<div id="edui4" style="height: 20px !important;width: 20px !important;background-image: url(/Admin/PlugIn/Ueditor/themes/default/images/icons.png);background-position: -381px 0px;"><div id="edui4_state" οnmοusedοwn="$EDITORUI["edui4"].Stateful_onMouseDown(event, this);" οnmοuseup="$EDITORUI["edui4"].Stateful_onMouseUp(event, this);" οnmοuseοver="$EDITORUI["edui4"].Stateful_onMouseOver(event, this);" οnmοuseοut="$EDITORUI["edui4"].Stateful_onMouseOut(event, this);" class="edui-default"><input id="Plupload" type="file" accept="image/*" name="Plupload" style="display:block;width:20px;height:20px;overflow:hidden;border:0;margin:0;padding:0;position:absolute;top:0;left:0;filter:alpha(opacity=0);-moz-opacity:0;-khtml-opacity: 0;opacity: 0;cursor:pointer;"></div></div>';
                } else {
                    buff[i] = this.items[i].renderHtml();
                }
            }
改完以上代码之后,在刷新看一下编辑器,其实已经更换成我们自己的代码了。
注意:
自定义代码部分外面包含的DIV我是全部复制之前百度生成的代码,主要是把中间的form替换成了自己想要的input
<input id="Plupload" type="file" accept="image/*" name="Plupload" style="太长了,方便大家参考先删除,可以直接复制我上面那段代码">3.自定义上传控件,处理完上面的事情之后,基本上就没有百度什么事情了,接下来在调用Ueditor编辑器的页面底部加入下面的JS
<span style="white-space:pre">	</span><script src="/Files/Themes/js/Plupload/plupload.full.min.js"></script>
        <script src="/Files/Themes/js/Plupload/PluploadInit_Ueditor.js"></script>
        <script>
			//初始化图片上传js
            $(function () {
				//Plupload是ID对应上面的Input控件的ID
                var uploader = settingsUploader("Plupload");
                uploader.init();
            });

			//上传完图片之后执行的方法
            function UploadSucc(data) {
				//接收后台返回的html代码,插入到百度编辑器内容区域
                editor.execCommand('insertHtml', data.response);
            }
        </script>
上面说了Plupload.js会把选择的文件发送到后台去进行处理,下面看下代码:
PluploadInit_Ueditor.js
//设置属性
function settingsUploader(btnId) {
    var uploader = new plupload.Uploader({
        // 常规设置
        //runtimes: 'silverlight,html4',
        browse_button: btnId, // 设置ID
        url: '/Action/UploadImg.aspx?' + Math.random(), //处理页面
        chunk_size: '10mb',
        unique_names: true,

         Resize images on client-side if we can
        //resize: { width: 320, height: 240, quality: 90 },

        filters: {
            max_file_size: '10mb',

            // 指定哪些文件浏览
            mime_types: [
                { title: "Image files", extensions: "*" }
            ]
        },

        flash_swf_url: '/Files/Themes/js/Plupload/Moxie.swf',
        silverlight_xap_url: '/Files/Themes/js/Plupload/Moxie.xap',

        // PreInit events, bound before the internal events
        preinit: {
            Init: function (up, info) {
                //初始化事件
            },

            UploadFile: function (up, file) {
                // You can override settings before the file is uploaded
                // up.setOption('url', 'upload.php?id=' + file.id);
                up.setOption('multipart_params', { FolderPath: "/Admin/PlugIn/ueditor/net/upload/image/" });
            }
        },

        // Post init events, bound after the internal events
        init: {
            PostInit: function () {
                //初始化完成后和内部事件处理程序绑定后调用
            },

            FilesAdded: function (up, files) {
                // 当添加文件到队列调用
                uploader.start();
                plupload.each(files, function (file) {
                });
            },
            FileUploaded: function (up, file, info) {
                // 当调用文件完成上传
                if (info.response == "0") {
                    alert("上传失败!");
                    return;
                }
                UploadSucc(info);
            }
        }
    });
    return uploader;
}
protected void Page_Load(object sender, EventArgs e)
        {
            //UploadSingleImg();
            var httpPostedFile = Request.Files["file"];
            string yearMonthPath = GetYearMonthPath();
            //上传图片路径
            string normalFolder = Request["FolderPath"] + "" + yearMonthPath;
            //检测上传图片路径
            string absoluteNormalFolderPath = DetectionDirectory(normalFolder);
            if (httpPostedFile == null)
            {
                /*失败发送0*/
                Response.Write("0");
                Response.End();
                return;
            }
            //图片名称
            string timestamp = string.Empty;
            string photoFileName = GetPhotoFileName(httpPostedFile, ref timestamp);
            //图片路径(用于发至前台)
            string photoFilePath = "NormalImage/" + yearMonthPath + "/" + photoFileName;
            //正常图片路径
            string normalPhotoFilePath = absoluteNormalFolderPath + photoFileName;
            httpPostedFile.SaveAs(normalPhotoFilePath);
            var imgHtml = string.Format("<p><img src=\"{0}\" title=\"{1}\" _src=\"{0}\" alt=\"{1}\" /></p>", normalFolder + "/" + photoFileName, httpPostedFile.FileName);
            Response.Write(string.Format(@"{0}", imgHtml));
            Response.End();
        }

        #region 上传图片

        /// <summary>
        /// 获取文件夹路径
        /// </summary>
        /// <returns></returns>
        private string GetFolderPath(string _folderPath)
        {
            return _folderPath + DateTime.Now.ToString("yyyy-MM-dd") + "/";
        }

        /// <summary>
        /// 获取年月文件夹
        /// </summary>

        private string GetYearMonthPath()
        {
            return DateTime.Now.ToString("yyyy-MM-dd");
        }

        /// <summary>
        /// 检测目录,如果无则创建
        /// </summary>
        private string DetectionDirectory(string path)
        {
            string absolutePath = Server.MapPath(path);
            if (!System.IO.Directory.Exists(absolutePath))
            {
                System.IO.Directory.CreateDirectory(absolutePath);
            }
            return absolutePath + "\\";
        }

        /// <summary>
        /// 获取图片名称
        /// </summary>
        /// <param name="httpPostedFile"></param>
        /// <returns></returns>
        private string GetPhotoFileName(HttpPostedFile httpPostedFile, ref string timestamp)
        {
            timestamp = DateTime.Now.ToString("yyyyMMddHHmmssffff", DateTimeFormatInfo.InvariantInfo);
            var strEx = (StringHelper.GetExName(httpPostedFile.FileName)).ToLower();
            return timestamp + strEx;
        }

        #endregion
下面在说一下过程中遇到的一个问题,打开调试工具发现报错是在Ueditor.all.js的28478行左右,把报错段的代码注释就可以解决了:
/*editor.addListener('ready', function() {
            var b = ui.getDom('body'),
                iconSpan = b.children[0];
            editor.fireEvent('simpleuploadbtnready', iconSpan);
        });*/

补充:
今天一位朋友QQ找到我,问UploadImg.aspx页面是什么,以下是解答。
UploadImg.aspx是我自己写的一个处理文件流的页面,大概思路是接收文件流,保存为图片到服务器,然后返回字符串到前台。

代码片段:
using System;
using System.Collections.Generic;
using System.Configuration;
using System.Globalization;
using System.Linq;
using System.Web;
using System.Web.Services;
using System.Web.UI;
using System.Web.UI.WebControls;
using Besture.Common;

namespace Besture.UI.Action
{
    public partial class UploadImg : System.Web.UI.Page
    {
        protected void Page_Load(object sender, EventArgs e)
        {
            //UploadSingleImg();
            var httpPostedFile = Request.Files["file"];
            string yearMonthPath = GetYearMonthPath();
            //上传图片路径
            string normalFolder = Request["FolderPath"] + "" + yearMonthPath;
            //检测上传图片路径
            string absoluteNormalFolderPath = DetectionDirectory(normalFolder);
            if (httpPostedFile == null)
            {
                /*失败发送0*/
                Response.Write("0");
                Response.End();
                return;
            }
            //图片名称
            string timestamp = string.Empty;
            string photoFileName = GetPhotoFileName(httpPostedFile, ref timestamp);
            //图片路径(用于发至前台)
            string photoFilePath = "NormalImage/" + yearMonthPath + "/" + photoFileName;
            //正常图片路径
            string normalPhotoFilePath = absoluteNormalFolderPath + photoFileName;
            httpPostedFile.SaveAs(normalPhotoFilePath);
            var imgHtml = string.Format("<p><img src=\"{0}\" title=\"{1}\" _src=\"{0}\" alt=\"{1}\" /></p>", normalFolder + "/" + photoFileName, httpPostedFile.FileName);
            Response.Write(string.Format(@"{0}", imgHtml));
            Response.End();
        }

        #region 上传图片

        /// <summary>
        /// 获取文件夹路径
        /// </summary>
        /// <returns></returns>
        private string GetFolderPath(string _folderPath)
        {
            return _folderPath + DateTime.Now.ToString("yyyy-MM-dd") + "/";
        }

        /// <summary>
        /// 获取年月文件夹
        /// </summary>

        private string GetYearMonthPath()
        {
            return DateTime.Now.ToString("yyyy-MM-dd");
        }

        /// <summary>
        /// 检测目录,如果无则创建
        /// </summary>
        private string DetectionDirectory(string path)
        {
            string absolutePath = Server.MapPath(path);
            if (!System.IO.Directory.Exists(absolutePath))
            {
                System.IO.Directory.CreateDirectory(absolutePath);
            }
            return absolutePath + "\\";
        }

        /// <summary>
        /// 获取图片名称
        /// </summary>
        /// <param name="httpPostedFile"></param>
        /// <returns></returns>
        private string GetPhotoFileName(HttpPostedFile httpPostedFile, ref string timestamp)
        {
            timestamp = DateTime.Now.ToString("yyyyMMddHHmmssffff", DateTimeFormatInfo.InvariantInfo);
            var strEx = (StringHelper.GetExName(httpPostedFile.FileName)).ToLower();
            return timestamp + strEx;
        }

        #endregion
    }
}


 2740
2740


 被折叠的 条评论
为什么被折叠?
被折叠的 条评论
为什么被折叠?
 到【灌水乐园】发言


