


数据集:
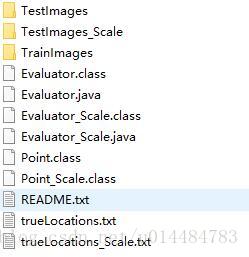
UIUC Image Database for Car Detection。下载解压之后文件目录如图所示,这里我们所需的是TrainImages这个文件夹和TestImages文件夹。
The download package contains the following:
- 1050 training images (550 car and 500 non-car images)
- 170 single-scale test images, containing 200 cars at roughly the same scale as in the training images
- 108 multi-scale test images, containing 139 cars at various scales
- Evaluation files
- README file
The images are all grey-scale and are available in raw PGM format.
算法模型
采用的是CNN网络,各层参数如下所示。输入是一幅40*100*1的灰度图片,经过多次卷积和池化之后得到1*1*1的结果。
input : [None, 40, 100, 1]
conv-pool1 :
    f : 5*5
    strides : 1
    nc : 6
    padding : VALID
    maxpool : 2

conv-pool2:
    f : 5*5
    strides : 1
    nc : 16
    padding : VALID
    maxpool : 2

conv3:
    f : 5*5
    strides : 1
    nc : 32
    padding : VALID

conv4:
    f : 3*18
    strides : 1
    nc : 64
    padding : VALID

conv5:
    f : 1*1
    strides : 1
    nc : 1
    padding : VALID

output : [None, 1, 1, 1]
代码
我的文件目录组织结构:
    -CarDetect
          --CarDetect.py
          --datas
              ---CarData
          --models
import tensorflow as tf
import numpy as np
import matplotlib.pyplot as plt
#定义加载数据的函数,注意训练数据的存储位置
def load_carDats():
import cv2
import os
file_path = './datas/CarData/TrainImages/'
files = os.listdir(file_path)
samples = []
for file_name in files:
data = cv2.imread(file_path + file_name, 0).reshape(-1) / 255
label = 0 if file_name.split('-')[0] == 'neg' else 1
samples.append((data, label))
return samples
#加载数据
datas = load_carDats()
#随机打乱数据
np.random.shuffle(datas)
#划分数据,xs、ys 用来训练网络,x_test、y_test 用来测试网络训练效果
xs = [i[0] for i in datas[:1000]]
ys = np.reshape([i[1] for i in datas[:1000]], newshape=(-1,1))
x_test = [i[0] for i in datas[1000:]]
y_test = np.reshape([i[1] for i in datas[1000:]], newshape=(-1,1))
#----------------定义网络中频繁使用的函数,将其重构-----------------#
#权重变量
def weight_variables(shape):
weights = tf.truncated_normal(shape, stddev=0.1, dtype=tf.float32)
return tf.Variable(weights)
#偏置变量
def biase_variables(shape):
biases = tf.constant(value=1.0, shape=shape)
return tf.Variable(biases)
#卷积
def conv2d(x, W):
'''计算卷积,x为输入层(shape=[-1,width,height,channel]),
W为f*f的共享权重矩阵shape=[f,f,in_layers_num, out_layers_num],
水平和垂直方向上的步长都为1'''
return tf.nn.conv2d(x, W, strides=[1,1,1,1], padding="VALID")
#最大值池化
def max_pooling(x):
'''计算最大值混合,x为输入层(一般是卷积结果)shape=[-1,width,height,channels]
ksize为混合pooling的核大小2*2,水平和垂直方向上的步长都为2'''
return tf.nn.max_pool(x, ksize=[1,2,2,1], strides=[1,2,2,1], padding="VALID")
#---------------------网络前向传播部分------------------#
def deepnn(x, keep_prop):
'''定义深层卷积网络,包含了两个卷积-混合层和三个卷积层'''
#step1:将原始一维得得数据转换成2维, 第一个表示样本数,第二三个是行列,最后一个是通道数
# x = tf.reshape(x, shape=[-1, 40, 100, 1])
#step2:定义第一的卷积-混合层
with tf.name_scope("conv-pooling1"):
W_conv1 = weight_variables([5,5,1,6])
b_conv1 = biase_variables([6])
ret_conv1 = tf.nn.relu(conv2d(x,W_conv1) + b_conv1) #计算卷积,并使用修正单元对卷积结果进一步处理
ret_pooling1 = max_pooling(ret_conv1) #执行混合操作
#step3:定义第二个卷积-混合层
with tf.name_scope("conv-pooling2"):
W_conv2 = weight_variables([5,5,6,16])
b_conv2 = biase_variables([16])
ret_conv2 = tf.nn.relu(conv2d(ret_pooling1, W_conv2) + b_conv2)
ret_pooling2 = max_pooling(ret_conv2)
#step4:定义第三个卷积层
with tf.name_scope("conv-pooling3"):
W_conv3 = weight_variables([5,5,16,32])
b_conv3 = biase_variables([32])
ret_conv3 = tf.nn.relu(conv2d(ret_pooling2, W_conv3) + b_conv3)
#step5:定义第四个卷积层
with tf.name_scope("conv4"):
W_conv4 = weight_variables([3,18,32,64])
b_conv4 = biase_variables([64])
ret_conv4 = tf.nn.relu(conv2d(ret_conv3, W_conv4) + b_conv4)
#step6:定义第五个卷积层
with tf.name_scope("conv5"):
W_conv5 = weight_variables([1,1,64,1])
b_conv5 = biase_variables([1])
ret_conv5 = conv2d(ret_conv4, W_conv5) + b_conv5
return ret_conv5
#---------------------训练网络前的准备-----------------------#
#申明输入数据和标签的占位符
x = tf.placeholder(dtype=tf.float32, shape=[None,None, None, 1], name="x-input")
labels = tf.placeholder(dtype=tf.float32, shape=[None, 1], name="y-output")
#申明弃权的占位符
keep_prop = tf.placeholder(dtype=tf.float32, name="kprob")
#创建分类模型
ret = deepnn(x, keep_prop)
#此时的返回值是 -1*1*1*1的, 为了得到方便运算的结果,这里将reshape
y = tf.reshape(ret, shape=[-1,1])
#定义损失函数
with tf.name_scope("loss_function"):
loss = tf.nn.sigmoid_cross_entropy_with_logits(logits=y, labels=labels)
cost = tf.reduce_mean(loss)
#定义训练模型(优化模型)
with tf.name_scope("optimizor"):
train = tf.train.AdamOptimizer(0.0005).minimize(cost)
#定义验证模型精度的方法
with tf.name_scope("accuracy"):
y_hat = tf.nn.sigmoid(y)
accuracy_rate = tf.abs(y_hat - labels) < 0.5
accuracy_rate = tf.cast(accuracy_rate, dtype=tf.float32)
accuracy = tf.reduce_mean(accuracy_rate)
#--------------开始训练网络,并将训练结果保存到文件中---------------#
saver = tf.train.Saver()
sess = tf.Session()
sess.run(tf.global_variables_initializer()) #初始化变量
for i in range(10):
skip = 10
for k in range(0,1000,skip):
x_train = np.reshape(xs[k:k+skip], newshape=(-1, 40, 100, 1))
sess.run(train, feed_dict={x:x_train, labels:ys[k:k+skip], keep_prop:0.5}) # 训练模型
# if (i+1) % 10 == 0:
train_accuracy = sess.run(accuracy, feed_dict = {x: np.reshape(xs, (-1,40,100,1)), labels: ys, keep_prop:1.0})
print('step %d, train accuracy %g' % (i, train_accuracy))
saver.save(sess, "./models/carDetect_model.ckpt", global_step=i)
这是我的训练结果:
step 0, train accuracy 0.859
step 1, train accuracy 0.934
step 2, train accuracy 0.965
step 3, train accuracy 0.971
step 4, train accuracy 0.985
step 5, train accuracy 0.991
step 6, train accuracy 0.995
step 7, train accuracy 0.994
step 8, train accuracy 0.995
step 9, train accuracy 0.997
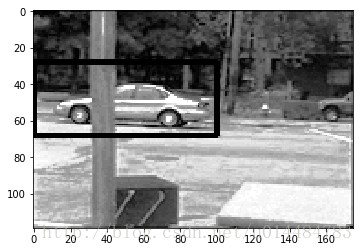
#--------------------------开始在新图片中检测-------------------#
import cv2
#导入图片
pic = cv2.imread("../../datas/CarData/TestImages/test-100.pgm", 0)
size = pic.shape
img = np.reshape(pic, (-1,size[0], size[1], 1))
#利用上面训练好的网络,开始在新的图片中检测
result = sess.run(ret, feed_dict={x:img})
#将检测结果显示
pt1 = np.array([result.argmax()//result.shape[2], result.argmax()%result.shape[2]]) * 4
pt2 = pt1 + np.array([40, 100])
pic_2 = cv2.rectangle(pic, (pt1[1], pt1[0]), (pt2[1], pt2[0]), 0, 2)
plt.imshow(pic_2, "gray")
plt.show()检测结果:
缺点:
由于这里例子过于简单,存在许多不足:
- 检测窗口是固定大小的,检测大小不一致的车辆时效果很差。
- 网络使用的层数和深度都比较小,所以检测的精度较低
- 训练的数据很少,使得网络的训练度不够,不具有很好的泛化能力


 2369
2369


 被折叠的 条评论
为什么被折叠?
被折叠的 条评论
为什么被折叠?
 到【灌水乐园】发言


