


环境说明
VMware 12 中搭建的 CentOS 7 x64 4cpu 2G内存
环境中已经安装了《CentOS 7 编译安装 MySQL-5.7.9》《CentOS 7 编译安装PHP7》
配置ip
参考《CentOS 7 编译安装 MySQL-5.7.9》中的 “配置防火墙和开放端口”
依赖库配置,编译和安装Nginx1.9.0
下载pcre-8.38.tar.gz
下载zlib-1.2.8.tar.gz
下载nginx-1.9.7.tar.gz
并上传到/root/目录
先创建一个名为nginx且没有登录权限的用户和一个名为nginx的用户组,然后安装nginx所需的依赖库和依赖包,最后通过.configure进行安装的详细配置。
#######新建nginx用户和nginx组
[root@localhost ~]# groupadd -r nginx && useradd -r -g nginx -s /bin/false -M nginx
#######yum安装nginx必须的依赖库
[root@localhost ~]# yum -y install openssl openssl-devel libxml2-devel libxslt-devel perl-devel perl-ExtUtils-Embed

#######官网下载Nginx1.9.7的tar包,然后解压到服务器上
[root@localhost ~]# tar -zxf nginx-1.9.7.tar.gz && cd nginx-1.9.7

#######下载pcre的tar包并解压,以便支持Nginx的Rewrite功能
[root@localhost nginx-1.9.7]# tar -zxf ../pcre-8.38.tar.gz

#######下载zlib的tar包并解压,以便支持Nginx的Gzip压缩功能
[root@localhost nginx-1.9.7]# tar -zxf ../zlib-1.2.8.tar.gz

#######新建Nginx1.9.7安装时所需要的目录
[root@localhost nginx-1.9.7]# cd /var/tmp/ && mkdir -p /var/tmp/nginx/{client,proxy,fastcgi,uwsgi,scgi}
[root@localhost tmp]# mkdir -p /var/run/nginx && cd ~/nginx-1.9.7
准备工作做好后,就开始正式配置Nginx-1.9.7的安装明细了。注意,在使用下面这条configure参数配置时,一定要先把反斜杠“\”后面添加的注释文字去掉!!!
[root@localhost nginx-1.9.7]# ./configure \
--prefix=/usr/share/nginx \ [Nginx安装目录]
--sbin-path=/usr/sbin/nginx \ [Nginx的sbin目录]
--conf-path=/etc/nginx/nginx.conf \ [Nginx的配置文件]
--error-log-path=/var/log/nginx/error.log \ [Nginx的错误日志]
--http-log-path=/var/log/nginx/access.log \ [Nginx的访问日志]
--pid-path=/var/run/nginx/nginx.pid \ [Nginx的进程ID]
--lock-path=/var/lock/nginx.lock \
--user=nginx \ [Nginx所属用户]
--group=nginx \ [Nginx所属用户组]
--with-http_ssl_module \ [Nginx的ssl模块]
--with-http_spdy_module \ [Nginx的Google spdy模块]
--with-http_dav_module \
--with-http_flv_module \
--with-http_realip_module \
--with-http_addition_module \
--with-http_xslt_module \
--with-http_stub_status_module \
--with-http_sub_module \
--with-http_random_index_module \
--with-http_degradation_module \
--with-http_secure_link_module \
--with-http_gzip_static_module \ [Nginx的gzip压缩模块]
--with-http_perl_module \
--with-pcre=pcre-8.38 \ [pcre的安装目录]
--with-zlib=zlib-1.2.8 \ [pcre的安装目录]
--with-debug \ [允许DEBUG]
--with-file-aio \
--with-mail \
--with-mail_ssl_module \
--http-client-body-temp-path=/var/tmp/nginx/client_body \
--http-proxy-temp-path=/var/tmp/nginx/proxy \
--http-fastcgi-temp-path=/var/tmp/nginx/fastcgi \
--http-uwsgi-temp-path=/var/tmp/nginx/uwsgi \
--http-scgi-temp-path=/var/tmp/nginx/scgi \
--with-stream \ [Nginx1.9.7特有的stream模块]
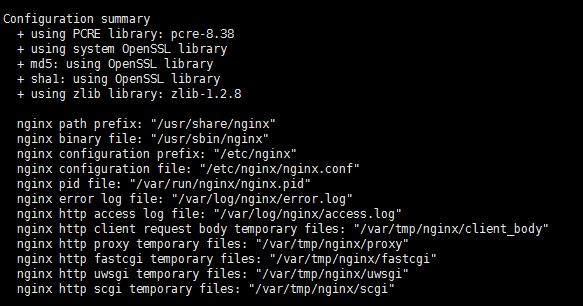
--with-ld-opt="-Wl,-E" [gcc的编译优化]配置简要,如下图:
配置完后,就可以直接编译和安装了
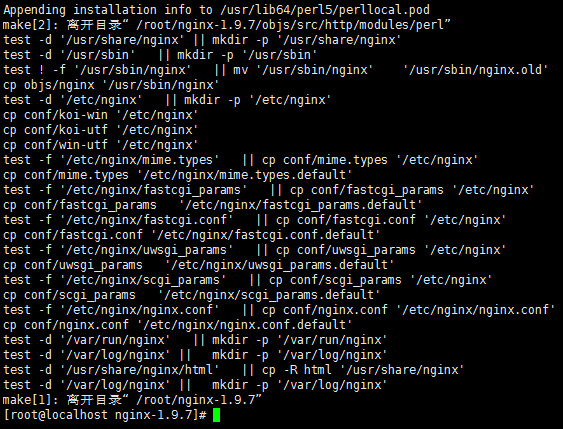
最后,直接使用执行这条命令[root@localhost nginx-1.9.7]# make && make install进行安装即可。其中,make命令和make install命令的执行结果附图如下:
配置Nginx1.9.0,使之正常工作
成功安装Nginx1.9.0后,我们需要进行一些配置,包括开机启动、SSL/HTTPS服务等。其中,Nginx服务控制脚本nginx参考文章《Nginx服务启动、停止和重启等操作的SHELL脚本》,或者从github下载上传到/root/目录
#######上传Nginx服务控制脚本nginx,并赋予执行权限,删除安装包,添加Nginx服务到开机启动
[root@localhost ~]# mv ~/nginx2 /etc/init.d/nginx && chmod +x /etc/init.d/nginx
[root@localhost ~]# rm -rf nginx-1.9.7*
[root@localhost ~]# chkconfig --add nginx
[root@localhost ~]# chkconfig nginx on

#######测试配置是否正常
[root@localhost nginx]# nginx -t
nginx: the configuration file /etc/nginx/nginx.conf syntax is ok
nginx: configuration file /etc/nginx/nginx.conf test is successful

#######新建Nginx进程日志nginx.pid目录,并启动服务
[root@localhost nginx]# mkdir -p /var/run/nginx
[root@localhost init.d]# service nginx start
Starting nginx (via systemctl):                            [  确定  ]
这里启动nginx服务时,会报“env: /etc/init.d/nginx: 没有那个文件或目录”错误,用vi命令重新创建/etc/init.d/nginx脚本就可以成功运行
最后使用命令[root@typecodes nginx]# nginx -V查看Nginx1.9.7的详细信息。

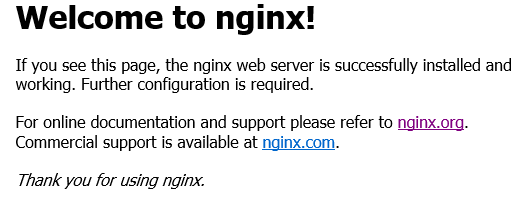
主机浏览器输入ip地址:
常见错误参考:Nginx编译安装时常见错误分析


 394
394


 被折叠的 条评论
为什么被折叠?
被折叠的 条评论
为什么被折叠?
 到【灌水乐园】发言


