


资料百度云盘:稍后
通用环境搭建介绍
1. 通用环境搭建
1.1 开发环境介绍
Openwrt 可以在大部分的linux 系统上面编译,包括市面上常用的Ubuntu、Redhat、 Debian、Fedora 等,这里介绍windows 操作系统上利用VMware + Ubuntu来搭建虚拟机开发环境。
1.2 安装虚拟机
1.2.1 虚拟机下载
{{{
https://www.vmware.com/
}}}
1.2.2 虚拟机安装
{{{
https://jingyan.baidu.com/album/08b6a591e505cb14a809220c.html
}}}
1.2.3 虚拟机配置
1.3 虚拟机安装Ubuntu
1.3.1 Ubuntu 下载
{{{
http://www.ubuntu.org.cn/download
}}}
下载:
i386就是32位的ubuntu 如果cpu只支持32位的 不支持64位的 就下载这个
amd64就是64位的ubuntu
不要以为i386只能用于intel的cpu,amd64只能用于amd的cpu。别被字面意思所迷惑。
1.3.2 Ubuntu 虚拟机安装
{{{
https://jingyan.baidu.com/article/54b6b9c0ffd0142d583b471f.html
}}}
1.4 配置编译环境
1.4.1 由于openwrt 系统编译的时候需要一些依赖库,
所以编译之前需要预安装一 些依赖库
1. Ssh (ubuntu sshd 安装方面宿主机(window)连接虚拟机)
{{{
sudo apt-get install openssh-client openssh-server
}}}
检查是否安装成功
{{{ ps -e | grep sshd
}}}
2. 装svn 工具
{{{
$ sudo apt-get install subversion
}}}
3. 安装git 工具
{{{
$ sudo apt-get install git-core
}}}
4. 安装samba
{{{
$ sudo apt-get install samba
}}}
在/etc/samba/smb.conf 末尾添加如下代码
{{{
[new]
comment = Samba server’s new
path = /new # 共享的Ubuntu 的目录
public = yes
writable = yes
create mask = 0766
}}}
5. 安装依赖的库文件
{{{
$  sudo apt-get install gcc g++ binutils patch   bzip2 flex bison make autoconf gettext texinfo    unzip sharutils ncurses-term zlib1g-dev libncurses5-dev gawk openssl libssl-dev
}}}
1.5 更新openwrt 源码
1.5.1 Openwrt 官网www.openwrt.org,
1.5.2 源代码下载
{{{
$ cd $WORK_DIR
 $ git clone git://git.openwrt.org/15.05/openwrt.git
}}}
1.6 编译源码
1.6.1 去到openwrt 工作目录
{{{
$ cd $WORK_DIR/openwrt
$ cp feeds.conf.default feeds.conf
}}}
1.6.2 更新与安装
 {{{
 $ ./scripts/feeds update -a
$ ./scripts/feeds install -a
          }}}
1.6.3 MT7628/MT7688 编译选择
      {{{
         $ make menuconfig
      }}}

      编译源码,此次过程中由于代码等依赖包都是在编译到的时候才去网上下载,如果网络好也许很快就能下载完成,如果出现下载不完成中断后继续编译就可以了。
         {{{
          $ make V=s
         }}}
1.6.4 编 译 完 成 固 件 目 录 $WORK_DIR/openwrt/bin/ramips/ , 固 件
         “openwrt-ramips-mt7628-mt7628-squashfs-sysupgrade.bin”             或  者  ”
         openwrt-ramips-mt7628-LinkIt7688-squashfs-sysupgrade.bin”
         {{{
             $ cd $WORK_DIR/openwrt
             $ ls bin/ramips/
         }}}
1.7 配置界面介绍
1.8 生成交叉工具链
1. 自己编译获得openwrt 的交叉工具链,
只需要在openwrt 的menuconfig 顶层配置界面中,勾选上“Build the OpenWrt based Toolchain”,如下图所示
{{{
cd
WORK_DIR/openwrt
$ make menuconfig
}}}
保存退出在目录下
$WORK_DIR/openwrt/bin/ramips/OpenWrt-Toolchain-ramips-mt7628_gcc-4.8-linaro_u
      Clibc-0.9.33.2.Linux-i686.tar.bz2
2. openwrt 的交叉工具链下载
{{{
链接: https://pan.baidu.com/s/1qYRwrF2  密码: vfks
}}}
2. 交叉编译链安装
2.1 解压压缩包
把下载好或者编译出来的交叉编译工具链拷贝到/opt 目录下
{{{
$ sudo cp  OpenWrt-Toolchain-ramips-mt7628_gcc-4.8-linaro_uClibc-0.9.33.2.Linux-i686.tar.bz2 /opt
$ cd /opt&& sudo tar  jxvf OpenWrt-Toolchain-ramips-mt7628_gcc-4.8-linaro_uClibc-0.9.33.2.Linux-i686.tar.bz2
}}}
2.2 设置环境变量
执行命令 sudo vi /etc/bash.bashrc 并在文件最后添加以下两行配置
 {{{
12$ sudo vi /etc/bash.bashrc
               export
          PATH=/opt/OpenWrt-Toolchain-ramips-mt7628_gcc-4.8-linaro_uClibc-0.9.33.2.Linux-i6
          86/toolch      ain-mipsel_24kec+dsp_gcc-4.8-linaro_uClibc-0.9.33.2/bin:$PATH          export
          STAGING_DIR=/$WORK_DIR /openwrt/staging_dir
          }}}
上面这个“STAGING_DIR”变量, 如果这“STAGING_DIR”变量不设置的话,会在用交 叉工具链编译文件时有警 告,但是不影响编译结果。最后保存退出。接着在终 端执行以下命令:
{{{
$ source /etc/bash.bashrc
}}}
2.3 测试
执行 mipsel-openwrt-linux-uclibc-gcc -v 如果能正常输出版本信息则代表安装成功
{{{
$ mipsel-openwrt-linux-uclibc-gcc -v
}}}
3. 应用程序安装
3.1 应用程序编译
hello_world 编写
{{{
#include <stdio.h>
Int main(int argc, char *argv)
{
printf(“hello world\n”);
return 0;
}}}
Hello world 编译, 用file 命令可以查看编译出来的目标文件信息
{{{
$ mipsel-openwrt-linux-uclibc-gcc -Wall -o hello_world hello_world.c
$ $ file hello_world
hello_world: ELF 32-bit LSB executable, MIPS, MIPS32 rel2 version 1, dynamically linked (uses    shared   libs),  with  unknown    capability  0xf41   =  0x756e6700,     with   unknown capability 0x70100 = 0x3040000, not stripped
}}}
3.2 应用程序拷贝
如果虚拟机的网络模式是桥接模式或者是NAT 模式的话,如下图:
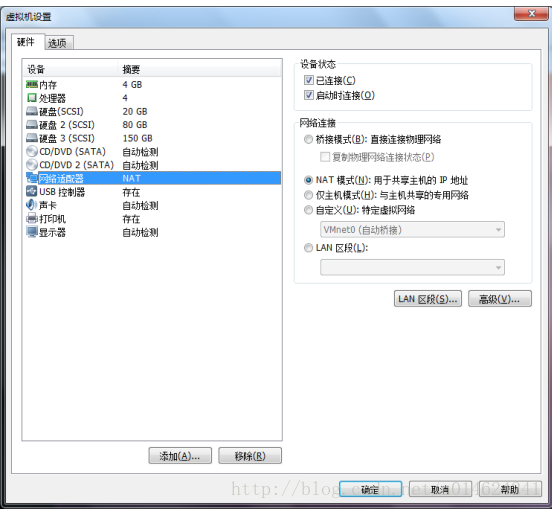
只要开发板的宿主机(window),能正常跟设备(开发板)正常网络通讯的话,可以直
接进行往设备进行拷贝文件了。
{{{
$ scp hello_world root@192.168.8.1:/tmp/
}}}
如果虚拟机不能和设备(开发板)正常网络通讯的话,需要在宿主机(window)上面安装
一个tftpd 的程序如下
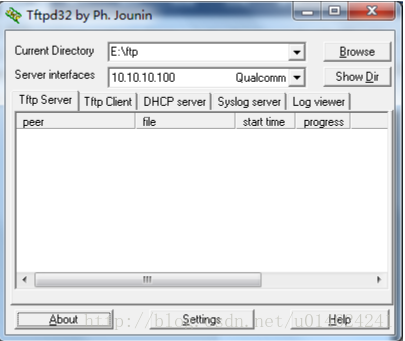
并通过samba 把文件共享编译的文件拷贝到tftpd 目录下的,用串口登录设备(开发板),
通过无线或者有线连接设备(开发板).
{{{
# tftp -gr hello_world 192.168.8.xxx
}}}
3.3 程序运行
     用串口登录设备(开发板),去到下载文件目录
     {{{
      # chmod +x hello_world
      # ./hello_world
     }}}
4. 添加应用程序到Openwrt
openwrt一个比较重要的特点就是它采用 ipk包的形式安装软件。有点像是 windows 下面的安装包一样,用户只需用简单的命令就可以将 ipk 安装包安装到openwrt系统中,非常方便。在“安装 IPK 包”一节中,我们已经介绍过如何安装openwrt 的ipk安装包,但那是 openwrt 官方已经为我们编译好的,下面来介绍一下如何制作编译一个简单的安装包。
切换到openwrt源码根目录,然后执行下列命令:
 {{{
 $ cd $WORK_DIR/openwrt
 $ cd ./package/utils //进入 package/utils        目录
 $ mkdir hello_world //创建一个名为“hello_world”的文件夹,用于放置安装包源码。
 $ cd hello_world //进入“hello_world” 目录
 $mkdir src //新建一个名为“src”的目录用于放置源码
 $ vi src/hello_world.c //在src目录下新建一个名为hello_world.c                  文件
}}}
输入 hello_world.c 中的内容同“编译第一个‘helloworld’应用程序”节中一致,这里不再
赘述,编辑完成后,保存退出。
在 src 目录下新建一个Makefile 输入以下内容:
{{{
  $ vi src/Makefile
   all: hello_world
    hello_world: hello_world.o
   $(CC) $(LDFLAGS) hello_world.o -o hello_world
    helloworld.o: hello_world.c $(CC) $(CFLAGS) -c hello_world.c
   clean: rm *.o hello_world
}}}
保存退出,然后再创建Makefile
{{{
$ vi Makefile
include (TOPDIR)/rules.mkPKGNAME:=helloworldPKGVERSION:=1.0PKGBUILDDIR:= (BUILD_DIR)/$(PKG_NAME)
include $(INCLUDE_DIR)/package.mk
define Package/hello_world
SECTION:=base
CATEGORY:=Utilities
TITLE:=Hello world -prints a hello world message
Endef
define Package/hello_world/description
If you can’t figure out what this program does, you’re probably brain-dead and need
immediate medical attention.
endef
define Build/Prepare
mkdir -p
(PKGBUILDDIR)
(CP) ./src/*
(PKGBUILDDIR)/endefdefinePackage/helloworld/install
(INSTALL_DIR)
(1)/bin
(INSTALL_BIN)
(PKGBUILDDIR)/helloworld
(1)/bin/
Endef
(eval
(call BuildPackage,hello_world))
}}}
保存退出,接下来回到 openwrt 根目录,执行命令
{{{
$ make menuconfig
}}}
并选择我们已经加进去的安装包。
Utilities —>
hello_world……………….. Hello world -prints a hello world message
保存退出。
{{{
$ make package/utils/complie V=s
}}}
等待编译完成后,我们就可以在以下路径找到生成的安装包
{{{
$ ls bin/ramips/packages/base/hello_world_1.0_ramips_24kec.ipk
}}}
PS: 如果要把程序生成在固件里面记得选为”*”而不是选”M”


 2万+
2万+


 被折叠的 条评论
为什么被折叠?
被折叠的 条评论
为什么被折叠?
 到【灌水乐园】发言


