


这篇blog带来一个不错的日历控件,是github上的一个开源库!
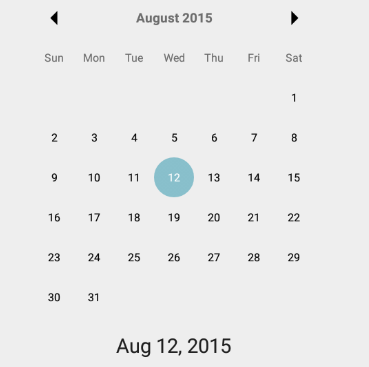
先来看基础的 Basic Example
布局文件很简单activity_basic.xml
<?xml version="1.0" encoding="utf-8"?>
<LinearLayout xmlns:android="http://schemas.android.com/apk/res/android"
              xmlns:tools="http://schemas.android.com/tools"
              android:orientation="vertical"
              android:layout_width="match_parent"
              android:layout_height="match_parent"
              android:paddingLeft="@dimen/activity_horizontal_margin"
              android:paddingRight="@dimen/activity_horizontal_margin"
              android:paddingTop="@dimen/activity_vertical_margin"
              android:paddingBottom="@dimen/activity_vertical_margin"
              tools:context=".BasicActivity"
    >

    <com.prolificinteractive.materialcalendarview.MaterialCalendarView
        android:id="@+id/calendarView"
        android:layout_width="match_parent"
        android:layout_height="wrap_content"
        />

    <TextView
        android:id="@+id/textView"
        android:layout_margin="16dp"
        android:layout_width="wrap_content"
        android:layout_height="wrap_content"
        android:layout_gravity="center"
        android:textAppearance="?android:attr/textAppearanceLarge"
        />

</LinearLayout>
BaseActivity中
public class BasicActivity extends AppCompatActivity implements OnDateChangedListener, OnMonthChangedListener {

    private static final DateFormat FORMATTER = SimpleDateFormat.getDateInstance();
    private TextView textView;

    @Override
    protected void onCreate(Bundle savedInstanceState) {
        super.onCreate(savedInstanceState);
        setContentView(R.layout.activity_basic);

        textView = (TextView) findViewById(R.id.textView);

        final MaterialCalendarView widget = (MaterialCalendarView) findViewById(R.id.calendarView);
        //设置点击选择日期改变事件
        widget.setOnDateChangedListener(this);
        //设置滑动选择改变月份事件
        widget.setOnMonthChangedListener(this);

        //点击文本内容清除之前的选择
        textView.setOnClickListener(new View.OnClickListener() {
            @Override
            public void onClick(View v) {
                widget.clearSelection();
            }
        });
    }

    /**
     * 监听日期改变函数
     * @param widget the view associated with this listener
     * @param date   the new date. May be null if selection was cleared
     */
    @Override
    public void onDateChanged(@NonNull MaterialCalendarView widget, @Nullable CalendarDay date) {
        if(date == null) {
            textView.setText(null);
        }
        else {
            textView.setText(FORMATTER.format(date.getDate()));
        }
    }

    /**
     * 监听月份改变函数
     * @param widget the view associated with this listener
     * @param date   the month picked, as the first day of the month
     */
    @Override
    public void onMonthChanged(MaterialCalendarView widget, CalendarDay date) {
        Toast.makeText(this, FORMATTER.format(date.getDate()), Toast.LENGTH_SHORT).show();
    }
}
以上是最基本的用法,设置两个监听函数,重写其方法,实现日期、月份改变事件!
接下来看自定义装饰器,针对特定日期做特定的效果,如下,设置特定的天数无法点击选择

Disabled Days Example
先来看两个自定义的Decorate,
private static class PrimeDayDisableDecorator implements DayViewDecorator {

        /**
         * 需要实现效果的天数返回true
          * @param day {@linkplain CalendarDay} to possibly decorate
         *
         * @return
         */
        @Override
        public boolean shouldDecorate(CalendarDay day) {
            return PRIME_TABLE[day.getDay()];
        }

        /**
         * 上面方法返回true的天,会设置无法选择
         * @param view View to decorate
         */
        @Override
        public void decorate(DayViewFacade view) {
            view.setDaysDisabled(true);
        }

        private static boolean[] PRIME_TABLE = {
                false,  // 0?
                false,
                true, // 2
                true, // 3
                false,
                true, // 5
                false,
                true, // 7
                false,
                false,
                false,
                true, // 11
                false,
                true, // 13
                false,
                false,
                false,
                true, // 17
                false,
                true, // 19
                false,
                false,
                false,
                true, // 23
                false,
                false,
                false,
                false,
                false,
                true, // 29
                false,
                true, // 31
                false,
                false,
                false, //PADDING
        };
    }
另一个,设置1-10的日期无法选择
  private static class EnableOneToTenDecorator implements DayViewDecorator {

        /**
         * 对<=10的日期,设置效果
         * @param day {@linkplain CalendarDay} to possibly decorate
         *
         * @return
         */
        @Override
        public boolean shouldDecorate(CalendarDay day) {
            return day.getDay() <= 10;
        }

        /**
         * 具体实现的效果
         * @param view View to decorate
         */
        @Override
        public void decorate(DayViewFacade view) {
            view.setDaysDisabled(false);
        }
    }
使用也很简单,使用addDecorator(DayViewDecorator dayViewDecorator)方法加入日历控件即可
  // Add a decorator to disable prime numbered days
        widget.addDecorator(new PrimeDayDisableDecorator());
        // Add a second decorator that explicitly enables days <= 10. This will work because
        //  decorators are applied in order, and the system allows re-enabling
        widget.addDecorator(new EnableOneToTenDecorator());
再来看个日历控件在dialog中使用,效果
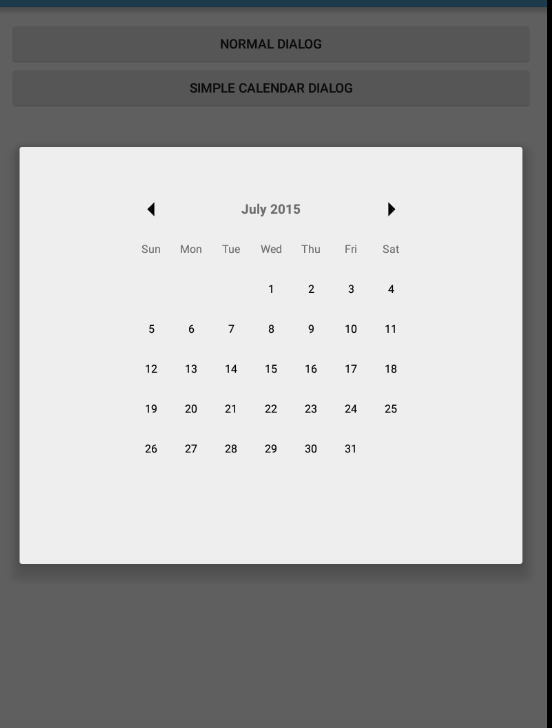
用一个DialogFragment来实现,如果不了解DialogFragmet的可以先去了解下,Googel推荐的实现dialog的方式
public static class SimpleCalendarDialogFragment extends DialogFragment implements OnDateChangedListener {

        private TextView textView;

        /**
         * 绑定视图,返回view对象
         * @param inflater
         * @param container
         * @param savedInstanceState
         * @return
         */
        @Override
        public View onCreateView(LayoutInflater inflater, ViewGroup container, Bundle savedInstanceState) {
            return inflater.inflate(R.layout.dialog_basic, container, false);
        }

        /**
         * 初始化view里面的日历控件,及控件方法绑定
         * @param view
         * @param savedInstanceState
         */
        @Override
        public void onViewCreated(View view, Bundle savedInstanceState) {
            super.onViewCreated(view, savedInstanceState);

            textView = (TextView) view.findViewById(R.id.textView);

            MaterialCalendarView widget = (MaterialCalendarView) view.findViewById(R.id.calendarView);

            widget.setOnDateChangedListener(this);
        }

        /**
         * 重写监听方法
         * @param widget the view associated with this listener
         * @param date   the new date. May be null if selection was cleared
         */
        @Override
        public void onDateChanged(MaterialCalendarView widget, CalendarDay date) {
            textView.setText(FORMATTER.format(date.getDate()));
        }
    }
调用很简单,只要执行show方法就ok
 @OnClick(R.id.button_simple_dialog)
    void onSimpleCalendarDialogClick() {
        new SimpleCalendarDialogFragment().show(getSupportFragmentManager(), "test-simple-calendar");
    }
OK,以上介绍的只是该控件的部分功能,下面看下这个日历控件的所有属性
<com.prolificinteractive.materialcalendarview.MaterialCalendarView
    android:id="@+id/calendarView"
    android:layout_width="match_parent"
    android:layout_height="wrap_content"
    xmlns:app="http://schemas.android.com/apk/res-auto"
    app:mcv_showOtherDates="boolean"
    app:mcv_arrowColor="color"
    app:mcv_selectionColor="color"
    app:mcv_headerTextAppearance="style"
    app:mcv_dateTextAppearance="style"
    app:mcv_weekDayTextAppearance="style"
    app:mcv_weekDayLabels="array"
    app:mcv_monthLabels="array"
    app:mcv_tileSize="dimension"
    app:mcv_firstDayOfWeek="enum"
    app:mcv_leftArrowMask="drawable"
    app:mcv_rightArrowMask="drawable"
    />
具体意思,如果感兴趣可以上github上看下,有针对每个方法的详细介绍,这里就不一一演示了,具体需求使用的时候,我们可以再深入了解下。


 4332
4332

 被折叠的 条评论
为什么被折叠?
被折叠的 条评论
为什么被折叠?
 到【灌水乐园】发言


