


在今天的教程中,我们来展示如何在Ubuntu Core中使用azure的IoT hub来开发我们的应用.Azure IoT Hub目前提供了一个框架对我们的IoT设备进行管理,并可以通过预置解决方案来展示我们的数据.在今天的文章中,我们将介绍如何把我们的设备连接到远程监视预配置解决方案中.
1)预配远程监视预配置解决方案
我们可以按照在微软的官方文档:
来创建一个我们的预配置解决方案,并最终形成向如下的配置:
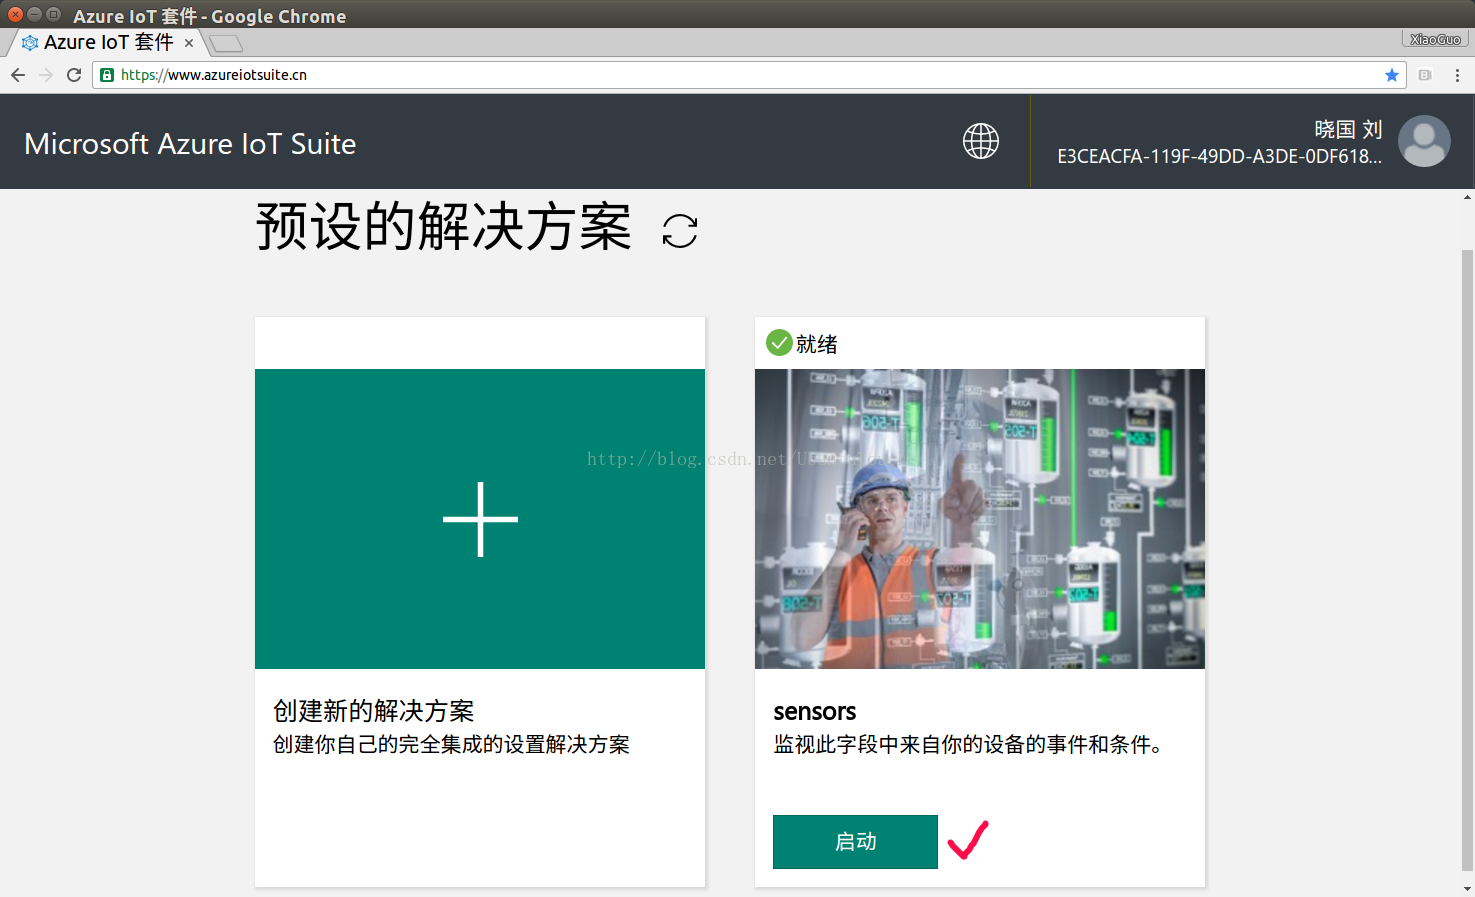
这里我的解决方案的名称叫做"
sensors".
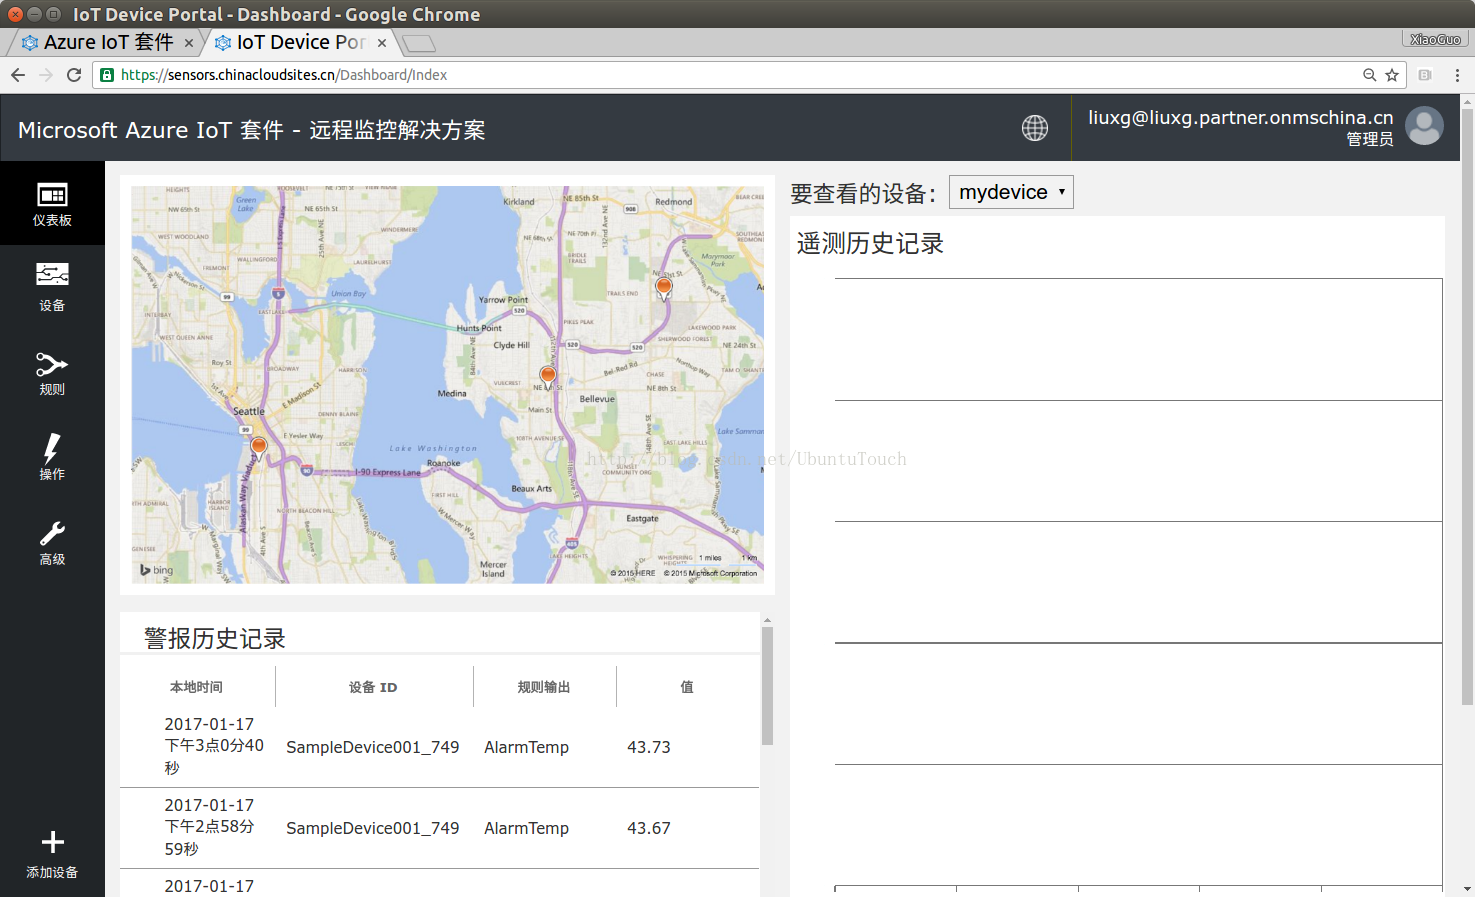
如果在我们的IoT设备中有数据传上来的话,我们可以在右边的"遥测历史记录"中看到这些数据.这些数据通常是以曲线的形式来表现出来的.
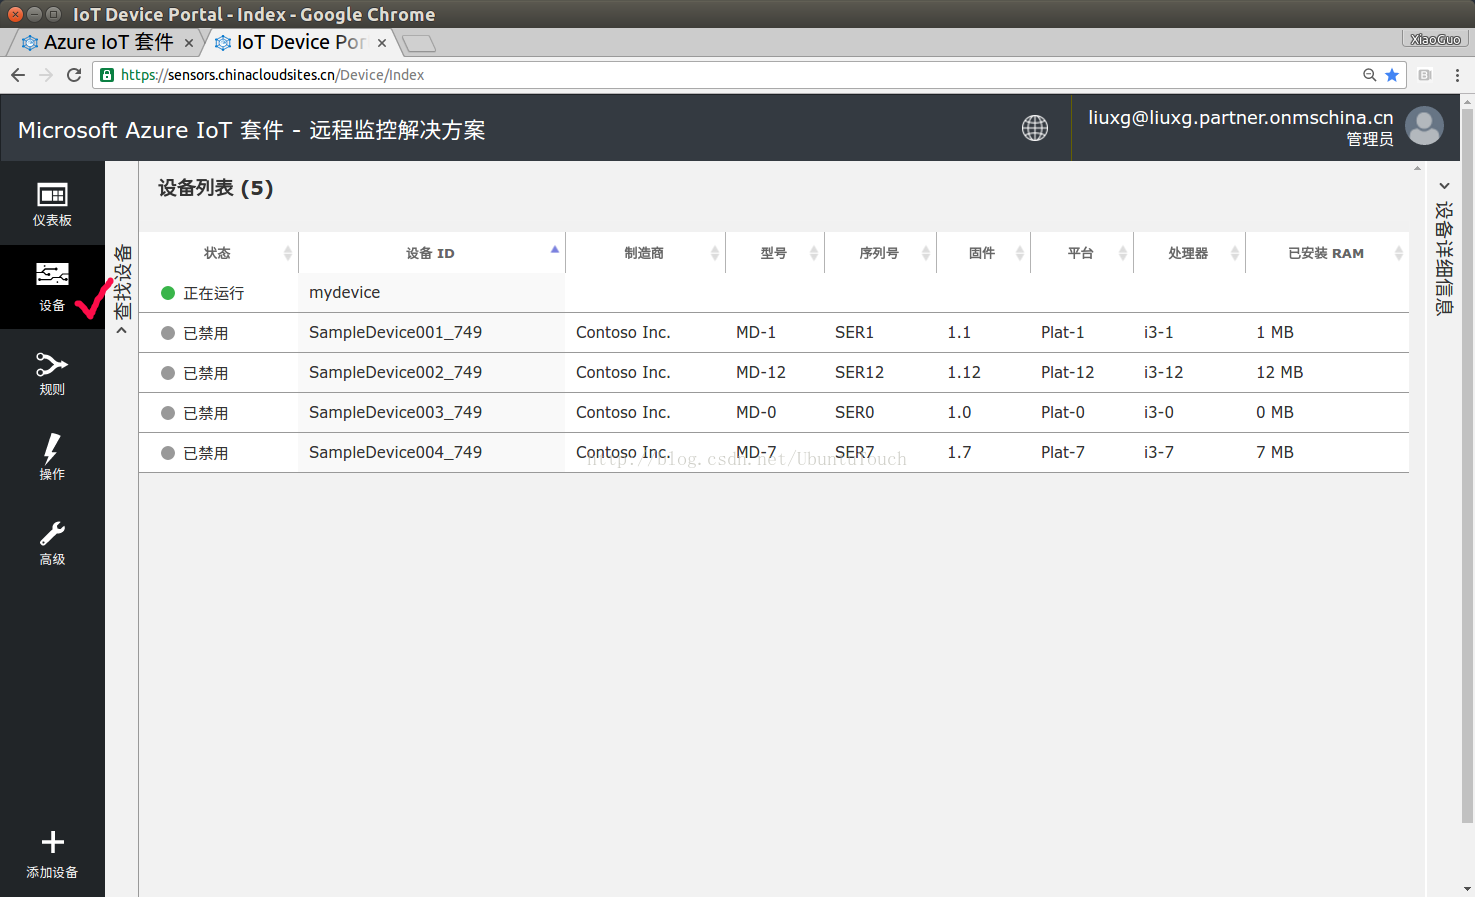
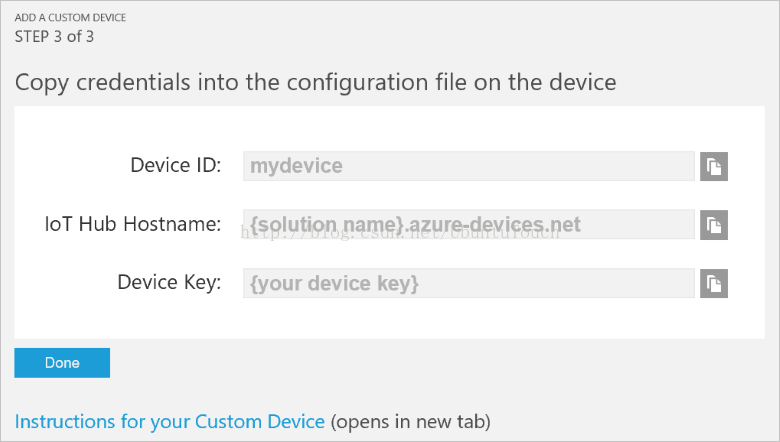
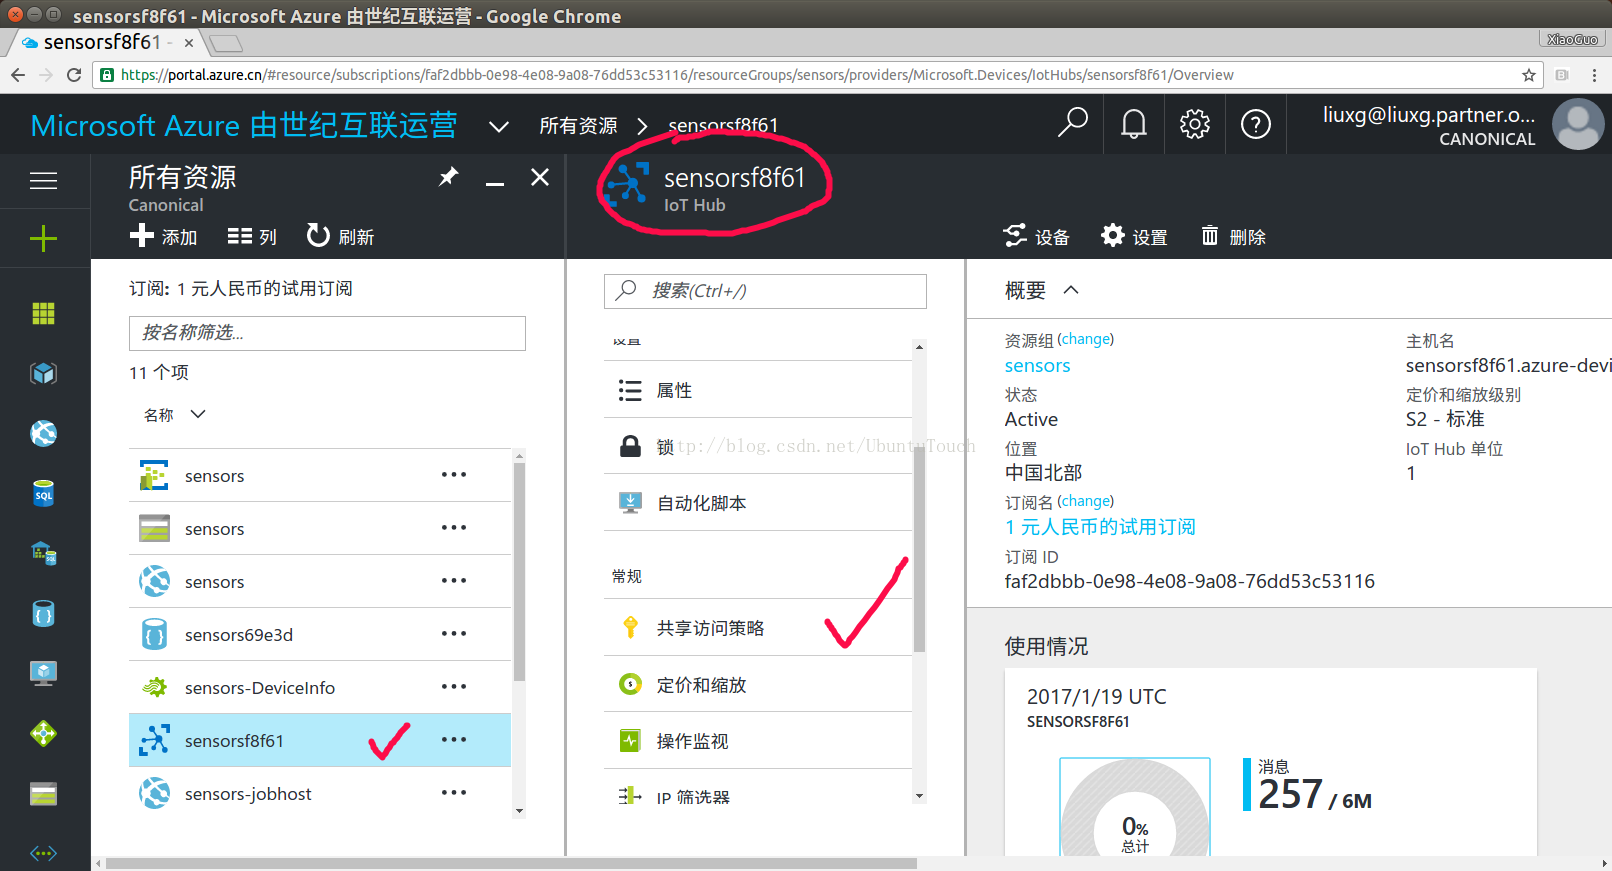
在创建设备的过程中,我们需要记录下来在下面画面中的数据,以便我们在代码实现中使用:
我们也可以打开
azure.cn来查看我们已经创建的所有的资源:

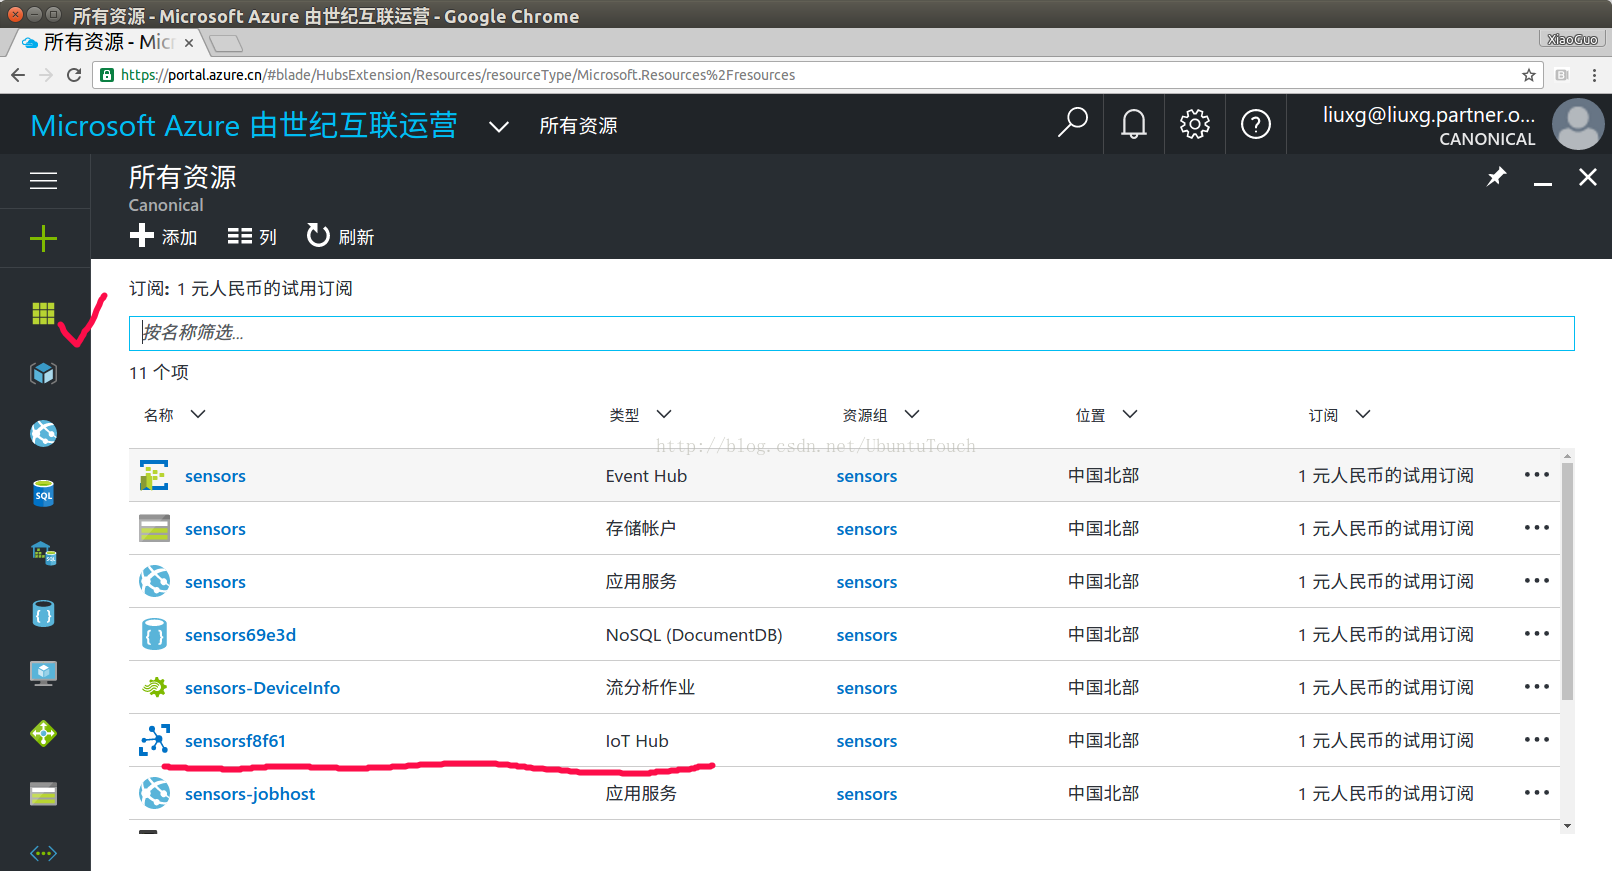

这里显示的"连接字符串-主秘钥"对我们以后的编程是非常有用的.需要特别留意一下.
2)生成以C语言开发的snap应用
在这一节中,我们将展示如下如何使用C语言来开发一个客户端,并最终形成一个snap应用.这个应用将和我们在上一节中所形成的远程监视预配置解决方案进行通信.我们在Ubuntu 16.04的Desktop中开发snap应用.如果大家对snap开发的安装还是不很熟悉的话,请参阅我的
文章来安装好自己的环境.就像
文章中介绍的那样,我们先安装必要的组件包:
$ sudo apt-get install cmake gcc g++将 AzureIoT 存储库添加到计算机:
$ sudo add-apt-repository ppa:aziotsdklinux/ppa-azureiot
$ sudo apt-get update$ sudo apt-get install -y azure-iot-sdk-c-dev
这样,我们就安装好了我们所需要的组件包.由于一些原因,在我们编译我们的例程中,会出现一些的错误,所以我们必须做如下的手动修改:
/usr/include/azureiot/inc$ sudo mv azure_c_shared_utility ..
我们先来看看我已经做好的一个项目:
snapcraft.yaml
name: remote-monitor
version: '0.1'
summary: This is a remote-monitor snap for azure
description: |
  This is a remote-monitor sample snap for azure

grade: stable # must be 'stable' to release into candidate/stable channels
confinement: strict # use 'strict' once you have the right plugs and slots

apps:
  remote-monitor:
    command: bin/sample_app
    plugs: [network]

parts:
  remote:
    plugin: cmake
    source: ./src
这个项目是一个cmake项目.由于我们的包的名称和我们的应用名称是一样的,所在我们运行我们的应用时,我们可以直接打入remote-monitorming来运行我们的应用.在做任何改变之前,我们打开remote_monitoring.c文件,并注意一下的代码:
static const char* deviceId = "mydevice";
static const char* deviceKey = "[Device Key]";
static const char* hubName = "sensorsf8f61";
static const char* hubSuffix = "azure-devices.cn";
这里的解释是:
static const char* deviceId = "[Device Id]";
static const char* deviceKey = "[Device Key]";
static const char* hubName = "[IoTHub Name]";
static const char* hubSuffix = "[IoTHub Suffix, i.e. azure-devices.net]";
我们需要根据我们自己的账号的情况替换这些值.在实际运用中,我们可以修改在remote_monitoring.c中的如下的代码:
while (1)
{
	unsigned char*buffer;
	size_t bufferSize;

	srand(time(NULL));
	int r = rand() % 50;
	int r1 = rand() % 55;
	int r2 = rand() % 50;
	printf("r: %d, r1: %d, r2: %d\n", r, r1, r2);
	thermostat->Temperature = r;
	thermostat->ExternalTemperature = r1;
	thermostat->Humidity = r2;

	(void)printf("Sending sensor value Temperature = %d, Humidity = %d\r\n", thermostat->Temperature, thermostat->Humidity);

	if (SERIALIZE(&buffer, &bufferSize, thermostat->DeviceId, thermostat->Temperature, thermostat->Humidity, thermostat->ExternalTemperature) != CODEFIRST_OK)
	{
		(void)printf("Failed sending sensor value\r\n");
	}
 ...
}
来把我们所需要的数据传上去.在这里,我们随意写了一些随机的数据.
我们在termnial中直接打入如下的命令:
$ snapcraft
这样就形成了我们的项目的snap包.我们可以通过如下的命令来进行安装:
liuxg@liuxg:~/snappy/desktop/azure/remote-monitor$ sudo snap install remote-monitor_0.1_amd64.snap --dangerous
[sudo] password for liuxg:
remote-monitor 0.1 installed
liuxg@liuxg:~$ snap list
Name            Version  Rev  Developer  Notes
azure           0.1      x1              -
core            16.04.1  714  canonical  -
hello           1.0      x1              devmode
hello-world     6.3      27   canonical  -
hello-xiaoguo   1.0      x1              -
remote-monitor 0.1 x2 liuxg@liuxg:~$ remote-monitor
IoTHubClient accepted the message for delivery
r: 30, r1: 37, r2: 4
Sending sensor value Temperature = 30, Humidity = 4
IoTHubClient accepted the message for delivery
r: 45, r1: 23, r2: 35
Sending sensor value Temperature = 45, Humidity = 35
IoTHubClient accepted the message for delivery
r: 16, r1: 39, r2: 25
Sending sensor value Temperature = 16, Humidity = 25
IoTHubClient accepted the message for delivery
r: 16, r1: 33, r2: 14
Sending sensor value Temperature = 16, Humidity = 14
IoTHubClient accepted the message for delivery
r: 20, r1: 29, r2: 32
显然我们的客户端应用在不断地向azure IoT Hub发送数据.我们可以通过 https://www.azureiotsuite.cn/来查看我们已经收到的数据.
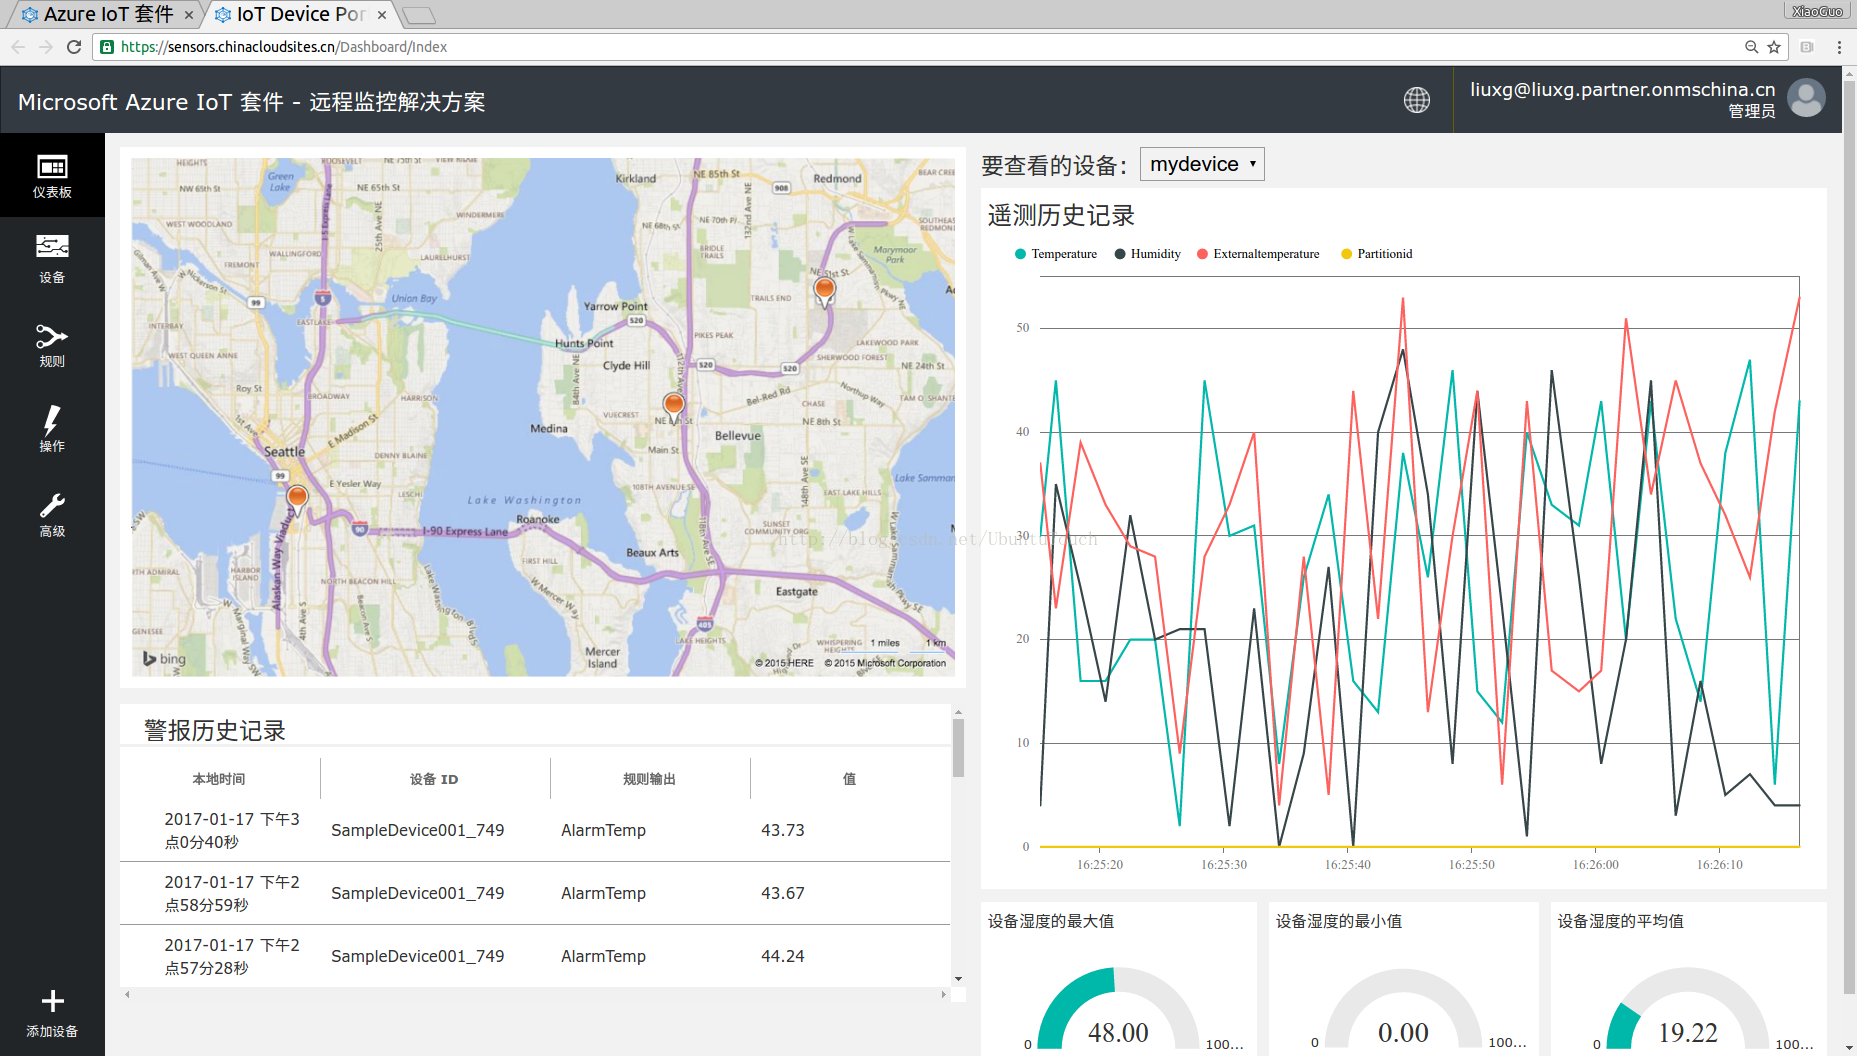
在下面我们可以看到设备数据的最大值及最小值的变化.
如果大家想把这个应用在树莓派等的ARM设备上运行的话,请参阅我的文章"
如何为树莓派安装Ubuntu Core并在Snap系统中进行编译".具体的安装和这里介绍的是一样的.请开发者自己去试.
3)生成以nodejs开发的snap应用
在这一节中,我们将介绍如何使用nodejs来开发我们的snap应用.我们可以参阅文章"
适用于 Node.js 的 Azure IoT 中心入门".就像这篇文章中所介绍的那样,我们最感兴趣的是它里面介绍的第三个控制台应用程序SimulatedDevice.js.
SimulatedDevice.js
#!/usr/bin/env node

var clientFromConnectionString = require('azure-iot-device-amqp').clientFromConnectionString;
var Message = require('azure-iot-device').Message;

var connectionString = 'HostName=sensorsf8f61.azure-devices.cn;DeviceId=mydevice;SharedAccessKey={Device Key}';

var client = clientFromConnectionString(connectionString);

function printResultFor(op) {
  return function printResult(err, res) {
    if (err) console.log(op + ' error: ' + err.toString());
    if (res) console.log(op + ' status: ' + res.constructor.name);
  };
}

var connectCallback = function (err) {
  if (err) {
    console.log('Could not connect: ' + err.amqpError);
  } else {
    console.log('Client connected');

    // Create a message and send it to the IoT Hub every second
    setInterval(function(){
        var temp = 10 + (Math.random() * 4);
        var windSpeed = 10 + (Math.random() * 4);
        var data = JSON.stringify({ deviceId: 'mydevice', temp: temp, windSpeed: windSpeed});
        var message = new Message(data);
        console.log("Sending message: " + message.getData());
        client.sendEvent(message, printResultFor('send'));

    }, 5000);
  }
};

client.open(connectCallback);
注意在上面的代码中,我们需要手动修改如下的connectionString:
var connectionString = 'HostName=sensorsf8f61.azure-devices.cn;DeviceId=mydevice;SharedAccessKey={yourdevicekey}';
就像在
文章中介绍的那样,它的定义为:
var connectionString = 'HostName={youriothostname};DeviceId=myFirstNodeDevice;SharedAccessKey={yourdevicekey}';snapcraft.yaml
name: azure
version: '0.1' # just for humans, typically '1.2+git' or '1.3.2'
summary: This is an azure snap app
description: |
  This is an azure client snap to send a message

grade: stable # must be 'stable' to release into candidate/stable channels
confinement: strict # use 'strict' once you have the right plugs and slots

apps:
  azure:
    command: bin/send
    plugs: [network]

parts:
  node:
    plugin: nodejs
    source: .
同样我们可以打入snapcraft命令来生产相应的包,并进行安装:
liuxg@liuxg:~/snappy/desktop/azurenode-snap$ snap list
Name            Version  Rev  Developer  Notes
azure           0.1      x2              -
core            16.04.1  714  canonical  -
hello           1.0      x1              devmode
hello-world     6.3      27   canonical  -
hello-xiaoguo   1.0      x1              -
remote-monitor  0.1      x2
我们可以直接运行azure命令:
liuxg@liuxg:~/snappy/desktop/azurenode-snap$ azure
Client connected
Sending message: {"deviceId":"mydevice","temp":11.826184131205082,"windSpeed":11.893792165443301}
send status: MessageEnqueued
Sending message: {"deviceId":"mydevice","temp":10.594819721765816,"windSpeed":10.54138664342463}
send status: MessageEnqueued
Sending message: {"deviceId":"mydevice","temp":11.27814894542098,"windSpeed":10.962828870862722}
send status: MessageEnqueued
Sending message: {"deviceId":"mydevice","temp":13.068702490068972,"windSpeed":10.28670579008758}
send status: MessageEnqueued
Sending message: {"deviceId":"mydevice","temp":11.723079251125455,"windSpeed":12.173830625601113}
send status: MessageEnqueued
Sending message: {"deviceId":"mydevice","temp":12.595101269893348,"windSpeed":12.120747512206435}
send status: MessageEnqueued
Sending message: {"deviceId":"mydevice","temp":11.431507185101509,"windSpeed":11.76255036983639}
send status: MessageEnqueued
Sending message: {"deviceId":"mydevice","temp":12.488932724110782,"windSpeed":13.200456796213984}
send status: MessageEnqueued
我们可以通过 https://www.azureiotsuite.cn/来查看我们已经收到的数据:
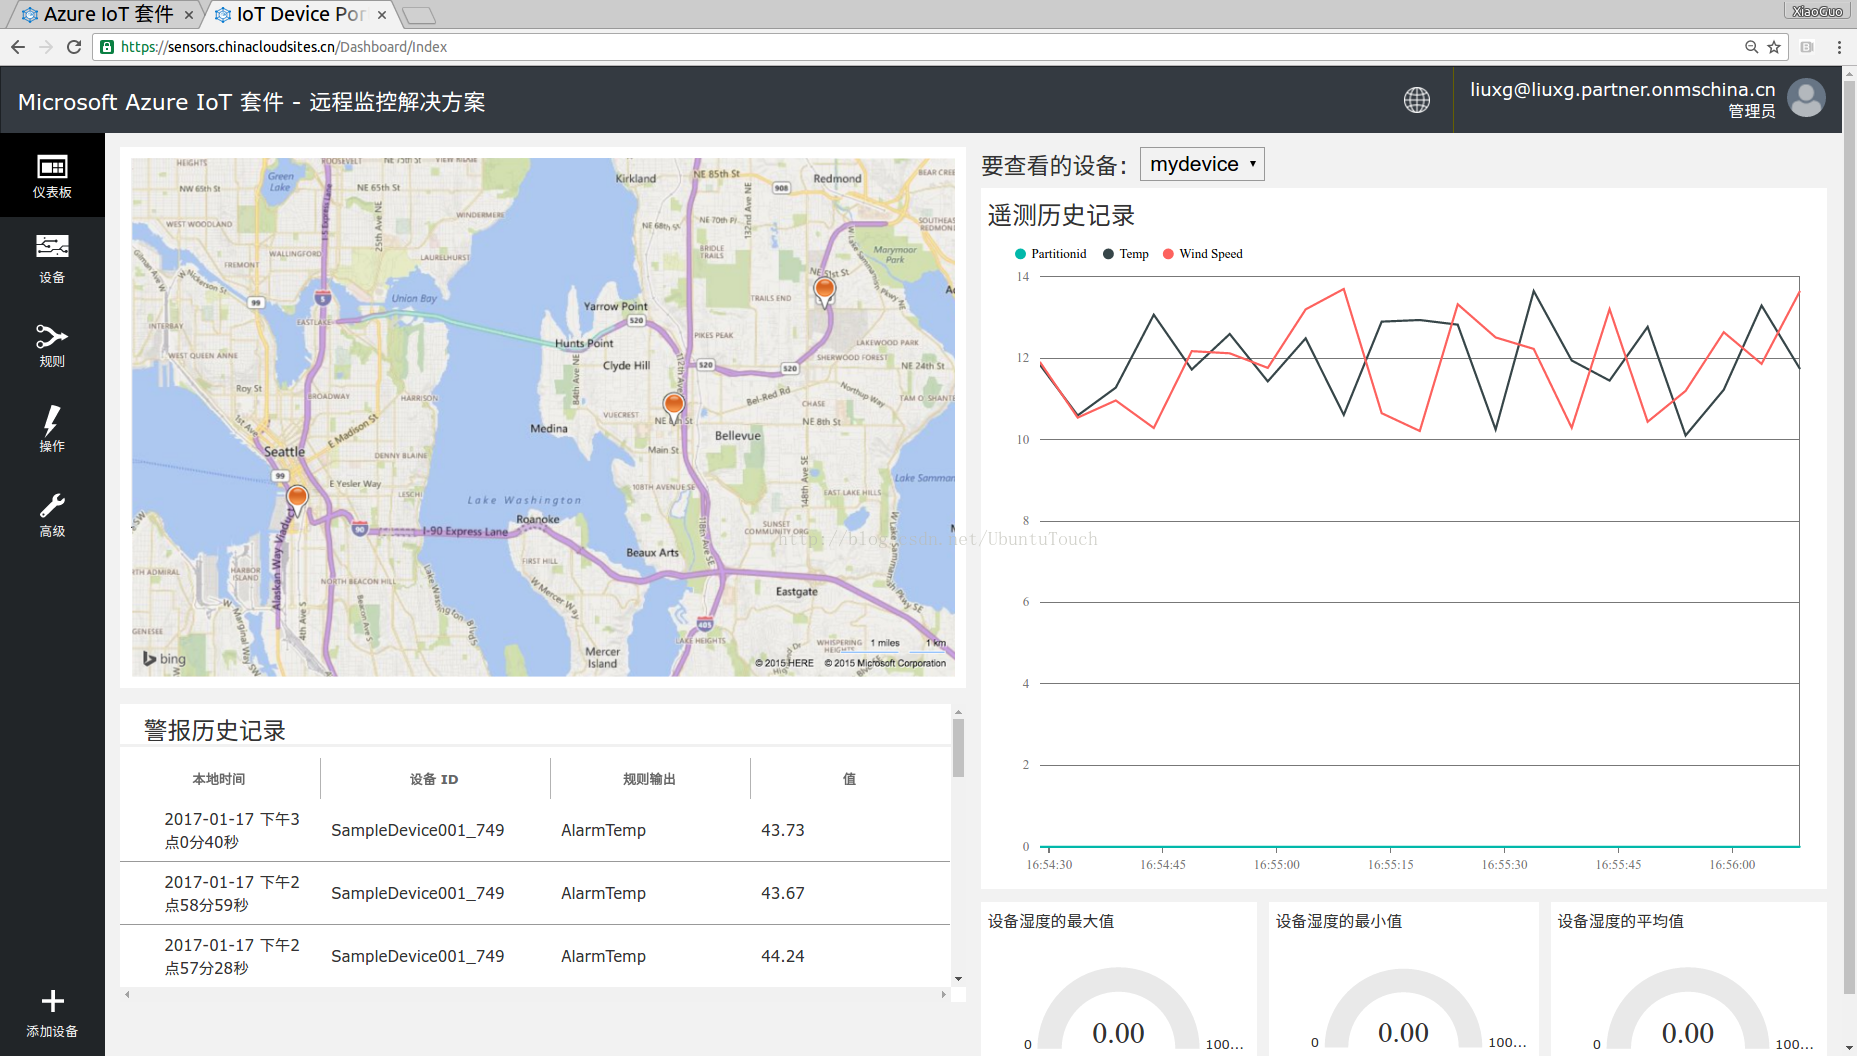
我们在上面可以看到Temp及Wind Speed的曲线.同样地,如果大家想把这个应用在树莓派等的ARM设备上运行的话,请参阅我的文章"
如何为树莓派安装Ubuntu Core并在Snap系统中进行编译".请开发者自己去试.


 1378
1378


 被折叠的 条评论
为什么被折叠?
被折叠的 条评论
为什么被折叠?
 到【灌水乐园】发言


