


 本文介绍了如何使用FlashWavRecorder实现网页录音功能,并详细解释了录音权限、录音过程及上传至服务器的方法。同时,提供了改装后版本的代码示例,包括引入JS、简化页面布局及后台处理代码。最后,通过一个实际应用示例展示了如何实现录音文件的上传和服务器保存。
【注意】
最新版本请看这里:http://uikoo9.com/blog/detail/java-flashwavrecorder
【前言】
肯定有需求要网页录音,而且要上传,这奇葩需求,
然后找到了FlashWavRecorder,
地址:https://github.com/cykod/FlashWavRecorder
【原始版本】
1.下载
在上面的地址下载zip解压之后,文件夹里面有个index.html,打开之后这效果:

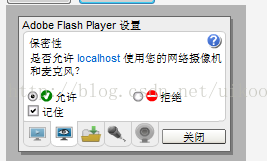
2.录音权限
必须保证你的电脑有麦克风,也就是说台式机你得有耳麦,笔记本保证麦克风没有坏掉,
有麦克风的情况下,点击上面的红框内的按钮,然后选择允许,如下:
可能有的人会说我点了没反应,或者firebug报错啊,神,插上麦克风。。
3.录音
之后你就可以试的录音了,自己研究吧,挺简单。
【上传】
1.上传
flash录音很好实现,比较难的是录音后直接上传录音文件到服务器,
FlashWavRecorder做到了,
看了下as源码,大概是js调用swf中的方法,
swf会把录音放到内存,然后编码,然后传到服务器,
服务器就可以保存了。
2.php
这个插件是好,对于用java程序员来说,as代码,php代码都是坑啊,
幸好as代码和java类似,还能看懂点,php以前也看过点。
【改装后版本】
1.引入js
在页面head中引入一下js和css:
			<script type="text/javascript" src="${base}/js/_record/js/swfobject.js"></script>
			<script type="text/javascript" src="${base}/js/_record/js/recorder.js"></script>
			<script type="text/javascript" src="${base}/js/_record/js/main.js"></script>
			<link rel="stylesheet" href="${base}/js/_record/style.css">
当然前提要有jquery,这里就没有写了
2.页面:
精简了一些东西,重新布局了,代码:
<div class="qcontainer">
		<div id="recorder-audio" class="control_panel idle">
			<button class="record_button" onclick="FWRecorder.record('audio', 'audio.wav');" title="Record">
				<img src="${base}/js/_record/images/record.png" alt="Record" />
			</button>
			<button class="stop_recording_button" onclick="FWRecorder.stopRecording('audio');" title="Stop Recording">
				<img src="${base}/js/_record/images/stop.png" alt="Stop Recording" />
			</button>
			<button class="play_button" onclick="FWRecorder.playBack('audio');" title="Play">
				<img src="${base}/js/_record/images/play.png" alt="Play" />
			</button>
			<button class="pause_playing_button" onclick="FWRecorder.pausePlayBack('audio');" title="Pause Playing">
				<img src="${base}/js/_record/images/pause.png" alt="Pause Playing" />
			</button>
			<button class="stop_playing_button" onclick="FWRecorder.stopPlayBack();" title="Stop Playing">
				<img src="${base}/js/_record/images/stop.png" alt="Stop Playing" />
			</button>
			<div class="level"></div>
		</div>

		<div class="details">
			<button class="show_level" onclick="FWRecorder.observeLevel();">显示声波</button>
			<button class="hide_level" onclick="FWRecorder.stopObservingLevel();" style="display: none;">隐藏声波</button>
			<button class="show_settings" onclick="microphonePermission()">麦克风权限</button>
			<span id="save_button" style="display:inline-block;">
				<span id="flashcontent">
					<p>您的浏览器必须支持Javascript,而且安装了Flash播放器!</p>
				</span>
			</span>
			<div id="status">录音状态。。。</div>
			<div>录音时长:<span id="duration"></span></div>
			<div>上传状态:<span id="upload_status"></span></div>
			<input type="hidden" id="qrecordId"/>
		</div>

		<form id="uploadForm" name="uploadForm" action="${base}/record/upload">
			<input name="authenticity_token" value="xxxxx" type="hidden">
			<input name="upload_file[parent_id]" value="1" type="hidden">
			<input name="format" value="json" type="hidden">
		</form>
	</div>
3.效果

4.后台代码
使用的springmvc(这个没啥关系),和apache的fileupload组件,代码:
package com.bfsuol.common.controller;

import java.io.File;
import java.util.Iterator;

import org.apache.commons.fileupload.FileItem;
import org.apache.commons.fileupload.disk.DiskFileItemFactory;
import org.apache.commons.fileupload.servlet.ServletFileUpload;
import org.springframework.beans.factory.annotation.Autowired;
import org.springframework.stereotype.Controller;
import org.springframework.web.bind.annotation.RequestMapping;
import org.springframework.web.bind.annotation.ResponseBody;

import com.bfsuolcomponents.file.entity.FileManager;
import com.bfsuolcomponents.file.service.FileManagerService;
import com.bfsuolframework.core.controller.SpringControllerSupport;
import com.bfsuolframework.core.utils.DateTimeUtils;
import com.bfsuolframework.core.utils.FileUtils;

/**
 * 录音以及上传controller
 * @author qiaowenbin
 */
@Controller
@RequestMapping("/record")
public class RecordController extends SpringControllerSupport{

	@Autowired
	private FileManagerService fileManagerService;

	@RequestMapping("/upload")
	public @ResponseBody String upload() throws Exception{
		Long id = null;

		Iterator<FileItem> iter = new ServletFileUpload(new DiskFileItemFactory()).parseRequest(getRequest()).iterator();
		while (iter.hasNext()) {
		    FileItem item = iter.next();

		    if(!item.isFormField()){
		    	id = processUploadedFile(item);
		    }
		}

		return "{\"saved\": 1,\"id\": "+id+"}";
	}
	private Long processUploadedFile(FileItem item) throws Exception{
		// 上传
		String uploadPath = FileUtils.getUploadRealPath("files/records") + FileUtils.getDatePath()+"/";
		FileUtils.createFolder(uploadPath);
        String fileFullPath = getFileValidName(uploadPath, item.getName(), true, true);
	    item.write(new File(fileFullPath));

	    // 保存
		FileManager fileManager = new FileManager();
		fileManager.setFilePath(fileFullPath);
		fileManager.setUrl(FileUtils.realPath2Path(fileFullPath));
		fileManager.setFileRealname(FileUtils.getFileName(fileFullPath));
		fileManager.setFileTitle(item.getName());

		return fileManagerService.save(fileManager);
	}
	private String getFileValidName(String filePath, String fileName,boolean format, boolean overwrite ){
		String fileValidName;
		if(format){
			String fileExt = FileUtils.getFileExt(fileName);
			fileValidName =  filePath + DateTimeUtils.getCurrentDateTimeString("yyyyMMddHHmmss") + (fileExt==null?"":"."+fileExt);
    	}else{
    		fileValidName =  filePath + fileName;
    	}
		if( !overwrite ){
			fileValidName = FileUtils.getValidFileName(fileValidName);
		}
		return fileValidName;
	}

}
5.讲解
大概的意思就是上传文件,将文件相关信息保存到数据库,返回保存后的id,
里面有些代码是没有用的,你可以自己修改。
【页面多次调用】
1.奇葩
怎么会有这需求,
解决办法,每次都弹出来就好了,
2.封装
可以自己封装一个方法,弹出后录音上传完毕后返回id。
【代码】
原始文件有修改了一些js和页面内容,打个zip包,
有需要的可以下载。
zip只打包了前端的,后台摘出来太麻烦了,自己看上面的代码吧,
index.html需要替换为上面的页面。
地址:http://download.csdn.net/detail/uikoo9/7937419


 2188
2188

 被折叠的 条评论
为什么被折叠?
被折叠的 条评论
为什么被折叠?
 到【灌水乐园】发言


