


今天我们的教程是根据前面一节扩展进行的,如果你没有看,请点击 Android高手进阶教程(三) 查看第三课,这样跟容易方便你的理解!
在xml 文件里定义控件的属性,我们已经习惯了android:attrs="" ,那么我们能不能定义自己的属性能,比如:test:attrs="" 呢?答案是肯定的.
进入主题。大致以下步骤:
一、 在res/values 文件下定义一个attrs.xml 文件.代码如下:
- <?xml version="1.0" encoding="utf-8"?>
- <resources>
- <declare-styleable name="MyView">
- <attr name="textColor" format="color" />
- <attr name="textSize" format="dimension" />
- </declare-styleable>
- </resources>
二、 我们在MyView.java 代码编写如下,其中下面的构造方法是重点,我们获取定义的属性R.sytleable.MyView_textColor, 获取方法中后面通常设定默认值(float textSize = a.getDimension(R.styleable.MyView_textSize, 36 ); ), 防止我们在xml 文件中没有定义.从而使用默认值!
MyView 就是定义在<declare-styleable name="MyView "></declare-styleable> 里的 名字,获取里面属性用 名字_ 属性 连接起来就可以.TypedArray 通常最后调用 .recycle() 方法,为了保持以后使用该属性一致性!
- public MyView(Context context,AttributeSet attrs)
- {
- super(context,attrs);
- mPaint = new Paint();
- TypedArray a = context.obtainStyledAttributes(attrs,
- R.styleable.MyView);
- int textColor = a.getColor(R.styleable.MyView_textColor,
- 0XFFFFFFFF);
- float textSize = a.getDimension(R.styleable.MyView_textSize, 36);
- mPaint.setTextSize(textSize);
- mPaint.setColor(textColor);
- a.recycle();
- }
MyView.java MyView控件全部代码如下:
- package com.android.tutor;
- import android.content.Context;
- import android.content.res.TypedArray;
- import android.graphics.Canvas;
- import android.graphics.Color;
- import android.graphics.Paint;
- import android.graphics.Rect;
- import android.graphics.Paint.Style;
- import android.util.AttributeSet;
- import android.view.View;
- public class MyView extends View {
- private Paint mPaint;
- private Context mContext;
- private static final String mString = "Welcome to Mr Wei's blog";
- public MyView(Context context) {
- super(context);
- mPaint = new Paint();
- }
- public MyView(Context context,AttributeSet attrs)
- {
- super(context,attrs);
- mPaint = new Paint();
- TypedArray a = context.obtainStyledAttributes(attrs,
- R.styleable.MyView);
- int textColor = a.getColor(R.styleable.MyView_textColor,
- 0XFFFFFFFF);
- float textSize = a.getDimension(R.styleable.MyView_textSize, 36);
- mPaint.setTextSize(textSize);
- mPaint.setColor(textColor);
- a.recycle();
- }
- @Override
- protected void onDraw(Canvas canvas) {
- // TODO Auto-generated method stub
- super.onDraw(canvas);
- //设置填充
- mPaint.setStyle(Style.FILL);
- //画一个矩形,前俩个是矩形左上角坐标,后面俩个是右下角坐标
- canvas.drawRect(new Rect(10, 10, 100, 100), mPaint);
- mPaint.setColor(Color.BLUE);
- //绘制文字
- canvas.drawText(mString, 10, 110, mPaint);
- }
- }
三、将我们自定义的MyView 加入布局main.xml 文件中,并且使用自定义属性,自定义属性必须加上:
" xmlns:test ="http://schemas.android.com/apk/res/com.android.tutor" ,test是自定义属性的前缀, com.android.tutor 是我们包名.
main.xml 全部代码如下:
- <?xml
- version="1.0" encoding="utf-8"?>
- <LinearLayout
- xmlns:android="http://schemas.android.com/apk/res/android"
- xmlns:test="http://schemas.android.com/apk/res/com.android.tutor"
- android:orientation="vertical"
- android:layout_width="fill_parent"
- android:layout_height="fill_parent"
- >
- <TextView
- android:layout_width="fill_parent"
- android:layout_height="wrap_content"
- android:text="@string/hello"
- />
- <com.android.tutor.MyView
- android:layout_width="fill_parent"
- android:layout_height="fill_parent"
- test:textSize="20px"
- test:textColor="#fff"
- />
- </LinearLayout>
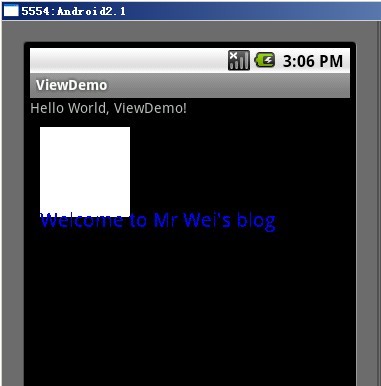
四、运行之效果如下图:
参考文章二:
Android 自定义View 己经不是什么新鲜话题,Android Api提供了一大堆基础组件给我们,需要什么特定功能还需要我们继承它们然后定制更加丰富的功能。前面有篇文章也说过为自定义VIEW添加属性,但只是一笔带过,这里就拿这点来说说吧。
第一种添加属性的方法,之前我也是经常使用这种写法,代码如下:
import android.content.Context;
import android.util.AttributeSet;
import android.widget.EditText;
import android.widget.LinearLayout;
import android.widget.TextView;
public class EditTextExt1 extends LinearLayout {
private String Text = "" ;
public EditTextExt1(Context context) {
this (context, null );
// TODO Auto-generated constructor stub
}
public EditTextExt1(Context context, AttributeSet attrs) {
super(context, attrs);
// TODO Auto-generated constructor stub
int resouceId = - 1 ;
TextView tv = new TextView(context);
EditText et = new EditText(context);
resouceId = attrs.getAttributeResourceValue( null , " Text " , 0 );
if (resouceId > 0 ) {
Text = context.getResources().getText(resouceId).toString();
} else {
Text = "" ;
}
tv.setText(Text);
addView(tv);
addView(et, new LinearLayout.LayoutParams(LayoutParams.FILL_PARENT,
LayoutParams.WRAP_CONTENT));
this .setGravity(LinearLayout.VERTICAL);
}
}
这种写法,简单明了,不需要额外XML的配置,就可以在我们的VIEW文件下使用。
以上代码通过构造函数中引入的AttributeSet 去查找XML布局的属性名称,然后找到它对应引用的资源ID去找值。使用也时分方便。所以一直以来我也是很喜欢这种写法。
如上,自定好VIEW文件就可以在XML布局下如此使用:
android:layout_width = " wrap_content " android:layout_height = " wrap_content "
Text = " @string/app_name " ></ com.terry.attrs.EditTextExt1 >
好了,这是第一种为VIEW注册属性的写法,比较简单就不多介绍。
下面是第二为VIEW注册属性的写法,这里也要重点说说第二种注册 属性的写法和使用要点,先看一下JAVA代码要如何编写:
import android.content.Context;
import android.content.res.TypedArray;
import android.util.AttributeSet;
import android.widget.EditText;
import android.widget.LinearLayout;
import android.widget.TextView;
public class EditTextExt extends LinearLayout {
public EditTextExt(Context context) {
this (context, null );
// TODO Auto-generated constructor stub
}
public EditTextExt(Context context, AttributeSet attrs) {
super(context, attrs);
// TODO Auto-generated constructor stub
int resouceId = - 1 ;
TypedArray typeArray = context.obtainStyledAttributes(attrs,
R.styleable.EditTextExt);
TextView tv = new TextView(context);
EditText et = new EditText(context);
int N = typeArray.getIndexCount();
for ( int i = 0 ; i < N; i ++ ) {
int attr = typeArray.getIndex(i);
switch (attr) {
case R.styleable.EditTextExt_Oriental:
resouceId = typeArray.getInt(R.styleable.EditTextExt_Oriental,
0 );
this .setOrientation(resouceId == 1 ? LinearLayout.HORIZONTAL
: LinearLayout.VERTICAL);
break ;
case R.styleable.EditTextExt_Text:
resouceId = typeArray.getResourceId(
R.styleable.EditTextExt_Text, 0 );
tv.setText(resouceId > 0 ? typeArray.getResources().getText(
resouceId) : typeArray
.getString(R.styleable.EditTextExt_Text));
break ;
}
}
addView(tv);
addView(et);
typeArray.recycle();
}
}
如上代码,跟前面代码一样。还是用的一个EDITTEXT和TEXTVIEW做基础组件。下面我们一步步分析上面的代码:
R.styleable.EditTextExt 代码的是一个attrs指向的一个declare-styleable 的标签,如下代码:
< resources >
< declare-styleable name ="EditTextExt" >
< attr name ="Text" format ="reference|string" ></ attr >
< attr name ="Oriental" >
< enum name ="Horizontal" value ="1" ></ enum >
< enum name ="Vertical" value ="0" ></ enum >
</ attr >
</ declare-styleable >
</ resources >
这个文件位于,values下的attrs.xml目录下面,我比较喜欢一个自定义View 对应一个declare-styleable标签。
Tip:一个自定义View 第一部分的代码,
R.styleable.EditTextExt);
指定为一个declare-styleable,而在declare-styleable 下的attr (即各属性)Android 的ADT 将会自动生成为declare-styleable的name 名字加上“_”加上对应attr(即属性名称)的名称,如上(EditTextExt_Text)我们要得到Text 就需要R.styleable.EditTextExt_Text,这一点的话可以看看R.java生成文件:
/** Attributes that can be used with a EditTextExt.
<p>Includes the following attributes:</p>
<table>
<colgroup align="left" />
<colgroup align="left" />
<tr><th>Attribute</th><th>Description</th></tr>
<tr><td><code>{ @link #EditTextExt_Oriental com.terry.attrs:Oriental}</code></td><td></td></tr>
<tr><td><code>{ @link #EditTextExt_Text com.terry.attrs:Text}</code></td><td></td></tr>
</table>
@see #EditTextExt_Oriental
@see #EditTextExt_Text
*/
public static final int [] EditTextExt = {
0x7f010000 , 0x7f010001
};
/**
<p>This symbol is the offset where the { @link com.terry.attrs.R.attr#Oriental}
attribute's value can be found in the { @link #EditTextExt} array.
<p>Must be one of the following constant values.</p>
<table>
<colgroup align="left" />
<colgroup align="left" />
<colgroup align="left" />
<tr><th>Constant</th><th>Value</th><th>Description</th></tr>
<tr><td><code>Horizontal</code></td><td>1</td><td></td></tr>
<tr><td><code>Vertical</code></td><td>0</td><td></td></tr>
</table>
@attr name android:Oriental
*/
public static final int EditTextExt_Oriental = 1 ;
/**
<p>This symbol is the offset where the { @link com.terry.attrs.R.attr#Text}
attribute's value can be found in the { @link #EditTextExt} array.
<p>May be a reference to another resource, in the form "<code>@[+][<i>package</i>:]<i>type</i>:<i>name</i></code>"
or to a theme attribute in the form "<code>?[<i>package</i>:][<i>type</i>:]<i>name</i></code>".
<p>May be a string value, using '//;' to escape characters such as '//n' or '//uxxxx' for a unicode character.
@attr name android:Text
*/
public static final int EditTextExt_Text = 0 ;
};
好了,上述的代码写完,我们要在XML布局如何使用呢?这个会跟Android 提供的基础组件的使用方法是一致的。首先,我们要为其提供一个引用包名如下:
xmlns:terry = " http://schemas.android.com/apk/res/com.terry.attrs "
上面提供的是android 基础组件的包名,和我们自己组件的包名。
写好了包名。就可以像使用andriod 基础组件一样使用了,如下全部XML布局源码:
< LinearLayout xmlns:android ="http://schemas.android.com/apk/res/android"
xmlns:terry ="http://schemas.android.com/apk/res/com.terry.attrs"
android:orientation ="vertical" android:layout_width ="fill_parent"
android:layout_height ="fill_parent" >
< TextView android:layout_width ="fill_parent"
android:layout_height ="wrap_content" android:text ="@string/hello" />
< com.terry.attrs.EditTextExt android:id ="@+id/ss"
android:layout_width ="fill_parent" android:layout_height ="wrap_content"
terry:Text ="fdsafda" terry:Oriental ="Vertical" ></ com.terry.attrs.EditTextExt >
< com.terry.attrs.EditTextExt1 android:id ="@+id/ss3"
android:layout_width ="wrap_content" android:layout_height ="wrap_content"
Text ="@string/app_name" ></ com.terry.attrs.EditTextExt1 >
</ LinearLayout >
这是这两种为Android 注册 属性的使用方法,那么两者有什么区别呢?
在这里我认为起码有五点,大家可以找找看还有什么区别:
- 第二种可以编译时报错,如果编程人员随便输入什么第一种是不会报错的,第二种可以支持代码检测功能。
- 第二种写法,跟Android 属性标准写法是一致的,而且可以统一书法规则。
- 第二种写法,可以支持数据格式的验证,比如我们在attrs上注明只支持integer 那么就不可以使用字符串,这是第一种达不到的。
- 第二种写法,可以为VIEW提供选择操作,比如如上我们使用的ENUM让VIEW对应的属性支持ENUM列表,或者为其提供BOOL等只有双项选择的操作。
- 第一种写法,所有的属性必须是引用自资源(不大确定,如果朋友有什么好的DEMO麻烦共享),第二种写法,可以即支持引用资源又可以直接输入做操作,为编程带来更多的方便性。
种种都说明,第二种写法更具规范性,功能更性,代码编写 也更优雅,但个人有个人的使用习惯,我两种都喜欢用,具体看需求吧。呵呵。。。


 2761
2761


 被折叠的 条评论
为什么被折叠?
被折叠的 条评论
为什么被折叠?
 到【灌水乐园】发言


