


备注:
通过前面几章的操作,对Spring Boot已经有了基本的了解,不过Spring Boot他也仅仅是个封装集成引用的盒子而已,需要与具体的项目相结合才能真正的使用起来,
主要是记录下 使用Spring Boot实现 Spring Mvc 和mybatis的整合:
具体配置如下:
1、创建Maven项目,可以是web项目或者也可以是基本maven项目,
2、配置pom.xml
<project xmlns="http://maven.apache.org/POM/4.0.0" xmlns:xsi="http://www.w3.org/2001/XMLSchema-instance"
	xsi:schemaLocation="http://maven.apache.org/POM/4.0.0 http://maven.apache.org/maven-v4_0_0.xsd">
	<modelVersion>4.0.0</modelVersion>
	<groupId>com.sam.project</groupId>
	<artifactId>spring_boot_mvc</artifactId>
	<packaging>war</packaging>
	<version>0.0.1-SNAPSHOT</version>
	<name>spring_boot_mvc Maven Webapp</name>
	<url>http://maven.apache.org</url>

	<parent>
		<groupId>org.springframework.boot</groupId>
		<artifactId>spring-boot-starter-parent</artifactId>
		<version>1.5.1.RELEASE</version>
	</parent>

	<properties>
		<webVersion>3.1</webVersion>
	</properties>
	<dependencies>
		<dependency>
			<groupId>org.springframework.boot</groupId>
			<artifactId>spring-boot-starter-web</artifactId>
			<exclusions>
				<exclusion>
					<artifactId>log4j-over-slf4j</artifactId>
					<groupId>org.slf4j</groupId>
				</exclusion>
				<exclusion>
					<groupId>org.springframework.boot</groupId>
					<artifactId>spring-boot-starter-tomcat</artifactId>
				</exclusion>
			</exclusions>
		</dependency>
		<dependency>
			<groupId>org.springframework.boot</groupId>
			<artifactId>spring-boot-starter-tomcat</artifactId>
			<scope>provided</scope>
		</dependency>

		<dependency>
			<groupId>org.springframework.boot</groupId>
			<artifactId>spring-boot-configuration-processor</artifactId>
			<optional>true</optional>
		</dependency>

		<dependency>
			<groupId>org.springframework.boot</groupId>
			<artifactId>spring-boot-starter-jdbc</artifactId>
		</dependency>
		<dependency>
			<groupId>org.springframework.boot</groupId>
			<artifactId>spring-boot-starter-aop</artifactId>
		</dependency>

		<dependency>
			<groupId>mysql</groupId>
			<artifactId>mysql-connector-java</artifactId>
		</dependency>
		<!--mybatis -->
		<dependency>
			<groupId>org.mybatis.spring.boot</groupId>
			<artifactId>mybatis-spring-boot-starter</artifactId>
			<version>1.2.0</version>
		</dependency>
		<dependency>
			<groupId>com.alibaba</groupId>
			<artifactId>druid</artifactId>
			<version>1.0.11</version>
		</dependency>

		<!-- spring boot tomcat jsp 支持开启 -->
		<dependency>
			<groupId>org.apache.tomcat.embed</groupId>
			<artifactId>tomcat-embed-jasper</artifactId>
		</dependency>
		<!-- servlet支持开启 -->
		<dependency>
			<groupId>javax.servlet</groupId>
			<artifactId>javax.servlet-api</artifactId>
		</dependency>
		<!-- jstl 支持开启 -->
		<dependency>
			<groupId>javax.servlet</groupId>
			<artifactId>jstl</artifactId>
		</dependency>
	</dependencies>

	<build>
		<plugins>
			<plugin>
				<artifactId>maven-compiler-plugin</artifactId>
				<configuration>
					<source>1.8</source>
					<target>1.8</target>
				</configuration>
			</plugin>
		</plugins>
	</build>
</project>
3、配置属性文件
在resources目录下创建application.properties
#数据源驱动
jdbc.ds.url=jdbc:mysql://localhost/springboot?autoReconnect=true&useUnicode=true&characterEncoding=utf-8&zeroDateTimeBehavior=convertToNull
jdbc.ds.username=root
jdbc.ds.password=root
jdbc.ds.driver-class-name=com.mysql.jdbc.Driver

#mybatis配置
mybatis.type-aliases-package=com.sam.project.*.model
mybatis.mapper-locations=classpath:mapper/*.xml

server.port=8088
server.contextPath=/spring_boot
#设置环境配置
#spring.profiles.active=dev


#http encoding
spring.http.encoding.charset=UTF-8
spring.http.encoding.enabled=true
spring.http.encoding.force=true


#日志
logging.file=/export/log
logging.level.root=INFO
logging.level.org.springframework.web=INFO
logging.level.sample.mybatis.mapper=TRACE

#关闭启动Logo
spring.main.banner-mode=off


#设置mvc页面跳转
spring.mvc.view.prefix=/WEB-INF/jsp/
spring.mvc.view.suffix=.jsp
4、配置Mybatis
1)、创建Mapper接口文件
package com.sam.project.mvc.mapper;

import java.util.List;

import com.sam.project.mvc.model.User;

/**
 * @ClassName: UserMapper
 * @Description: mybites数据查询接口
 */
public interface UserMapper {

	List<User> queryList();

	void save(User user);

	void batchDelete(Integer[] ids);

	void update(User user);

}
2)、创建mapper.xml
在resources目录下创建mapper目录,并创建UserMapper.xml
/mapper/UserMapper.xml
<?xml version="1.0" encoding="UTF-8"?>
<!DOCTYPE mapper PUBLIC "-//mybatis.org//DTD Mapper 3.0//EN"
	"http://mybatis.org/dtd/mybatis-3-mapper.dtd">
<mapper namespace="com.sam.project.mvc.mapper.UserMapper">
	<select id="queryList" resultType="com.sam.project.mvc.model.User">
		SELECT u.id, u.username, u.password, u.email, u.useable, u.addtime, u.logintime, u.loginip FROM t_user u
	</select>

	<select id="queryById" resultType="com.sam.project.mvc.model.User">
		SELECT u.id, u.username, u.password, u.email, u.useable, u.addtime, u.logintime, u.loginip FROM t_user u where u.id = #{id}
	</select>

	<insert id="save">
		insert into t_user(username, password, email, useable, addtime)
		values(#{username}, #{password}, #{email}, #{useable}, now())
	</insert>

	<update id="update">
		update t_user set password = #{password}, email = #{email}, useable = #{useable} where id = #{id}
	</update>

	<delete id="batchDelete">
		delete from t_user where id in
		<foreach collection="array" item="item" open="(" separator="," close=")">
			#{item}
		</foreach>
	</delete>

	<!-- <delete id="delUsers">
		delete from t_user where id in
		<foreach collection="list" item="item" open="(" separator="," close=")">
			#{item}
		</foreach>
	</delete> -->
</mapper>
3)、创建实体类
package com.sam.project.mvc.model;

/**
 * @ClassName: User
 * @Description: 实体模型
 */
public class User {
	private Integer id;

	private String username;

	private String password;

	private String email;

	/**
	 * 是否可用(0禁用,1可用)
	 */
	private Integer useable;

	/**
	 * 创建时间
	 */
	private String addtime;

	/**
	 * 登陆时间
	 */
	private String logintime;

	/**
	 * 登陆IP
	 */
	private String loginip;

	/**
	 * @return id
	 */
	public Integer getId() {
		return id;
	}

	/**
	 * @param id
	 */
	public void setId(Integer id) {
		this.id = id;
	}

	/**
	 * @return username
	 */
	public String getUsername() {
		return username;
	}

	/**
	 * @param username
	 */
	public void setUsername(String username) {
		this.username = username;
	}

	/**
	 * @return password
	 */
	public String getPassword() {
		return password;
	}

	/**
	 * @param password
	 */
	public void setPassword(String password) {
		this.password = password;
	}

	/**
	 * @return email
	 */
	public String getEmail() {
		return email;
	}

	/**
	 * @param email
	 */
	public void setEmail(String email) {
		this.email = email;
	}

	/**
	 * 获取是否可用(0禁用,1可用)
	 *
	 * @return useable - 是否可用(0禁用,1可用)
	 */
	public Integer getUseable() {
		return useable;
	}

	/**
	 * 设置是否可用(0禁用,1可用)
	 *
	 * @param useable
	 *            是否可用(0禁用,1可用)
	 */
	public void setUseable(Integer useable) {
		this.useable = useable;
	}

	/**
	 * 获取创建时间
	 *
	 * @return addtime - 创建时间
	 */
	public String getAddtime() {
		return addtime;
	}

	/**
	 * 设置创建时间
	 *
	 * @param addtime
	 *            创建时间
	 */
	public void setAddtime(String addtime) {
		this.addtime = addtime;
	}

	/**
	 * 获取登陆时间
	 *
	 * @return logintime - 登陆时间
	 */
	public String getLogintime() {
		return logintime;
	}

	/**
	 * 设置登陆时间
	 *
	 * @param logintime
	 *            登陆时间
	 */
	public void setLogintime(String logintime) {
		this.logintime = logintime;
	}

	/**
	 * 获取登陆IP
	 *
	 * @return loginip - 登陆IP
	 */
	public String getLoginip() {
		return loginip;
	}

	/**
	 * 设置登陆IP
	 *
	 * @param loginip
	 *            登陆IP
	 */
	public void setLoginip(String loginip) {
		this.loginip = loginip;
	}
}
4)、创建Service业务处理类UserService
package com.sam.project.mvc.service;

import java.util.List;

import org.springframework.beans.factory.annotation.Autowired;
import org.springframework.stereotype.Service;

import com.sam.project.mvc.common.AjaxResult;
import com.sam.project.mvc.mapper.UserMapper;
import com.sam.project.mvc.model.User;

@Service
public class UserService {

	@Autowired
	private UserMapper userMapper;

	public AjaxResult queryList() {
		List<User> list = userMapper.queryList();
		return new AjaxResult(list);
	}

	public AjaxResult save(User user) {
		user.setUsername("user" + System.currentTimeMillis());
		user.setPassword("123456");
		user.setEmail("user" + System.currentTimeMillis() + "@test.com");
		user.setUseable(1);
		userMapper.save(user);
		return new AjaxResult();
	}

	public AjaxResult batchDelete(Integer[] ids) {
		userMapper.batchDelete(ids);
		return new AjaxResult();
	}

	public AjaxResult update(User user) {
		userMapper.update(user);
		return new AjaxResult();
	}

}
4、配置Controller类UserController
package com.sam.project.mvc.controller;

import org.springframework.beans.factory.annotation.Autowired;
import org.springframework.stereotype.Controller;
import org.springframework.web.bind.annotation.RequestMapping;
import org.springframework.web.bind.annotation.ResponseBody;

import com.sam.project.mvc.common.AjaxResult;
import com.sam.project.mvc.model.User;
import com.sam.project.mvc.service.UserService;

/**
 * @ClassName: UserController
 * @Description: 用户Controller
 */
@Controller
public class UserController {

	@Autowired
	private UserService userService;

	@ResponseBody
	@RequestMapping("/queryList")
	public AjaxResult queryList(){
		return userService.queryList();
	}

	@ResponseBody
	@RequestMapping("/addUser")
	public AjaxResult addUser(User user){
		return userService.save(user);
	}

	@ResponseBody
	@RequestMapping("/delUser")
	public AjaxResult delUser(Integer[] ids){
		return userService.batchDelete(ids);
	}

	@ResponseBody
	@RequestMapping("/updateUser")
	public AjaxResult updateUser(User user){
		return userService.update(user);
	}

}
5、配置数据库处理类
package com.sam.project.mvc.common;

import javax.sql.DataSource;

import org.mybatis.spring.annotation.MapperScan;
import org.springframework.boot.context.properties.ConfigurationProperties;
import org.springframework.context.annotation.Bean;
import org.springframework.context.annotation.Configuration;

import com.alibaba.druid.pool.DruidDataSource;

/**
 * @ClassName: DataSourceConfiguration
 * @Description: 单数据源配置
 */
@Configuration
@MapperScan(basePackages = "com.sam.project.*.mapper")
public class DataSourceConfiguration {

    @Bean
    @ConfigurationProperties(prefix = "jdbc.ds")
    public DataSource readDataSource() {
        return new DruidDataSource();
    }
}
数据库创建脚本:
CREATE TABLE `t_user` (
  `id` int(11) NOT NULL,
  `username` varchar(255) default NULL,
  `password` varchar(255) default NULL,
  `email` varchar(255) default NULL,
  `useable` int(20) default NULL,
  `addtime` datetime default NULL,
  `logintime` datetime default NULL,
  `loginip` varchar(255) default NULL,
  PRIMARY KEY  (`id`)
) ENGINE=InnoDB DEFAULT CHARSET=utf8;
6、写个测试json返回的公用类
package com.sam.project.mvc.common;

/**
 * @ClassName: AjaxResult
 * @Description: 封装返回数据
 */
public class AjaxResult {

	private int retcode = 1;
	private String retmsg = "操作成功";
	private Object data;

	public AjaxResult(int retcode, String retmsg, Object data){
		this.retcode = retcode;
		this.retmsg = retmsg;
		this.data = data;
	}

	public AjaxResult(int retcode, String retmsg){
		this.retcode = retcode;
		this.retmsg = retmsg;
	}

	public AjaxResult(Object data){
		this.retmsg = "查询成功";
		this.data = data;
	}

	public AjaxResult(int retcode){
		this.retcode = retcode;
		this.retmsg = "操作失败";
	}

	public AjaxResult(String retmsg){
		this.retcode = 0;
		this.retmsg = retmsg;
	}

	public AjaxResult(){

	}

	public int getRetcode() {
		return retcode;
	}
	public void setRetcode(int retcode) {
		this.retcode = retcode;
	}
	public String getRetmsg() {
		return retmsg;
	}
	public void setRetmsg(String retmsg) {
		this.retmsg = retmsg;
	}
	public Object getData() {
		return data;
	}
	public void setData(Object data) {
		this.data = data;
	}

	@Override
	public String toString() {
		return "AjaxResult [retcode=" + retcode + ", retmsg=" + retmsg + ", data=" + data + "]";
	}

}
7、创建启动入口:
package com.sam.project.mvc;

import org.springframework.boot.SpringApplication;
import org.springframework.boot.autoconfigure.SpringBootApplication;
import org.springframework.boot.builder.SpringApplicationBuilder;
import org.springframework.boot.web.support.SpringBootServletInitializer;
import org.springframework.cache.annotation.EnableCaching;

/**
 * @ClassName: Application
 * @Description: springboot启动器
 */
// 开启缓存
@EnableCaching
@SpringBootApplication
public class Application extends SpringBootServletInitializer {

	@Override
	protected SpringApplicationBuilder configure(SpringApplicationBuilder application) {
		return application.sources(Application.class);
	}

	public static void main(String[] args) {
		SpringApplication.run(Application.class, args);
	}
}
好了,至此,配置完成,创建完成后目录如下:
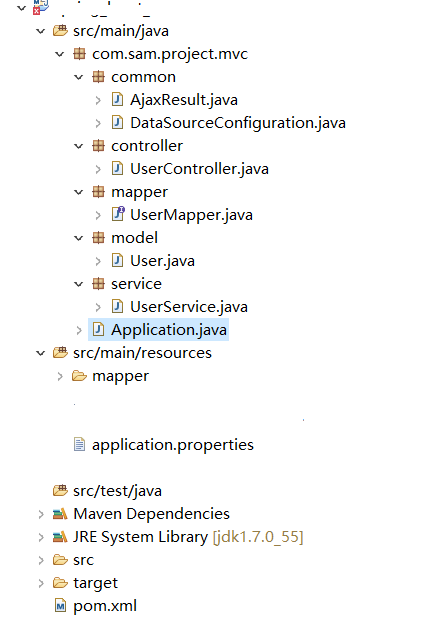
启动Application 类Main方法进行开启Spring Boot
由于没有做页面,所以启动完成后,直接访问后台方法 http://localhost:8088/spring_boot/queryList

至此使用Spring Boot配置Spring Mvc 和MyBatis完成!


 2万+
2万+


 被折叠的 条评论
为什么被折叠?
被折叠的 条评论
为什么被折叠?
 到【灌水乐园】发言


