


1、gtx1070显卡驱动安装
Step 1: Remove the Older version of Nvidia driver before installation
sudo apt-get purge nvidia*
Step 2: Reboot the system
Step 3: Download the Nvidia Driver 367.27,记住下载的位置,不要在中文目录下
For 32bit
wget http://us.download.nvidia.com/XFree86/Linux-x86/367.2/NVIDIA-Linux-x86-367.27.run
For 64 bit
wget http://us.download.nvidia.com/XFree86/Linux-x86_64/367.27/NVIDIA-Linux-x86_64-367.27.run
Step 4: Switch to command prompt and stop the running Graphics session
按住Ctrl+Alt+F1切换到命令提示窗,需要记住下面的命令
For Ubuntu
sudo service lightdm stop
sudo service gdm stop
For LinuxMint
sudo mdm stop
Step 5: Give execute permissions to the installer
sudo chmod 755 NVIDIA-Linux-x86_64-367.27.run
Step 6: Install the Nvidia 367.27 driver
sudo ./NVIDIA-Linux-x86_64-367.27.run
安装完成后重启使用
nvidia-smi
安装正确后将显示
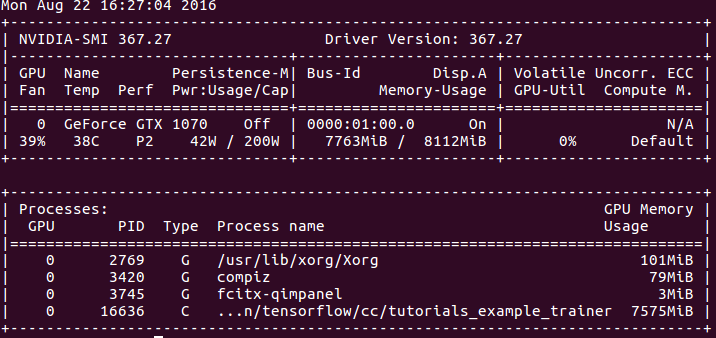
2、cuda安装
2.1、禁用nouveau(是否必要未验证)
sudo gedit /etc/modprobe.d/blacklist.conf
在最后添加:
blacklist nouveau
退出
sudo update-initramfs -u
sudo reboot
2.2更换gcc版本
ubuntu16.04默认安装的gcc版本为gcc-5.4,(可用gcc –version查看)有时可能需要低版本的,所以我们先安装gcc-4.8.5
sudo apt-get install -y gcc-4.8 g++-4.8
sudo update-alternatives --install /usr/bin/gcc gcc /usr/bin/gcc-4.8 20
sudo update-alternatives --install /usr/bin/g++ g++ /usr/bin/g++-4.8 20
cd /usr/bin
sudo cp gcc gcc_backup
sudo cp g++ g++_backup
sudo rm gcc g++
sudo ln -s gcc-4.8 gcc
sudo ln -s g++-4.8 g++
这样再用gcc –version查看就是4.8.5了,如果想切换为系统默认的版本:
sudo rm gcc g++
sudo ln -s gcc-5 gcc
sudo ln -s g++-5 g++
2.3下载并安装Cuda Toolkit
https://developer.nvidia.com/cuda-downloads
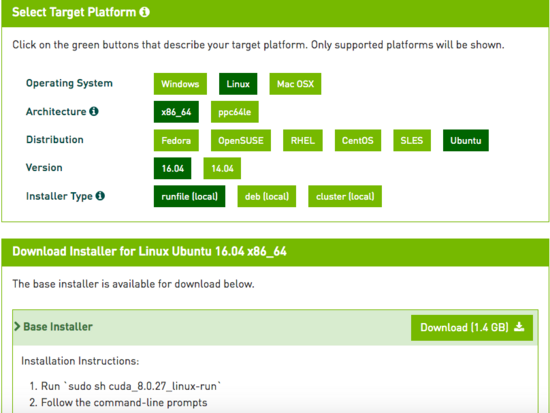
这里选择了Ubuntu16.04系统runfile安装方案。
大小1.4G,下载完成后,到下载目录:
sudo sh cuda_8.0.27_linux.run
如果提示空间不足,在命令后面加上—tmpdir=/opt/temp/为:
sudo sh cuda_8.0.27_linux.run –tmpdir=/opt/temp/
之后回车有一系列提示需要确认,具体如下:
注意Install NVIDIA Accelerated Graphics Driver for Linux-x86_64 361.62?
答案必须是n,否则之前安装的驱动就白费了。
Do you accept the previously read EULA?accept/decline/quit: accept
Install NVIDIA Accelerated Graphics Driver for Linux-x86_64 361.62?(y)es/(n)o/(q)uit: n
Install the CUDA 8.0 Toolkit?(y)es/(n)o/(q)uit: y
Enter Toolkit Location[ default is /usr/local/cuda-8.0 ]:
Do you want to install a symbolic link at /usr/local/cuda?(y)es/(n)o/(q)uit: y
Install the CUDA 8.0 Samples?(y)es/(n)o/(q)uit: y
Enter CUDA Samples Location[ default is /home/textminer ]:
Installing the CUDA Toolkit in /usr/local/cuda-8.0 …
安装完成后声明环境变量:
sudo gedit ~/.bashrc
在最后加入:
export CUDA_HOME=/usr/local/cuda-8.0
export LD_LIBRARY_PATH=/usr/local/cuda-8.0/lib64:$LD_LIBRARY_PATH
export PATH=/usr/local/cuda-8.0/bin:$PATH
退出后使其立即生效:
source ~/.bashrc
在这里输入
nvcc --version
看有没有信息输出,如果没有就重启终端。或者重启一下电脑。

测试:
打开到例子目录下进入到1_Utilities/deviceQuery目录下
sudo make
./deviceQuery
通过结果查看是否安装成功
3、下载安装cuDNN
Download and install cuDNN
https://developer.nvidia.com/cudnn
Download cuDNN v4 (v5 is currently a release candidate and is only supported when installing TensorFlow from sources).此处下载的是v5.1
下载完成后:
tar -xf cudnn-8.0-linux-x64-v5.1.tgz
sudo cp cuda/include/cudnn.h /usr/local/cuda/include
sudo cp cuda/lib64/libcudnn* /usr/local/cuda/lib64
sudo chmod a+r /usr/local/cuda/include/cudnn.h /usr/local/cuda/lib64/libcudnn*
4、tensorflow安装
Tensorflow 0.9.0 pip install (目前不支持CUDA8.0)
Tensorflow 0.9.0 docker install (目前不支持CUDA8.0)
所以使用build from source来安装
4.1、安装bazel
sudo apt-get install openjdk-8-jdk
echo "deb http://storage.googleapis.com/bazel-apt stable jdk1.8" | sudo tee /etc/apt/sources.list.d/bazel.list
curl https://storage.googleapis.com/bazel-apt/doc/apt-key.pub.gpg | sudo apt-key add -
sudo apt-get update
sudo apt-get install bazel
4.2、编译tensorflow
sudo apt-get install python-numpy swig python-dev
mkdir ~/github && cd ~/github
git clone --recurse-submodules https://github.com/tensorflow/tensorflow
cd ~/github/tensorflow && ./configure
根据情况进行输入选择
Please specify the location of python. [Default is /usr/bin/python]:
Do you wish to build TensorFlow with Google Cloud Platform support? [y/N] n
No Google Cloud Platform support will be enabled for TensorFlow
Found possible Python library paths:
/usr/local/lib/python2.7/dist-packages
/usr/lib/python2.7/dist-packages
Please input the desired Python library path to use. Default is [/usr/local/lib/python2.7/dist-packages]
/usr/local/lib/python2.7/dist-packages
Do you wish to build TensorFlow with GPU support? [y/N] y
GPU support will be enabled for TensorFlow
Please specify which gcc should be used by nvcc as the host compiler. [Default is /usr/bin/gcc]:
Please specify the Cuda SDK version you want to use, e.g. 7.0. [Leave empty to use system default]: 8.0
Please specify the location where CUDA 8.0 toolkit is installed. Refer to README.md for more details. [Default is /usr/local/cuda]:
Please specify the Cudnn version you want to use. [Leave empty to use system default]:
Please specify the location where cuDNN library is installed. Refer to README.md for more details. [Default is /usr/local/cuda]:
Please specify a list of comma-separated Cuda compute capabilities you want to build with.
You can find the compute capability of your device at: https://developer.nvidia.com/cuda-gpus.
Please note that each additional compute capability significantly increases your build time and binary size.
[Default is: “3.5,5.2”]:
Setting up Cuda include
Setting up Cuda lib64
Setting up Cuda bin
Setting up Cuda nvvm
Setting up CUPTI include
Setting up CUPTI lib64
Configuration finished
接下来输入:
bazel build -c opt –config=cuda //tensorflow/cc:tutorials_example_trainer
(如果zlib not installed:sudo apt-get install zlib1g-dev)
(如果Getting “missing dependency declarations”错误,那么把这句话
cxx_builtin_include_directory: “/usr/local/cuda-8.0/include”
加到这个文件中相应有 cxx_builtin_include_directory的位置
third_party/gpus/crosstool/CROSSTOOL)
( 如果重新运行上面的命令bazel clean一下)
bazel-bin/tensorflow/cc/tutorials_example_trainer –use_gpu
如果有很长的输出,则说明可以调用cuda了
接着:
bazel build -c opt –config=cuda //tensorflow/tools/pip_package:build_pip_package
bazel-bin/tensorflow/tools/pip_package/build_pip_package /tmp/tensorflow_pkg
(如有错误ImportError: No module named setuptools,那么用pip安装setuptools)
sudo pip install /tmp/tensorflow_pkg/tensorflow-0.10.0rc0-py2-none-any.whl
具体版本进入对应目录看一下就好了。
到此就都安装完成了,可以进入python环境,注意不要在tensorflow目录下打开
import tensorflow as tf
如果没有报错,则安装成功!


 767
767


 被折叠的 条评论
为什么被折叠?
被折叠的 条评论
为什么被折叠?
 到【灌水乐园】发言


