


 本文详细介绍如何自定义实现一个带有下拉刷新和上拉加载更多功能的View,包括实现思路、具体步骤以及代码实现。
学习自定义View已经有一段时间了,现在都有个毛病了,看了其它应用一些效果,然后就在那研究半天,这个东西我能实现吗?我能! 哈哈哈,以前我都是看到自定义控件望尘莫及的,现在都能有点自信的说我能了,不错!只要坚持并不断总结,一定会有收获的,废话不说了,今天也算是前面学习自定义View的一个总结,一步一步的实现一个下拉刷新View。
滑动到顶部的时候弹出下拉刷新,滑动到底部自动弹出进度条加载更多,也可以手动上拉加载更多
当然如果只用ListView的话也可以直接拿代码用:https://github.com/913453448/PullToRefreshView
先看下效果:
实现思路:
1、还是自定一个View继承LineaLayout,orientation为Vertical
2、定义一个HeaderView放在LinearLayout的顶部,ListView放中间,自定义一个FooterView放在最底下。
3、通过改变HeaderVeiw的topMargin来实现刷新控件的显示与隐藏。
可能我这样说有一点抽象了,下面我通过改变布局文件来演示下显示的过程:
首先我们定义一个Layout文件
test.layout:
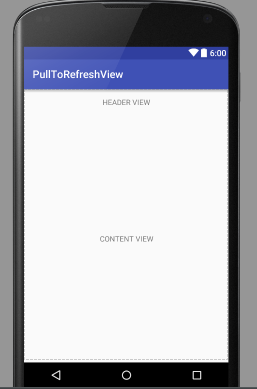
1、把HeaderView的topMargin设置0,这个时候我们的HeaderView是显示出来的,也就是下拉刷新中。
<LinearLayout xmlns:android="http://schemas.android.com/apk/res/android"
    android:layout_width=match_parent
    android:layout_height=match_parent
    android:orientation=vertical>
    <TextView
        android:layout_marginTop=0dp
        android:layout_gravity=center
        android:gravity=center
        android:layout_width=wrap_content
        android:layout_height=50dp
        android:text=HEADER VIEW
        />
    <TextView
        android:layout_gravity=center
        android:gravity=center
        android:layout_width=match_parent
        android:layout_height=match_parent
        android:text=CONTENT VIEW
        />
    <TextView
        android:layout_gravity=center
        android:gravity=center
        android:layout_width=match_parent
        android:layout_height=50dp
        android:text=FOOTER VIEW
        />
</LinearLayout>
效果图:
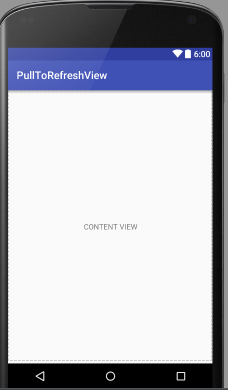
2、我们把HeaderView的topMargin设置成-50dp,这时HeaderView隐藏了,也就是正常状态。
<LinearLayout xmlns:android="http://schemas.android.com/apk/res/android"
    android:layout_width=match_parent
    android:layout_height=match_parent
    android:orientation=vertical>
    <TextView
        android:layout_marginTop=-50dp
        android:layout_gravity=center
        android:gravity=center
        android:layout_width=wrap_content
        android:layout_height=50dp
        android:text=HEADER VIEW
        />
    <TextView
        android:layout_gravity=center
        android:gravity=center
        android:layout_width=match_parent
        android:layout_height=match_parent
        android:text=CONTENT VIEW
        />
    <TextView
        android:layout_gravity=center
        android:gravity=center
        android:layout_width=match_parent
        android:layout_height=50dp
        android:text=FOOTER VIEW
        />
</LinearLayout>
效果图:
3、我们再把HeaderView的topMargin改为-100dp,这时footerView可见了,也就是上拉加载中。
<LinearLayout xmlns:android="http://schemas.android.com/apk/res/android"
    android:layout_width=match_parent
    android:layout_height=match_parent
    android:orientation=vertical>
    <TextView
        android:layout_marginTop=-100dp
        android:layout_gravity=center
        android:gravity=center
        android:layout_width=wrap_content
        android:layout_height=50dp
        android:text=HEADER VIEW
        />
    <TextView
        android:layout_gravity=center
        android:gravity=center
        android:layout_width=match_parent
        android:layout_height=match_parent
        android:text=CONTENT VIEW
        />
    <TextView
        android:layout_gravity=center
        android:gravity=center
        android:layout_width=match_parent
        android:layout_height=50dp
        android:text=FOOTER VIEW
        />
</LinearLayout>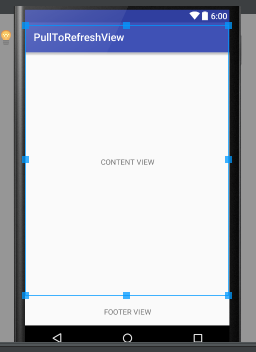
好啦! 演示完毕了,看完整个过程是不是有点思路了呢,其实看起来还挺容易的对吧,呵呵,不过实现起来还不是那么容易的咯,既然是学习嘛,下面我们来一步一步实现……
第一步:创建一个叫PullRefreshView的类继承LinearLayout,然后覆盖三个构造方法,不要再问为什么要覆盖三个构造方法了,因为父类实现了这几个构造方法,身为子类要显示的用super()来调用父类的构造方法,带一个参数的构造方法会在比如我们直接new一个组件的时候用到,带两个参数的,如果我们写在了布局文件中系统new的时候会调用,带三个参数的构造方法,当我们new一个View的时候需要指定默认style的时候调用,待会的demo也会用到带三个参数的构造方法。
public class PullRefreshView extends LinearLayout{
    /**上下文*/
    private Context mContext;
    public PullRefreshView(Context context) {
        this(context, null);
    }

    public PullRefreshView(Context context, AttributeSet attrs) {
        this(context, attrs, 0);
    }

    public PullRefreshView(Context context, AttributeSet attrs, int defStyleAttr) {
        super(context, attrs, defStyleAttr);
        //设置LinearLayout默认方向为垂直方向
        this.setOrientation(LinearLayout.VERTICAL);
        this.mContext=context;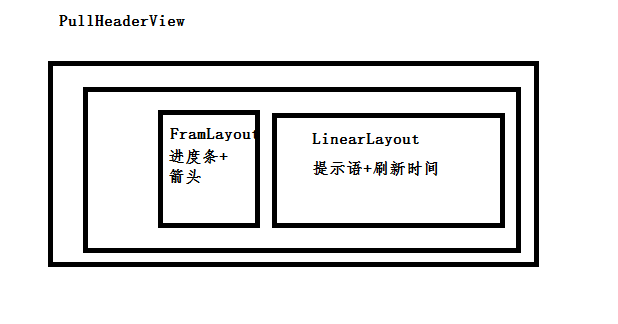
}第二步:我们要往主布局LinearLayout中添加一个HeaderView了,在添加之前我们先定一个自己的PullHeaderView,画的有点丑
大概的样子:
照样是自定义View的步骤:
1、自定义一个View继承LinearLayout,覆盖三个构造方法,然后初始化View(也就是添加布局)
/**
 * Author:Yqy
 * Date:2016-08-23
 * Desc:下拉刷新HeaderView
 * Company:cisetech
 */
public class PullHeaderView extends LinearLayout {
    private Context mContext;
    /**
     * 主View
     */
    private LinearLayout headerView;
    /**
     * 箭头图标View
     */
    private ImageView arrowImageView;
    /**
     * 进度图标View
     */
    private ProgressBar headerProgressBar;
    /**
     * 箭头图标
     */
    private Bitmap arrowBitmap;
    /**
     * 文本提示的View
     */
    private TextView tipsTextView;
    /**
     * 提示刷新时间的View
     */
    private TextView headerTimeView;
    /**
     * 当前控件的状态
     */
    private int mState = -1;
    /**
     * 箭头向上时候的动画
     */
    private Animation mRotateUpAnim;
    /**
     * 箭头向下时候的动画
     */
    private Animation mRotateDownAnim;
    /**
     * 动画持续的时间
     */
    private final int ROTATE_ANIM_DURATION = 180;
    /**
     * 提示下拉刷新
     */
    public final static int STATE_NORMAL = 0;
    /**
     * 提示松开刷新
     */
    public final static int STATE_READY = 1;
    /**
     * 提示正在刷新
     */
    public final static int STATE_REFRESHING = 2;
    /**
     * 上一次刷新的时间
     */
    private String lastRefreshTime;
    /**
     * Header的高度
     */
    private int headerHeight;

    public PullHeaderView(Context context) {
        this(context, null);
    }

    public PullHeaderView(Context context, AttributeSet attrs) {
        this(context, attrs, 0);
    }

    public PullHeaderView(Context context, AttributeSet attrs, int defStyleAttr) {
        super(context, attrs, defStyleAttr);
        this.mContext = context;
        initView();
    }

    /**
     * 初始化控件
     */
    private void initView() {
        /**
         * 创建一个整体的刷新栏布局,然后放在this中,
         * 也就是我们画图中的第二层,方向为水平
         * setOrientation(LinearLayout.HORIZONTAL);
         */
        headerView = new LinearLayout(mContext);
        headerView.setOrientation(LinearLayout.HORIZONTAL);
        headerView.setGravity(Gravity.CENTER);
        headerView.setPadding(0, Utils.dp2px(mContext, 10), 0, Utils.dp2px(mContext, 10));//设置padding
        /**
         * 创建一个FramLayout,
         * 因为进度条跟箭头是放在一起的
         */
        FrameLayout headImage = new FrameLayout(mContext);
        arrowBitmap = Utils.getBitmapFromSrc(mContext,R.mipmap.arrow);
        arrowImageView=new ImageView(mContext);
        arrowImageView.setImageBitmap(arrowBitmap);
        /**
         * 创建一个进度条,默认Style为
         * android.R.attr.progressBarStyleSmall
         * 默认是不显示的
         */
        headerProgressBar = new ProgressBar(mContext, null, android.R.attr.progressBarStyleSmall);
        headerProgressBar.setVisibility(View.GONE);
        /**
         * 然后把箭头跟进度条放入FramLayout中
         * 大小为40dp
         */
        LinearLayout.LayoutParams imgLp = new LinearLayout.LayoutParams(-2, -2);
        imgLp.gravity = Gravity.CENTER;
        imgLp.width = Utils.dp2px(mContext, 40);
        imgLp.height = Utils.dp2px(mContext, 40);
        headImage.addView(arrowImageView, imgLp);
        headImage.addView(headerProgressBar, imgLp);
        /**
         * 添加提示文字跟刷新时间
         * 放入headTextLayout(LinearLayout中)
         * 方向为LinearLayout.VERTICAL
         */
        LinearLayout headTextLayout = new LinearLayout(mContext);
        headTextLayout.setOrientation(LinearLayout.VERTICAL);
        headTextLayout.setGravity(Gravity.CENTER);
        tipsTextView = new TextView(mContext);
        tipsTextView.setTextColor(Color.DKGRAY);
        tipsTextView.setTextSize(TypedValue.COMPLEX_UNIT_SP, 14.5f);
        headerTimeView = new TextView(mContext);
        headerTimeView.setTextColor(Color.DKGRAY);
        headerTimeView.setTextSize(TypedValue.COMPLEX_UNIT_SP, 14.5f);
        LinearLayout.LayoutParams textLp = new LinearLayout.LayoutParams(-2, -2);
        headTextLayout.addView(tipsTextView, textLp);
        headTextLayout.addView(headerTimeView, textLp);

        /**
         * 创建一个叫headerLayout(LinearLayout)
         * 把headImage跟headTextLayout包裹起来
         */
        LinearLayout.LayoutParams headLp = new LinearLayout.LayoutParams(LayoutParams.WRAP_CONTENT, ViewGroup.LayoutParams.WRAP_CONTENT);
        headLp.gravity = Gravity.CENTER;
        headLp.rightMargin = Utils.dp2px(mContext, 10);
        LinearLayout headerLayout = new LinearLayout(mContext);
        headerLayout.setOrientation(LinearLayout.HORIZONTAL);
        headerLayout.setGravity(Gravity.CENTER);
        headerLayout.addView(headImage, headLp);
        headerLayout.addView(headTextLayout, headLp);
        /**
         * 把创建一个叫headerLayout放入到headerView中
         */
        LinearLayout.LayoutParams lp = new LinearLayout.LayoutParams(LayoutParams.FILL_PARENT, LayoutParams.WRAP_CONTENT);
        lp.gravity = Gravity.BOTTOM;
        headerView.addView(headerLayout, lp);
        /**
         * 最后把headerView主布局添加到PullHeaderView中
         */
        this.addView(headerView, lp);
        //获取控件的高度,获取之前先measure一下,不然拿不到宽高
        Utils.measureView(this);
        headerHeight = this.getMeasuredHeight();
        /**
         * 初始化箭头朝上的动画
         */
        mRotateUpAnim = new RotateAnimation(0.0f, -180f, Animation.RELATIVE_TO_SELF,
                0.5f, Animation.RELATIVE_TO_SELF, 0.5f);
        mRotateUpAnim.setDuration(ROTATE_ANIM_DURATION);
        mRotateUpAnim.setFillAfter(true);
        /**
         * 初始化箭头朝下的动画
         */
        mRotateDownAnim= new RotateAnimation(-180f,0.0f, Animation.RELATIVE_TO_SELF,
                0.5f, Animation.RELATIVE_TO_SELF, 0.5f);
        mRotateDownAnim.setDuration(ROTATE_ANIM_DURATION);
        mRotateDownAnim.setFillAfter(true);

    }
}第二步:定义setState方法,因为下拉刷新有几个状态,我们需要根据PullRefreshView传入的状态进行HeaderView的显示状态,状态跟HeaderView显示的状态为:
/**
* 提示下拉刷新
*/
public final static int STATE_NORMAL = 0;
/**
* 提示松开刷新
*/
public final static int STATE_READY = 1;
/**
* 提示正在刷新
*/
public final static int STATE_REFRESHING = 2;
/**
     * 设置当前HeaderView的状态
     * @param state
     */
    public void setState(int state){
        //当前状态跟设置的状态一致的时候
        if(state==mState){
            return ;
        }
        //为刷新中的时候,箭头隐藏,进度条显示
        if(state==STATE_REFRESHING){
            arrowImageView.clearAnimation();
            arrowImageView.setVisibility(View.GONE);
            headerProgressBar.setVisibility(View.VISIBLE);
        }else{
            arrowImageView.setVisibility(View.VISIBLE);
            headerProgressBar.setVisibility(View.GONE);
        }
        switch (state){
            //当为下拉刷新的时候,箭头朝下
            case STATE_NORMAL:
                if(mState==STATE_READY){//如果前面状态是箭头朝上
                    arrowImageView.startAnimation(mRotateDownAnim);
                }
                if(mState==STATE_REFRESHING){
                    arrowImageView.clearAnimation();
                }
                tipsTextView.setText("下拉刷新");
                if(TextUtils.isEmpty(lastRefreshTime)){
                    lastRefreshTime=Utils.getCurrentDate();
                    headerTimeView.setText("刷新时间: "+lastRefreshTime);
                }else{
                    headerTimeView.setText("上次刷新时间:" +lastRefreshTime);
                }
                break;
            case STATE_READY:
                if (mState != STATE_READY) {
                    arrowImageView.clearAnimation();
                    arrowImageView.startAnimation(mRotateUpAnim);
                    tipsTextView.setText("该放手啦!");
                    headerTimeView.setText("上次刷新时间:" + lastRefreshTime);
                }
                break;
            case STATE_REFRESHING:
                lastRefreshTime=Utils.getCurrentDate();
                tipsTextView.setText("正在刷新...");
                headerTimeView.setText("本次刷新时间:" + lastRefreshTime);
                break;
            default:
        }
        mState=state;
    }
整个HeaderView的内容还是比较多的,但是只要思路不要乱就可以了,代码多一点也无所谓啦,可以写完后再去优化一下代码的,自我感觉有些地方写的还是有点臃肿了。
第三步:照样来定义一个FooterView,因为FooterView的布局很简单,就一个ProgressBar,我就不一一描述了,直接贴代码了
/**
 * Author:Yqy
 * Date:2016-08-23
 * Desc:上拉加载footView
 * Company:cisetech
 */
public class PullFootView extends LinearLayout {
    private Context mContext;
    private LinearLayout footView;
    private ProgressBar mProgressBar;
    private int footHeight;
    public PullFootView(Context context) {
        this(context,null);
    }

    public PullFootView(Context context, AttributeSet attrs) {
        this(context, attrs, 0);
    }

    public PullFootView(Context context, AttributeSet attrs, int defStyleAttr) {
        super(context, attrs, defStyleAttr);
        initView(context);
    }

    /**
     * 初始化
     * @param context
     */
    private void initView(Context context) {
        this.mContext=context;
        this.setOrientation(LinearLayout.HORIZONTAL);
        footView=new LinearLayout(mContext);
        mProgressBar=new ProgressBar(mContext,null,android.R.attr.progressBarStyleSmall);
        LinearLayout.LayoutParams progressLp=new LinearLayout.LayoutParams(-2,-2);
        progressLp.gravity= Gravity.CENTER;
        progressLp.width= Utils.dp2px(mContext,40);
        progressLp.height=Utils.dp2px(mContext,40);
        footView.addView(mProgressBar,progressLp);
        LinearLayout.LayoutParams footLp=new LinearLayout.LayoutParams(-2,-2);
        footLp.gravity=Gravity.CENTER;
        footView.setGravity(Gravity.CENTER);
        this.addView(footView,footLp);
        Utils.measureView(this);
        footHeight=this.getMeasuredHeight();
    }

    /**
     * 获取footview的高度
     * @return
     */
    public int getFootViewHeight() {
        return footHeight;
    }
    private int mSate;
    public void setState(int state) {
        if(mSate==state){
            return;
        }
        if(state==PullHeaderView.STATE_REFRESHING||state==PullHeaderView.STATE_READY){
            this.setVisibility(View.VISIBLE);
        }else{
            this.setVisibility(View.GONE);
        }
        mSate=state;
    }
}
第四步:写完了HeaderView跟FooterView,我们要添加到PullRefreshView中去了
1、先添加HeaderView,因为我们的HeaderView是放在最上面的,接下来添加的是我们的ContentView(当然,布局中已经添加进来了),最后当加载完布局文件后我们添加FooterView,跟我一开始演示的那个一样的顺序了。
我们在构造方法中调用addHeaderView方法:
public PullRefreshView(Context context, AttributeSet attrs, int defStyleAttr) {
        super(context, attrs, defStyleAttr);
        this.setOrientation(LinearLayout.VERTICAL);
        this.mContext=context;
        /**
         * 添加头部刷新view
         */
        addHeaderView();
    }
 /**
     * 添加头部刷新View
     */
    private void addHeaderView() {
        mHeaderView=new PullHeaderView(mContext);
        mHeaderViewHeight=mHeaderView.getHeaderHeight();
        mHeaderView.setGravity(Gravity.BOTTOM);

        LayoutParams params = new LayoutParams(LayoutParams.MATCH_PARENT, mHeaderViewHeight);
        // 设置topMargin的值为负的header View高度,隐藏在最上方
        params.topMargin = -mHeaderViewHeight;
        addView(mHeaderView, params);
    }
2、当布局文件加载完毕的时候,这个时候PullRefreshView中已经有两个布局了,依次是HeaderView、ContentView、然后该添加我们的FooterView了。
 /**
     * 当加载完布局后,获取ListView
     */
    @Override
    protected void onFinishInflate() {
        super.onFinishInflate();
        //添加footView,
        addFootView();
        //获取AdapterView
        initContentAdapterView();
    }

    /**
     * 添加FootView
     */
    private void addFootView() {
        mFootView=new PullFootView(mContext);
        mFootViewHeight=mFootView.getFootViewHeight();
        LayoutParams params = new LayoutParams(LayoutParams.MATCH_PARENT, mFootViewHeight);
        mFootView.setGravity(Gravity.CENTER_HORIZONTAL);
        addView(mFootView, params);
    }
前面都是比较简单的步骤,现在到了下拉刷新组件关键的几步了
第五步:重写onIntercepterTouchEvent方法,拦截事件,这里先拿ListView来说了。
当ListView滑动到顶部的时候:
也就是ListView的getFirstVisiblePosition()为0,然后第一个child的top为0
当ListView滑动到底部的时候:
最后一个child的bottom=PullRefreshView的高度并且getLastVisiblePosition()==mAdapterView.getCount()-1
当前最后一个child为所有child中最后一个child。
当满足滑动到底部或者顶部其中一个条件的时候,这个时候需要拦截事件交给父控件处理了,并且判断是上拉还是下拉,然后在父控件的onTouchEvent方法中去处理滑动了。
 /**xx
     * 处理事件拦截
     */
    @Override
    public boolean onInterceptTouchEvent(MotionEvent ev) {
        int x= (int) ev.getX();
        int y= (int) ev.getY();
        int action=ev.getAction();
        switch (action){
            case MotionEvent.ACTION_DOWN://记录按下时候的位置
                mLastMotionX=x;
                mLastMotionY=y;
                break;
            case MotionEvent.ACTION_MOVE:
                //duraY>0是向下滑动,<0是向上滑动
                int duraX=x-mLastMotionX;
                int duraY=y-mLastMotionY;
                //解决错误滑动操作
                if(Math.abs(duraX)<Math.abs(duraY)&&Math.abs(duraY)>10){
                    if(isRefreshScroll(duraY)){//判断是否滑动到底部或者顶部
                        return true;
                    }
                }
                break;
            case MotionEvent.ACTION_CANCEL:
            case MotionEvent.ACTION_UP:
                isAllowFootRefreshing=true;
                break;
        }
        return super.onInterceptTouchEvent(ev);
    }

    /**
     * 判断是否需要拦截事件,也就是是否滑动到底部或者顶部
     * @param duraY
     * @return boolean
     */
    private boolean isRefreshScroll(int duraY) {
        //如果正在加载或者正在刷新的时候,直接不拦截事件
        if(mPullRefreshing||mPullLoading){
            return false;
        }
        if(mAdapterView!=null){
            if(duraY>0){//向下滑动
                if(!mEnablePullRefresh){
                    return false;//如果禁止了下拉刷新那么不拦截
                }
                View child=mAdapterView.getChildAt(0);
                if(child==null){
                    return false;
                }
                int top=child.getTop();
                int padding=mAdapterView.getPaddingTop();
                //判断是否滑动到了顶部
                if(mAdapterView.getFirstVisiblePosition()==0&&Math.abs(top - padding)<=11){
                    mPullState=PULL_DOWN_STATE;
                    return true;
                }
            }else if(duraY<0){//上拉的时候
                isAllowFootRefreshing=false;
                View child = mAdapterView.getChildAt(mAdapterView.getChildCount() - 1);
                if(child!=null&&child.getBottom()<=getMeasuredHeight()&&mAdapterView.getLastVisiblePosition()==mAdapterView.getCount()-1){
                    mPullState=PULL_UP_STATE;
                    return true;
                }
            }
        }
        return false;
    }
第六步:当父类拦截到事件自己处理的时候,这个时候说明需要根据滑动的状态和距离对HeaderView和FooterView进行操作了。
我们onTouchEvent方法中不处理ACTION_DOWN的操作,
因为前面onInterceopterTouchEvent方法中记录了是下拉还是上拉状态了,所以当ACTION为ACTION_MOVE移动的时候,根据记录的状态处理上拉和下拉
 case MotionEvent.ACTION_MOVE:
                int duraY=y-mLastMotionY;
                if(mPullState==PULL_DOWN_STATE){
                    //执行下拉操作
                    headerPrepareToRefresh(duraY);
                }else if(mPullState==PULL_UP_STATE){
                    //执行上拉
                    footPrepareToRefresh(duraY);
                }
                mLastMotionY=y;
                break;
/**
* 执行下拉操作
* @param duraY
*/
private void headerPrepareToRefresh(int duraY) {
if(mPullRefreshing||mPullLoading){
return ;
}
/**
* 根据滑动的距离计算出HeaderView的topMargin
*/
int newTopMargin=updateHeaderViewTopMargin(duraY);
/**
* 当HeaderView新的topMargin>=0的时候,也就是我们上面演示的marginTop=-50dp
* 的时候,也就是HeaderView全部显示出来
* HeaderView此时显示“松手刷新”
*
* 反之如果还有一截在没有显示出来就显示
* “下拉刷新”状态
*/
if(newTopMargin>=0&&mHeaderView.getState()!=PullHeaderView.STATE_REFRESHING){
mHeaderView.setState(PullHeaderView.STATE_READY);
}else if(newTopMargin<0&&newTopMargin>-mHeaderViewHeight){
mHeaderView.setState(PullHeaderView.STATE_NORMAL);
}
}当手指抬起或者cancel的时候判断是否需要下拉刷新了:
 case MotionEvent.ACTION_UP:
                int topMargin=((LayoutParams)mHeaderView.getLayoutParams()).topMargin;
                if(mPullState==PULL_DOWN_STATE){
                    if(topMargin>0){
                        //提示正在刷新中,
                        headerRefresh();
                    }else{
                        //从新隐藏headerView
                        setHeaderTopMargin(-mHeaderViewHeight);
                    }
                }else if(mPullState==PULL_UP_STATE){
                    //上拉加载中
                    isAllowFootRefreshing=true;
                   if(topMargin<=-(mHeaderViewHeight+mFootViewHeight)){
                        footRefreshing();
                    }else{
                        //从新隐藏footView
                        setHeaderTopMargin(-mHeaderViewHeight);
                    }
                }
                break;
/**
* 下拉刷新中
*/
private void headerRefresh() {
mPullRefreshing=true;
mHeaderView.setState(PullHeaderView.STATE_REFRESHING);
setHeaderTopMargin(0);
if(onHeaderRefreshListener!=null){
onHeaderRefreshListener.onHeaderRefresh(this);
}
}footerview的判断逻辑跟HeaderView也差不多,我就不多解释了,直接贴代码了
提示一下:footerView全部显示出来也就是当HeaderView的topMargin为-(footerView的高度+HeaderView的高度)
case MotionEvent.ACTION_MOVE:
                int duraY=y-mLastMotionY;
                if(mPullState==PULL_DOWN_STATE){
                    //执行下拉操作
                    headerPrepareToRefresh(duraY);
                }else if(mPullState==PULL_UP_STATE){
                    //执行上拉
                    footPrepareToRefresh(duraY);
                }
                mLastMotionY=y;
                break;
/**
     * 执行上拉加载操作
     * @param duraY
     */
    private void footPrepareToRefresh(int duraY) {
        if(mPullRefreshing||mPullLoading){
            return ;
        }
        int newTopMargin=updateHeaderViewTopMargin(duraY);
        mFootView.setState(PullHeaderView.STATE_READY);
    }
当手抬起或Cancle的时候,判断是否需要上拉加载
case MotionEvent.ACTION_UP:
                int topMargin=((LayoutParams)mHeaderView.getLayoutParams()).topMargin;
                if(mPullState==PULL_DOWN_STATE){
                    if(topMargin>0){
                        //提示正在刷新中,
                        headerRefresh();
                    }else{
                        //从新隐藏headerView
                        setHeaderTopMargin(-mHeaderViewHeight);
                    }
                }else if(mPullState==PULL_UP_STATE){
                    //上拉加载中
                    isAllowFootRefreshing=true;
                   if(topMargin<=-(mHeaderViewHeight+mFootViewHeight)){
                        footRefreshing();
                    }else{
                        //从新隐藏footView
                        setHeaderTopMargin(-mHeaderViewHeight);
                    }
                }
                break;
/**
* 底部加载中..
*/
private void footRefreshing() {
if(mPullLoading||mPullRefreshing){
return;
}
mPullLoading=true;
isAllowFootRefreshing=false;
mFootView.setState(PullHeaderView.STATE_REFRESHING);
setHeaderTopMargin(-(mFootViewHeight + mHeaderViewHeight));
if(onfootRefreshListener!=null){
onfootRefreshListener.onFootRefresh(this);
}
}最后一步了:完成刷新时候操作,也就是给HeaderView的topMargin改为-HeaderView的高度,这样就只有一个ListView显示了,然后恢复所有的状态,定义下拉刷新跟上拉加载的监听器
/**
     * 刷新完成,隐藏刷新view
     */
    public void refreshComplete(){
        mPullLoading=false;//是否上拉加载中置为false
        mPullRefreshing=false;//是否下拉加载置为false
        /**
         * HeaderView的状态置为初始状态
         */
        mHeaderView.setState(PullHeaderView.STATE_NORMAL);
        /**
         * 隐藏HeaderView跟FooterView,
         * 不明白的可以看我一开始演示的那几个过程
         */
        setHeaderTopMargin(-mHeaderViewHeight);
        mFootView.setState(PullHeaderView.STATE_NORMAL);
    }
/**
* 下拉刷新监听
*/
public interface IOnHeaderRefreshListener{
void onHeaderRefresh(PullRefreshView view);
}
/**
* 加载更多监听接口
*/
public interface IOnfootRefreshListener{
void onFootRefresh(PullRefreshView view);
}
/**
* 设置下拉刷新监听器
* @param onHeaderRefreshListener
*/
public void setHeaderRefreshListener(IOnHeaderRefreshListener onHeaderRefreshListener){
this.onHeaderRefreshListener=onHeaderRefreshListener;
}
/**
* 设置加载更多监听
* @param onfootRefreshListener
*/
public void setOnfootRefreshListener(IOnfootRefreshListener onfootRefreshListener) {
this.onfootRefreshListener = onfootRefreshListener;
}实现ListView滑动到底部的时候自动上拉加载更多数据
思路:监听ListView的滑动过程,然后判断是否自由滑动到最底部了,自由滑动到最底部的时候就自动加载更多。
/**
     * 获取AdapterView
     */
    private void initContentAdapterView() {
        int count=getChildCount();
        if(count<2){
            throw new IllegalArgumentException("this layout must contain 2 child views,and AdapterView or ScrollView must in the second position!");
        }
        View view=null;
        for (int i = 0; i < count; i++) {
            view=getChildAt(i);
            if(view instanceof AdapterView<?>){
                mAdapterView= (AdapterView<?>) view;
                /**
                 * 只针对ListView做上拉加载操作
                 */
                ListView lv= (ListView) mAdapterView;
                /**
                 * 设置ListView的滚动监听
                 */
                lv.setOnScrollListener(this);
            }else if(view instanceof ScrollView){
                mScrollerView = (ScrollView) view;
            }
        }
        if (mAdapterView == null && mScrollerView == null) {
            throw new IllegalArgumentException("must contain a AdapterView or ScrollView in this layout!");
        }
    }
判断是否是自由滑动,是的话就判断是否到达了底部,到了就自动加载更多
/**
     * ListView滑动的状态,当为SCROLL_STATE_FLING的时候滑动到底部就自动加载更多
     */
    private int mScrollState;
    @Override
    public void onScrollStateChanged(AbsListView view, int scrollState) {
        mScrollState=scrollState;
    }
    @Override
    public void onScroll(AbsListView view, int firstVisibleItem, int visibleItemCount, int totalItemCount) {
        if(mAdapterView!=null&&mAdapterView.getCount()>0){
            View child = mAdapterView.getChildAt(mAdapterView.getChildCount() - 1);
            if(child!=null&&child.getBottom()<=getMeasuredHeight()&&mAdapterView.getLastVisiblePosition()==mAdapterView.getCount()-1){
                if(mScrollState== AbsListView.OnScrollListener.SCROLL_STATE_FLING){
                    footRefreshing();
                }
            }
        }
    }
好啦!!整个PullRefreshView就实现了,肯定还有不少bug,关键是知道原理,然后多巧几遍,我相信会有收获的,感兴趣的可以自己实现下PullRefreshScrollView或者各种View,只需要将下面方法写活就可以了。
/**
     * 获取AdapterView
     */
    private void initContentAdapterView() {
        int count=getChildCount();
        if(count<2){
            throw new IllegalArgumentException("this layout must contain 2 child views,and AdapterView or ScrollView must in the second position!");
        }
        View view=null;
        for (int i = 0; i < count; i++) {
            view=getChildAt(i);
            if(view instanceof AdapterView<?>){
                mAdapterView= (AdapterView<?>) view;
                /**
                 * 只针对ListView做上拉加载操作
                 */
                ListView lv= (ListView) mAdapterView;
                /**
                 * 设置ListView的滚动监听
                 */
                lv.setOnScrollListener(this);
            }else if(view instanceof ScrollView){
                mScrollerView = (ScrollView) view;
            }
        }
        if (mAdapterView == null && mScrollerView == null) {
            throw new IllegalArgumentException("must contain a AdapterView or ScrollView in this layout!");
        }
    }
好啦!!!结束啦,,3Q!


 507
507

 被折叠的 条评论
为什么被折叠?
被折叠的 条评论
为什么被折叠?
 到【灌水乐园】发言


