1.设置首页的导航按钮
我们要设置左上角和右上角的图片 我们发现UIBarButtonItem设置图片的方法不能设置高亮状态下的图片
所以我们只能用这个方法设置图片initWithCustomView 把一个UI控件塞到Button里面去 设置button的默认和高亮状态下的图片
一定不要忘记设置button的尺寸 凡是在导航控制器的按钮无论在左边右边还是中间 X Y的值是没有用的
         2设置左边按钮
    UIButton *leftButton = [[UIButton alloc] init];

    [leftButton setBackgroundImage:[UIImage imageNamed:@"navigationbar_friendsearch"] forState:UIControlStateNormal];
    [leftButton setBackgroundImage:[UIImage imageNamed:@"navigationbar_friendsearch_highlighted"] forState:UIControlStateHighlighted];
    //设置button的尺寸 为了更方便的设置尺寸 我们建了一个UIView的分类
    //2.1按钮尺寸为它背景图片的尺寸  设置按钮是为了做事情所以添加上点击事件
    leftButton.size = leftButton.currentBackgroundImage.size;
    //添加按钮的点击事件
    [leftButton addTarget:self action:@selector(friendsearch) forControlEvents:UIControlEventTouchUpInside];
    self.navigationItem.leftBarButtonItem = [[UIBarButtonItem alloc] initWithCustomView:leftButton];

     3设置右边按钮
    UIButton *rightButton = [[UIButton alloc] init];

    [rightButton setBackgroundImage:[UIImage imageNamed:@"navigationbar_pop"] forState:UIControlStateNormal];
    [rightButton setBackgroundImage:[UIImage imageNamed:@"navigationbar_pop_highlighted"] forState:UIControlStateHighlighted];
    //设置button的尺寸 为了更方便的设置尺寸 我们建了一个UIView的分类
    //3.1按钮尺寸为它背景图片的尺寸  设置按钮是为了做事情所以添加上点击事件
    rightButton.size = rightButton.currentBackgroundImage.size;
    //添加按钮的点击事件
    [rightButton addTarget:self action:@selector(pop) forControlEvents:UIControlEventTouchUpInside];
    self.navigationItem.rightBarButtonItem = [[UIBarButtonItem alloc] initWithCustomView:rightButton];
3.1分类的.h文件 UIView+Extension.h
@interface UIView (Extension)

@property (nonatomic, assign) CGFloat x;
@property (nonatomic, assign) CGFloat y;
@property (nonatomic, assign) CGFloat width;
@property (nonatomic, assign) CGFloat height;
@property (nonatomic, assign) CGSize size;
@end
UIView+Extension.m
@implementation UIView (Extension)

- (void)setX:(CGFloat)x
{

    CGRect frame = self.frame;
    frame.origin.x = x;
    self.frame = frame;
}
-(CGFloat)x
{
    return self.frame.origin.x;
}

- (void)setY:(CGFloat)y
{
    CGRect frame = self.frame;
    frame.origin.y = y;
    self.frame = frame;
}
- (CGFloat)y
{
    return self.frame.origin.y;
}

- (void)setWidth:(CGFloat)width
{
    CGRect frame = self.frame;
    frame.size.width = width;
    self.frame = frame;
}
-(CGFloat)width
{
    return self.frame.size.width;
}

- (void)setHeight:(CGFloat)height
{
    CGRect frame = self.frame;
    frame.size.height = height;
    self.frame = frame;
}
-(CGFloat)height
{
    return self.frame.size.height;
}

- (void)setSize:(CGSize)size
{
    CGRect frame = self.frame;
    frame.size = size;
    self.frame = frame;
}
-(CGSize)size
{
    return self.frame.size;
}
@end
4 用button按钮写的这些基础代码很繁琐 把上面的代码删除,写一个封装
自己的事情自己做 所以创建一个UIBarButtonItem类别在UIBarButtonItem+Extension.m文件写封装
//图片和 单机事件跳转动作(action) 是不同的方法所以写成参数传进来
+ (UIBarButtonItem *)itemWhthImageName:(NSString *)imageName highImageName:(NSString *)highImageName action:(SEL)action target:(id)target
{
    UIButton *Button = [[UIButton alloc] init];

    [Button setBackgroundImage:[UIImage imageNamed:imageName] forState:UIControlStateNormal];
    [Button setBackgroundImage:[UIImage imageNamed:highImageName] forState:UIControlStateHighlighted];

    //按钮尺寸为它背景图片的尺寸  设置按钮是为了做事情所以添加上点击事件
    Button.size = Button.currentBackgroundImage.size;
    //添加按钮的点击事件
    /*因为这里的self要改成UIBarButtonItem 谁调用self self就指向谁这里UIBarButtonItem调用self
     * 所以还要在这个封装方法里添加一个target 把这个方法传进来
     */
    [Button addTarget:target action:action forControlEvents:UIControlEventTouchUpInside];
    //因为不确定返回的事左边还是右边 所以这里设置成return
    return [[UIBarButtonItem alloc] initWithCustomView:Button];
}
在ZHHomeViewController调用
- (void)viewDidLoad {
    [super viewDidLoad];
self.navigationItem.leftBarButtonItem = [UIBarButtonItem itemWhthImageName:@"navigationbar_friendsearch" highImageName:@"navigationbar_friendsearch_highlighted" action:@selector(friendsearch) target:self];

    self.navigationItem.rightBarButtonItem = [UIBarButtonItem itemWhthImageName:@"navigationbar_pop" highImageName:@"navigationbar_pop_highlighted" action:@selector(pop) target:self];
}

- (void)friendsearch
{
//设置跳转
    ZHFirstViewController *FirstVc = [[ZHFirstViewController alloc] init];
    FirstVc.title = @"one";
    [self.navigationController pushViewController:FirstVc animated:YES];
}

- (void)pop
{

}

@end
5.我们现在要做的是当用户点击导航按钮的时候进入下一个页面再在这个页面点击一个cell进入下一个页面等等。。跳转好几层的操作
*而且导航按钮的图标除了第一个页面都是一样的,点击导航做按钮就返回上一个页面 点击右按钮就返回主界面
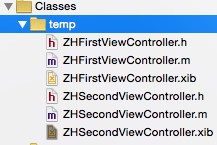
*为里便于理解所以创建几个控制文件演示 新建一个包名为temp 创建几个控制器有xib方便搭界面
* 1.在home点击首页左上角按钮的时候先来到我们创建的first控制器
* 2.在first控制器里添加个button按钮 点击button跳转到Second控制器
临时的temp文件

first控制器 给button拖线 设置跳转
- (IBAction)JumpTwo {

    ZHSecondViewController *SecondVc = [[ZHSecondViewController alloc] init];

    SecondVc.title = @"two";
    [self.navigationController pushViewController:SecondVc animated:YES];
}
要求进去的那两个控制器左上角和右上角都要有那两个按钮 所以拷贝home里的代码 到first
- (void)viewDidLoad {
    [super viewDidLoad];

    self.navigationItem.leftBarButtonItem = [UIBarButtonItem itemWhthImageName:@"navigationbar_back" highImageName:@"navigationbar_back_highlighted" action:@selector(back) target:self];

    self.navigationItem.rightBarButtonItem = [UIBarButtonItem itemWhthImageName:@"navigationbar_more" highImageName:@"navigationbar_more_highlighted" action:@selector(more) target:self];
}
- (void)back
{
//返回  移除当前的控制器
    [self.navigationController popViewControllerAnimated:YES];
}

- (void)more
{
    //回到根控制器
    [self.navigationController popToRootViewControllerAnimated:YES];
}
*这样写的程序不健壮因为所有的导航按钮都要用到 不能在这一个控制器写 解决这个问题的方法有两个
*1.创建一个父类 但是OC里的类都是单继承一半不建议创建父类 多层跳转中我想要在跳转的某个页面里面
* 添加tableView 这样就不能继承之前创建好的父类,两个会有冲突
*2. 现在我们想做的是每当push的时候都要让左上角和右上角有东西所以采用拦截push方法的操作
把代码拷入ZHNavigationController.m中
-(void)pushViewController:(UIViewController *)viewController animated:(BOOL)animated
{

//如果什么都不写 就什么也不显示来所以要先调用父类的方法

    if (self.viewControllers.count > 0) {
        //如果现在push的不是栈低控制器(最先push进来的控制器)
        viewController.hidesBottomBarWhenPushed = YES;
        // self换成这个控制器viewController
        viewController.navigationItem.leftBarButtonItem = [UIBarButtonItem itemWhthImageName:@"navigationbar_back" highImageName:@"navigationbar_back_highlighted" action:@selector(back) target:self];

        viewController.navigationItem.rightBarButtonItem = [UIBarButtonItem itemWhthImageName:@"navigationbar_more" highImageName:@"navigationbar_more_highlighted" action:@selector(more) target:self];
    }
    [super pushViewController:viewController animated:animated];
}

- (void)back
{
    //返回  移除当前的控制器
#warning 这里用的是self,因为self就是当前正在使用的导航控制器
    [self popViewControllerAnimated:YES];
}

- (void)more
{
    //回到根控制器
    [self popToRootViewControllerAnimated:YES];
}


 2330
2330


 被折叠的 条评论
为什么被折叠?


