


上一篇写到搭建开发环境,这篇当然就是传统的Hello World了。
首先在webstorm打开cocos2d-html5引擎目录,选择复制HelloHTML5World文件夹,然后再粘贴到根目录下,并且重新命名一下就可以了,如图
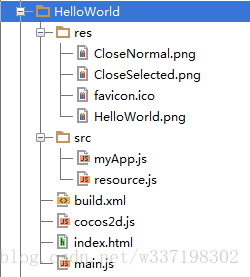
这样就是基本的项目,可以在此基础上进行开发了,当然,你也可以复制里面template文件夹,因为这个文件夹的中文意思就是“模板”,然后重新建立新的项目,只是这个模板要复杂一些,涉及到HD以及跨手机平台的内容,如果仅仅只是想在网页上做个游戏,我们开始复制的文件夹就足矣了。
想看一下效果就运行一下index.html就可以了。需要补充的一点就是一些浏览器可能运行不了,比如IE,谷歌的浏览器,会被阻止,所以就用火狐,safari这些浏览器吧,它们支持的很好,我就是重新安装了火狐的。。。
下面简单分析一下这些代码:
index.html的代码,学过html就不用多说了。
<!DOCTYPE html>
<html>
<head>
    <meta charset="utf-8">
    <title>Cocos2d-html5 Hello World test</title>  //标题
    <link rel="icon" type="image/GIF" href="res/favicon.ico"/>
    <meta name="viewport" content="width=800,user-scalable=no"/>
    <meta name="screen-orientation" content="portrait"/>
    <meta name="apple-mobile-web-app-capable" content="yes"/>
    <meta name="full-screen" content="yes"/>
    <meta name="x5-fullscreen" content="true"/>
    <style>
        body, canvas, div {
            -moz-user-select: none;
            -webkit-user-select: none;
            -ms-user-select: none;
            -khtml-user-select: none;
            -webkit-tap-highlight-color: rgba(0, 0, 0, 0);
        }
    </style>
</head>
<body style="padding:0; margin: 0; background: #000;">
<div style="text-align: center;">
    <canvas id="gameCanvas" width="800" height="450"></canvas>  //画布的大小
</div>
</body>
</html>
<script src="cocos2d.js"></script>
main.js
var cocos2dApp = cc.Application.extend({
    config:document['ccConfig'],
    ctor:function (scene) {
        this._super();
        this.startScene = scene;
        cc.COCOS2D_DEBUG = this.config['COCOS2D_DEBUG'];
        cc.initDebugSetting();
        cc.setup(this.config['tag']);
        cc.AppController.shareAppController().didFinishLaunchingWithOptions();
    },
    applicationDidFinishLaunching:function () {
        if(cc.RenderDoesnotSupport()){
            //show Information to user
            alert("Browser doesn't support WebGL");
            return false;
        }
        // 初始化导演类
        var director = cc.Director.getInstance();
	//下面两行是打开Retian高清屏
        // enable High Resource Mode(2x, such as iphone4) and maintains low resource on other devices.
        //director.enableRetinaDisplay(true);

        // 打开FPS
        director.setDisplayStats(this.config['showFPS']);

        // 设置FPS帧速
        director.setAnimationInterval(1.0 / this.config['frameRate']);

        //加载资源,即一开始会有个百分进度加载就在这里使用的
        cc.LoaderScene.preload(g_resources, function () {
            director.replaceScene(new this.startScene());
        }, this);

        return true;
    }
});
var myApp = new cocos2dApp(HelloWorldScene);  //程序的主入口,游戏画面从这里开始
cocos2d.js
关键的部分我就用汉字解释了一下,其他不怎么重要的就不解释了。。。
(function () {
    var d = document;
    var c = {
        COCOS2D_DEBUG:2, //0 to turn debug off, 1 for basic debug, and 2 for full debug
        box2d:false,
        chipmunk:false,
        showFPS:true,
        frameRate:60,
        loadExtension:false,
        renderMode:0,       //Choose of RenderMode: 0(default), 1(Canvas only), 2(WebGL only)
        tag:'gameCanvas', //the dom element to run cocos2d on
        engineDir:'../cocos2d/',
        //SingleEngineFile:'',
        appFiles:[
            'src/resource.js',
            'src/myApp.js'//如果自己新建的js文件需要在这里进行注册添加
        ]
    };

    if(!d.createElement('canvas').getContext){
        var s = d.createElement('div');
        s.innerHTML = '<h2>Your browser does not support HTML5 canvas!</h2>' +
            '<p>Google Chrome is a browser that combines a minimal design with sophisticated technology to make the web faster, safer, and easier.Click the logo to download.</p>' +
            '<a href="http://www.google.com/chrome" target="_blank"><img src="http://www.google.com/intl/zh-CN/chrome/assets/common/images/chrome_logo_2x.png" border="0"/></a>';
        var p = d.getElementById(c.tag).parentNode;
        p.style.background = 'none';
        p.style.border = 'none';
        p.insertBefore(s);

        d.body.style.background = '#ffffff';
        return;
    }

    window.addEventListener('DOMContentLoaded', function () {
        //first load engine file if specified
        var s = d.createElement('script');
        /*********Delete this section if you have packed all files into one*******/
        if (c.SingleEngineFile && !c.engineDir) {
            s.src = c.SingleEngineFile;
        }
        else if (c.engineDir && !c.SingleEngineFile) {
            s.src = c.engineDir + 'platform/jsloader.js';
        }
        else {
            alert('You must specify either the single engine file OR the engine directory in "cocos2d.js"');
        }
        /*********Delete this section if you have packed all files into one*******/

            //s.src = 'Packed_Release_File.js'; //IMPORTANT: Un-comment this line if you have packed all files into one

        document.ccConfig = c;
        s.id = 'cocos2d-html5';
        d.body.appendChild(s);
        //else if single file specified, load singlefile
    });
})();
resource.js
在开始进行加载资源的时候,最好把用到的所有图片声音瓦片地图等等资源文件都写到这里面去,这样在游戏运行过程中就不会出现页面加载资源卡顿的现象了。
每添加一个资源,都还需要在数组中也添加一下
var s_HelloWorld = "res/HelloWorld.png";
var s_CloseNormal = "res/CloseNormal.png";
var s_CloseSelected = "res/CloseSelected.png";

var g_resources = [
    //image
    {src:s_HelloWorld},
    {src:s_CloseNormal},
    {src:s_CloseSelected}

    //plist

    //fnt

    //tmx

    //bgm

    //effect
];
好了,基本的主要文件就这些了,后面我们就要开始真枪实战进行开发了,欢迎继续关注~


 1218
1218


 被折叠的 条评论
为什么被折叠?
被折叠的 条评论
为什么被折叠?
 到【灌水乐园】发言


