


下一篇:
Spring Security 4 自定义登录表单 注解和XML例子
原文:http://websystique.com/spring-security/spring-security-4-hello-world-annotation-xml-example/
【已翻译文章,点击分类里面的spring security 4进行查看】
【翻译by 明明如月 QQ 605283073】
本教程演示Spring MVC web项目中Spring Security 4的用法。通过url对访问进行验证。
我们将通过一个经典的hello world例子来学习Spring Security 4 的基本用法。
本文使用基于Servlet3.0容器的Spring注解(因此没有web.xml文件)。同样也会给出基于Security 配置的xml配置。
所用到的技术和软件:
- Spring 4.1.6.RELEASE
- Spring Security 4.0.1.RELEASE
- Maven 3
- JDK 1.7
- Tomcat 8.0.21
- Eclipse JUNO Service Release 2
让我们开始吧...
第1步: 项目目录结构

现在让我为你展示上面目录结构里面的内容和每个的详细介绍。
第2步: 更新 pom.xml 包含所需的依赖
<project xmlns="http://maven.apache.org/POM/4.0.0" xmlns:xsi="http://www.w3.org/2001/XMLSchema-instance"
    xsi:schemaLocation="http://maven.apache.org/POM/4.0.0 http://maven.apache.org/xsd/maven-4.0.0.xsd">
    <modelVersion>4.0.0</modelVersion>

    <groupId>com.websystique.springsecurity</groupId>
    <artifactId>SpringSecurityHelloWorldAnnotationExample</artifactId>
    <version>1.0.0</version>
    <packaging>war</packaging>

    <name>SpringSecurityHelloWorldAnnotationExample</name>

    <properties>
        <springframework.version>4.1.6.RELEASE</springframework.version>
        <springsecurity.version>4.0.1.RELEASE</springsecurity.version>
    </properties>

    <dependencies>
        <!-- Spring -->
        <dependency>
            <groupId>org.springframework</groupId>
            <artifactId>spring-core</artifactId>
            <version>${springframework.version}</version>
        </dependency>
        <dependency>
            <groupId>org.springframework</groupId>
            <artifactId>spring-web</artifactId>
            <version>${springframework.version}</version>
        </dependency>
        <dependency>
            <groupId>org.springframework</groupId>
            <artifactId>spring-webmvc</artifactId>
            <version>${springframework.version}</version>
        </dependency>

        <!-- Spring Security -->
        <dependency>
            <groupId>org.springframework.security</groupId>
            <artifactId>spring-security-web</artifactId>
            <version>${springsecurity.version}</version>
        </dependency>
        <dependency>
            <groupId>org.springframework.security</groupId>
            <artifactId>spring-security-config</artifactId>
            <version>${springsecurity.version}</version>
        </dependency>

        <dependency>
            <groupId>javax.servlet</groupId>
            <artifactId>javax.servlet-api</artifactId>
            <version>3.1.0</version>
        </dependency>
        <dependency>
            <groupId>javax.servlet.jsp</groupId>
            <artifactId>javax.servlet.jsp-api</artifactId>
            <version>2.3.1</version>
        </dependency>
        <dependency>
            <groupId>javax.servlet</groupId>
            <artifactId>jstl</artifactId>
            <version>1.2</version>
        </dependency>
    </dependencies>

    <build>
        <pluginManagement>
            <plugins>
                <plugin>
                    <groupId>org.apache.maven.plugins</groupId>
                    <artifactId>maven-compiler-plugin</artifactId>
                    <version>3.2</version>
                    <configuration>
                        <source>1.7</source>
                        <target>1.7</target>
                    </configuration>
                </plugin>
                <plugin>
                    <groupId>org.apache.maven.plugins</groupId>
                    <artifactId>maven-war-plugin</artifactId>
                    <version>2.4</version>
                    <configuration>
                        <warSourceDirectory>src/main/webapp</warSourceDirectory>
                        <warName>SpringSecurityHelloWorldAnnotationExample</warName>
                        <failOnMissingWebXml>false</failOnMissingWebXml>
                    </configuration>
                </plugin>
            </plugins>
        </pluginManagement>
        <finalName>SpringSecurityHelloWorldAnnotationExample</finalName>
    </build>
</project> 首先需要注意的是maven-war-plugin 的声明。鉴于我们使用纯注解,甚至都没用web.xml。因此我们需配置此插件防止maven创建war包失败。
我们使用的是Spring 和 Spring Security(在本文发表时)最新版本。与此同时,由于我们将使用servlet api和jstl在我们界面中,我们也添加了JSP/Servlet/Jstl的依赖。
一般来说,容器也许已经包含了这些库,所以我们在pom.xml文件中,可以设置他们的scope 为provided。
第3步: 添加 Spring Security 配置类
添加spring security到我们应用中第一步是要创建Spring Security Java 配置类。
这个配置创建一个叫springSecurityFilterChain的Servlet过滤器,来对我们应用中所有的安全相关的事项(保护应用的所有url,验证用户名密码,表单重定向等)负责。
com.websystique.springsecurity.configuration.SecurityConfiguration
<pre class="brush: java; title: ; notranslate" title="" style="box-sizing: border-box; border: 0px; font-family: 'Courier 10 Pitch', Courier, monospace; font-size: 15px; margin-top: 0px; margin-bottom: 1.6em; outline: 0px; padding: 1.6em; vertical-align: baseline; line-height: 1.6; max-width: 100%; overflow: auto; color: rgb(64, 64, 64); background: rgb(238, 238, 238);">package com.websystique.springsecurity.configuration;

import org.springframework.beans.factory.annotation.Autowired;
import org.springframework.context.annotation.Configuration;
import org.springframework.security.config.annotation.authentication.builders.AuthenticationManagerBuilder;
import org.springframework.security.config.annotation.web.builders.HttpSecurity;
import org.springframework.security.config.annotation.web.configuration.EnableWebSecurity;
import org.springframework.security.config.annotation.web.configuration.WebSecurityConfigurerAdapter;

@Configuration
@EnableWebSecurity
public class SecurityConfiguration extends WebSecurityConfigurerAdapter {

	@Autowired
	public void configureGlobalSecurity(AuthenticationManagerBuilder auth) throws Exception {
		auth.inMemoryAuthentication().withUser("bill").password("abc123").roles("USER");
		auth.inMemoryAuthentication().withUser("admin").password("root123").roles("ADMIN");
		auth.inMemoryAuthentication().withUser("dba").password("root123").roles("ADMIN","DBA");//dba have two roles.
	}

	@Override
	protected void configure(HttpSecurity http) throws Exception {

	  http.authorizeRequests()
	  	.antMatchers("/", "/home").permitAll()
		.antMatchers("/admin/**").access("hasRole('ADMIN')")
		.antMatchers("/db/**").access("hasRole('ADMIN') and hasRole('DBA')")
		.and().formLogin()
		.and().exceptionHandling().accessDeniedPage("/Access_Denied");

	}
}
上面这个类的configureGlobalSecurity方法为 AuthenticationManagerBuilder配置用户授权和角色信息 。
此AuthenticationManagerBuilder (权限管理器创建器)创建负责所有权限请求的AuthenticationManager(权限管理器)。
注意:在上面例子中,我们使用的是 基于内存的权限认证,当然你也可以自由选择JDBC,LDAP或者基于其他技术的权限认证。
重写Configure方法,来配置HttpSecurity 来配置基于特定http请求的安全认证。
它默认是实用所有请求的,但是也可以通过requestMatcher(RequestMatcher)/antMathchers 或者其他类似的方法进行限定。
在上述配置中,我们可以看到‘/’ & ‘/home’这种Url配置是不安全的,任何人都可以访问。
只有具有ADMIN权限的用户才可以访问符合‘/admin/**’的url。只能够同时具有ADMIN 和 DBA权限的人才可以访问符合‘/db/**’ 的Url 。
formLogin 方法提供了基于表单的权限验证,将会产生一个默认的对用户的表单请求。
你也可以自定义登录表单。在接下来的文章里面,你可以看到类似的例子。
我们也会使用exceptionHandling().accessDeniedPage() ,在本例中它将获取所有的403(http访问拒绝)异常然后显示我们的用户定义的HTTP403页面(虽然也没有太大益处)。
上面的安全配置 XML 配置形式如下:
<beans:beans xmlns="http://www.springframework.org/schema/security"
    xmlns:beans="http://www.springframework.org/schema/beans"
    xmlns:xsi="http://www.w3.org/2001/XMLSchema-instance"
    xsi:schemaLocation="http://www.springframework.org/schema/beans http://www.springframework.org/schema/beans/spring-beans-4.1.xsd
    http://www.springframework.org/schema/security http://www.springframework.org/schema/security/spring-security-4.0.xsd">

    <http auto-config="true" >
        <intercept-url pattern="/" access="permitAll" />
        <intercept-url pattern="/home" access="permitAll" />
        <intercept-url pattern="/admin**" access="hasRole('ADMIN')" />
        <intercept-url pattern="/dba**" access="hasRole('ADMIN') and hasRole('DBA')" />
        <form-login  authentication-failure-url="/Access_Denied" />
    </http>

    <authentication-manager >
        <authentication-provider>
            <user-service>
                <user name="bill"  password="abc123"  authorities="ROLE_USER" />
                <user name="admin" password="root123" authorities="ROLE_ADMIN" />
                <user name="dba"   password="root123" authorities="ROLE_ADMIN,ROLE_DBA" />
            </user-service>
        </authentication-provider>
    </authentication-manager>


</beans:beans>
第 4步: 通过war注册springSecurityFilter(spring安全过滤器)
下面是定制初始化war包中的springSecurityFilter(第三步中的)注册类。
com.websystique.springsecurity.configuration.SecurityWebApplicationInitializer
package com.websystique.springsecurity.configuration;

import org.springframework.security.web.context.AbstractSecurityWebApplicationInitializer;

public class SecurityWebApplicationInitializer extends AbstractSecurityWebApplicationInitializer {

} <filter-name>springSecurityFilterChain</filter-name>
<filter-class>org.springframework.web.filter.DelegatingFilterProxy</filter-class>
</filter>
<filter-mapping>
<filter-name>springSecurityFilterChain</filter-name>
<url-pattern>/*</url-pattern>
</filter-mapping>第5步: 添加 Controller(控制器)
com.websystique.springsecurity.controller.HelloWorldController
package com.websystique.springsecurity.controller;

import javax.servlet.http.HttpServletRequest;
import javax.servlet.http.HttpServletResponse;

import org.springframework.security.core.Authentication;
import org.springframework.security.core.context.SecurityContextHolder;
import org.springframework.security.core.userdetails.UserDetails;
import org.springframework.security.web.authentication.logout.SecurityContextLogoutHandler;
import org.springframework.stereotype.Controller;
import org.springframework.ui.ModelMap;
import org.springframework.web.bind.annotation.RequestMapping;
import org.springframework.web.bind.annotation.RequestMethod;

@Controller
public class HelloWorldController {


    @RequestMapping(value = { "/", "/home" }, method = RequestMethod.GET)
    public String homePage(ModelMap model) {
        model.addAttribute("greeting", "Hi, Welcome to mysite. ");
        return "welcome";
    }

    @RequestMapping(value = "/admin", method = RequestMethod.GET)
    public String adminPage(ModelMap model) {
        model.addAttribute("user", getPrincipal());
        return "admin";
    }

    @RequestMapping(value = "/db", method = RequestMethod.GET)
    public String dbaPage(ModelMap model) {
        model.addAttribute("user", getPrincipal());
        return "dba";
    }

    @RequestMapping(value="/logout", method = RequestMethod.GET)
       public String logoutPage (HttpServletRequest request, HttpServletResponse response) {
          Authentication auth = SecurityContextHolder.getContext().getAuthentication();
          if (auth != null){
             new SecurityContextLogoutHandler().logout(request, response, auth);
          }
          return "welcome";
       }

    @RequestMapping(value = "/Access_Denied", method = RequestMethod.GET)
    public String accessDeniedPage(ModelMap model) {
        model.addAttribute("user", getPrincipal());
        return "accessDenied";
    }

    private String getPrincipal(){
        String userName = null;
        Object principal = SecurityContextHolder.getContext().getAuthentication().getPrincipal();

        if (principal instanceof UserDetails) {
            userName = ((UserDetails)principal).getUsername();
        } else {
            userName = principal.toString();
        }
        return userName;
    }
}controller类中的方法比较繁琐.getPrincipal 方法返回从Spring
SecurityContext中记录的登录的用户。
logoutPage 方法简单调用 SecurityContextLogoutHandler().logout(request, response, auth)方法
来处理退出操作。
它很巧妙而且将你从不容易管理的jsp页面退出逻辑中解放出来。
你也许注意到上面没有出现 /login’,因为Spring Security默认会产生和处理。
第6步: 添加 SpringMVC 配置类
com.websystique.springsecurity.configuration.HelloWorldConfiguration
package com.websystique.springsecurity.configuration;

import org.springframework.context.annotation.Bean;
import org.springframework.context.annotation.ComponentScan;
import org.springframework.context.annotation.Configuration;
import org.springframework.web.servlet.ViewResolver;
import org.springframework.web.servlet.config.annotation.EnableWebMvc;
import org.springframework.web.servlet.view.InternalResourceViewResolver;
import org.springframework.web.servlet.view.JstlView;

@Configuration
@EnableWebMvc
@ComponentScan(basePackages = "com.websystique.springsecurity")
public class HelloWorldConfiguration {

    @Bean
    public ViewResolver viewResolver() {
        InternalResourceViewResolver viewResolver = new InternalResourceViewResolver();
        viewResolver.setViewClass(JstlView.class);
        viewResolver.setPrefix("/WEB-INF/views/");
        viewResolver.setSuffix(".jsp");

        return viewResolver;
    }

}
第7步: 添加Initializer(初始化器)类
package com.websystique.springsecurity.configuration;

import org.springframework.web.servlet.support.AbstractAnnotationConfigDispatcherServletInitializer;

public class SpringMvcInitializer extends AbstractAnnotationConfigDispatcherServletInitializer {

    @Override
    protected Class<?>[] getRootConfigClasses() {
        return new Class[] { HelloWorldConfiguration.class };
    }

    @Override
    protected Class<?>[] getServletConfigClasses() {
        return null;
    }

    @Override
    protected String[] getServletMappings() {
        return new String[] { "/" };
    }

} 注意上面的初始化器继承自AbstractAnnotationConfigDispatcherServletInitializer ,它是所有WebApplicationInitializer 实现的基类.
在Servlet 3.0 环境下,通过实现WebApplicationInitializer 来配置ServletContext 。这意味着我们将不使用web.xml而且将在支持servlet3.0容器下发布此应用。
第8步: 添加Views(视图)
<%@ page language="java" contentType="text/html; charset=ISO-8859-1" pageEncoding="ISO-8859-1"%>
<html>
<head>
<meta http-equiv="Content-Type" content="text/html; charset=ISO-8859-1">
<title>HelloWorld page</title>
</head>
<body>
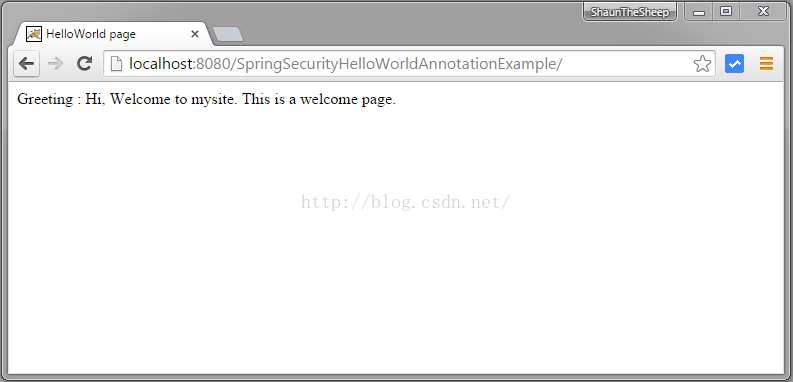
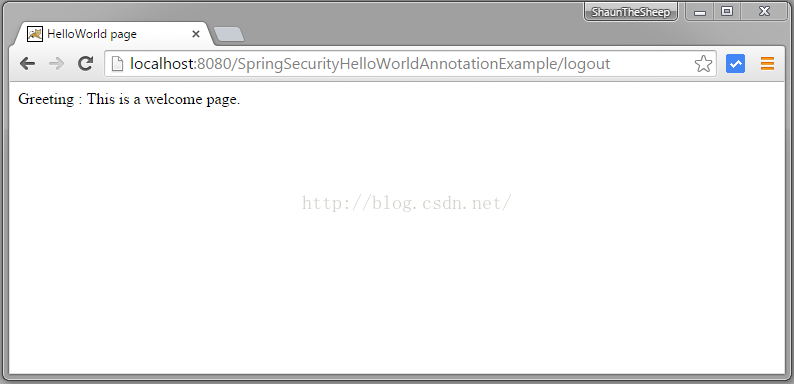
Greeting : ${greeting}
This is a welcome page.
</body>
</html><%@ page language="java" contentType="text/html; charset=ISO-8859-1" pageEncoding="ISO-8859-1"%>
<%@ taglib prefix="c" uri="http://java.sun.com/jsp/jstl/core"%>
<html>
<head>
<meta http-equiv="Content-Type" content="text/html; charset=ISO-8859-1">
<title>HelloWorld Admin page</title>
</head>
<body>
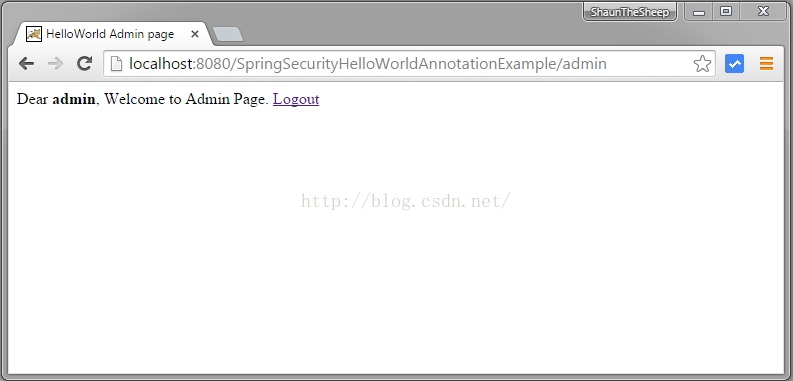
Dear <strong>${user}</strong>, Welcome to Admin Page.
<a href="<c:url value="/logout" />">Logout</a>
</body>
</html><%@ page language="java" contentType="text/html; charset=ISO-8859-1" pageEncoding="ISO-8859-1"%>
<%@ taglib prefix="c" uri="http://java.sun.com/jsp/jstl/core"%>
<html>
<head>
<meta http-equiv="Content-Type" content="text/html; charset=ISO-8859-1">
<title>DBA page</title>
</head>
<body>
Dear <strong>${user}</strong>, Welcome to DBA Page.
<a href="<c:url value="/logout" />">Logout</a>
</body>
</html><%@ page language="java" contentType="text/html; charset=ISO-8859-1" pageEncoding="ISO-8859-1"%>
<%@ taglib prefix="c" uri="http://java.sun.com/jsp/jstl/core"%>
<html>
<head>
<meta http-equiv="Content-Type" content="text/html; charset=ISO-8859-1">
<title>AccessDenied page</title>
</head>
<body>
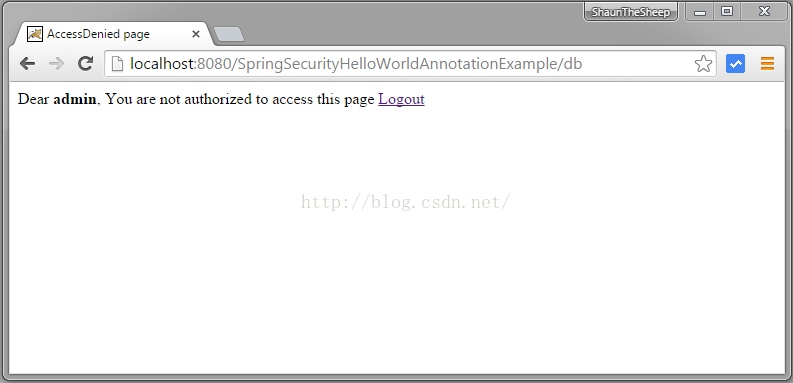
Dear <strong>${user}</strong>, You are not authorized to access this page
<a href="<c:url value="/logout" />">Logout</a>
</body>
</html>第9步: 创建和发布应用
正如第7步提到的, 在我们应用中没有用到web.xml作为ServletContext 来启动程序.
现在构建 war 包(通过eclipse或者myeclipse)或者通过maven 命令行( mvn clean install). 在一个 Servlet 3.0 容器中发布本应用. 在这里我使用的是tomcat, 我将 war 文件放到 tomcat webapps 文件夹然后点击 tomcat安装目录的bin文件夹下的start.bat .
启动应用
打开浏览器 在地址栏输入 localhost:8080/SpringSecurityHelloWorldAnnotationExample/并回车
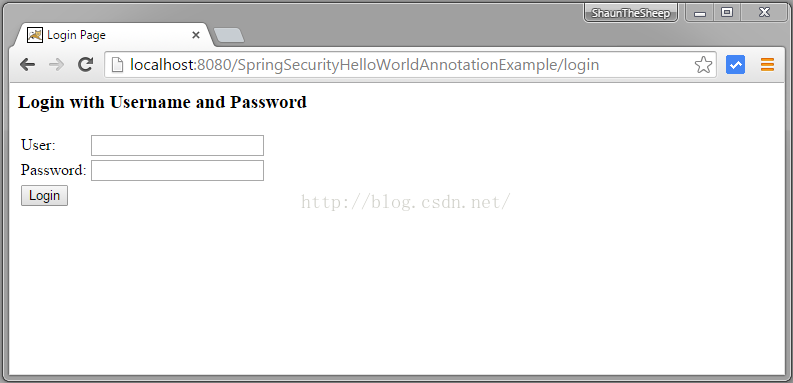
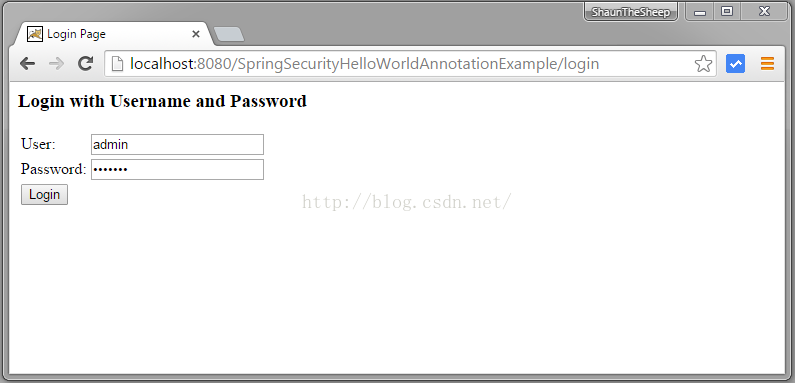
通过 localhost:8080/SpringSecurityHelloWorldAnnotationExample/admin 来访问admin 页面, 你将会被引导到登录页面.
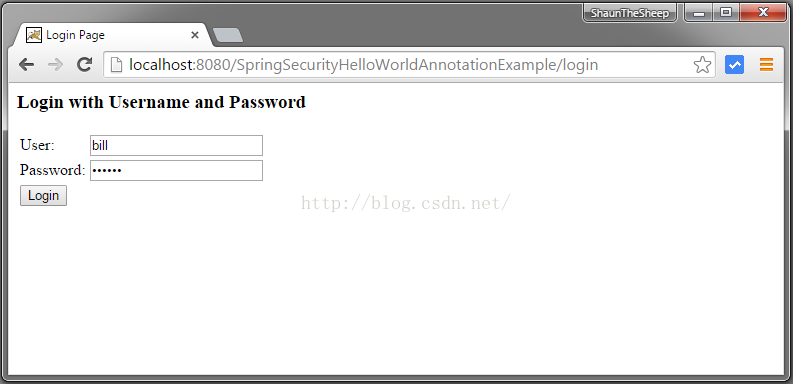
输入一个USER角色的账户
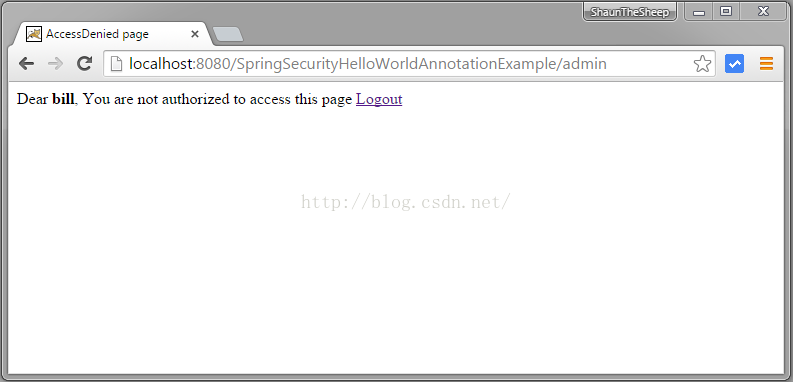
提交表单, 你将看到AccessDenied(访问拒绝)页面
退出然后再次访问admin页面
输入错误的password(密码)

现在尝试通过localhost:8080/SpringSecurityHelloWorldAnnotationExample/db 访问 db页面将得到AccessDenied页面


 1036
1036


 被折叠的 条评论
为什么被折叠?
被折叠的 条评论
为什么被折叠?
 到【灌水乐园】发言


