


一、前言
最近在看android fragment与Activity进行数据传递的部分,看到了接口回调的内容,今天来总结一下。
二、回调的含义和用途
1、什么是回调?
一般来说,模块之间都存在一定的调用关系,从调用方式上看,可以分为三类同步调用、异步调用和回调。同步调用是一种阻塞式调用,即在函数A的函数体里通过书写函数B的函数名来调用之,使内存中对应函数B的代码得以执行。异步调用是一种类似消息或事件的机制解决了同步阻塞的问题,例如 A通知 B后,他们各走各的路,互不影响,不用像同步调用那样, A通知 B后,非得等到 B走完后, A才继续走 。回调是一种双向的调用模式,也就是说,被调用的接口被调用时也会调用对方的接口,例如A要调用B,B在执行完又要调用A。
2、回调的用途
回调一般用于层间协作,上层将本层函数安装在下层,这个函数就是回调,而下层在一定条件下触发回调。例如作为一个驱动,是一个底层,他在收到一个数据时,除了完成本层的处理工作外,还将进行回调,将这个数据交给上层应用层来做进一步处理,这在分层的数据通信中很普遍。
三、Java实现接口回调
在C/C++中,要实现回调函数,被调用函数要告诉调用者自己的指针地址。但是Java没有指针地址,不能传递方法的地址,一般采用接口回调的方法来实现:把实现某一接口的类创建的对象的引用赋给该接口声明的接口变量,那么该接口变量就可以调用被调用类实现的接口的方法。
原理:首先创建一个回调对象,然后再创建一个控制器对象,将回调对象需要被调用的方法告诉控制器对象,控制器对象负责检查某个场景是否出现或某个条件是否满足,当满足时,自动调用回调对象的方法。
例如老板A对员工B说,我现在交给你一个任务,并且我把我的电话号码给你,你一旦完成任务就给我打电话。
详细的代码如下:
Activity代码:
package com.example.callback;
import android.graphics.Color;
import android.support.v4.app.*;
import android.support.v7.app.AppCompatActivity;
import android.os.Bundle;
import android.widget.Button;
public class MainActivity extends AppCompatActivity implements Fragment.callBackFragmentButton {
private Button btn1;
private Button btn2;
private Button btn3;
private Button btn4;
@Override
protected void onCreate(Bundle savedInstanceState) {
super.onCreate(savedInstanceState);
setContentView(R.layout.activity_main);
//调用添加Fragment方法
changeButton(new Fragment(this));
//调用加载控件的方法
initView();
}
//加载控件按钮
private void initView() {
btn1 = (Button) findViewById(R.id.btn1);
btn2 = (Button) findViewById(R.id.btn2);
btn3 = (Button) findViewById(R.id.btn3);
btn4 = (Button) findViewById(R.id.btn4);
}
//添加Fragment的方法
private void changeButton(android.support.v4.app.Fragment fragment) {
FragmentManager manager = getSupportFragmentManager();
FragmentTransaction beginTransaction = manager.beginTransaction();
beginTransaction.replace(R.id.fragment_ll, fragment);
beginTransaction.commit();
}
//接口回调的方法
@Override
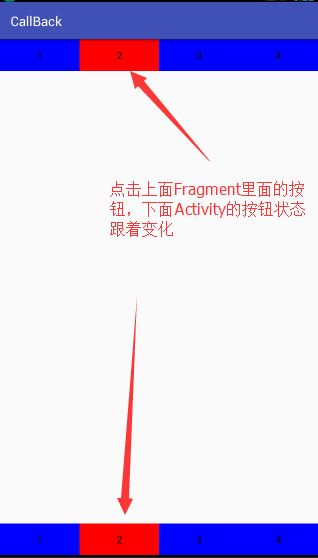
public void changeButton(int cb) {
//根据回调回来的传的值进行判断,改变Activity的按钮状态
switch (cb) {
case 1:
btn1.setBackgroundColor(Color.RED);
btn2.setBackgroundColor(Color.BLUE);
btn3.setBackgroundColor(Color.BLUE);
btn4.setBackgroundColor(Color.BLUE);
break;
case 2:
btn1.setBackgroundColor(Color.BLUE);
btn2.setBackgroundColor(Color.RED);
btn3.setBackgroundColor(Color.BLUE);
btn4.setBackgroundColor(Color.BLUE);
break;
case 3:
btn1.setBackgroundColor(Color.BLUE);
btn2.setBackgroundColor(Color.BLUE);
btn3.setBackgroundColor(Color.RED);
btn4.setBackgroundColor(Color.BLUE);
break;
case 4:
btn1.setBackgroundColor(Color.BLUE);
btn2.setBackgroundColor(Color.BLUE);
btn3.setBackgroundColor(Color.BLUE);
btn4.setBackgroundColor(Color.RED);
break;
default:
break;
}
}
}
Fragment类代码
package com.example.callback;

import android.graphics.Color;
import android.os.Bundle;
import android.support.annotation.Nullable;
import android.view.LayoutInflater;
import android.view.View;
import android.view.ViewGroup;
import android.widget.Button;

/**
 * Created by Administrator on 2016/11/7 0007.
 */
public class Fragment extends android.support.v4.app.Fragment {
//设置资源
    private View v;
    private Button btn1;
    private Button btn2;
    private Button btn3;
    private Button btn4;

    @Nullable
    @Override
    public View onCreateView(LayoutInflater inflater, @Nullable ViewGroup container, @Nullable Bundle savedInstanceState) {
       //加载Fragment控件
        v = inflater.inflate(R.layout.activity_fragment, null);
//调用加载控件的方法
        initView();
        //返回加载的Fragment
        return v;
    }

    /**
     * 定义改变按钮接口
     */
    public interface callBackFragmentButton {
        public void changeButton(int cb);
    }

    //定义接口
    callBackFragmentButton callBackFragmentButton;

    /**
     * 创建构造方法
     * @param callBackFragmentButton
     */
    public Fragment(Fragment.callBackFragmentButton callBackFragmentButton) {
        this.callBackFragmentButton = callBackFragmentButton;
    }

    /**
     * 获取控件View
     */
    private void initView() {
        btn1 = (Button) v.findViewById(R.id.btn_f1);
        btn2 = (Button) v.findViewById(R.id.btn_f2);
        btn3 = (Button) v.findViewById(R.id.btn_f3);
        btn4 = (Button) v.findViewById(R.id.btn_f4);
        //设置按钮监听
        btn1.setOnClickListener(new View.OnClickListener() {
            @Override
            public void onClick(View v) {
                btn1.setBackgroundColor(Color.RED);
                btn2.setBackgroundColor(Color.BLUE);
                btn3.setBackgroundColor(Color.BLUE);
                btn4.setBackgroundColor(Color.BLUE);
                callBackFragmentButton.changeButton(1);
            }
        });

        btn2.setOnClickListener(new View.OnClickListener() {
            @Override
            public void onClick(View v) {
                btn1.setBackgroundColor(Color.BLUE);
                btn2.setBackgroundColor(Color.RED);
                btn3.setBackgroundColor(Color.BLUE);
                btn4.setBackgroundColor(Color.BLUE);
                callBackFragmentButton.changeButton(2);
            }
        });

        btn3.setOnClickListener(new View.OnClickListener() {
            @Override
            public void onClick(View v) {
                btn1.setBackgroundColor(Color.BLUE);
                btn2.setBackgroundColor(Color.BLUE);
                btn3.setBackgroundColor(Color.RED);
                btn4.setBackgroundColor(Color.BLUE);
                callBackFragmentButton.changeButton(3);
            }
        });

        btn4.setOnClickListener(new View.OnClickListener() {
            @Override
            public void onClick(View v) {
                btn1.setBackgroundColor(Color.BLUE);
                btn2.setBackgroundColor(Color.BLUE);
                btn3.setBackgroundColor(Color.BLUE);
                btn4.setBackgroundColor(Color.RED);
                callBackFragmentButton.changeButton(4);
            }
        });

    }


}
两个XML布局:
Activity:
<?xml version="1.0" encoding="utf-8"?>
<LinearLayout xmlns:android="http://schemas.android.com/apk/res/android"
    xmlns:tools="http://schemas.android.com/tools"
    android:layout_width="match_parent"
    android:layout_height="match_parent"
    android:orientation="vertical">

    <FrameLayout
        android:id="@+id/fragment_ll"
        android:layout_width="match_parent"
        android:layout_height="match_parent"
        android:layout_weight="1"></FrameLayout>

    <LinearLayout
        android:layout_width="match_parent"
        android:layout_height="wrap_content"
        android:orientation="horizontal">

        <Button
            android:id="@+id/btn1"
            android:layout_width="wrap_content"
            android:layout_height="wrap_content"
            android:layout_weight="1"
            android:text="1" />

        <Button
            android:id="@+id/btn2"
            android:layout_width="wrap_content"
            android:layout_height="wrap_content"
            android:layout_weight="1"
            android:text="2" />

        <Button
            android:id="@+id/btn3"
            android:layout_width="wrap_content"
            android:layout_height="wrap_content"
            android:layout_weight="1"
            android:text="3" />

        <Button
            android:id="@+id/btn4"
            android:layout_width="wrap_content"
            android:layout_height="wrap_content"
            android:layout_weight="1"
            android:text="4" />
    </LinearLayout>
</LinearLayout>
Fragment:
<?xml version="1.0" encoding="utf-8"?>
<RelativeLayout xmlns:android="http://schemas.android.com/apk/res/android"
    xmlns:tools="http://schemas.android.com/tools"
    android:layout_width="match_parent"
    android:layout_height="match_parent"
    tools:context="com.example.callback.Fragment">
    <LinearLayout

        android:layout_width="match_parent"
        android:layout_height="wrap_content"
        android:orientation="horizontal">

        <Button
            android:id="@+id/btn_f1"
            android:layout_width="wrap_content"
            android:layout_height="wrap_content"
            android:layout_weight="1"
            android:text="1" />

        <Button
            android:id="@+id/btn_f2"
            android:layout_width="wrap_content"
            android:layout_height="wrap_content"
            android:layout_weight="1"
            android:text="2" />

        <Button
            android:id="@+id/btn_f3"
            android:layout_width="wrap_content"
            android:layout_height="wrap_content"
            android:layout_weight="1"
            android:text="3" />
s
        <Button
            android:id="@+id/btn_f4"
            android:layout_width="wrap_content"
            android:layout_height="wrap_content"
            android:layout_weight="1"
            android:text="4" />
    </LinearLayout>
</RelativeLayout>


 3802
3802

 被折叠的 条评论
为什么被折叠?
被折叠的 条评论
为什么被折叠?
 到【灌水乐园】发言


