


Abstract
The Windows NT™ version 3.1 operating system introduces a new executable file format called the Portable Executable (PE) file format. The Portable Executable File Format specification, though rather vague, has been made available to the public and is included on the Microsoft Developer Network CD (Specs and Strategy, Specifications, Windows NT File Format Specifications).
Yet this specification alone does not provide enough information to make it easy, or even reasonable, for developers to understand the PE file format. This article is meant to address that problem. In it you’ll find a thorough explanation of the entire PE file format, along with descriptions of all the necessary structures and source code examples that demonstrate how to use this information.
All of the source code examples that appear in this article are taken from a dynamic-link library (DLL) called PEFILE.DLL. I wrote this DLL simply for the purpose of getting at the important information contained within a PE file. The DLL and its source code are also included on this CD as part of the PEFile sample application; feel free to use the DLL in your own applications. Also, feel free to take the source code and build on it for any specific purpose you may have. At the end of this article, you’ll find a brief list of the functions exported from the PEFILE.DLL and an explanation of how to use them. I think you’ll find these functions make understanding the PE file format easier to cope with.
Introduction TO PE
The recent addition of the Microsoft® Windows NT™ operating system to the family of Windows™ operating systems brought many changes to the development environment and more than a few changes to applications themselves. One of the more significant changes is the introduction of the Portable Executable (PE) file format. The new PE file format draws primarily from the COFF (Common Object File Format) specification that is common to UNIX® operating systems. Yet, to remain compatible with previous versions of the MS-DOS® and Windows operating systems, the PE file format also retains the old familiar MZ header from MS-DOS.
In this article, the PE file format is explained using a top-down approach. This article discusses each of the components of the file as they occur when you traverse the file’s contents, starting at the top and working your way down through the file.
Much of the definition of individual file components comes from the file WINNT.H, a file included in the Microsoft Win32™ Software Development Kit (SDK) for Windows NT. In it you will find structure type definitions for each of the file headers and data directories used to represent various components in the file. In other places in the file, WINNT.H lacks sufficient definition of the file structure. In these places, I chose to define my own structures that can be used to access the data from the file. You will find these structures defined in PEFILE.H, a file used to create the PEFILE.DLL. The entire suite of PEFILE.H development files is included in the PEFile sample application.
In addition to the PEFILE.DLL sample code, a separate Win32-based sample application called EXEVIEW.EXE accompanies this article. This sample was created for two purposes: First, I needed a way to be able to test the PEFILE.DLL functions, which in some cases required multiple file views simultaneously–hence the multiple view support. Second, much of the work of figuring out PE file format involved being able to see the data interactively. For example, to understand how the import address name table is structured, I had to view the .idata section header, the import image data directory, the optional header, and the actual .idata section body, all simultaneously. EXEVIEW.EXE is the perfect sample for viewing that information.
Without further ado, let’s begin.
Structure of PE Files
The PE file format is organized as a linear stream of data. It begins with an MS-DOS header, a real-mode program stub, and a PE file signature. Immediately following is a PE file header and optional header. Beyond that, all the section headers appear, followed by all of the section bodies. Closing out the file are a few other regions of miscellaneous information, including relocation information, symbol table information, line number information, and string table data. All of this is more easily absorbed by looking at it graphically, as shown in Figure 1.
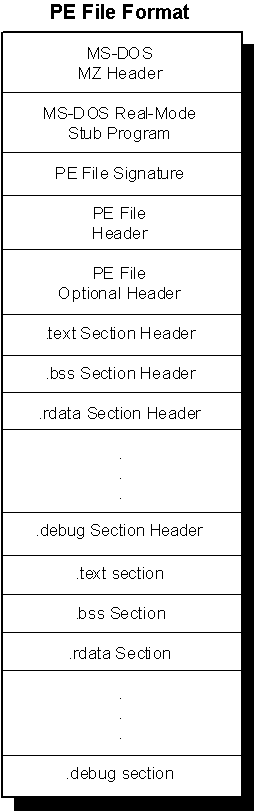
Figure 1. Structure of a Portable Executable file image
MS-DOS/Real-Mode Header
As mentioned above, the first component in the PE file format is the MS-DOS header. The MS-DOS header is not new for the PE file format. It is the same MS-DOS header that has been around since version 2 of the MS-DOS operating system. The main reason for keeping the same structure intact at the beginning of the PE file format is so that, when you attempt to load a file created under Windows version 3.1 or earlier, or MS DOS version 2.0 or later, the operating system can read the file and understand that it is not compatible. In other words, when you attempt to run a Windows NT executable on MS-DOS version 6.0, you get this message: “This program cannot be run in DOS mode.” If the MS-DOS header was not included as the first part of the PE file format, the operating system would simply fail the attempt to load the file and offer something completely useless, such as: “The name specified is not recognized as an internal or external command, operable program or batch file.”The MS-DOS header occupies the first 64 bytes of the PE file.
Real-Mode Stub Program
The real-mode stub program is an actual program run by MS-DOS when the executable is loaded. For an actual MS-DOS executable image file, the application begins executing here. For successive operating systems, including Windows, OS/2®, and Windows NT, an MS-DOS stub program is placed here that runs instead of the actual application. The programs typically do no more than output a line of text, such as: “This program requires Microsoft Windows v3.1 or greater.” Of course, whoever creates the application is able to place any stub they like here, meaning you may often see such things as: “You can’t run a Windows NT application on OS/2, it’s simply not possible.”
When building an application for Windows version 3.1, the linker links a default stub program called WINSTUB.EXE into your executable. You can override the default linker behavior by substituting your own valid MS-DOS-based program in place of WINSTUB and indicating this to the linker with the STUB module definition statement. Applications developed for Windows NT can do the same thing by using the -STUB: linker option when linking the executable file.
PE File Header and Signature
The PE file header is located by indexing the e_lfanew field of the MS-DOS header. The e_lfanew field simply gives the offset in the file, so add the file’s memory-mapped base address to determine the actual memory-mapped address.(actual memory-mapped address = e_lfanew+memory-mapped base address)
PE Optional Header
The next 224 bytes in the executable file make up the PE optional header. Though its name is “optional header,” rest assured that this is not an optional entry in PE executable files.
Data Directories
Each data directory is basically a structure defined as an IMAGE_DATA_DIRECTORY. And although data directory entries themselves are the same, each specific directory type is entirely unique.
PE File Sections
The PE file specification consists of the headers defined so far and a generic object called a section. Sections contain the content of the file, including code, data, resources, and other executable information. Each section has a header and a body (the raw data). Section headers are described below, but section bodies lack a rigid file structure. They can be organized in almost any way a linker wishes to organize them, as long as the header is filled with enough information to be able to decipher the data.
Predefined Sections
An application for Windows NT typically has the nine predefined sections named .text, .bss, .rdata, .data, .rsrc, .edata, .idata, .pdata, and .debug. Some applications do not need all of these sections, while others may define still more sections to suit their specific needs. This behavior is similar to code and data segments in MS-DOS and Windows version 3.1. In fact, the way an application defines a unique section is by using the standard compiler directives for naming code and data segments or by using the name segment compiler option -NT–exactly the same way in which applications defined unique code and data segments in Windows version 3.1.
The following is a discussion of some of the more interesting sections common to typical Windows NT PE files.
Executable code section, .text
One difference between Windows version 3.1 and Windows NT is that the default behavior combines all code segments (as they are referred to in Windows version 3.1) into a single section called “.text” in Windows NT. Since Windows NT uses a page-based virtual memory management system, there is no advantage to separating code into distinct code segments. Consequently, having one large code section is easier to manage for both the operating system and the application developer.
The .text section also contains the entry point mentioned earlier. The IAT also lives in the .text section immediately before the module entry point. (The IAT’s presence in the .text section makes sense because the table is really a series of jump instructions, for which the specific location to jump to is the fixed-up address.) When Windows NT executable images are loaded into a process’s address space, the IAT is fixed up with the location of each imported function’s physical address. In order to find the IAT in the .text section, the loader simply locates the module entry point and relies on the fact that the IAT occurs immediately before the entry point. And since each entry is the same size, it is easy to walk backward in the table to find its beginning.
Data sections, .bss, .rdata, .data
The .bss section represents uninitialized data for the application, including all variables declared as static within a function or source module.
The .rdata section represents read-only data, such as literal strings, constants, and debug directory information.
All other variables (except automatic variables, which appear on the stack) are stored in the .data section. Basically, these are application or module global variables.
Resources section, .rsrc
The .rsrc section contains resource information for a module. It begins with a resource directory structure like most other sections, but this section’s data is further structured into a resource tree.
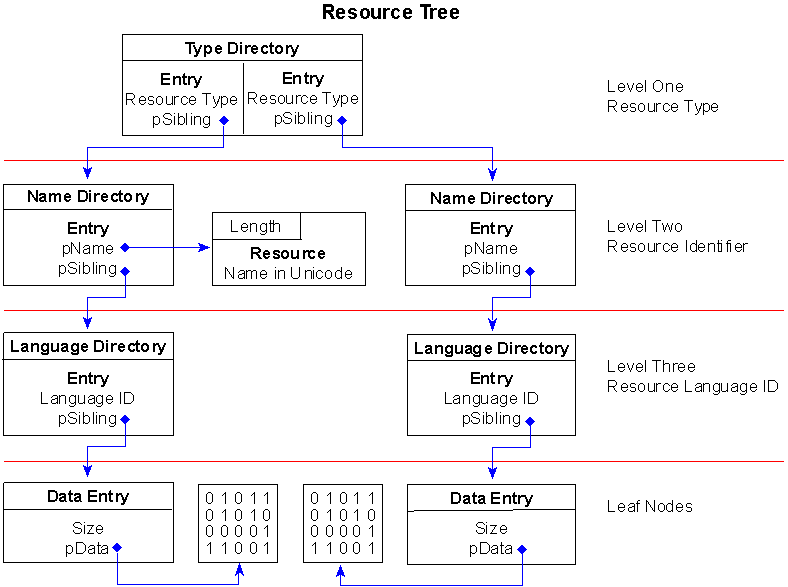
Figure 2. A simple resource tree structure
Export data section, .edata
The .edata section contains export data for an application or DLL. When present, this section contains an export directory for getting to the export information.
Import data section, .idata
The .idata section is import data, including the import directory and import address name table. Although an IMAGE_DIRECTORY_ENTRY_IMPORT directory is defined, no corresponding import directory structure is included in the file WINNT.H. Instead, there are several other structures called IMAGE_IMPORT_BY_NAME, IMAGE_THUNK_DATA, and IMAGE_IMPORT_DESCRIPTOR. Personally, I couldn’t make heads or tails of how these structures are supposed to correlate to the .idata section, so I spent several hours deciphering the .idata section body and came up with a much simpler structure. I named this structure IMAGE_IMPORT_MODULE_DIRECTORY.
Debug information section, .debug
Debug information is initially placed in the .debug section. The PE file format also supports separate debug files (normally identified with a .DBG extension) as a means of collecting debug information in a central location. The debug section contains the debug information, but the debug directories live in the .rdata section mentioned earlier. Each of those directories references debug information in the .debug section.
REFERENCE
1. The Portable Executable File Format from Top to Bottom
2. Executable File Analysis
3. Executable File Analysis (Windows Forensic Analysis) Part 1
4.


 444
444


 被折叠的 条评论
为什么被折叠?
被折叠的 条评论
为什么被折叠?
 到【灌水乐园】发言


