


写在前面话
WebService对List本身就提供了支持,但是对Map结构类型的数据不支持,但是我们可通过将其转换List类似的结构完成对Map的间接支持,服务端在WebService-04的基础上增加一个处理Map的方法,客户端不变,
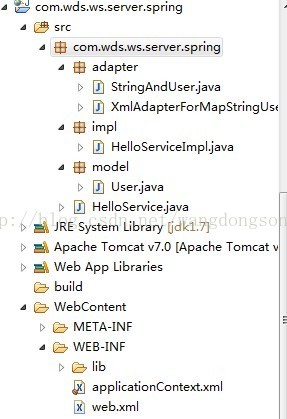
服务端
创建Web工程,工作结构图如下:
web.xml配置
<?xml version="1.0" encoding="UTF-8"?>
<web-app version="2.5" xmlns="http://java.sun.com/xml/ns/javaee"
	xmlns:xsi="http://www.w3.org/2001/XMLSchema-instance"
	xsi:schemaLocation="http://java.sun.com/xml/ns/javaee
	http://java.sun.com/xml/ns/javaee/web-app_2_5.xsd">
	<context-param>
		<param-name>webAppRootKey</param-name>
		<param-value>cxf.root</param-value>
	</context-param>

	<!-- UTF-8编码配置 -->
	<filter>
		<filter-name>CharacterEncodingFilter</filter-name>
		<filter-class>org.springframework.web.filter.CharacterEncodingFilter</filter-class>
		<init-param>
			<param-name>encoding</param-name>
			<param-value>UTF-8</param-value>
		</init-param>
		<init-param>
			<param-name>forceEncoding</param-name>
			<param-value>true</param-value>
		</init-param>
	</filter>
	<filter-mapping>
		<filter-name>CharacterEncodingFilter</filter-name>
		<url-pattern>/*</url-pattern>
	</filter-mapping>

	<!-- 指定配置文件的路径 -->
	<context-param>
		<param-name>contextConfigLocation</param-name>
		<param-value>
			/WEB-INF/applicationContext.xml
		</param-value>
	</context-param>

	<!-- 配置Spring的监听 -->
	<listener>
		<listener-class>org.springframework.web.context.ContextLoaderListener</listener-class>
	</listener>

	<!-- 配置CXFServlet -->
	<servlet>
		<servlet-name>CXFServlet</servlet-name>
		<servlet-class>org.apache.cxf.transport.servlet.CXFServlet</servlet-class>
	</servlet>
	<servlet-mapping>
		<servlet-name>CXFServlet</servlet-name>
		<!-- 两个URL形式都转向WebService,两种URL形式可以访问服务 -->
		<url-pattern>/soa-infra/services/default/*</url-pattern>
		<url-pattern>/cxf/*</url-pattern>
	</servlet-mapping>

</web-app>
applicationContext.xml
<?xml version="1.0" encoding="UTF-8"?>
<!-- 除添加Spring的schmea之外,还要添加关于cxf的schema,其前缀可以随意命名,我使用cxf,也可以使用jaxws -->
<beans xmlns="http://www.springframework.org/schema/beans"
	xmlns:xsi="http://www.w3.org/2001/XMLSchema-instance"
	xmlns:p="http://www.springframework.org/schema/p"
	xmlns:cxf="http://cxf.apache.org/jaxws"
	xsi:schemaLocation="http://www.springframework.org/schema/beans
         http://www.springframework.org/schema/beans/spring-beans-3.0.xsd
         http://cxf.apache.org/jaxws
		 http://cxf.apache.org/schemas/jaxws.xsd">

	<!-- 指定到类路径下面的META-INF/cxf中去寻找cxf.xml和cxf-servlet.xml这两个文件 -->
	<import resource="classpath:META-INF/cxf/cxf.xml" />
	<import resource="classpath:META-INF/cxf/cxf-servlet.xml" />

	<!-- 提供服务的bean -->
	<bean id="helloWorldWs" class="com.wds.ws.server.spring.impl.HelloServiceImpl" />

	<!--
		implementor:指定服务的提供者,有两种方式:1是类名,2是bean的名字
		address:服务路径
	 -->
	<cxf:endpoint
		implementor="#helloWorldWs"
		address="/helloworld"
	>
	</cxf:endpoint>

</beans>
服务接口
在接口增加一个关于Map返回类型的方法
package com.wds.ws.server.spring;

import java.util.Map;

import javax.jws.WebService;
import javax.xml.bind.annotation.adapters.XmlJavaTypeAdapter;

import com.wds.ws.server.spring.adapter.XmlAdapterForMapStringUser;
import com.wds.ws.server.spring.model.User;

/**
 * 服务接口
 * @author wds
 *
 */
@WebService
public interface HelloService {

	public String sayHi(String userName);

	/**
	 * WebService对Map类型数据处理的方式
	 * @param type
	 * @return
	 */
	@XmlJavaTypeAdapter(value=XmlAdapterForMapStringUser.class)
	public Map<String, User> getMapData(String type);
}
转换类
package com.wds.ws.server.spring.adapter;
import java.util.HashMap;
import java.util.List;
import java.util.Map;

import javax.xml.bind.annotation.adapters.XmlAdapter;

import com.wds.ws.server.spring.adapter.StringAndUser.Entry;
import com.wds.ws.server.spring.model.User;

/**
 * 实现从BoundType到ValueType之间的转换
 * @author wds
 *
 */
public class XmlAdapterForMapStringUser extends
		XmlAdapter<StringAndUser, Map<String, User>> {

	@Override
	public Map<String, User> unmarshal(StringAndUser stringUser) throws Exception {
		List<Entry> entrties = stringUser.getEntries();
		Map<String, User> result = null;
		if(entrties != null && entrties.size() > 0){
			result = new HashMap<String, User>();
			for (Entry entry : entrties) {
				result.put(entry.getKey(), entry.getValue());
			}
		}
		return null;
	}

	@Override
	public StringAndUser marshal(Map<String, User> stringUserMap) throws Exception {
		StringAndUser result = new StringAndUser();
		if(stringUserMap != null){
			for (String key : stringUserMap.keySet()) {
				result.getEntries().add(new Entry(key, stringUserMap.get(key)));
			}
		}
		return result;
	}


}
这个转换类的作用就是在WebService支持的数据类型与Map之间做一个转换,而StringAndUser就是将Map转换成了WebService支持的类型,接下来我们看StringAndUser类
StringAndUser类,与Map相等同的数据类型
package com.wds.ws.server.spring.adapter;

import java.util.ArrayList;
import java.util.List;

import com.wds.ws.server.spring.model.User;

/**
 * 与Map<String, User>互相转换的类 Map是由Key和Value构成,可以存放多个Key,类似二维结构的List
 * 基于此,我们可构成一个List<Object>的数据类型,而这个Object是两个属性,一个是Key,一个是Value
 *
 * @author wds
 *
 */
public class StringAndUser {

	private List<Entry> entries = new ArrayList<Entry>();

	public List<Entry> getEntries() {
		return entries;
	}

	public void setEntries(List<Entry> entries) {
		this.entries = entries;
	}

	/**
	 * 创建一个关于Entry的内部类 由Key和Value组织 注意内部类的访问权限
	 */
	public static class Entry {

		private String key;
		private User value;

		public Entry() {
		}

		/**
		 * 带参数的构造方法
		 *
		 * @param key
		 * @param value
		 */
		public Entry(String key, User value) {
			this.key = key;
			this.value = value;
		}

		public String getKey() {
			return key;
		}

		public void setKey(String key) {
			this.key = key;
		}

		public User getValue() {
			return value;
		}

		public void setValue(User value) {
			this.value = value;
		}

	}
}
服务实现
package com.wds.ws.server.spring.impl;

import java.util.Date;
import java.util.HashMap;
import java.util.Map;

import javax.jws.WebService;

import com.wds.ws.server.spring.HelloService;
import com.wds.ws.server.spring.model.User;

/**
 * 服务实现类
 * 关于@WebService在上面有介绍过
 * @author wds
 *
 */
@WebService(endpointInterface="com.wds.ws.server.spring.HelloService", portName="hwPort", serviceName="hwService")
public class HelloServiceImpl implements HelloService {

	@Override
	public String sayHi(String userName) {
		String result = new Date() + " " + userName;
		System.out.println("Server: " + result);
		return result;
	}

	@Override
	public Map<String, User> getMapData(String type) {
		Map<String, User> result = new HashMap<String, User>();

		User user = new User("no.1", "address one");
		result.put("one1", user);
		user = new User("no.2", "address two");
		result.put("one2", user);
		user = new User("no.3", "address three");
		result.put("one3", user);

		return result;
	}

}
user类
package com.wds.ws.server.spring.model;

public class User {

	private String userName;
	private String address;

	public User() {
	}

	public User(String userName, String address) {
		this.userName = userName;
		this.address = address;
	}

	public String getUserName() {
		return userName;
	}

	public void setUserName(String userName) {
		this.userName = userName;
	}

	public String getAddress() {
		return address;
	}

	public void setAddress(String address) {
		this.address = address;
	}


}
将服务部署到Tomcat下,启动
客户端
客户端如WebService-04的方式,切换到cxf的bin目录下,执行以下命令:
wsdl2java -p com.wds.ws.client.spring http://localhost:8080/com.wds.ws.server.spring/cxf/helloworld?wsdl
-p是指定包结构
将产生的类复制到工作中去,工作结构如下:
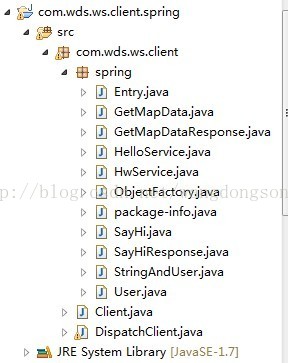
编写Client测试类,代码如下:
package com.wds.ws.client;

import java.net.MalformedURLException;
import java.net.URL;
import java.util.List;

import javax.xml.namespace.QName;
import javax.xml.ws.Service;

import com.wds.ws.client.spring.Entry;
import com.wds.ws.client.spring.HelloService;
import com.wds.ws.client.spring.StringAndUser;

/**
 * 客户端
 * @author wds
 *
 */
public class Client {

	/**
	 * 命令
	 * 我的cxf的包放到f:/package,可根据实际目录调整
	 * F:\Package\apache-cxf-2.7.3\bin>wsdl2java -p com.wds.ws.client.spring http://localhost:8080/com.wds.ws.server.spring/cxf/helloworld?wsdl
	 */

	/**
	 * WSDL的地址
	 */
	private final static String url = "http://localhost:8080/com.wds.ws.server.spring/cxf/helloworld?wsdl";

	/**
	 * 命名空间,在WSDL根节点中的targetNameSpace
	 */
	private final static String nameSpace = "http://impl.spring.server.ws.wds.com/";

	/**
	 * 服务名称,在WSDL文件中的节点为<wsdl:sevice name="XXX">的name属性值
	 */
	private final static String sName = "hwService";

	/**
	 * @param args
	 */
	public static void main(String[] args) {
		try {

			//生成wsdlUrl对象
			URL wsdlUrl = new URL(url);

			//ServiceName
			QName serviceName = new QName(nameSpace, sName);

			//创建Service对象
			Service service = Service.create(wsdlUrl, serviceName);

			//获取port,HelloService为port的类型
			HelloService hwService = service.getPort(HelloService.class);

			//执行方法调用
			String result = hwService.sayHi("wds");

			StringAndUser stringUser = hwService.getMapData("map");
			List<Entry> entries = stringUser.getEntries();

			//输出getMapData方法的结果
			for (Entry entry : entries) {
				System.out.println("Key:" + entry.getKey() + " Value:" + entry.getValue());
			}

			//输出sayHi的结果
			System.out.println(result);
		} catch (MalformedURLException e) {
			e.printStackTrace();
		}
	}

}
小结
对于WebService不支持Map结构的数据类型,我们可将其转换成WebService支持的数据结构即可解决。


 2314
2314


 被折叠的 条评论
为什么被折叠?
被折叠的 条评论
为什么被折叠?
 到【灌水乐园】发言


