OpenSSL.Net 在生产环境中无法正常加载的原因分析与解决方式。

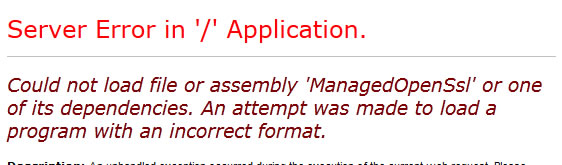
在本地测试好好的代码部署到生产环境后,遇到OpenSSL.Net不能加载的错误。

Could not load file or assembly 'ManagedOpenSsl' or one of its dependencies. An attempt was made to load a program with an incorrect format.

ManagedOpenSsl.dll 是一个对 unmanaged的libeay32.dllssleay32.dll 进行包装的Assembly.

它通过P/Invoke调用openssl的dll导出函数,并提供对.Net友好的对象封装方式


而这个错误一般由以下两点原因造成的:

1.  libeay32.dll 和 ssleay32.dll 这两个动态库使用动态链接VC Runtime的方式编译的,因为服务器上没有安装VC++ Runtime而导致加载失败。

2. 服务器操作系统是x64,而这些动态库却是x86的,导致加载失败。


对于这两个原因,下面逐步说明解决方式。


1. VC 运行时(Runtime)依赖性的问题


如果使用Depends.exe查看 从http://openssl-net.sourceforge.net/ 上下载的两个非托管DLL文件,会发现它们都引用了MSVER100.dll, 而此DLL却不是系统自带的。

要解决这个问题,可以使用静态链接VC Runtime的方式编译自己需要的openssl dll.

  1. 首先安装 ActivePerl http://www.activestate.com/activeperl/downloads
  2. http://www.openssl.org/下载最新的openssl源代码包
  3. 在开始菜单中找到 Visual Studio 的命令提示符(Visual Studio Command Prompt),也就是vcvarsall.bat设置好x86编译需要环境变量
  4. 在命令提示符窗口中 切换到下载的openssl源代码包的位置
  5. 执行  perl configure VC-WIN32
  6. 执行 ms\do_ms
  7. 用文本编辑器打开 ms目录下的 ntdll.mak. 将CFLAG中的 /MD 标识符改成 /MT
  8. 回到命令提示符下,继续执行 nmake -f ms\ntdll.mak 编译
  9. 编译成功后,就可以在out32dll目录下找到这2个DLL了, 替换掉原有的即可。


2. x64操作系统的问题


如果服务器是x64操作系统,如Windows 2008 R2, 那么由于这些dll都是x86环境下的,也会导致加载失败。

对于这类问题最简单的解决办法是,修改IIS应用程序池的设置,允许32bit代码的执行。这种方式并不好,实际上进程被限制在WOW64上运行,对性能会有影响。

最好还是编译一套x64版本的dll,这样无需修改任何IIS设置也可保证运行。

  1. 在开始菜单中找到 Visual Studio 的x64环境命令提示符(Visual Studio x64 Cross Tools Command Prompt ),也就是vcvarsall.bat设置好x64编译需要环境变量
  2. 在命令提示符窗口中 切换到下载的openssl源代码包的位置
  3. 执行  perl configure VC-WIN64A
  4. 执行 ms\do_win64a
  5. 用文本编辑器打开 ms目录下的 ntdll.mak. 将CFLAG中的 /MD 标识符改成 /MT
  6. 继续修改ntdll.mak
    # The output directory for everything intersting
    OUT_D=out64dll
    # The output directory for all the temporary muck
    TMP_D=tmp64dll
    # The output directory for the header files
    INC_D=inc64
    INCO_D=inc64\openssl
  7. 回到命令提示符下,继续执行 nmake -f ms\ntdll.mak 编译
  8. openssl编译成功后,就可以在out64dll目录下找到这2个DLL了。
  9. 使用GIT客户端下载最新的 OpenSSL.Net的代码, http://sourceforge.net/projects/openssl-net/
  10. 使用VisualStudio打开工程后,将配置管理器中的平台改为x64后编译
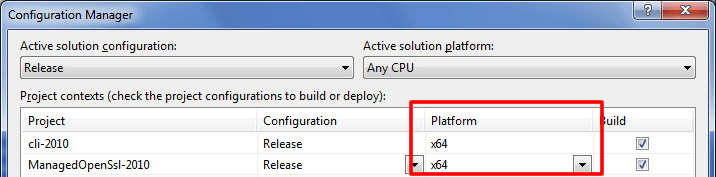
  11. 此时3个dll都有了,直接部署到x64服务器即可。


这里是使用VS2010编译后的文件下载:http://download.csdn.net/detail/wangjia184/3812878

openssl版本 1.0.0e,  openssl.net版本 0.5-rc1


以下是 .NET Core 使用 OpenSSL 进行加密的示例代码: ```csharp using System; using System.Security.Cryptography; using System.Text; using System.Runtime.InteropServices; public class OpenSSLExample { public static void Main() { // 加载 OpenSSL 库 const string OPENSSL_LIB = "libcrypto.so.1.1"; IntPtr openssl = LoadLibrary(OPENSSL_LIB); if (openssl == IntPtr.Zero) { Console.WriteLine("无法加载 OpenSSL 库: {0}", OPENSSL_LIB); return; } // 准备密钥和数据 byte[] key = Encoding.UTF8.GetBytes("my secret key"); byte[] plaintext = Encoding.UTF8.GetBytes("hello world"); // 加密数据 byte[] ciphertext = Encrypt(plaintext, key); // 解密数据 byte[] decryptedtext = Decrypt(ciphertext, key); // 输出结果 Console.WriteLine("原始数据: {0}", Encoding.UTF8.GetString(plaintext)); Console.WriteLine("加密后的数据: {0}", Convert.ToBase64String(ciphertext)); Console.WriteLine("解密后的数据: {0}", Encoding.UTF8.GetString(decryptedtext)); // 卸载 OpenSSL 库 FreeLibrary(openssl); } [DllImport("libdl.so")] private static extern IntPtr dlopen(string filename, int flags); [DllImport("libdl.so")] private static extern IntPtr dlerror(); [DllImport("libdl.so")] private static extern IntPtr dlsym(IntPtr handle, string symbol); [DllImport("libdl.so")] private static extern int dlclose(IntPtr handle); [DllImport("libc.so.6")] private static extern int puts(string s); [DllImport("libc.so.6")] private static extern int printf(string format, IntPtr arg); private static IntPtr LoadLibrary(string filename) { int RTLD_NOW = 2; IntPtr handle = dlopen(filename, RTLD_NOW); if (handle == IntPtr.Zero) { IntPtr error = dlerror(); printf("无法加载库: %s\n", error); } return handle; } private static void FreeLibrary(IntPtr handle) { dlclose(handle); } private static byte[] Encrypt(byte[] plaintext, byte[] key) { IntPtr evp_cipher = dlsym(LoadLibrary("libcrypto.so.1.1"), "EVP_aes_256_cbc"); byte[] iv = GenerateRandomBytes(16); byte[] ciphertext = new byte[plaintext.Length + 16]; int ciphertext_len; using (var ctx = new EVP_CIPHER_CTX()) { EVP_CipherInit_ex(ctx, evp_cipher, IntPtr.Zero, key, iv, 1); EVP_CipherUpdate(ctx, ciphertext, out ciphertext_len, plaintext, plaintext.Length); EVP_CipherFinal_ex(ctx, ciphertext, out ciphertext_len); } return ciphertext; } private static byte[] Decrypt(byte[] ciphertext, byte[] key) { IntPtr evp_cipher = dlsym(LoadLibrary("libcrypto.so.1.1"), "EVP_aes_256_cbc"); byte[] iv = new byte[16]; Array.Copy(ciphertext, iv, 16); byte[] plaintext = new byte[ciphertext.Length - 16]; int plaintext_len; using (var ctx = new EVP_CIPHER_CTX()) { EVP_CipherInit_ex(ctx, evp_cipher, IntPtr.Zero, key, iv, 0); EVP_CipherUpdate(ctx, plaintext, out plaintext_len, ciphertext, 16, ciphertext.Length - 16); EVP_CipherFinal_ex(ctx, plaintext, out plaintext_len); } return plaintext; } private static byte[] GenerateRandomBytes(int length) { byte[] bytes = new byte[length]; using (var rng = new RNGCryptoServiceProvider()) { rng.GetBytes(bytes); } return bytes; } private class EVP_CIPHER_CTX : SafeHandle { public EVP_CIPHER_CTX() : base(IntPtr.Zero, true) {} public override bool IsInvalid { get { return handle == IntPtr.Zero; } } protected override bool ReleaseHandle() { EVP_CIPHER_CTX_free(handle); return true; } [DllImport("libcrypto.so.1.1")] private static extern IntPtr EVP_CIPHER_CTX_new(); [DllImport("libcrypto.so.1.1")] private static extern void EVP_CIPHER_CTX_free(IntPtr ctx); [DllImport("libcrypto.so.1.1")] private static extern int EVP_CipherInit_ex(EVP_CIPHER_CTX ctx, IntPtr cipher, IntPtr engine, byte[] key, byte[] iv, int enc); [DllImport("libcrypto.so.1.1")] private static extern int EVP_CipherUpdate(EVP_CIPHER_CTX ctx, byte[] @out, out int outl, byte[] @in, int inl); [DllImport("libcrypto.so.1.1")] private static extern int EVP_CipherFinal_ex(EVP_CIPHER_CTX ctx, byte[] @out, out int outl); } } ``` 在上面的示例,我们使用 OpenSSL的 AES-256-CBC 算法对数据进行加密和解密,可以根据需要修改算法和密钥长度。注意,需要在 Linux 环境下编译和运行此示例。
评论 2
添加红包

请填写红包祝福语或标题

红包个数最小为10个

红包金额最低5元

当前余额3.43前往充值 >
需支付:10.00
成就一亿技术人!
领取后你会自动成为博主和红包主的粉丝 规则
hope_wisdom
发出的红包
实付
使用余额支付
点击重新获取
扫码支付
钱包余额 0

抵扣说明:

1.余额是钱包充值的虚拟货币,按照1:1的比例进行支付金额的抵扣。
2.余额无法直接购买下载,可以购买VIP、付费专栏及课程。

余额充值