


TensorBoard是TensorFlow极为有用的工具,可以用来记录和跟踪学习过程中网络结构节点的变化(Event、Images),展示整个网络结构,对于程序的结构检验、调试和优化有很大的帮助。本文用一个卷积神经网络(CNN)演示如何使用TensorBoard以及使用过程中遇到的一些问题。
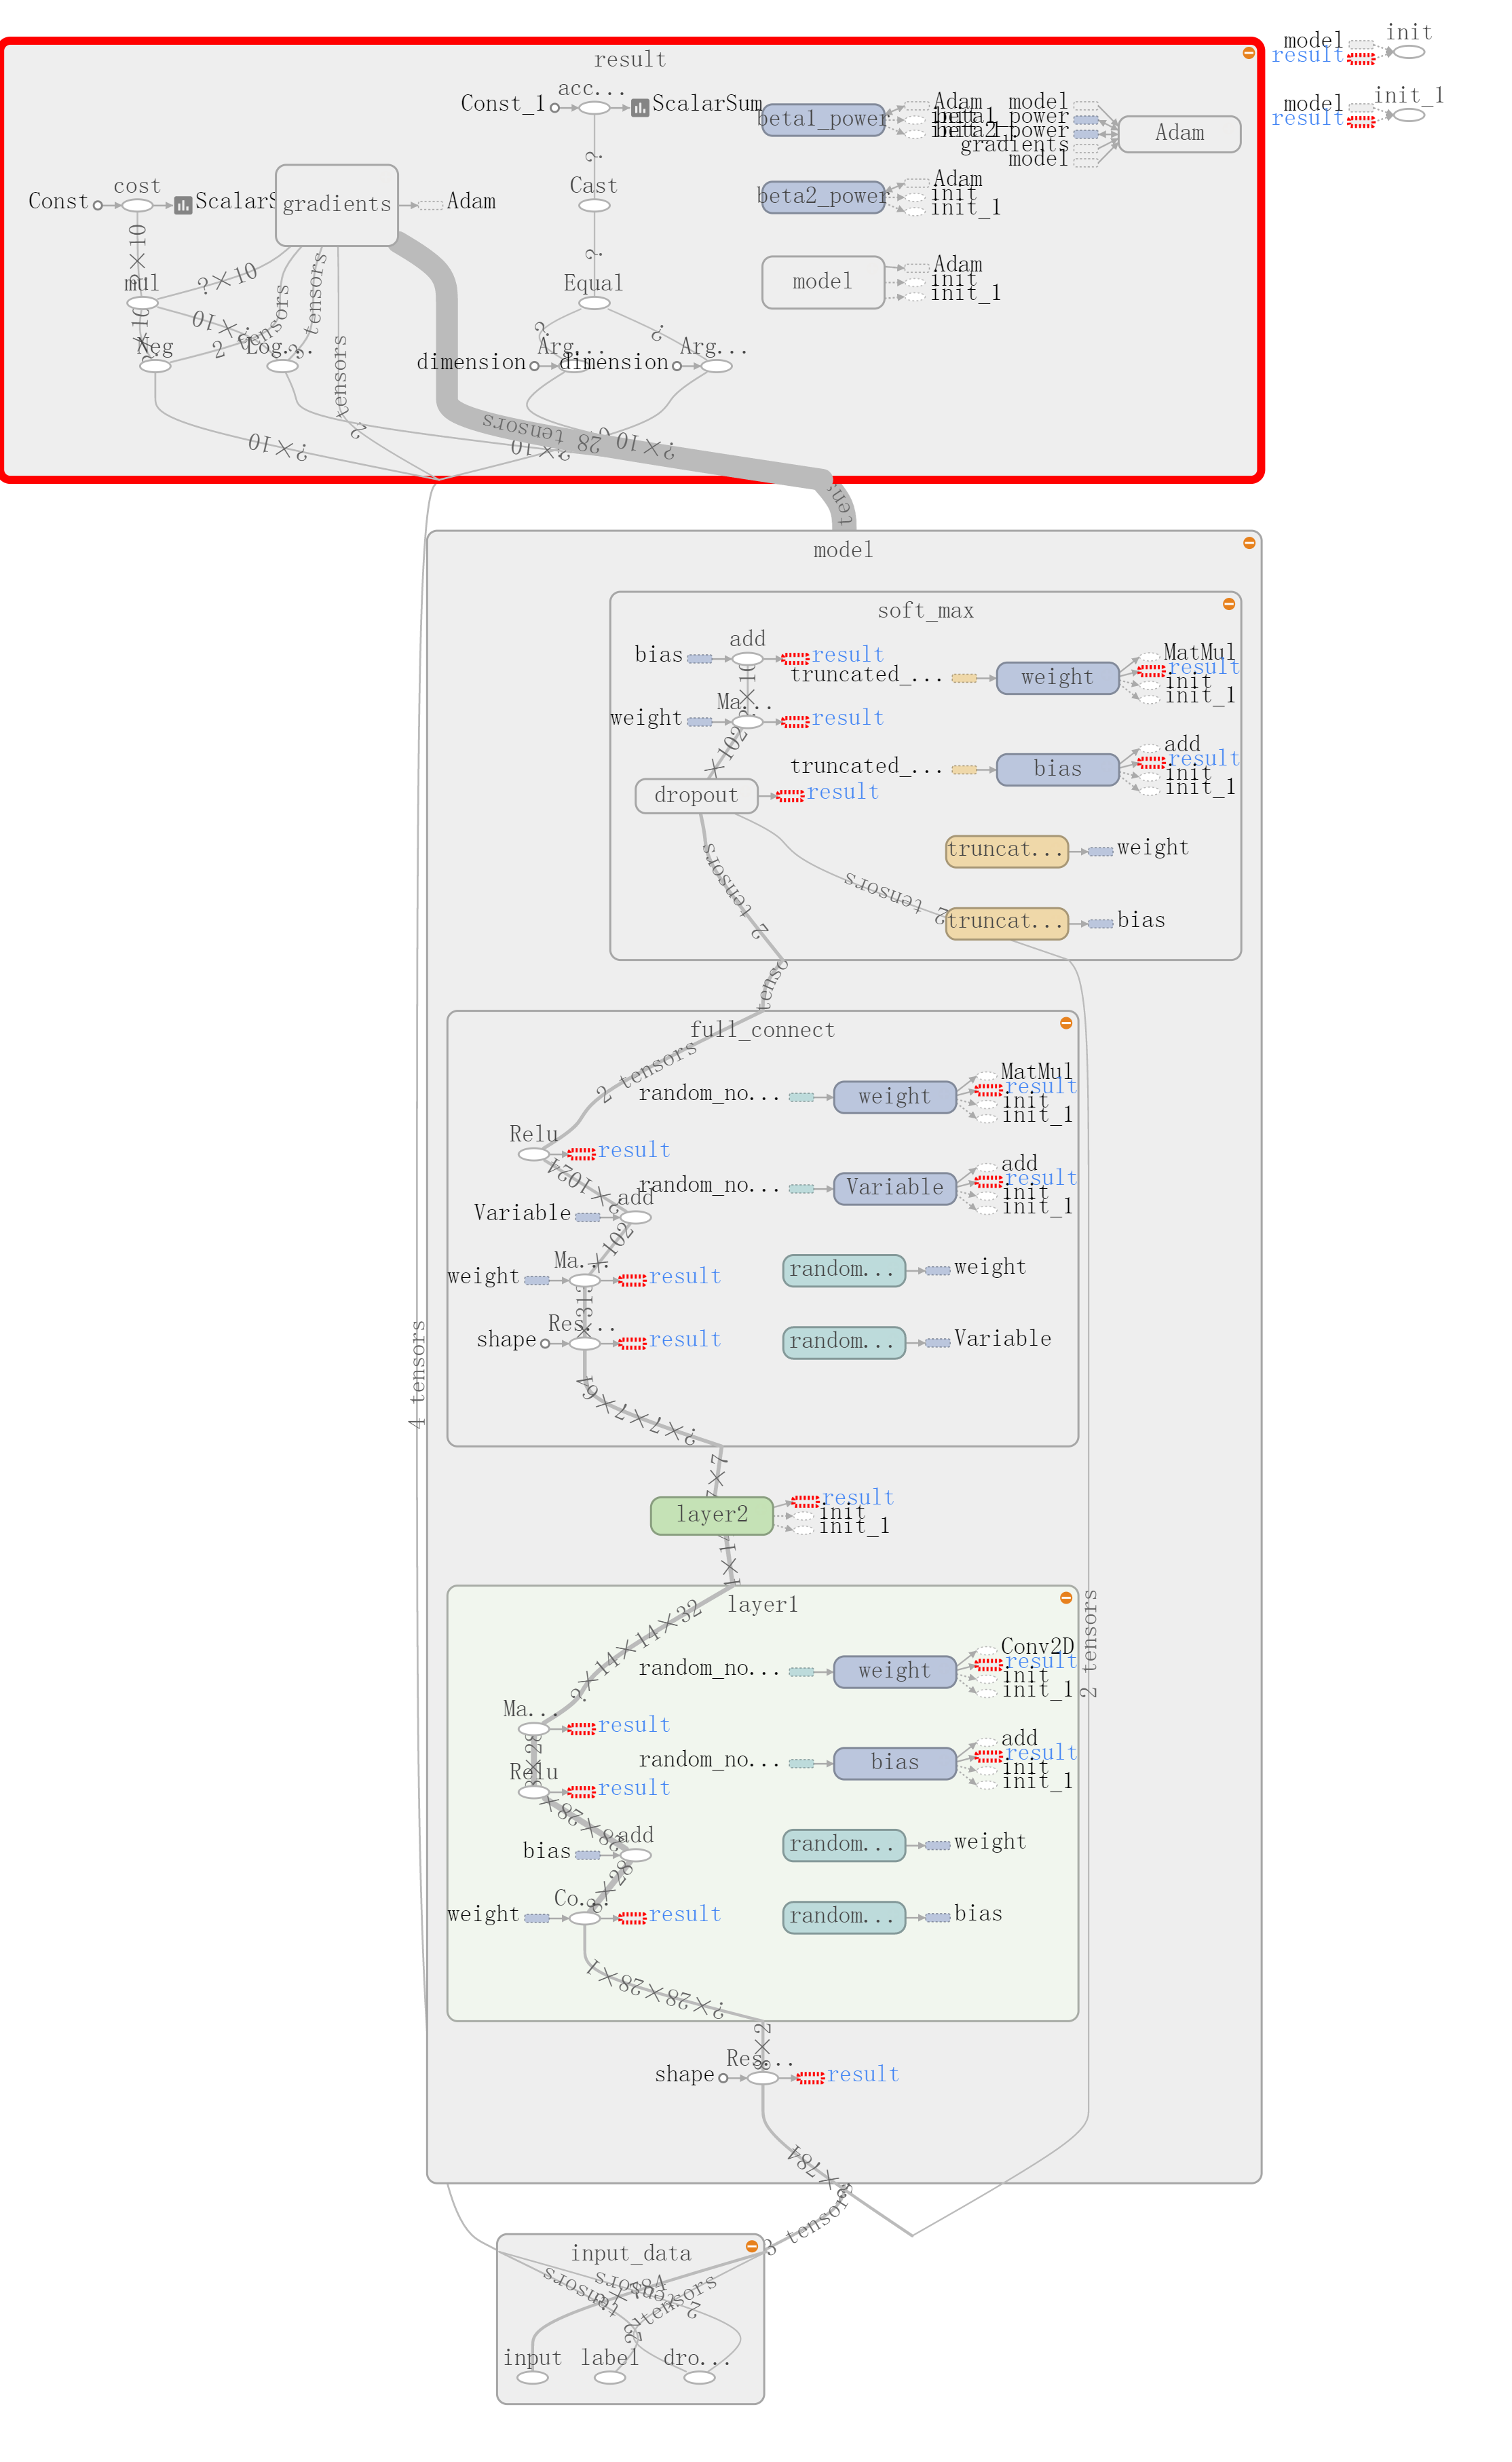
代码最后的graph结构图:
一、示例代码:
1、加载数据MNIST
import tutorials.mnist.input_data as input_data
mnist = input_data.read_data_sets("MNIST_data/", one_hot=True)
import tensorflow as tf
2、构造网络结构
# tf.reset_default_graph()
# Parameters
learning_rate = 0.001

# Network Parameters
n_input = 784 # MNIST data input (img shape: 28*28)
n_classes = 10 # MNIST total classes (0-9 digits)
dropout = 0.75 # Dropout, probability to keep units


# tf Graph input
with tf.name_scope('input_data') as scope:
    x = tf.placeholder(tf.float32, [None, n_input] ,name='input')
    y = tf.placeholder(tf.float32, [None, n_classes], name='label')
    keep_prob = tf.placeholder(tf.float32, shape=(), name='drop_out') #dropout (keep probability)

# Create some wrappers for simplicity
def conv2d(x, W, b, strides=1):
    # Conv2D wrapper, with bias and relu activation
    x = tf.nn.conv2d(x, W, strides=[1, strides, strides, 1], padding='SAME')
    x = tf.nn.bias_add(x, b)
    return tf.nn.relu(x)


def maxpool2d(x, k=2):
    # MaxPool2D wrapper
    return tf.nn.max_pool(x, ksize=[1, k, k, 1], strides=[1, k, k, 1],padding='SAME')


# Create model
def conv_net(x,dropout):
    with tf.name_scope('model') as scope:
        # Reshape input picture
        x = tf.reshape(x, shape=[-1, 28, 28, 1])

        # Convolution Layer

        # Max Pooling (down-sampling)
        with tf.name_scope('layer1') as scope:
            W_conv1 = tf.Variable(tf.random_normal(shape=[5,5,1,32]), name='weight')
            b_conv1 = tf.Variable(tf.random_normal(shape=[1,32]), name='bias')
            convOne = tf.nn.conv2d(x, W_conv1, strides=[1,1,1,1], padding="SAME")
            reluOne = tf.nn.relu(convOne + b_conv1)
            conv1 = tf.nn.max_pool(reluOne, ksize=[1,2,2,1],strides=[1,2,2,1],padding="SAME")

        # Convolution Layer
        with tf.name_scope('layer2') as scope:
            W_conv2 = tf.Variable(tf.random_normal(shape=[5,5,32,64]), name='weight')
            b_conv2 = tf.Variable(tf.random_normal( shape=[1,64]), name='bias')
            convTwo = tf.nn.conv2d(conv1, W_conv2, strides=[1,1,1,1], padding="SAME")
            reluTwo = tf.nn.relu(convTwo + b_conv2)
            conv2 = tf.nn.max_pool(reluTwo, ksize=[1,2,2,1], strides=[1,2,2,1],padding="SAME")

        # Fully connected layer
        # Reshape conv2 output to fit fully connected layer input
        with tf.name_scope('full_connect') as scope:
            W_full = tf.Variable(tf.random_normal(shape=[7 * 7 * 64, 1024]), name='weight')
            b_full = tf.Variable(tf.random_normal(shape=[1, 1024]), 'bias')
            input_flat=tf.reshape(conv2, shape=[-1, 7 * 7 * 64])
            fc1 = tf.nn.relu(tf.matmul(input_flat, W_full) + b_full)

        # Apply Dropout
        with tf.name_scope('soft_max') as scope:
            drop_out = tf.nn.dropout(fc1,keep_prob)

        # Output, class prediction
            W_softmax = tf.Variable(tf.truncated_normal(shape=[1024, 10]), name='weight')
            b_softmax = tf.Variable(tf.truncated_normal(shape=[1,10]), name='bias')
            y_predict = tf.matmul(drop_out, W_softmax) + b_softmax

        return y_predict
3、构造目标函数(损失函数cost和预测准确度accuracy )
# Construct model
# pred = conv_net(x, weights, biases, keep_prob)
pred = conv_net(x, keep_prob)

with tf.name_scope('result') as scope:
    # Define loss and optimizer
    cross_entropy_cnn = -y * tf.nn.log_softmax(pred)
    cost = tf.reduce_sum(cross_entropy_cnn, name='cost') ### 目标函数有问题

    optimizer = tf.train.AdamOptimizer(learning_rate=learning_rate).minimize(cost)

    # Evaluate model
    correct_pred = tf.equal(tf.argmax(pred, 1), tf.argmax(y, 1))
    accuracy = tf.reduce_mean(tf.cast(correct_pred, tf.float32), name='accuracy')

cost_summary = tf.scalar_summary(cost.op.name, cost)
accuracy_summary = tf.scalar_summary(accuracy.op.name, accuracy)

# Initializing the variables
init = tf.initialize_all_variables()
4、训练模型
sess = tf.Session()
sess.run(tf.initialize_all_variables())

summary_op = tf.merge_summary([cost_summary, accuracy_summary])
summary_writer = tf.train.SummaryWriter('/home/Alex/tensorboard/log', graph_def=sess.graph)

for i in range(2000):
    batch = mnist.train.next_batch(128)

    if i% 100 == 0:
        train_accuracy = accuracy.eval(feed_dict={x:batch[0], y:batch[1], keep_prob:1.0},session=sess)
        print ("step "+ str(i) +", training accuracy :"+ str(train_accuracy))
        cross_entropy_val = cross_entropy_cnn.eval(feed_dict={x:batch[0], y:batch[1], keep_prob:1.0},session=sess)

        summary_str = sess.run(summary_op, feed_dict={x:batch[0], y:batch[1], keep_prob:(1.0)})
        summary_writer.add_summary(summary_str, i)

    sess.run(optimizer, feed_dict={x:batch[0], y:batch[1], keep_prob:0.75})
print("test accuracy :" + str(accuracy.eval(feed_dict={x:mnist.test.images, y:mnist.test.labels, keep_prob:1.0},session=sess)))
sess.close()
summary_writer.close()  ##程序运行结束后关闭文件并刷新到硬盘
二、解释
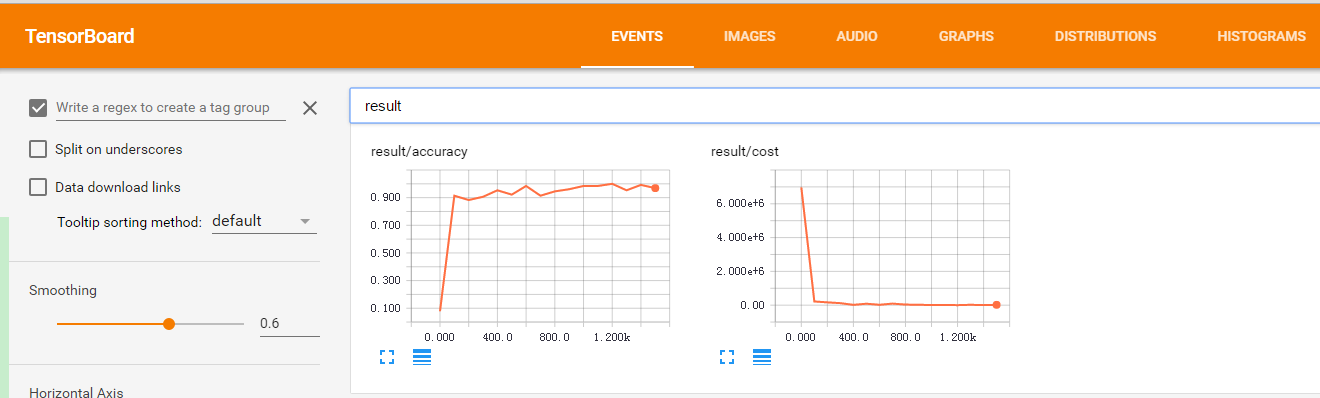
TensorBoard
使用TensorBoard的方法很简单,在程序中添加几条语句语句就可以把数据保存到文件里了,具体可以拆分为三个步骤(tensorflow1.0版本和之前的版本接口有所不同,在注释## tf1.0中给出了tensorflow1.0的方法样例 ):
(1)设置需要跟踪的变量:
cost_summary = tf .scalar_summary(cost.op .name, cost) ## tf1.0 :cost_summary = tf.summary.scalar(cost.op .name, cost)
accuracy_summary = tf .scalar_summary(accuracy.op .name, accuracy) ##tf1.0 : accuracy_summary = tf.summary.scalar(accuracy.op .name, accuracy)
(2)设置op和保存路径:
summary_op = tf .merge_summary([cost_summary, accuracy_summary ]) ##tf1.0 summary_op = tf.summary.merge_all()
summary_writer = tf.train. SummaryWriter('/home/Alex/tensorboard/log' , graph_def=sess. graph) ##tf1.0 :summary_writer = tf.summary.FileWriter('/home/Alex/tensorboard/log' , graph=sess. graph)
(3)运行时计算需要跟踪的变量并写入文件:
summary_str = sess .run( summary_op, feed_dict ={x: batch[0 ], y: batch[1 ], keep_prob:(1.0)})
summary_writer.add_summary (summary_str, i)
(4)程序运行结束后关闭文件并刷新到硬盘:
summary_writer.close() (5)启动TensorBoard:
tensorboard --logdir=/home/Alex/tensorboard/logTensorFlow启动后会打印出访问地址,例如http://localhost:6006,在浏览器中就可以访问到。
命名域
为了使graph中的图片聚集到一起,可以使用命名域来定义哪些节点属于同一个结构块,例如上面代码中的:
with tf.name_scope('input_data') as scope:
with tf.name_scope('model') as scope:
with tf.name_scope('result') as scope: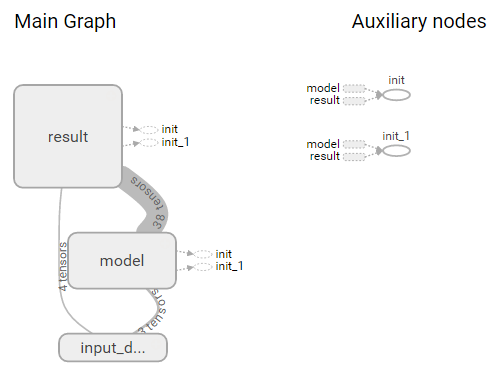
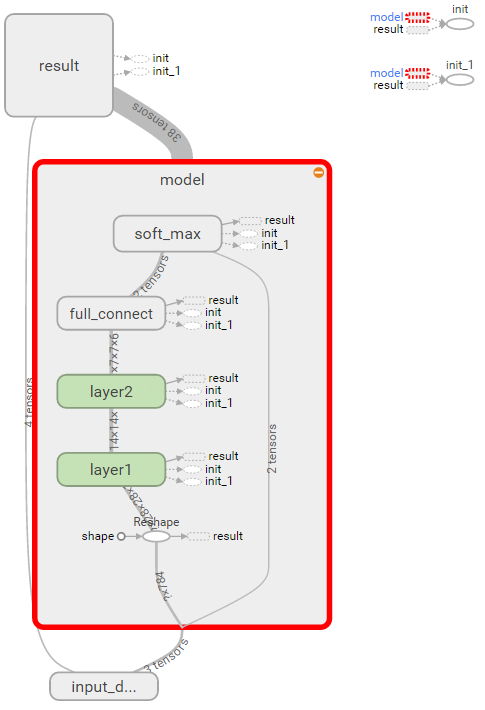
使用name_scope得到的graph如上图所示,会把同一name_scope中的图片聚集到一起,点击各个模块可以展开模块看到里面的节点:
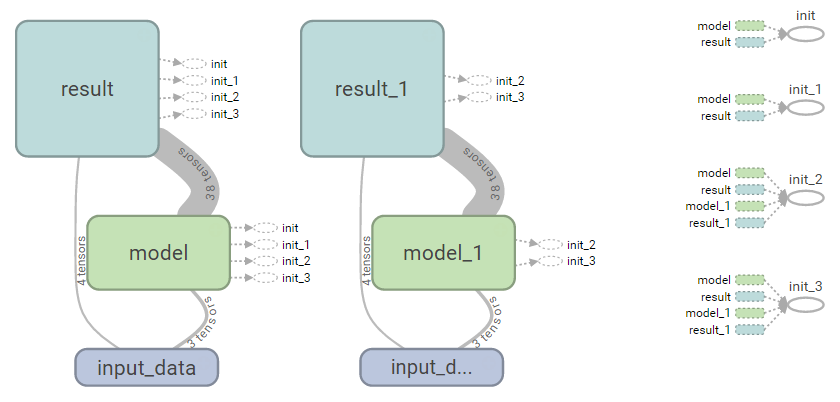
graph重叠
在多次运行TensorFlow程序之后,你可能会发现Graph变的越来越复杂,主要是因为default graph并没有自动清理前面几次运行生成的节点,需要手动清理,可以在最开始的时候添加代码重置graph:
tf.reset_default_graph()下面给个graph重叠的例子,连续两次运行上面的代码后就会生成两个网络结构了:
graph重叠还可能引发其他问题,如果你用了summary_op = tf.merge_all_summaries()函数,而不是summary_op = tf .merge_summary([cost_summary, accuracy_summary ]),可能会报错:
PlaceHolder error猜测主要原因是在多个graph混淆后,前一次的tf .scalar_summary变量也需要被计算,所以会要求你给前几次的placeholder变量赋值。


 4139
4139


 被折叠的 条评论
为什么被折叠?
被折叠的 条评论
为什么被折叠?
 到【灌水乐园】发言


