


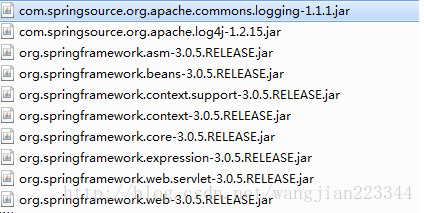
1.spring 需要的jar 包
spring框架配置
<?xml version="1.0" encoding="UTF-8"?>
<web-app
    xmlns:xsi="http://www.w3.org/2001/XMLSchema-instance"
    xmlns="http://java.sun.com/xml/ns/javaee"
    xmlns:web="http://java.sun.com/xml/ns/javaee/web-app_2_5.xsd"
    xsi:schemaLocation="http://java.sun.com/xml/ns/javaee http://java.sun.com/xml/ns/javaee/web-app_3_0.xsd"
    id="WebApp_ID"
    version="3.0">
    <context-param>
        <param-name>contextConfigLocation</param-name>
        <!-- 应用上下文配置文件 -->
        <param-value>/WEB-INF/spring-servlet.xml</param-value>
    </context-param>
    <listener>
        <listener-class>org.springframework.web.context.ContextLoaderListener</listener-class>
    </listener>
    <!-- 配置spring核心servlet -->
    <servlet>
        <servlet-name>spring</servlet-name>
        <servlet-class>org.springframework.web.servlet.DispatcherServlet</servlet-class>
        <load-on-startup>1</load-on-startup>
    </servlet>
    <!-- url-pattern配置为/,不带文件后缀,会造成其它静态文件(js,css等)不能访问。如配为*.do,则不影响静态文件的访问 -->
    <servlet-mapping>
        <servlet-name>spring</servlet-name>
        <url-pattern>/</url-pattern>
    </servlet-mapping>
</web-app>
2、应用上下文配置
spring-servlet.xml即配置用于开启基于注解的springMVC功能,照web.xml中设定,路径为WEB-INF下
    <beans xmlns="http://www.springframework.org/schema/beans"
     xmlns:context="http://www.springframework.org/schema/context"
     xmlns:p="http://www.springframework.org/schema/p"
     xmlns:mvc="http://www.springframework.org/schema/mvc"
     xmlns:xsi="http://www.w3.org/2001/XMLSchema-instance"
     xsi:schemaLocation="http://www.springframework.org/schema/beans
          http://www.springframework.org/schema/beans/spring-beans-3.0.xsd
          http://www.springframework.org/schema/context
          http://www.springframework.org/schema/context/spring-context.xsd
          http://www.springframework.org/schema/mvc
          http://www.springframework.org/schema/mvc/spring-mvc-3.0.xsd">
         <!-- 启动注解驱动的Spring MVC功能,注册请求url和注解POJO类方法的映射-->
         <mvc:annotation-driven />
         <!-- 启动包扫描功能,以便注册带有@Controller、@Service、@repository、@Component等注解的类成为spring的bean -->
         <context:component-scan base-package="com.mvc.rest" />
         <!-- 对模型视图名称的解析,在请求时模型视图名称添加前后缀 -->
         <bean class="org.springframework.web.servlet.view.InternalResourceViewResolver" p:prefix="/WEB-INF/view/" p:suffix=".jsp" />
    </beans>
Demo例子
1、根据spring-servlet.xml配置的包路径(com.mvc.rest)新建Constroller
package com.mvc.rest;
import javax.servlet.http.HttpServletRequest;
import javax.servlet.http.HttpServletResponse;
import org.springframework.stereotype.Controller;
import org.springframework.ui.ModelMap;
import org.springframework.web.bind.annotation.PathVariable;
import org.springframework.web.bind.annotation.RequestMapping;
import org.springframework.web.bind.annotation.RequestMethod;
import org.springframework.web.servlet.ModelAndView;
@Controller
public class RestConstroller {
    public RestConstroller() {}
    @RequestMapping(value = "/login/{user}", method = RequestMethod.GET)
    public ModelAndView myMethod(HttpServletRequest request,HttpServletResponse response,
            @PathVariable("user") String user, ModelMap modelMap) throws Exception {
        modelMap.put("loginUser", user);
        return new ModelAndView("/login/hello", modelMap);
    }
    @RequestMapping(value = "/welcome", method = RequestMethod.GET)
    public String registPost() {
        return "/welcome";
    }
}
2、建jsp视图
视图路径在spring-servlet.xml配置(/WEB-INF/view/),据上述RestConstroller 类,我们在WEB-INF下建立view目录,在view下建立welcome.jsp及login/hello.jsp
welcome.jsp随意,hello.jsp代码如下:
    <%@ page language="java" import="java.util.*" pageEncoding="UTF-8"%>
    <%
    String path = request.getContextPath();
    String basePath = request.getScheme()+"://"+request.getServerName()+":"+request.getServerPort()+path+"/";
    %>
    <!DOCTYPE HTML PUBLIC "-//W3C//DTD HTML 4.01 Transitional//EN">
    <html>
    <head>
    <base href="<%=basePath%>">
    <title>My JSP 'hello.jsp' starting page</title>
    <meta http-equiv="pragma" content="no-cache">
    <meta http-equiv="cache-control" content="no-cache">
    </head>
    <body>
        你好:<%=request.getAttribute("loginUser") %>,现在时间是<%= new Date() %>
    </body>
    </html>


 314
314


 被折叠的 条评论
为什么被折叠?
被折叠的 条评论
为什么被折叠?
 到【灌水乐园】发言


