


在上一篇中,我们分析了 Shiro Web 应用的入口 —— EnvironmentLoaderListener,它是一个 ServletContextListener,在 Web 容器启动的时候,它为我们创建了两个非常重要的对象:
-
WebSecurityManager:它是用于 Web 环境的 SecurityManager 对象,通过读取 shiro.ini 中 [main] 片段生成的,我们可以通过 SecurityUtils.getSecurityManager 方法获取该对象。
-
FilterChainResolver:它是 shiro.ini 中 [urls] 片段所配置的 Filter Chain 的解析器,可对一个 URL 配置一个或多个 Filter(用逗号分隔),Shiro 也为我们提供了几个默认的 Filter。
欢迎阅读《Shiro 源码分析》第一集: http://my.oschina.net/huangyong/blog/209339
在第二集中,我们就一起探索一下 Shiro Web 的第二个核心对象 —— ShiroFilter,它是在整个 Shiro Web 应用中请求的门户,也就是说,所有的请求都会被 ShiroFilter 拦截并进行相应的链式处理。
我们还是使用老套路,从 ShiroFilter 的继承体系开始吧:
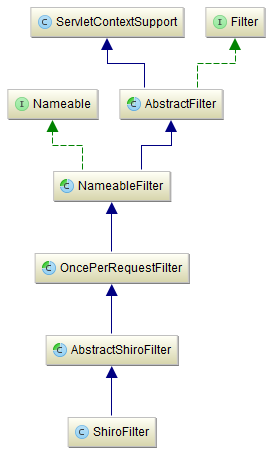
上图可见,ShiroFilter 往上竟然有五层,最上层是 Filter(即 javax.servlet.Filter),它是 Servlet 规范中的 Filter 接口,代码如下:
|
1
2
3
4
5
6
7
8
|
public
interface
Filter {
void
init(FilterConfig filterConfig)
throws
ServletException;
void
doFilter(ServletRequest request, ServletResponse response, FilterChain chain)
throws
IOException, ServletException;
void
destroy();
}
|
Filter 接口中的三个方法分别在 Filter 生命周期的三个时期内由 Web 容器来调用,分别是:初始化、执行、销毁。
相信这些内容对于做过 Java Web 开发的朋友而言,都是非常明了的,但与 Filter 接口同一级别下竟然还有一个名为 ServletContextSupport 的类,它又是起什么作用的呢?
打开 ServletContextSupport 的源码便知,它是 Shiro 为了封装 ServletContext 的而提供的一个类,代码如下:
|
1
2
3
4
5
6
7
8
9
10
11
12
13
14
15
16
17
18
19
20
21
22
23
24
25
26
27
28
29
30
31
32
33
34
35
36
37
38
39
40
41
42
43
44
45
46
47
48
49
50
51
52
53
54
55
|
/**
* 封装 ServletContext
*/
public
class
ServletContextSupport {
private
ServletContext servletContext;
public
ServletContext getServletContext() {
return
servletContext;
}
public
void
setServletContext(ServletContext servletContext) {
this
.servletContext = servletContext;
}
@SuppressWarnings
({
"UnusedDeclaration"
})
protected
String getContextInitParam(String paramName) {
return
getServletContext().getInitParameter(paramName);
}
private
ServletContext getRequiredServletContext() {
ServletContext servletContext = getServletContext();
if
(servletContext ==
null
) {
throw
new
IllegalStateException();
}
return
servletContext;
}
@SuppressWarnings
({
"UnusedDeclaration"
})
protected
void
setContextAttribute(String key, Object value) {
if
(value ==
null
) {
removeContextAttribute(key);
}
else
{
getRequiredServletContext().setAttribute(key, value);
}
}
@SuppressWarnings
({
"UnusedDeclaration"
})
protected
Object getContextAttribute(String key) {
return
getRequiredServletContext().getAttribute(key);
}
protected
void
removeContextAttribute(String key) {
getRequiredServletContext().removeAttribute(key);
}
@Override
public
String toString() {
return
toStringBuilder().toString();
}
protected
StringBuilder toStringBuilder() {
return
new
StringBuilder(
super
.toString());
}
}
|
通过这个类,我们可以方便的操纵 ServletContext 对象(使用其中的属性),那么这个 ServletContext 对象又是如何来初始化的呢?
不妨看看 Filter 与 ServletContextSupport 的子类 AbstractFilter 吧,代码如下:
|
1
2
3
4
5
6
7
8
9
10
11
12
13
14
15
16
17
18
19
20
21
22
23
24
25
26
27
28
29
30
31
32
33
34
35
36
37
38
39
40
41
42
43
44
45
46
47
|
/**
* 初始化 ServletContext 并封装 FilterConfig
*/
public
abstract
class
AbstractFilter
extends
ServletContextSupport
implements
Filter {
protected
FilterConfig filterConfig;
public
FilterConfig getFilterConfig() {
return
filterConfig;
}
public
void
setFilterConfig(FilterConfig filterConfig) {
// 初始化 FilterConfig 与 ServletContext
this
.filterConfig = filterConfig;
setServletContext(filterConfig.getServletContext());
}
protected
String getInitParam(String paramName) {
// 从 FilterConfig 中获取初始参数
FilterConfig config = getFilterConfig();
if
(config !=
null
) {
return
StringUtils.clean(config.getInitParameter(paramName));
}
return
null
;
}
public
final
void
init(FilterConfig filterConfig)
throws
ServletException {
// 初始化 FilterConfig
setFilterConfig(filterConfig);
try
{
// 在子类中实现该模板方法
onFilterConfigSet();
}
catch
(Exception e) {
if
(e
instanceof
ServletException) {
throw
(ServletException) e;
}
else
{
throw
new
ServletException(e);
}
}
}
protected
void
onFilterConfigSet()
throws
Exception {
}
public
void
destroy() {
}
}
|
看到这个类的第一感觉就是,它对 FilterConfig 进行了封装,为什么要封装 FilterConfig 呢?就是想通过它来获取 ServletContext。可见,在 init 方法中完成了 FilterConfig 的初始化,并提供了一个名为 onFilterConfigSet 的模板方法,让它的子类去实现其中的细节。
在阅读 AbstractFilter 的子类 NameableFilter 的源码之前,不妨先看看 NameableFilter 实现了一个很有意思的接口 Nameable,代码如下:
|
1
2
3
4
5
6
7
|
/**
* 确保实现该接口的类可进行命名(具有唯一的名称)
*/
public
interface
Nameable {
void
setName(String name);
}
|
仅提供了一个 setName 的方法,目的就是为了让其子类能够提供一个唯一的 Filter Name,如果子类不提供怎么办呢?
相信 Nameable 的实现类也就是 AbstractFilter 的子类 NameableFilter 会告诉我们想要的答案,代码如下:
|
1
2
3
4
5
6
7
8
9
10
11
12
13
14
15
16
17
18
19
20
21
22
23
24
25
26
27
28
29
30
31
32
33
|
/**
* 提供 Filter Name 的 get/set 方法
*/
public
abstract
class
NameableFilter
extends
AbstractFilter
implements
Nameable {
private
String name;
protected
String getName() {
// 若成员变量 name 为空,则从 FilterConfig 中获取 Filter Name
if
(
this
.name ==
null
) {
FilterConfig config = getFilterConfig();
if
(config !=
null
) {
this
.name = config.getFilterName();
}
}
return
this
.name;
}
public
void
setName(String name) {
this
.name = name;
}
protected
StringBuilder toStringBuilder() {
String name = getName();
if
(name ==
null
) {
return
super
.toStringBuilder();
}
else
{
StringBuilder sb =
new
StringBuilder();
sb.append(name);
return
sb;
}
}
}
|
看到了 NameableFilter 中的 getName 方法,我们应该清楚了,每个 Filter 必须有一个名字,可通过 setName 方法设置的,如果不设置就取该 Filter 默认的名字,也就是在 web.xml 中配置的 filter-name 了。此外,这里还通过一个 toStringBuilder 方法完成了类似 toString 方法,不过暂时还没什么用途,可能以后会有用。
以上这一切都是为了让每个 Filter 有一个名字,而且这个名字最好是唯一的(这一点在 Shiro 源码中没有得到控制)。此外,在 shiro.ini 的 [urls] 片段的配置满足一定规则的,例如:
|
1
2
|
[urls]
/foo = ssl, authc
|
等号左边的是 URL,右边的是 Filter Chian,一个或多个 Filter,每个 Filter 用逗号进行分隔。
对于 /foo 这个 URL 而言,可先后通过 ssl 与 authc 这两个 Filter。如果我们同时配置了两个 ssl,这个 URL 会被 ssl 拦截两次吗?答案是否定的,因为 Shiro 为我们提供了一个“一次性 Filter”的原则,也就是保证了每个请求只能被同一个 Filter 拦截一次,而且仅此一次。
这样的机制是如何实现的呢?我们不妨看看 NameableFilter 的子类 OncePerRequestFilter 吧,代码如下:
|
1
2
3
4
5
6
7
8
9
10
11
12
13
14
15
16
17
18
19
20
21
22
23
24
25
26
27
28
29
30
31
32
33
34
35
36
37
38
39
40
41
42
43
44
45
46
47
48
49
50
51
52
53
54
55
56
57
58
59
60
61
62
63
64
65
66
|
/**
* 确保每个请求只能被 Filter 过滤一次
*/
public
abstract
class
OncePerRequestFilter
extends
NameableFilter {
// 已过滤属性的后缀名
public
static
final
String ALREADY_FILTERED_SUFFIX =
".FILTERED"
;
// 是否开启过滤功能
private
boolean
enabled =
true
;
public
boolean
isEnabled() {
return
enabled;
}
public
void
setEnabled(
boolean
enabled) {
this
.enabled = enabled;
}
public
final
void
doFilter(ServletRequest request, ServletResponse response, FilterChain filterChain)
throws
ServletException, IOException {
// 获取 Filter 已过滤的属性名
String alreadyFilteredAttributeName = getAlreadyFilteredAttributeName();
// 判断是否已过滤
if
(request.getAttribute(alreadyFilteredAttributeName) !=
null
) {
// 若已过滤,则进入 FilterChain 中下一个 Filter
filterChain.doFilter(request, response);
}
else
{
// 若未过滤,则判断是否未开启过滤功能(其中 shouldNotFilter 方法将被废弃,由 isEnabled 方法取代)
if
(!isEnabled(request, response) || shouldNotFilter(request)) {
// 若未开启,则进入 FilterChain 中下一个 Filter
filterChain.doFilter(request, response);
}
else
{
// 若已开启,则将已过滤属性设置为 true(只要保证 Request 中有这个属性即可)
request.setAttribute(alreadyFilteredAttributeName, Boolean.TRUE);
try
{
// 在子类中执行具体的过滤操作
doFilterInternal(request, response, filterChain);
}
finally
{
// 当前 Filter 执行结束需移除 Request 中的已过滤属性
request.removeAttribute(alreadyFilteredAttributeName);
}
}
}
}
protected
String getAlreadyFilteredAttributeName() {
String name = getName();
if
(name ==
null
) {
name = getClass().getName();
}
return
name + ALREADY_FILTERED_SUFFIX;
}
@SuppressWarnings
({
"UnusedParameters"
})
protected
boolean
isEnabled(ServletRequest request, ServletResponse response)
throws
ServletException, IOException {
return
isEnabled();
}
@Deprecated
@SuppressWarnings
({
"UnusedDeclaration"
})
protected
boolean
shouldNotFilter(ServletRequest request)
throws
ServletException {
return
false
;
}
protected
abstract
void
doFilterInternal(ServletRequest request, ServletResponse response, FilterChain chain)
throws
ServletException, IOException;
}
|
如何确保每个请求只会被同一个 Filter 拦截一次呢?Shiro 提供了一个超简单的解决方案:在 Requet 中放置一个后缀为 .FILTERED 的属性,在执行具体拦截操作(即 doFilterInternal 方法)之前放入该属性,执行完毕后移除该属性。
在 Shiro 的 Filter Chian 配置中,如果我们想禁用某个 Filter,如何实现呢?OncePerRequestFilter 也为我们提供了一个 enabled 的属性,方便我们可以在 shiro.ini 中随时禁用某个 Filter,例如:
|
1
2
3
4
5
|
[main]
ssl.enabled =
false
[urls]
/foo = ssl, authc
|
这样一来 ssl 这个 Filter 就被我们给禁用了,以后想开启 ssl 的话,完全不需要在 urls 配置中一个个手工来添加,只需把 ssl.enabled 设置为 true,或注释掉该行,或直接删除该行即可。
可见,OncePerRequestFilter 给我们提供了一个模板方法 doFilterInternal,在其子类中我们需要实现该方法的具体细节,那么谁来实现呢?不妨继续看下面的 AbstractShiroFilter 吧,代码如下:
|
1
2
3
4
5
6
7
8
9
10
11
12
13
14
15
16
17
18
19
20
21
22
23
24
25
26
27
28
29
30
31
32
33
34
35
36
37
38
39
40
41
42
43
44
45
46
47
48
49
50
51
52
53
54
55
56
57
58
59
60
61
62
63
64
65
66
67
68
69
70
71
72
73
74
75
76
77
78
79
80
81
82
83
84
85
86
87
88
89
90
91
92
93
94
95
96
97
98
99
100
101
102
103
104
105
106
107
108
109
110
111
112
113
114
115
116
117
118
119
120
121
122
123
124
125
126
127
128
129
130
131
132
133
134
135
136
137
138
139
140
141
142
143
144
145
146
147
148
149
150
151
152
153
154
155
156
157
158
159
160
161
162
163
164
165
166
167
168
169
170
171
172
173
174
175
176
177
178
179
180
181
182
183
184
185
186
187
188
189
190
|
/**
* 确保可通过 SecurityUtils 获取 SecurityManager,并执行过滤器操作
*/
public
abstract
class
AbstractShiroFilter
extends
OncePerRequestFilter {
// 是否可以通过 SecurityUtils 获取 SecurityManager
private
static
final
String STATIC_INIT_PARAM_NAME =
"staticSecurityManagerEnabled"
;
private
WebSecurityManager securityManager;
private
FilterChainResolver filterChainResolver;
private
boolean
staticSecurityManagerEnabled;
protected
AbstractShiroFilter() {
this
.staticSecurityManagerEnabled =
false
;
}
public
WebSecurityManager getSecurityManager() {
return
securityManager;
}
public
void
setSecurityManager(WebSecurityManager sm) {
this
.securityManager = sm;
}
public
FilterChainResolver getFilterChainResolver() {
return
filterChainResolver;
}
public
void
setFilterChainResolver(FilterChainResolver filterChainResolver) {
this
.filterChainResolver = filterChainResolver;
}
public
boolean
isStaticSecurityManagerEnabled() {
return
staticSecurityManagerEnabled;
}
public
void
setStaticSecurityManagerEnabled(
boolean
staticSecurityManagerEnabled) {
this
.staticSecurityManagerEnabled = staticSecurityManagerEnabled;
}
// 这是 AbstractFilter 提供的在 init 时需要执行的方法
protected
final
void
onFilterConfigSet()
throws
Exception {
// 从 web.xml 中读取 staticSecurityManagerEnabled 参数(默认为 false)
applyStaticSecurityManagerEnabledConfig();
// 初始化(在子类中实现)
init();
// 确保 SecurityManager 必须存在
ensureSecurityManager();
// 若已开启 static 标志,则将当前的 SecurityManager 放入 SecurityUtils 中,以后可以随时获取
if
(isStaticSecurityManagerEnabled()) {
SecurityUtils.setSecurityManager(getSecurityManager());
}
}
private
void
applyStaticSecurityManagerEnabledConfig() {
String value = getInitParam(STATIC_INIT_PARAM_NAME);
if
(value !=
null
) {
Boolean b = Boolean.valueOf(value);
if
(b !=
null
) {
setStaticSecurityManagerEnabled(b);
}
}
}
public
void
init()
throws
Exception {
}
private
void
ensureSecurityManager() {
// 首先获取当前的 SecurityManager,若不存在,则创建默认的 SecurityManager(即 DefaultWebSecurityManager)
WebSecurityManager securityManager = getSecurityManager();
if
(securityManager ==
null
) {
securityManager = createDefaultSecurityManager();
setSecurityManager(securityManager);
}
}
protected
WebSecurityManager createDefaultSecurityManager() {
return
new
DefaultWebSecurityManager();
}
// 这是 OncePerRequestFilter 提供的在 doFilter 时需要执行的方法
protected
void
doFilterInternal(ServletRequest servletRequest, ServletResponse servletResponse,
final
FilterChain chain)
throws
ServletException, IOException {
Throwable t =
null
;
try
{
// 返回被 Shiro 包装过的 Request 与 Response 对象
final
ServletRequest request = prepareServletRequest(servletRequest, servletResponse, chain);
final
ServletResponse response = prepareServletResponse(request, servletResponse, chain);
// 创建 Shiro 的 Subject 对象
final
Subject subject = createSubject(request, response);
// 使用异步的方式执行相关操作
subject.execute(
new
Callable() {
public
Object call()
throws
Exception {
// 更新 Session 的最后访问时间
updateSessionLastAccessTime(request, response);
// 执行 Shiro 的 Filter Chain
executeChain(request, response, chain);
return
null
;
}
});
}
catch
(ExecutionException ex) {
t = ex.getCause();
}
catch
(Throwable throwable) {
t = throwable;
}
if
(t !=
null
) {
if
(t
instanceof
ServletException) {
throw
(ServletException) t;
}
if
(t
instanceof
IOException) {
throw
(IOException) t;
}
throw
new
ServletException(t);
}
}
@SuppressWarnings
({
"UnusedDeclaration"
})
protected
ServletRequest prepareServletRequest(ServletRequest request, ServletResponse response, FilterChain chain) {
ServletRequest toUse = request;
if
(request
instanceof
HttpServletRequest) {
// 获取包装后的 Request 对象(使用 ShiroHttpServletRequest 进行包装)
HttpServletRequest http = (HttpServletRequest) request;
toUse = wrapServletRequest(http);
}
return
toUse;
}
protected
ServletRequest wrapServletRequest(HttpServletRequest orig) {
return
new
ShiroHttpServletRequest(orig, getServletContext(), isHttpSessions());
}
protected
boolean
isHttpSessions() {
return
getSecurityManager().isHttpSessionMode();
}
@SuppressWarnings
({
"UnusedDeclaration"
})
protected
ServletResponse prepareServletResponse(ServletRequest request, ServletResponse response, FilterChain chain) {
ServletResponse toUse = response;
if
(!isHttpSessions() && (request
instanceof
ShiroHttpServletRequest) && (response
instanceof
HttpServletResponse)) {
// 获取包装后的 Response 对象(使用 ShiroHttpServletResponse 进行包装)
toUse = wrapServletResponse((HttpServletResponse) response, (ShiroHttpServletRequest) request);
}
return
toUse;
}
protected
ServletResponse wrapServletResponse(HttpServletResponse orig, ShiroHttpServletRequest request) {
return
new
ShiroHttpServletResponse(orig, getServletContext(), request);
}
protected
WebSubject createSubject(ServletRequest request, ServletResponse response) {
return
new
WebSubject.Builder(getSecurityManager(), request, response).buildWebSubject();
}
@SuppressWarnings
({
"UnusedDeclaration"
})
protected
void
updateSessionLastAccessTime(ServletRequest request, ServletResponse response) {
// 仅对本地 Session 做如下操作
if
(!isHttpSessions()) {
// 获取 Subject(实际上是从 ThreadLocal 中获取的)
Subject subject = SecurityUtils.getSubject();
if
(subject !=
null
) {
// 从 Subject 中获取 Session
Session session = subject.getSession(
false
);
if
(session !=
null
) {
// 更新 Session 对象的 lastAccessTime 属性
session.touch();
}
}
}
}
protected
void
executeChain(ServletRequest request, ServletResponse response, FilterChain origChain)
throws
IOException, ServletException {
// 获取 Shiro 代理后的 FilterChain 对象,并进行链式处理
FilterChain chain = getExecutionChain(request, response, origChain);
chain.doFilter(request, response);
}
protected
FilterChain getExecutionChain(ServletRequest request, ServletResponse response, FilterChain origChain) {
FilterChain chain = origChain;
// 获取 FilterChainResolver,若不存在,则返回原始的 FilterChain
FilterChainResolver resolver = getFilterChainResolver();
if
(resolver ==
null
) {
return
origChain;
}
// 通过 FilterChainResolver 获取 ProxiedFilterChain
FilterChain resolved = resolver.getChain(request, response, origChain);
if
(resolved !=
null
) {
chain = resolved;
}
return
chain;
}
}
|
这个 AbstractShiroFilter 类代码稍微有点长,因为它干了许多的事情,主要实现了两个模板方法:onFilterConfigSet 与 doFilterInternal,以上代码中均已对它们做了详细的注释。
其中,在 onFilterConfigSet 中实际上提供了一个框架,只是将 SecurityManager 放入 SecurityUtils 这个工具类中,至于具体行为还是放在子类的 init 方法中去实现,而这个子类就是 ShiroFilter,代码如下:
|
1
2
3
4
5
6
7
8
9
10
11
12
13
14
15
16
17
18
19
20
|
/**
* 初始化过滤器
*/
public
class
ShiroFilter
extends
AbstractShiroFilter {
@Override
public
void
init()
throws
Exception {
// 从 ServletContext 中获取 WebEnvironment(该对象已通过 EnvironmentLoader 创建)
WebEnvironment env = WebUtils.getRequiredWebEnvironment(getServletContext());
// 将 WebEnvironment 中的 WebSecurityManager 放入 AbstractShiroFilter 中
setSecurityManager(env.getWebSecurityManager());
// 将 WebEnvironment 中的 FilterChainResolver 放入 AbstractShiroFilter 中
FilterChainResolver resolver = env.getFilterChainResolver();
if
(resolver !=
null
) {
setFilterChainResolver(resolver);
}
}
}
|
在 ShiroFilter 中只用做初始化的行为,就是从 WebEnvironment 中分别获取 WebSecurityManager 与 FilterChainResolver,其它的事情都由它的父类去实现了。
到此为止,ShiroFilter 的源码已基本分析完毕,当然还有些非常有意思的代码,这里没有进行分析,例如:
-
通过 ShiroHttpServletRequest 来包装 Request
-
通过 ShiroHttpServletResponse 来包装 Response
-
通过 Session 来代理 HttpSession
-
提供 FilterChain 的代理机制
-
使用 ThreadContext 来保证线程安全
这些有意思的代码,我就不继续分析了,留点滋味让大家去慢慢品尝吧!
最后需要补充说明的是,Shiro 的 Filter 架构体系是非常庞大的,这里仅对 ShiroFilter 进行了分析,整个 Filter 静态结构看起来是这样的:
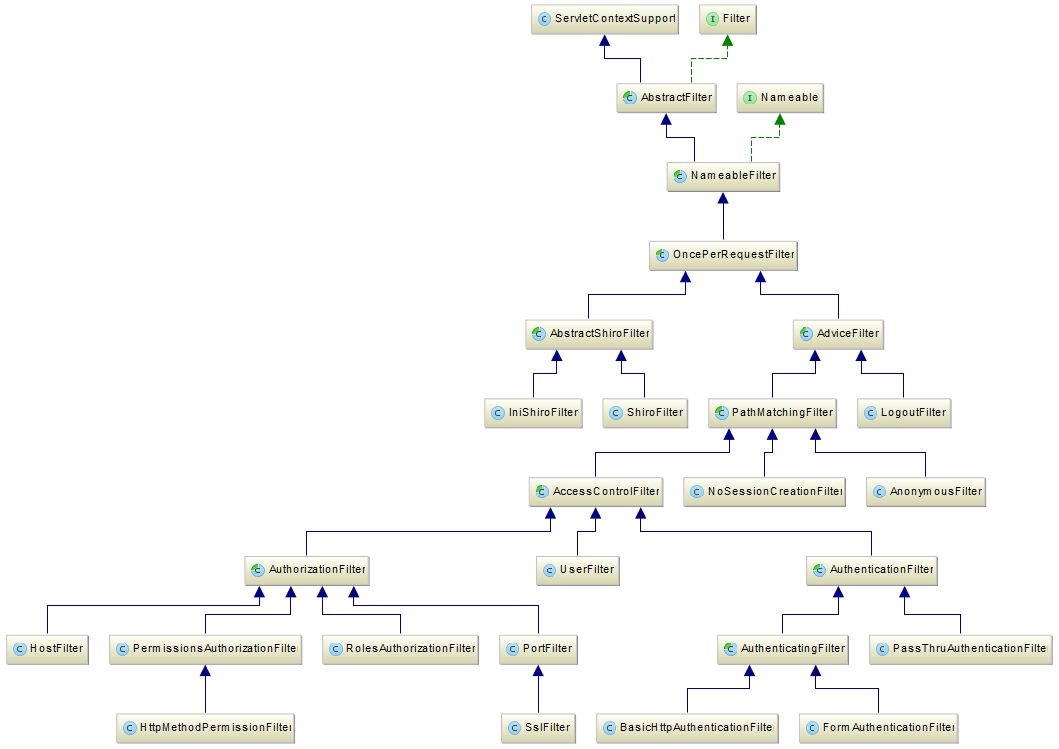
可见,在 OncePerRequestFilter 下有两个分支,本文只分析了 ShiroFilter 这个分支,另外还有一个 AdviceFilter 分支,它提供了 AOP 功能的 Filter,这些 Filter 就是 Shiro 为我们提供的默认 Filter:
以上这些 Filter 是如何实现的呢?有机会再与大家分享《Shrio 源码分析》,感谢您阅读本文!


 692
692


 被折叠的 条评论
为什么被折叠?
被折叠的 条评论
为什么被折叠?
 到【灌水乐园】发言


