


在android项目开发中,手机端的开发中,都会涉及到用户信息,而用户信息中就会涉及到切换用户头像的功能,刚好前端时间进行过这方面的开发,下面是该功能的实现:
布局文件中我使用的是ImageButton来实现的,当然也有用imageview和button方式实现的;
<RelativeLayout xmlns:android="http://schemas.android.com/apk/res/android"
    xmlns:tools="http://schemas.android.com/tools"
    android:layout_width="match_parent"
    android:layout_height="match_parent"
    android:background="#000000"
    tools:context=".MainActivity" >

    <ImageButton
        android:id="@+id/iv_head"
        android:layout_width="120dp"
        android:layout_height="120dp"
        android:layout_centerHorizontal="true"
        android:layout_marginTop="10dp"
        android:background="@null"
        android:scaleType="fitXY"
        android:src="@drawable/user_header_icon" />

</RelativeLayout>
下面是activity中的代码,
public class MainActivity extends Activity implements OnClickListener {
    private Button  btn_picture, btn_photo, btn_cancle;
    private ImageButton ivHead;
    private Bitmap head;// 头像Bitmap
    @SuppressLint("SdCardPath")
    private static String path = "/sdcard/myHead/";// sd路径

    protected void onCreate(Bundle savedInstanceState) {
        super.onCreate(savedInstanceState);
        requestWindowFeature(Window.FEATURE_NO_TITLE);
        setContentView(R.layout.activity_main);
        ivHead = (ImageButton) findViewById(R.id.iv_head);
        ivHead.setOnClickListener(this);

        Bitmap bt = BitmapFactory.decodeFile(path + "head.jpg");// 从Sd中找头像,转换成Bitmap
        if (bt != null) {
            @SuppressWarnings("deprecation")
            Drawable drawable = new BitmapDrawable(toRoundBitmap(bt));// 转换成drawable
            ivHead.setImageDrawable(drawable);
        } else {
            /**
             * 如果SD里面没有则需要从服务器取头像,取回来的头像再保存在SD中
             *
             */
        }
    }

    public void onClick(View v) {
        showDialog();
    }

    private void showDialog() {
        View view = getLayoutInflater().inflate(R.layout.photo_choose_dialog, null);
        final Dialog dialog = new Dialog(this, R.style.transparentFrameWindowStyle);
        dialog.setContentView(view, new LayoutParams(LayoutParams.FILL_PARENT, LayoutParams.WRAP_CONTENT));
        Window window = dialog.getWindow();
        // 设置显示动画
        window.setWindowAnimations(R.style.main_menu_animstyle);
        WindowManager.LayoutParams wl = window.getAttributes();
        wl.x = 0;
        wl.y = getWindowManager().getDefaultDisplay().getHeight();
        // 以下这两句是为了保证按钮可以水平满屏
        wl.width = ViewGroup.LayoutParams.MATCH_PARENT;
        wl.height = ViewGroup.LayoutParams.WRAP_CONTENT;

        // 设置显示位置
        dialog.onWindowAttributesChanged(wl);
        // 设置点击外围解散
        dialog.setCanceledOnTouchOutside(true);
        dialog.show();

        btn_picture = (Button) window.findViewById(R.id.btn_picture);
        btn_photo = (Button) window.findViewById(R.id.btn_photo);
        btn_cancle = (Button) window.findViewById(R.id.btn_cancle);

        btn_picture.setOnClickListener(new View.OnClickListener() {
            @Override
            public void onClick(View v) {
                Intent intent1 = new Intent(Intent.ACTION_PICK, null);
                intent1.setDataAndType(MediaStore.Images.Media.EXTERNAL_CONTENT_URI, "image/*");
                startActivityForResult(intent1, 1);
                dialog.dismiss();
            }
        });
        btn_photo.setOnClickListener(new View.OnClickListener() {
            @Override
            public void onClick(View v) {
                Intent intent2 = new Intent(MediaStore.ACTION_IMAGE_CAPTURE);
                intent2.putExtra(MediaStore.EXTRA_OUTPUT, Uri.fromFile(new File(Environment.getExternalStorageDirectory(), "head.jpg")));
                startActivityForResult(intent2, 2);// 采用ForResult打开
                dialog.dismiss();
            }
        });
        btn_cancle.setOnClickListener(new View.OnClickListener() {
            @Override
            public void onClick(View v) {
                dialog.dismiss();
            }
        });
    }

    protected void onActivityResult(int requestCode, int resultCode, Intent data) {
        switch (requestCode) {
        case 1:
            if (resultCode == RESULT_OK) {
                cropPhoto(data.getData());// 裁剪图片
            }

            break;
        case 2:
            if (resultCode == RESULT_OK) {
                File temp = new File(Environment.getExternalStorageDirectory() + "/head.jpg");
                cropPhoto(Uri.fromFile(temp));// 裁剪图片
            }

            break;
        case 3:
            if (data != null) {
                Bundle extras = data.getExtras();
                head = extras.getParcelable("data");
                if (head != null) {
                    /**
                     * 上传服务器代码
                     */
                    setPicToView(head);// 保存在SD卡中
                    ivHead.setImageBitmap(toRoundBitmap(head));// 用ImageView显示出来
                }
            }
            break;
        default:
            break;

        }
        super.onActivityResult(requestCode, resultCode, data);
    };

    /**
     * 调用系统的裁剪
     *
     * @param uri
     */
    public void cropPhoto(Uri uri) {
        Intent intent = new Intent("com.android.camera.action.CROP");
        intent.setDataAndType(uri, "image/*");
        intent.putExtra("crop", "true");
        // aspectX aspectY 是宽高的比例
        intent.putExtra("aspectX", 1);
        intent.putExtra("aspectY", 1);
        // outputX outputY 是裁剪图片宽高
        intent.putExtra("outputX", 150);
        intent.putExtra("outputY", 150);
        intent.putExtra("return-data", true);
        startActivityForResult(intent, 3);
    }

    private void setPicToView(Bitmap mBitmap) {
        String sdStatus = Environment.getExternalStorageState();
        if (!sdStatus.equals(Environment.MEDIA_MOUNTED)) { // 检测sd是否可用
            return;
        }
        FileOutputStream b = null;
        File file = new File(path);
        file.mkdirs();// 创建文件夹
        String fileName = path + "head.jpg";// 图片名字
        try {
            b = new FileOutputStream(fileName);
            mBitmap.compress(Bitmap.CompressFormat.JPEG, 100, b);// 把数据写入文件

        } catch (FileNotFoundException e) {
            e.printStackTrace();
        } finally {
            try {
                // 关闭流
                b.flush();
                b.close();
            } catch (IOException e) {
                e.printStackTrace();
            }

        }
    }
    /**
     * 把bitmap转成圆形
     * */
    public Bitmap toRoundBitmap(Bitmap bitmap) {
        int width = bitmap.getWidth();
        int height = bitmap.getHeight();
        int r = 0;
        // 取最短边做边长
        if (width < height) {
            r = width;
        } else {
            r = height;
        }
        // 构建一个bitmap
        Bitmap backgroundBm = Bitmap.createBitmap(width, height, Config.ARGB_8888);
        // new一个Canvas,在backgroundBmp上画图
        Canvas canvas = new Canvas(backgroundBm);
        Paint p = new Paint();
        // 设置边缘光滑,去掉锯齿
        p.setAntiAlias(true);
        RectF rect = new RectF(0, 0, r, r);
        // 通过制定的rect画一个圆角矩形,当圆角X轴方向的半径等于Y轴方向的半径时,
        // 且都等于r/2时,画出来的圆角矩形就是圆形
        canvas.drawRoundRect(rect, r / 2, r / 2, p);
        // 设置当两个图形相交时的模式,SRC_IN为取SRC图形相交的部分,多余的将被去掉
        p.setXfermode(new PorterDuffXfermode(Mode.SRC_IN));
        // canvas将bitmap画在backgroundBmp上
        canvas.drawBitmap(bitmap, null, rect, p);
        return backgroundBm;
    }
}
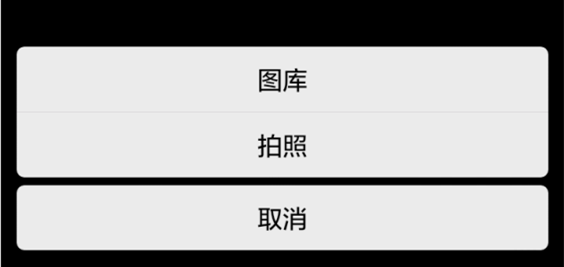
点击imagebutton时会有个弹窗,下面是弹窗的布局文件:photo_choose_dialog
<?xml version="1.0" encoding="utf-8"?>
<LinearLayout xmlns:android="http://schemas.android.com/apk/res/android"
    android:layout_width="match_parent"
    android:layout_height="match_parent"
    android:background="#00000000"
    android:gravity="bottom"
    android:orientation="vertical"
    android:padding="5dip" >

    <Button
        android:id="@+id/btn_picture"
        android:layout_width="match_parent"
        android:layout_height="wrap_content"
        android:background="@drawable/photo_gallery_selector"
        android:paddingBottom="10dip"
        android:paddingTop="10dip"
        android:text="图库"
        android:textSize="16sp" />

    <TextView
        android:layout_width="match_parent"
        android:layout_height="0.5dip"
        android:background="#DAD9DB" />

    <Button
        android:id="@+id/btn_photo"
        android:layout_width="match_parent"
        android:layout_height="wrap_content"
        android:background="@drawable/photo_camera_selector"
        android:paddingBottom="10dip"
        android:paddingTop="10dip"
        android:text="拍照"
        android:textSize="16sp" />

    <Button
        android:id="@+id/btn_cancle"
        android:layout_width="match_parent"
        android:layout_height="wrap_content"
        android:layout_marginTop="5dip"
        android:background="@drawable/photo_cancel_selector"
        android:paddingBottom="10dip"
        android:paddingTop="10dip"
        android:text="取消"
        android:textSize="16sp" />

</LinearLayout>
下面是弹窗按钮的背景文件:
photo_gallery_pressed文件:
<?xml version="1.0" encoding="UTF-8"?>
<shape xmlns:android="http://schemas.android.com/apk/res/android"
    android:shape="rectangle" >
    <gradient
        android:angle="90"
        android:endColor="#CACACB"
        android:startColor="#CACACB" />
    <corners
        android:bottomLeftRadius="0dp"
        android:bottomRightRadius="0dp"
        android:topLeftRadius="5dp"
        android:topRightRadius="5dp" />
</shape>
photo_gallery_normal文件:
<?xml version="1.0" encoding="UTF-8"?>
<shape xmlns:android="http://schemas.android.com/apk/res/android"
    android:shape="rectangle" >
    <gradient
        android:angle="90"
        android:endColor="#EBEBEB"
        android:startColor="#EBEBEB" />
    <corners
        android:bottomLeftRadius="0dp"
        android:bottomRightRadius="0dp"
        android:topLeftRadius="5dp"
        android:topRightRadius="5dp" />
</shape>
photo_camera_pressed文件:
<?xml version="1.0" encoding="UTF-8"?>
<shape xmlns:android="http://schemas.android.com/apk/res/android"
    android:shape="rectangle" >
    <gradient
        android:angle="90"
        android:endColor="#CACACB"
        android:startColor="#CACACB" />
    <corners
        android:bottomLeftRadius="5dp"
        android:bottomRightRadius="5dp"
        android:topLeftRadius="0dp"
        android:topRightRadius="0dp" />
</shape>
photo_camera_normal文件:
<?xml version="1.0" encoding="UTF-8"?>
<shape xmlns:android="http://schemas.android.com/apk/res/android"
    android:shape="rectangle" >
    <gradient
        android:angle="90"
        android:endColor="#EBEBEB"
        android:startColor="#EBEBEB" />
    <corners
        android:bottomLeftRadius="5dp"
        android:bottomRightRadius="5dp"
        android:topLeftRadius="0dp"
        android:topRightRadius="0dp" />
</shape>
photo_cancel_pressed文件:
<?xml version="1.0" encoding="UTF-8"?>
<shape xmlns:android="http://schemas.android.com/apk/res/android"
    android:shape="rectangle" >
    <gradient
        android:angle="90"
        android:endColor="#CACACB"
        android:startColor="#CACACB" />
    <corners
        android:bottomLeftRadius="5dp"
        android:bottomRightRadius="5dp"
        android:topLeftRadius="5dp"
        android:topRightRadius="5dp" />
</shape>
photo_cancel_normal文件:
<?xml version="1.0" encoding="UTF-8"?>
<shape xmlns:android="http://schemas.android.com/apk/res/android"
    android:shape="rectangle" >
    <gradient
        android:angle="90"
        android:endColor="#EBEBEB"
        android:startColor="#EBEBEB" />
    <corners
        android:bottomLeftRadius="5dp"
        android:bottomRightRadius="5dp"
        android:topLeftRadius="5dp"
        android:topRightRadius="5dp" />
</shape>
下面是利用上面的背景为按照设置选择器
photo_gallery_selector文件:
<?xml version="1.0" encoding="UTF-8"?>
<selector xmlns:android="http://schemas.android.com/apk/res/android">

    <item android:drawable="@drawable/photo_gallery_pressed" android:state_focused="true"/>
    <item android:drawable="@drawable/photo_gallery_pressed" android:state_focused="false" android:state_pressed="true"/>
    <item android:drawable="@drawable/photo_gallery_normal" android:state_focused="false"/>

</selector>
photo_camera_selector文件:
<?xml version="1.0" encoding="UTF-8"?>
<selector xmlns:android="http://schemas.android.com/apk/res/android">

    <item android:drawable="@drawable/photo_camera_pressed" android:state_focused="true"/>
    <item android:drawable="@drawable/photo_camera_pressed" android:state_focused="false" android:state_pressed="true"/>
    <item android:drawable="@drawable/photo_camera_normal" android:state_focused="false"/>

</selector>
photo_cancel_selector文件:
<?xml version="1.0" encoding="UTF-8"?>
<selector xmlns:android="http://schemas.android.com/apk/res/android">

    <item android:drawable="@drawable/photo_cancel_pressed" android:state_focused="true"/>
    <item android:drawable="@drawable/photo_cancel_pressed" android:state_focused="false" android:state_pressed="true"/>
    <item android:drawable="@drawable/photo_cancel_normal" android:state_focused="false"/>

</selector>
为弹窗添加样式:
<?xml version="1.0" encoding="utf-8"?>
<resources>

    <style name="transparentFrameWindowStyle" parent="android:style/Theme.Dialog">
        <item name="android:windowBackground">@drawable/photo_choose_bg</item>
    </style>

    <style name="main_menu_animstyle">
        <item name="android:windowEnterAnimation">@anim/photo_dialog_in_anim</item>
        <item name="android:windowExitAnimation">@anim/photo_dialog_out_anim</item>
    </style>

</resources>
photo_choose_bg文件为设置样式的背景
<?xml version="1.0" encoding="utf-8"?>
<shape xmlns:android="http://schemas.android.com/apk/res/android" >

    <solid android:color="#00000000" />

    <corners android:radius="20dip" />

    <padding
        android:bottom="5dp"
        android:left="5dp"
        android:right="5dp"
        android:top="5dp" />

</shape>
添加动画效果
photo_dialog_in_anim文件:
<?xml version="1.0" encoding="utf-8"?>
<set xmlns:android="http://schemas.android.com/apk/res/android" >

    <translate
        android:duration="500"
        android:fromXDelta="0"
        android:fromYDelta="1000"
        android:toXDelta="0"
        android:toYDelta="0" />

</set>
photo_dialog_out_anim文件:
<?xml version="1.0" encoding="utf-8"?>
<set xmlns:android="http://schemas.android.com/apk/res/android" >

    <translate
        android:duration="500"
        android:fromXDelta="0"
        android:fromYDelta="0"
        android:toXDelta="0"
        android:toYDelta="1000" />

</set>
以上就是全部的代码,由于调动系统相机涉及到权限的访问,所以还要在清单文件中添加相应的权限:
<uses-permission android:name="android.permission.CAMERA"/>
    <uses-permission android:name="android.permission.WRITE_EXTERNAL_STORAGE"/>
    <uses-permission android:name="android.permission.MOUNT_UNMOUNT_FILESYSTEMS"/>
这样就可以运行程序了,运行结果如下:
这是一开始运行的效果:

这是切换头像后的效果:

源码地址:http://download.csdn.net/detail/wangwo1991/9591604
由于写这篇博客的时候Android6.0和Android7.0还没有上市,所以上面的代码就没有做这方面的适配,后面Android6.0和Android7.0上线后,也没有及时更新代码做适配,今天刚好有点时间,就对Android6.0和Android7.0做了下适配,效果和之前的一样,只是做了下适配。
Android6.0和Android7.0适配后源码:http://download.csdn.net/detail/wangwo1991/9891633


 1573
1573


 被折叠的 条评论
为什么被折叠?
被折叠的 条评论
为什么被折叠?
 到【灌水乐园】发言


