


对于很多新手来说,如何实现android端与服务器之间的通信还是一个难题。这里我提供一个比较好用的类
package org.crazyit.net;

import java.io.*;
import java.net.*;
import java.util.*;

/**
 * Description:
 * <br/>site: <a href="http://www.crazyit.org">crazyit.org</a>
 * <br/>Copyright (C), 2001-2014, Yeeku.H.Lee
 * <br/>This program is protected by copyright laws.
 * <br/>Program Name:
 * <br/>Date:
 * @author  Yeeku.H.Lee kongyeeku@163.com
 * @version  1.0
 */
public class GetPostUtil
{
    /**
     * 向指定URL发送GET方法的请求
     * @param url 发送请求的URL
     * @param params 请求参数,请求参数应该是name1=value1&name2=value2的形式。
     * @return URL所代表远程资源的响应
     */
    public static String sendGet(String url, String params)
    {
        String result = "";
        BufferedReader in = null;
        try
        {
            String urlName = url + "?" + params;
            URL realUrl = new URL(urlName);
            // 打开和URL之间的连接
            URLConnection conn = realUrl.openConnection();
            // 设置通用的请求属性
            conn.setRequestProperty("accept", "*/*");
            conn.setRequestProperty("connection", "Keep-Alive");
            conn.setRequestProperty("user-agent",
                "Mozilla/4.0 (compatible; MSIE 6.0; Windows NT 5.1; SV1)");
            // 建立实际的连接
            conn.connect();  //①
            // 获取所有响应头字段
            Map<String, List<String>> map = conn.getHeaderFields();
            // 遍历所有的响应头字段
            for (String key : map.keySet())
            {
                System.out.println(key + "--->" + map.get(key));
            }
            // 定义BufferedReader输入流来读取URL的响应
            in = new BufferedReader(
                new InputStreamReader(conn.getInputStream()));
            String line;
            while ((line = in.readLine()) != null)
            {
                result += "\n" + line;
            }
        }
        catch (Exception e)
        {
            System.out.println("发送GET请求出现异常!" + e);
            e.printStackTrace();
        }
        // 使用finally块来关闭输入流
        finally
        {
            try
            {
                if (in != null)
                {
                    in.close();
                }
            }
            catch (IOException ex)
            {
                ex.printStackTrace();
            }
        }
        return result;
    }

    /**
     * 向指定URL发送POST方法的请求
     * @param url 发送请求的URL
     * @param params 请求参数,请求参数应该是name1=value1&name2=value2的形式。
     * @return URL所代表远程资源的响应
     */
    public static String sendPost(String url, String params)
    {
        PrintWriter out = null;
        BufferedReader in = null;
        String result = "";
        try
        {
            URL realUrl = new URL(url);
            // 打开和URL之间的连接
            URLConnection conn = realUrl.openConnection();
            // 设置通用的请求属性
            conn.setRequestProperty("accept", "*/*");
            conn.setRequestProperty("connection", "Keep-Alive");
            conn.setRequestProperty("user-agent",
                "Mozilla/4.0 (compatible; MSIE 6.0; Windows NT 5.1; SV1)");
            // 发送POST请求必须设置如下两行
            conn.setDoOutput(true);
            conn.setDoInput(true);
            // 获取URLConnection对象对应的输出流
            out = new PrintWriter(conn.getOutputStream());
            // 发送请求参数
            out.print(params);  //②
            // flush输出流的缓冲
            out.flush();
            // 定义BufferedReader输入流来读取URL的响应
            in = new BufferedReader(
                new InputStreamReader(conn.getInputStream()));
            String line;
            while ((line = in.readLine()) != null)
            {
                result += "\n" + line;
            }
        }
        catch (Exception e)
        {
            System.out.println("发送POST请求出现异常!" + e);
            e.printStackTrace();
        }
        // 使用finally块来关闭输出流、输入流
        finally
        {
            try
            {
                if (out != null)
                {
                    out.close();
                }
                if (in != null)
                {
                    in.close();
                }
            }
            catch (IOException ex)
            {
                ex.printStackTrace();
            }
        }
        return result;
    }
}
在这里我们简单的做一个android的客户端
这里是layout里的布局文件
<?xml version="1.0" encoding="utf-8"?>
<LinearLayout xmlns:android="http://schemas.android.com/apk/res/android"
    android:orientation="vertical"
    android:layout_width="fill_parent"
    android:layout_height="fill_parent"
    >
<LinearLayout
    android:orientation="horizontal"
    android:layout_width="fill_parent"
    android:layout_height="wrap_content"
    android:gravity="center"
    >
<Button
    android:id="@+id/get"
    android:layout_width="wrap_content"
    android:layout_height="wrap_content"
    android:text="@string/get"
    />
<Button
    android:id="@+id/post"
    android:layout_width="wrap_content"
    android:layout_height="wrap_content"
    android:text="@string/post"
    />
</LinearLayout>
<TextView
    android:id="@+id/show"
    android:layout_width="fill_parent"
    android:layout_height="fill_parent"
    android:gravity="top"
    android:background="#ffff"
    android:textColor="#f000"
    android:textSize="16dp"
    />
</LinearLayout>
这里我们简单的写一下MainActivity
package org.crazyit.net;

import android.app.Activity;
import android.os.Bundle;
import android.os.Handler;
import android.os.Message;
import android.view.View;
import android.view.View.OnClickListener;
import android.widget.Button;
import android.widget.EditText;
import android.widget.TextView;

/**
 * Description:
 * <br/>site: <a href="http://www.crazyit.org">crazyit.org</a>
 * <br/>Copyright (C), 2001-2014, Yeeku.H.Lee
 * <br/>This program is protected by copyright laws.
 * <br/>Program Name:
 * <br/>Date:
 * @author  Yeeku.H.Lee kongyeeku@163.com
 * @version  1.0
 */
public class GetPostMain extends Activity
{
    Button get , post;
    TextView show;
    // 代表服务器响应的字符串
    String response;
    Handler handler = new Handler()
    {
        @Override
        public void handleMessage(Message msg)
        {
            if(msg.what == 0x123)
            {
                // 设置show组件显示服务器响应
                show.setText(response);
            }
        }
    };
    @Override
    public void onCreate(Bundle savedInstanceState)
    {
        super.onCreate(savedInstanceState);
        setContentView(R.layout.main);
        get = (Button) findViewById(R.id.get);
        post = (Button) findViewById(R.id.post);
        show = (TextView)findViewById(R.id.show);
        get.setOnClickListener(new OnClickListener()
        {
            @Override
            public void onClick(View v)
            {
                new Thread()
                {
                    @Override
                    public void run()
                    {
                        response = GetPostUtil.sendGet(
                            "http://192.168.0.102/test/index.php"
                            , null);
                        // 发送消息通知UI线程更新UI组件
                        handler.sendEmptyMessage(0x123);
                    }
                }.start();
            }
        });
        post.setOnClickListener(new OnClickListener()
        {
            @Override
            public void onClick(View v)
            {
                new Thread()
                {
                    @Override
                    public void run()
                    {
                        response = GetPostUtil.sendPost(
                            "http://192.168.0.102/test/index.php"
                            , "name=帅&pass=leegang");
                    }
                }.start();
                // 发送消息通知UI线程更新UI组件
                handler.sendEmptyMessage(0x123);
            }
        });
    }
}
php测试的部分很简单,只有一个页面
<?php
header("content-type:text/html;charset=utf-8");
echo "hellow world";
echo $_POST['name'];
对于很多新手来说,echo的作用像是c语言中的printf一样,事实上echo最重要的作用是把服务器产生的结果返回回来。
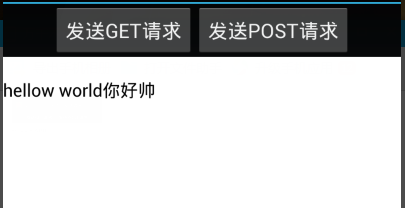
这里是效果图

发送post请求后:
这样简单的说明就完成了。


 1360
1360

 被折叠的 条评论
为什么被折叠?
被折叠的 条评论
为什么被折叠?
 到【灌水乐园】发言


