android利用回调函数在对话框中传递数据

Android 开发中,往往需要在当前activity中打开一个输入框来获取用户数据,但是怎么将输入框的数据传递到activity中呢? 

一种方法是创建一个全局变量,在对话框中将数据传递给静态全局变量,然后在当前activity中使用它。这种方式繁琐而且不待见,因为静态全局变量是一直存在的,处理不好会发生很多问题。 
另一种方式就是使用回调函数将数据传递回来。 
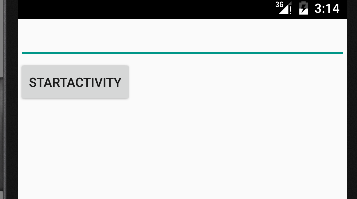
先来看看效果图: 
没有数据之前: 
这里写图片描述 
打开输入对话框并往对话框中输入数据: 
这里写图片描述 
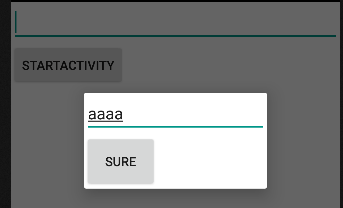
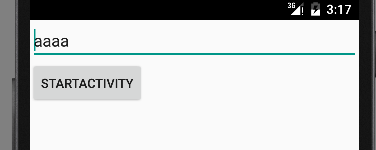
然后按下输入框中的确定按钮,就将数据传递给了打开它的activity: 
这里写图片描述

这里的回调函数,其实就是对对话框进行监听,这里的监听就是回调函数。当对话框完成数据的输入后,回调函数会将数据自动传回到对对话框进行监听的activity中。这样就实现了数据的共享和传递。要实现这样的回调函数很简单,只要定义一个接口,接口里定义一个获取数据的函数就可以了。 
具体代码如下: 
首先定义简单的布局: 
activity的布局和输入框的布局

<LinearLayout xmlns:android="http://schemas.android.com/apk/res/android"
    xmlns:tools="http://schemas.android.com/tools" android:layout_width="match_parent"
    android:layout_height="match_parent"
    android:orientation="vertical"
tools:context=".DialogActivity">
    <EditText
        android:id="@+id/showResult"
        android:layout_width="fill_parent"
        android:layout_height="wrap_content" />
    <Button
        android:id="@+id/start"
        android:text="StartActivity"
        android:layout_width="wrap_content"
        android:layout_height="wrap_content" />
</LinearLayout>


  • 1
  • 2
  • 3
  • 4
  • 5
  • 6
  • 7
  • 8
  • 9
  • 10
  • 11
  • 12
  • 13
  • 14
  • 15
  • 16
  • 1
  • 2
  • 3
  • 4
  • 5
  • 6
  • 7
  • 8
  • 9
  • 10
  • 11
  • 12
  • 13
  • 14
  • 15
  • 16

这里只使用了一个EditText文本框,用来显示从对话框传来的数据,一个Button按钮,用来打开对话框。 
接着是自定义对话框的布局:

<?xml version="1.0" encoding="utf-8"?>
<LinearLayout xmlns:android="http://schemas.android.com/apk/res/android"
    android:orientation="vertical" android:layout_width="match_parent"
    android:layout_height="match_parent">
    <EditText
        android:id="@+id/edit"
        android:layout_width="200dp"
        android:layout_height="wrap_content" />
    <Button
        android:layout_width="80dp"
        android:layout_height="60dp"
        android:id="@+id/sure"
        android:text="Sure"/>
</LinearLayout>
   
   
  • 1
  • 2
  • 3
  • 4
  • 5
  • 6
  • 7
  • 8
  • 9
  • 10
  • 11
  • 12
  • 13
  • 14
  • 1
  • 2
  • 3
  • 4
  • 5
  • 6
  • 7
  • 8
  • 9
  • 10
  • 11
  • 12
  • 13
  • 14

自定义对话框的布局也比较简单,一个EditText用来输入数据,一个Button确定按钮。

接着在实现自定义对话框的类,这里为了方便,将接口定义在类里面,也可以将接口单独定义。

/**
 * Created by mhwang on 2015/11/18.
 */
public class MyDialog extends Dialog {
    //定义接口
    public interface DataBackListener{
        public void getData(String data);
    }
    private EditText editText;
    private Button btnSure;
    DataBackListener listener;   //创建监听对象
    public MyDialog(Context context, final DataBackListener listener) {
        super(context);
        //用传递过来的监听器来初始化
        this.listener = listener;
        setContentView(R.layout.dialog);
        editText = (EditText)findViewById(R.id.edit);
        btnSure = (Button)findViewById(R.id.sure);
        btnSure.setOnClickListener(new View.OnClickListener() {
            @Override
            public void onClick(View v) {
                String str = editText.getText().toString();
                //这里调用接口,将数据传递出去。
                listener.getData(str);
                dismiss();
            }
        });
    }
}


  • 1
  • 2
  • 3
  • 4
  • 5
  • 6
  • 7
  • 8
  • 9
  • 10
  • 11
  • 12
  • 13
  • 14
  • 15
  • 16
  • 17
  • 18
  • 19
  • 20
  • 21
  • 22
  • 23
  • 24
  • 25
  • 26
  • 27
  • 28
  • 29
  • 30
  • 1
  • 2
  • 3
  • 4
  • 5
  • 6
  • 7
  • 8
  • 9
  • 10
  • 11
  • 12
  • 13
  • 14
  • 15
  • 16
  • 17
  • 18
  • 19
  • 20
  • 21
  • 22
  • 23
  • 24
  • 25
  • 26
  • 27
  • 28
  • 29
  • 30

最后在activity中创建对话框并监听。

public class DialogActivity extends Activity {
    EditText showResult;
    Button btnStartDialog;
    @Override
    protected void onCreate(Bundle savedInstanceState) {
        super.onCreate(savedInstanceState);
        setContentView(R.layout.activity_dialog);
        showResult = (EditText)findViewById(R.id.showResult);
        btnStartDialog = (Button)findViewById(R.id.start);
        btnStartDialog.setOnClickListener(new View.OnClickListener() {
            @Override
            public void onClick(View v) {
                //创建对话框对象的时候对对话框进行监听
                MyDialog dialog = new MyDialog(DialogActivity.this,
                        new MyDialog.DataBackListener() {
                            @Override
                            public void getData(String data) {
                                String result = data;
                                showResult.setText(result);
                            }
                        });
                dialog.show();
            }
        });
    }
   
   
  • 1
  • 2
  • 3
  • 4
  • 5
  • 6
  • 7
  • 8
  • 9
  • 10
  • 11
  • 12
  • 13
  • 14
  • 15
  • 16
  • 17
  • 18
  • 19
  • 20
  • 21
  • 22
  • 23
  • 24
  • 25
  • 1
  • 2
  • 3
  • 4
  • 5
  • 6
  • 7
  • 8
  • 9
  • 10
  • 11
  • 12
  • 13
  • 14
  • 15
  • 16
  • 17
  • 18
  • 19
  • 20
  • 21
  • 22
  • 23
  • 24
  • 25

很简单的,就是通过接口将activity和dialog关联起来,然后共享数据。

  • 1
    点赞
  • 2
    收藏
    觉得还不错? 一键收藏
  • 0
    评论

“相关推荐”对你有帮助么?

  • 非常没帮助
  • 没帮助
  • 一般
  • 有帮助
  • 非常有帮助
提交
评论
添加红包

请填写红包祝福语或标题

红包个数最小为10个

红包金额最低5元

当前余额3.43前往充值 >
需支付:10.00
成就一亿技术人!
领取后你会自动成为博主和红包主的粉丝 规则
hope_wisdom
发出的红包
实付
使用余额支付
点击重新获取
扫码支付
钱包余额 0

抵扣说明:

1.余额是钱包充值的虚拟货币,按照1:1的比例进行支付金额的抵扣。
2.余额无法直接购买下载,可以购买VIP、付费专栏及课程。

余额充值